스프링 시큐리티(Spring Security)를 사용하면 편리하게 인증/인가를 구현할 수 있다.
Spring Security 개념
스프링 기반의 애플리케이션의 보안(인증과 권한)을 담당하는 프레임워크
- 스프링 시큐리티는 필터(filter) 기반으로 동작한다.
- 스프링 MVC와 분리되어 관리 및 동작
- Dispatcher Servlet으로 가기 전에 적용
- 가장 먼저 URL 요청을 받음
- 응답을 해주지 않고 종료할 수 있음
용어
-
접근 주체(Principal) : 보호된 대상에 접근하는 유저
-
인증(Authentication) : 인증은 '증명하다'라는 의미로 예를 들어, 유저 아이디와 비밀번호를 이용하여 로그인하는 과정과정
ex. 로그인 -
인가(Authorization) : '권한부여'나 '허가'와 같은 의미로 사용된다. 즉, 어떤 대상이 특정 목적을 실현하도록 허용(Access) 하는 것을 의미
ex. 이용하기 위한 권한이 있는지, 유저가 로그인해서 JWT토큰을 발급받고 private한 서비스를 이용할때, 서버가 유저가 가져온 JWT토큰이 유효한지 유저로 식별되는 payload를 가지고 있는지 확인하는 행위
-
권한(Role) : 인증된 주체가 애플리케이션의 동작을 수행할 수 있도록 허락되었는지를 결정할 때 사용
Spring Security Filter
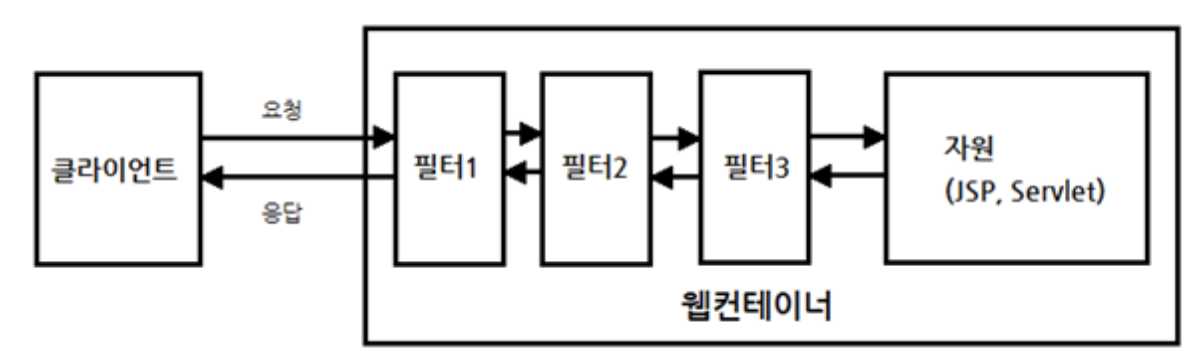
-
DispatcherServlet이 요청을 받기 전에 다양한 필터가 있을 수 있음
-
필터는 클라이언트와 자원 사이에서 요청과 응답 정보를 이용해 다양한 처리를 함
ex. 어떤 필터는 요청을 받고 클라이언트가 원래 요청한 자원이 아닌 다른 자원으로 리다이렉트 시킬 수 있음
ex. 어떤 필터는 다음 필터에게 요청과 응답을 전달하지 않고 바로 클라이언트에게 응답하고 끝낼 수도 있음
Security Filter Chain
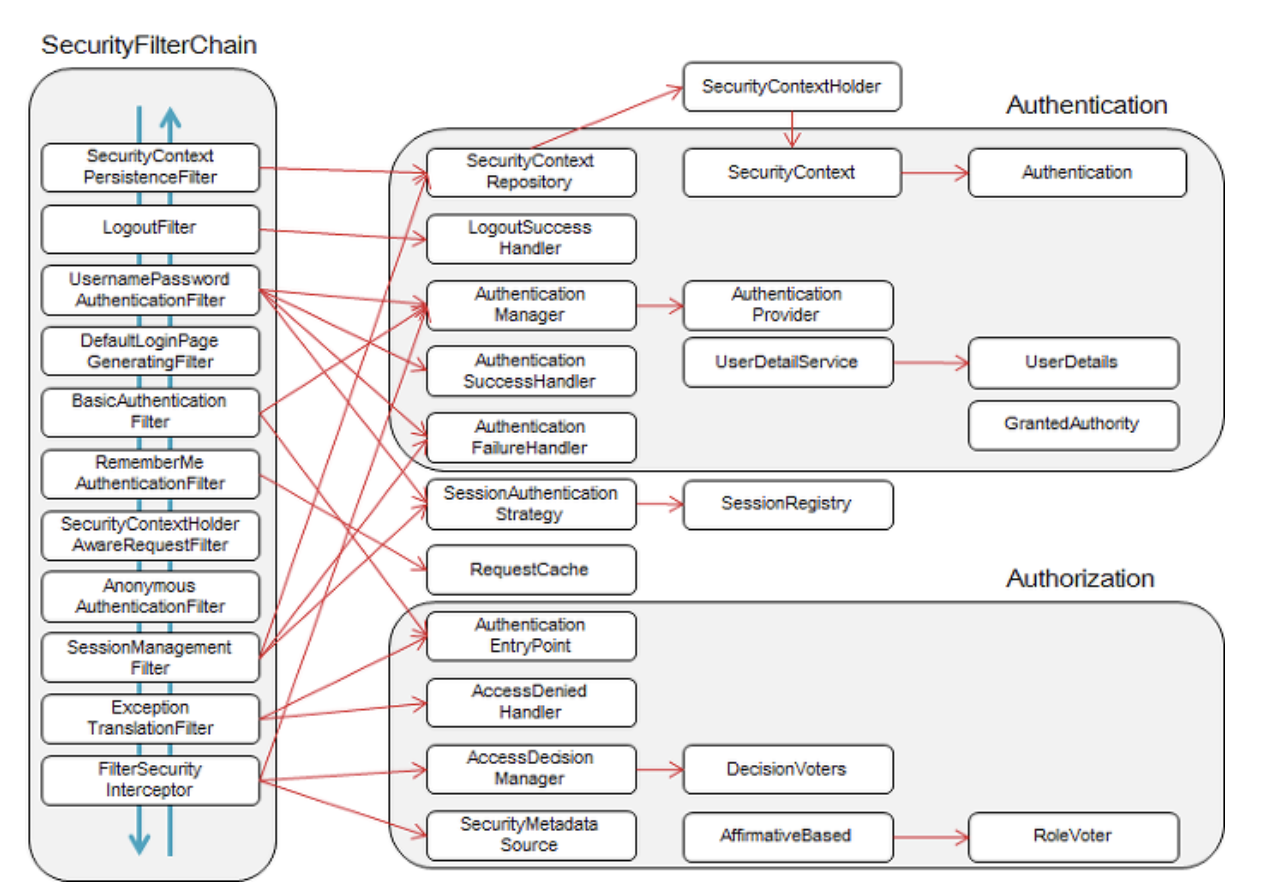
- Spring Security는 다양한 기능을 가진 필터들을 10개 이상 기본적으로 제공
- 이렇게 제공되는 필터들을 Security Filter Chain(시큐리티 필터 체인)이라함
Spring Security 주요 모듈
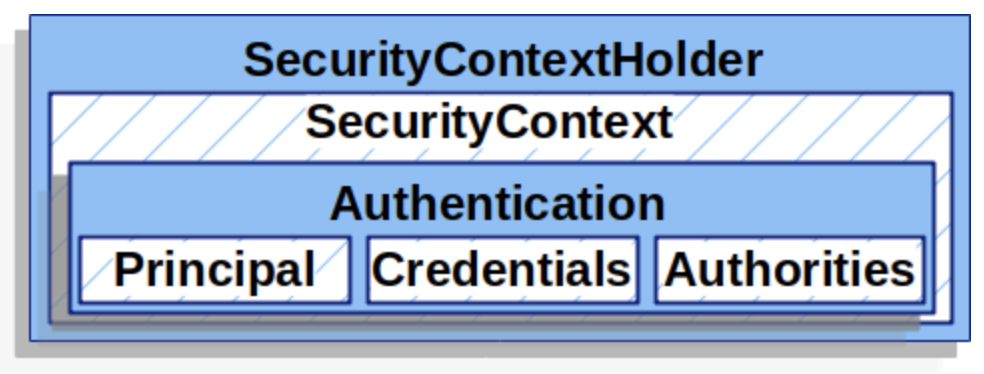
Authentication
- 현재 접근하는 주체의 정보와 권한을 담는 인터페이스
- 인증이 이루어지면 해당 Authentication이 저장됨
- principal - 유저를 식별. username과 password를 식별할 때 보통 UserDetail 의 인스턴스가 됨
- credentials - 보통 password
- authorities - GrantedAuthority 의 높은 수준의 권한. role, scope등등 있음.
SecurityContext
- Authentication을 보관하는 역할
- Authentication 객체를 꺼내올 수 있음
SecurityContextHolder
- 보안 주체의 세부 정보를 포함하여 응용프로그램의 현재 보안 컨텍스트에 대한 세부 정보가 저장됨
- SecurityContext 를 제공하는 static method(getContext)를 지원한다.
// SecurityContextHolder -> SecurityContext -> authentication 세팅
SecurityContextHolder.getContext().setAuthentication(authentication);
다중 쓰레드에서의 race condition을 회피하기 위해서는?
// 새로운 SecurityContext 생성하는 것이 좋다.
SecurityContext context = SecurityContextHolder.createEmptyContext(); //1)
Authentication authentication =
    new TestingAuthenticationToken("username", "password", "ROLE_USER"); //2)
context.setAuthentication(authentication);
// 더 일반적인 production 시나리오는 UsernamePasswordAuthenticationToken(userDetails, password, authorities) 를 사용하는 것.
<br/>
SecurityContextHolder.setContext(context); //3)
// 이 세팅한 정보를 authorization에 사용하게 될 것.
연관관계
-
유저가 로그인을 통해 인증을 마침
-
인증에 성공하면 principal과 credential 정보를 Authentication에 담는다.
-
Spring Security에서 Authentication을 SpringContext에 보관한다.
-
이 SpringContext을 SecurityContextHolder에 담아 보관한다.
UserDetails
-
대부분의 경우 Spring Security의 기본 UserDetails로는 실무에서 필요한 정보를 모두 담을 수 없기에 아래와 같은 CustomUserDetails를 구현하여 사용한다.
-
아쉬움이 남는게 바로 사용자 계정 정보를 담고있는 UserDetails에는 단지 사용자의 아이디와 비밀번호, role 정보등 만 남긴다는 점이다.
-
우리가 필요한 정보를 UserDetails에 추가하기 위해서는 UserDetails를 구현해서 확장하면 된다.
public class CustomUserDetails implements UserDetails, OAuth2User {
// Oauth2 정보도 같이 묶어서 하나의 CustomUserDetails로 관리하면 깔끔하다. 사용시 추가로 메서드 오버라이딩을 해야한다.

    private User user;

    public User getUser() {
        return user;
    }

    public CustomUserDetails(User account) {
        this.user = account;
    }

    @Override
    .
    .
    .
}
public interface UserDetails extends Serializable {
// 권한 목록
Collection<? extends GrantedAuthority> getAuthorities();
String getPassword();
String getUsername();
// 계정 만료 여부
boolean isAccountNonExpired();
// 계정 잠김 여부
boolean isAccountNonLocked();
// 비밀번호 만료 여부
boolean isCredentialsNonExpired();
// 사용자 활성화 여부
boolean isEnabled();
}
// OAuth2 오버라이딩 해야할 메서드들
@Override
public String getName() {
String sub = (String) attributes.get("sub");
return sub; // 별로 안중요하고 쓰지도 않음
}
@Override
public Map<String, Object> getAttributes() {
return attributes;
}-
인증에 성공하여 생성된 UserDetails 객체는 Authentication 객체를 구현한 UsernamePasswordAuthenticationToken을 생성하기 위해 사용됨
-
UsernamePasswordAuthenticationToken는 인증전 객체를 생성하거나 인증이 완료된 객체를 생성한다.
User userEntity = userRepository.findByUsername(username);
CustomUserDetails customUserDetails = new CustomUserDetails(userEntity);
			Authentication authentication = new UsernamePasswordAuthenticationToken(
					customUserDetails, null, customUserDetails.getAuthorities());
                    			SecurityContextHolder.getContext().setAuthentication(authentication);
UserDetailsService
-
UserDetailsService는 UserDetails 객체를 반환하는 하나의 메서드만을 가지고 있는데, 일반적으로 이를 implements 한 클래스에 UserRepository를 주입받아 DB와 연결하여 처리한다.
-
즉, 이곳에서 DB의 사용자 정보를 조회한다.
public interface UserDetailsService {

	UserDetails loadUserByUsername(String username) throws UsernameNotFoundException;

}

// CustomUserDetailsService 구현
@Service
@RequiredArgsConstructor
public class CustomUserDetailService implements UserDetailsService {

    private final UserRepository userRepository;

    @Override
    public UserDetails loadUserByUsername(String socialId) throws UsernameNotFoundException {
        User user = userRepository.findUser(socialId);
        return new CustomUserDetails(user);
    }
}
AuthenticationManager
- 사용자 아이디 / 비밀번호 인증을 처리하는 곳 -> 유효한 인증인지 확인
- 인자로 받은 Authentication이 유효한 인증인지 확인하고, "Authentication" 객체를 리턴
public interface AuthenticationManager {

	Authentication authenticate(Authentication authentication) throws AuthenticationException;

}
AuthenticationProvider
- AuthenticationProvider에서는 실제 인증에 대한 부분을 처리하는데, 인증 전의 Authentication 객체를 받아서 인증이 완료된 객체를 반환하는 역할을 한다.
인증 과정
- 유저의 요청 내에 담긴 "Authentication"를 Authentication Manager 에 넘겨주고
- AuthenticationProvider에서 인증을 처리한다.
Authentication Manager은 인자로 받은 Authentication을 Provider을 통해, 유효한지 처리하여, "Authentication" 객체를 리턴한다.
Spring Security 인증 처리 과정
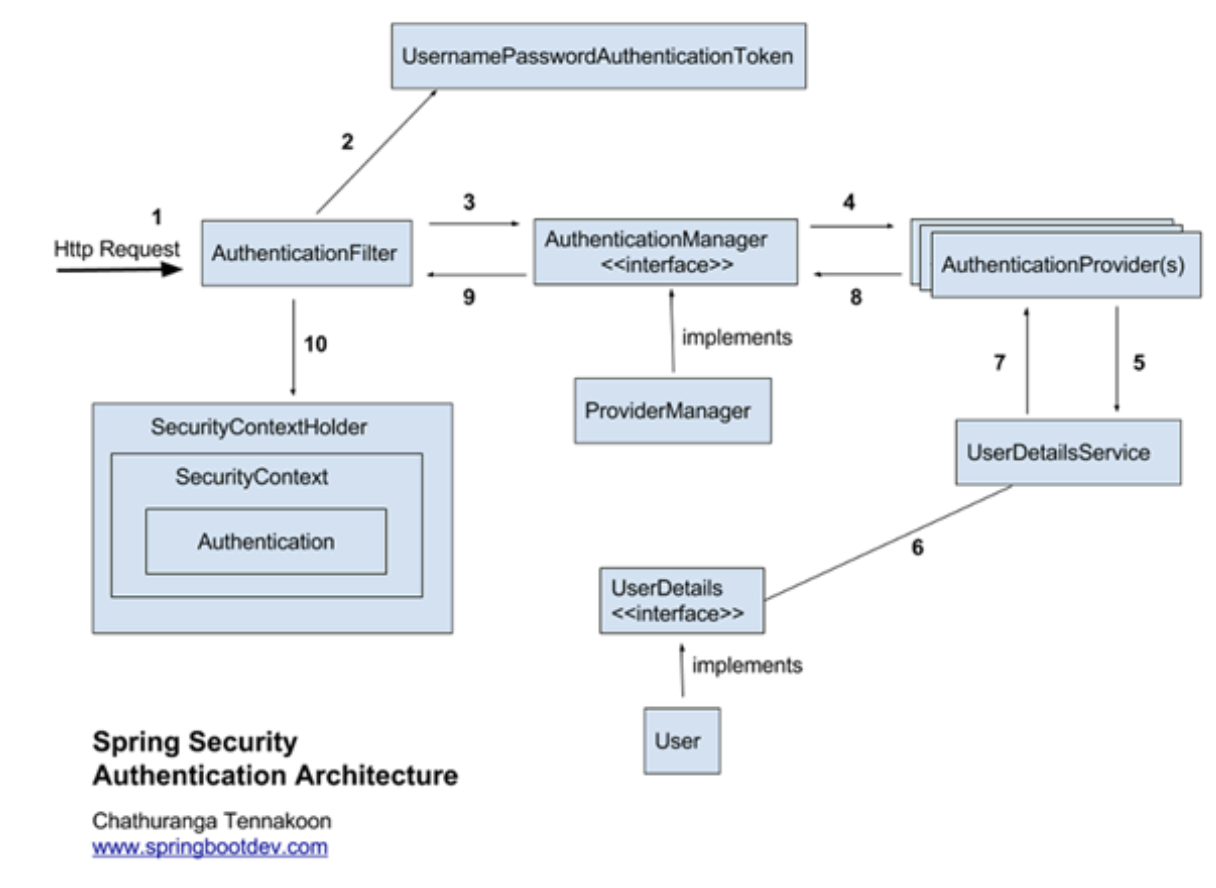
1) 사용자가 로그인 정보와 함께 인증 요청을 한다.(Http Request)
2) AuthenticationFilter가 요청을 가로채고, 가로챈 정보를 통해 UsernamePasswordAuthenticationToken의 인증용 객체를 생성한다.
3) AuthenticationManager의 구현체인 ProviderManager에게 생성한 UsernamePasswordToken 객체를 전달한다.
4) AuthenticationManager는 등록된 AuthenticationProvider(들)을 조회하여 인증을 요구한다.
5) 실제 DB에서 사용자 인증정보를 가져오는 UserDetailsService에 사용자 정보를 넘겨준다.
이때 메서드는 UserDetails을 반환하는 것 하나이다.
@Override
public UserDetails loadUserByUsername(String socialId) throws UsernameNotFoundException {
    User user = userRepository.findUser(socialId);
    return new CustomUserDetails(user);
}
6) 넘겨받은 사용자 정보를 통해 DB에서 찾은 사용자 정보인 UserDetails 객체를 만든다.
7) AuthenticationProvider(들)은 UserDetails를 넘겨받고 사용자 정보를 비교한다.
8) 인증이 완료되면 권한 등의 사용자 정보를 담은 Authentication 객체를 반환한다.
9) 다시 최초의 AuthenticationFilter에 Authentication 객체가 반환된다.
10) Authenticaton 객체를 SecurityContext에 저장한다.
인증 성공 시, AuthenticationSuccessHandler 실행
인증 실패 시, AuthenticationFailureHandler 실행
로그인 한 사용자 정보 가져오기
Bean에서 사용자 정보 가져오기
- 가장 간단한 전역에 선언된 SecurityContextHolder에서 가져오는 방법이다.
public static String getCurrentUserSocialId() {
        Object principal = SecurityContextHolder.getContext().getAuthentication().getPrincipal();
        User currentUser = (User) principal;
        Social social = currentUser.getSocial();
        return social.getId();
}
@AuthenticationPrincipal
-
Spring Security 3.2부터는 annotation을 이용하여 현재 로그인한 사용자 객체를 인자에 주입할 수 있다.
-
우리 프로젝트를 기준으로 UserDetails를 구현한 CustomUserDetails 클래스가 있고, UserDetailsService 구현체에서 CustomUserDetails 객체를 반환한다.
@PostMapping("/{challengeRoomId}/create")
public Response<CreateRecordResponse> createRecord(
            @AuthenticationPrincipal CustomUserDetails customUserDetails) {
            .
            .
            .
}
참고
https://velog.io/@qudtjs0753/SecurityContextHolder-%EB%9C%AF%EC%96%B4%EB%B3%B4%EA%B8%B0
https://www.boostcourse.org/web326/lecture/58997?isDesc=false
https://dev-coco.tistory.com/174
https://github.com/devSquad-study/2023-CS-Study/blob/main/Spring/spring_security.md

가치 있는 정보 공유해주셔서 감사합니다.