2일차 목표
오늘은 Controller의 기능에 대해서 생각해보고
그에 맞게 Autowired를 통해서 주입하는 기능 까지 구현을 해보고자 한다
Controller 작동 확인
1. Controller 설정
	//@RequiredArgsConstructor // final의 의존성 주입을 해줌
    @Controller
    @RequestMapping("/board/*")
    @Log4j
    public class BoardController {

        @GetMapping("/check")
            public void check() {

            }
    }
Controller 의 RequestMapping 과 GetMapping에 의해 board/check라는 url이 입력되면 check( ) 메소드가 실행되도록 Controller 설정
2. component-scan 설정 (servlet-context)
<context:component-scan base-package="com.bok.contorller"/> 해당 코드를 servlet-context에 입력
3. index 페이지에서 check 페이지로 이동 하는 jsp 설정
<a href="./board/check">check 이동</a>해당 a태그 클릭시 정상적으로 Controller가 작동하여서 이동하는 모습을 볼 수 있었다
root-context / servlet-context 차이
https://fbtmdwhd33.tistory.com/262
Model로 파라미터 적용 시켜 보기
1. Controller에 매개변수를 Model로 만들기
@GetMapping("/parameter")
public void parameter(Model model) {

	model.addAttribute("parameter","Parameter is back!!");

}
parameter라는 변수명에 "Parameter is back!!" 이라는 데이터를 넣기
2. jsp 페이지에 적용
-
index
<a href="/board/parameter">parameter Model값 확인</a> -
parameter
<h3>parameter</h3>
${parameter }
JSTL을 이용해서 해당 변수를 불러옴
[JSTL에 대한 설명]
https://daesuni.github.io/jstl/
RequestMapping / GetMapping / PostMapping 사용법
@RequestMapping : Get과 Post를 둘 다 사용할 수 있는 어노테이션
@GetMapping : Spring 4.3부터 사용할 수 있는 화면을 볼때 CRUD에서 R 부분의 기능을 쓸 때 사용하는 어노테이션
@PostMapping : Spring 4.3부터 사용할 수 있는 화면에서 어떠한 데이터 조작을해서 해당 데이터를 보내야할 때 사용하는 어노테이션으로 CRUD에서 CUD 기능을 담당
1. PostMapping Controller
@GetMapping("/getParameter")
    public void getParameter() {


    }

    @PostMapping("/postParameter")
    public String postParameter(@RequestParam("param") String param,Model model ) {

	model.addAttribute("result",param);
	return "/board/postParameter";
}
위의 PostMapping의 의미는
1. /board/postParameter라는 url에 입력되었을 때 발동
2. post된 데이터 중 "param"이라는 변수명으로 전달 된 데이터를 String param에 저장
3. model.addAttribute를 통해서 "result"라는 변수에 param 데이터를 저장\
4. return을 통해 /board/postParmeter 라는 jsp 파일로 이동
2. PostMapping jsp
먼저 getParameter를 통해서 입력할 데이터를 작성한다
<h3>getParameter</h3>

<form action="/board/postParameter" method="post">
	<input type="text" name="param">
	<input type="submit" value="전송">
</form><h3>postParameter</h3>
전달된 파라미터 값 : ${result }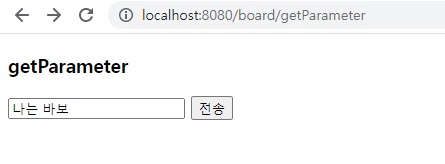
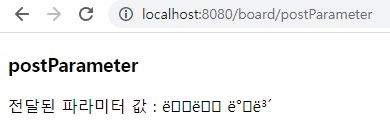
위와같이 어떠한 데이터가 전달 된 것은 알 수 있느나 필터가 깨진 것을 알 수 있다
한글의 경우 데이터 전송이 1Byte가 아닌 2Byte로 전송 되서 이러한 일이 발생할 수 있기에
UTF-8로 인코딩 해줘야할 필요가 있다
UTF-8 설정
Web.xml에 해당 Filter 추가
<filter>
    <filter-name>encoding</filter-name>
    <filter-class>org.springframework.web.filter.CharacterEncodingFilter</filter-class>
    <init-param>
        <param-name>encoding</param-name>
        <param-value>UTF-8</param-value>
    </init-param>
</filter>

<filter-mapping>
    <filter-name>encoding</filter-name>
    <servlet-name>appServlet</servlet-name>
</filter-mapping>
위 셋팅 후 다시 입력해보면
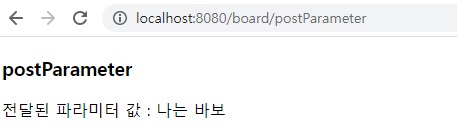
값이 정확하게 전달 되는 것을 볼 수 있다
