1. Vue.js 기본
1. Vue instance
🔻 뷰로 개발할 때 필수로 생성하는 코드로, script에서 사용
1. 생성
var vm = new Vue();- 인스턴스 기본 속성 및 API
new Vue({
  el: ,
  template: ,
  data: ,
  methods: ,
  created: ,
  watch: ,
});
el : 인스턴스가 그려지는 화면의 시작점 (특정 HTML 태그)
template : 화면에 표시할 요소 (HTML, CSS 등). 주로 template과 script, style로 나누어 코드 작성
data : 뷰의 반응성(Reactivity)이 반영된 데이터 속성
methods : 화면의 동작과 이벤트 로직을 제어하는 메서드
created : 뷰의 라이프 사이클과 관련된 속성
watch : data에서 정의한 속성이 변화했을 때 추가 동작을 수행할 수 있게 정의하는 속성
2. Instance 라이프 사이클
🔻 Instance 라이프 사이클이란 인스턴스 라이프 사이클이란 뷰의 인스턴스가 생성되어 소멸되기까지 거치는 과정
🔻 라이프사이클 다이어그램
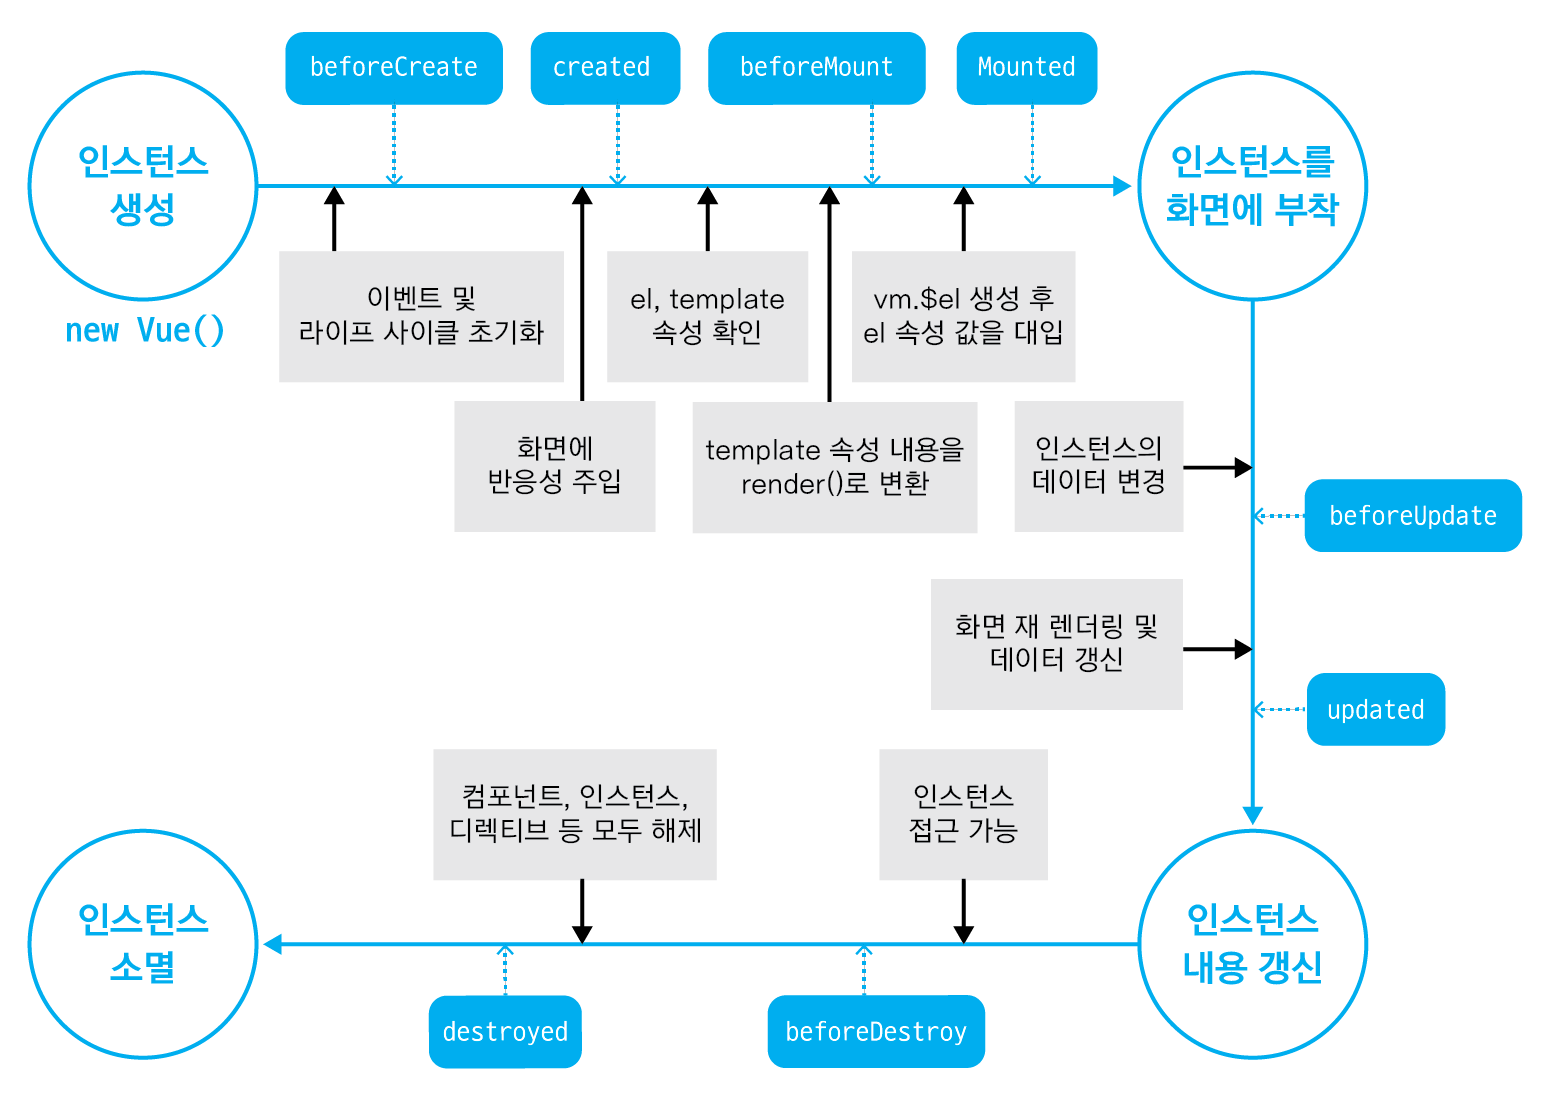
🔻 vue 파일의 에 라이프사이클 훅 (created, beforeMount, mounted, destroyed) 존재
3. Template
🔻 뷰로 화면을 조작하는 방법: data binding / directive
1. Data Binding
🔻 뷰 인스턴스에서 정의한 속성들을 화면에 표시하는 방법으로 Mustache Tag 바인딩 방식 사용
<template>
<div>{{ message }}</div>

</template>

<script>
new Vue({
  data: {
    message: 'Hello Vue.js'
  }
})
</script>
2. Directive
🔻 뷰로 화면의 요소를 더 쉽게 조작하기 위한 문법
🔻 v-if / v-for / v-bind / v-on / v-model
Ex. v-if: show라는 데이터 속성값에 따라 Vue.js가 출력되거나 출력되지 않음
<template>
  <div>
    Hello <span v-if="show">Vue.js</span>
  </div>
</template>

<script>
new Vue({
  data: {
    show: false
  }
})
</script>
4. Component
🔻 화면의 영역을 구분하여 개발할 수 있는 뷰의 기능
1. 전역으로 등록
- app-header 컴포넌트 생성
Vue.component('app-header', {
  template: '<h1>Header Component</h1>'
});- 사용
<div id="app">
  <app-header></app-header>	//Header Component 출력
</div>
2. 인스턴스/컴포넌트 범위에서 사용하도록 등록
🔻 components 인스턴스 등록
⭐️ 컴포넌트 통신 방식
🔻 컴포넌트는 각각 고유한 데이터 유효 범위를 가져 컴포넌트 간의 데이터를 주고 받기 위해선 아래의 규칙을 따라야 함
1. 상위 컴포넌트 -> 하위 컴포넌트 : Props 속성
2. 하위 컴포넌트 -> 상위 컴포넌트 : Event 발생
5. Props
🔻 Props 속성은 컴포넌트 간의 데이터를 전달하는 통신 방법
🔻 props는 상위 컴포넌트의 정보를 전달하기 위한 특성으로 하위 컴포넌트는 props 옵션을 사용하여 수신할 것으로 기대되는 props를 명시적으로 선언해야함
-
하위 컴포넌트의 컴포넌트 내용에 props 추가
-
상위 컴포넌트의 템플렛에 child-component
v-bind
// 하위 컴포넌트 : childComponent
var childComponent = {
  props: ['propsdata'],	//1. 하위 컴포넌트의 컴포넌트 내용에 props 추가
  template: '<p>{{ propsdata }}</p>'
}

// 상위 컴포넌트 : root 컴포넌트
new Vue({
  el: '#app',
  components: {
    'child-component': childComponent	//2. 상위 컴포넌트의 템플렛에 child-component 추가
  },
  data: {
    message: 'hello vue.js'
  }
})
- 결과
<div id="app">
  <child-component v-bind:propsdata="message"></child-component>
  <!-- 위의 출력 결과는 hello vue.js -->
</div>
6. Event Emit
🔻 하위 컴포넌트에서 상위 컴포넌트로 통신하는 방식
1. 하위 컴포넌트의 내용에 $emit 코드 추가
2. 상위 컴포넌트의 템플릿에 child-component v-on
// 하위 컴포넌트 : childComponent
var childComponent = {
  methods: {
    sendEvent: function() {
      this.$emit('update');
    }
  }
}

// 상위 컴포넌트 : root 컴포넌트
new Vue({
  el: '#app',
  components: {
    'child-component': childComponent
  },
  methods: {
    showAlert: function() {
      alert('event received');
    }
  }
})- 결과
<div id="app">
  <child-component v-on:update="showAlert"></child-component>
</div>
🔻 하위 컴포넌트에서 sendEvent() 메서드가 실행 -> update라는 이벤트가 발생 -> 상위 컴포넌트인 루트 컴포넌트의 v-on 디렉티브로 이벤트를 받아 showAlert() 메서드를 실행
출처
https://v2.ko.vuejs.org/v2/guide/components.html
https://joshua1988.github.io/vue-camp/vue/instance.html#%E1%84%8B%E1%85%B5%E1%86%AB%E1%84%89%E1%85%B3%E1%84%90%E1%85%A5%E1%86%AB%E1%84%89%E1%85%B3-%E1%84%89%E1%85%A2%E1%86%BC%E1%84%89%E1%85%A5%E1%86%BC
2. compositon api vs option api
🔻 composition api는 vue3에 추가된 api
🔻 script 안에서 아래와 같이 setup() 작성하면 template에서 {{ }} 사이에 해당 변수를 넣어 접근 가능
<!--template: HTML 코드 작성-->
<template>
  <div class="name">{{ name }}</div>
</template>

<!--script: Javascript 코드 작성-->
<script>
export default {
  setup() {
    const name = 'Hello Hi';

    return {
      name
    }
  }
}
</script>

<!--style: CSS 코드 작성-->
<style>
  .name {
    color: red;
  }
</style>


Options API
비교하여 작성할 것ㅅ!!!!
3. 함수
🔻 setup() 안에 함수를 정의하고 return 하여 template에서 사용
<!--template: HTML 코드 작성-->
<template>
  <div class="name">{{ greeting() }}</div>
</template>

<!--script: Javascript 코드 작성-->
<script>
export default {
  setup() {
    const name = 'Hello Hi';

    const greeting = () => {
      return 'Hihihi';
    };

    return {
      name, greeting
    }
  }
}
</script>

<!--style: CSS 코드 작성-->
<style>
  .name {
    color: red;
  }
</style>
🔻 함수 안에 매개변수 사용 가능
<!--template: HTML 코드 작성-->
<template>
  <div class="name">{{ greeting('Seoyeon') }}</div>
</template>

<!--script: Javascript 코드 작성-->
<script>
export default {
  setup() {
    const name = 'Hello Hi';

    const greeting = (name) => {
      return 'Hihihi, '+ name;
    };

    return {
      name, greeting
    }
  }
}
</script>

<!--style: CSS 코드 작성-->
<style>
  .name {
    color: red;
  }
</style>
🔻 매개변수로 변수 사용 가능
<!--template: HTML 코드 작성-->
<template>
  <div class="name">{{ greeting(name) }}</div>
</template>

<!--script: Javascript 코드 작성-->
<script>
export default {
  setup() {
    const name = 'ParkSeoYeon';

    const greeting = (name) => {
      return 'Hihihi, '+ name;
    };

    return {
      name, greeting
    }
  }
}
</script>

<!--style: CSS 코드 작성-->
<style>
  .name {
    color: red;
  }
</style>
🔻 setup() 안에서도 생성한 함수 사용 가능
<!--template: HTML 코드 작성-->
<template>
  <div class="name">{{ greet }}</div>
</template>

<!--script: Javascript 코드 작성-->
<script>
export default {
  setup() {
    const name = 'ParkSeoYeon';

    const greeting = (name) => {
      return 'Hihihi, '+ name;
    };

    const greet = greeting(name);

    return {
      greet
    }
  }
}
</script>

<!--style: CSS 코드 작성-->
<style>
  .name {
    color: red;
  }
</style>
4. event
🔶 event: 어떤 행동을 할 때 어떤 일이 발생. ex) Button 클릭 시 팝업창 나타남
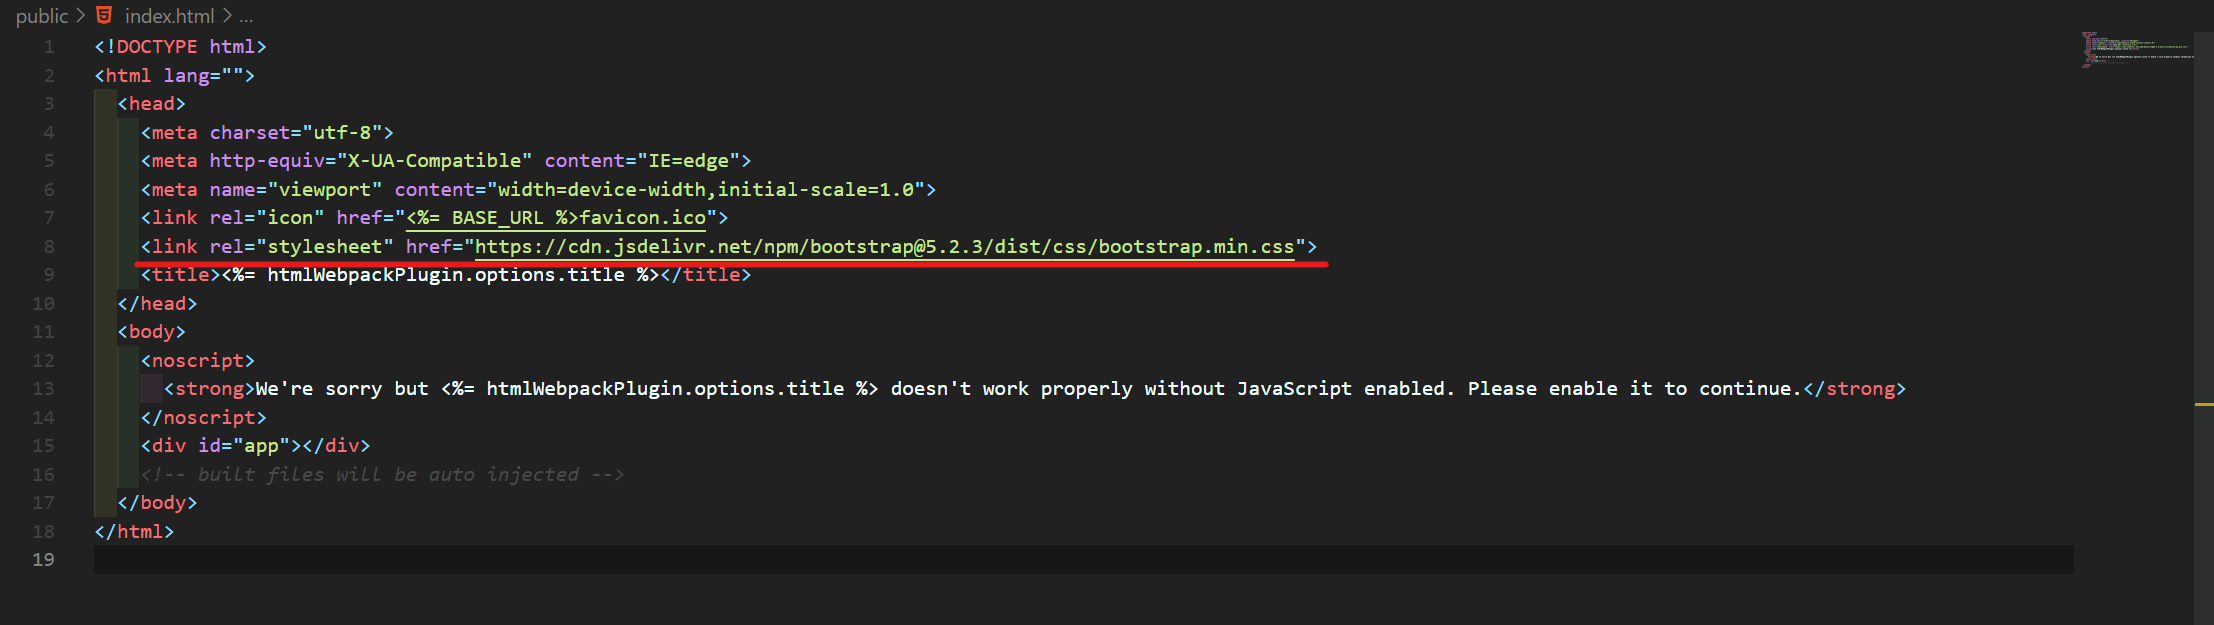
1. BootstrapCDN
🔶 CSS를 Bootstrap에서 style 가져와 사용할 것이므로 CSS 복사해 public/index.html의 head에 link로 붙여넣기

2. Click event
- Bootstrap class를 넣은 버튼 추가
<button class="btn btn-primary">Click</button>- event 추가
v-on:click="함수"
<!--template: HTML 코드 작성-->
<template>
  <div class="name">{{ name }}</div>
  <button class="btn btn-primary" v-on:click="consoleLog">Click</button>
</template>

<!--script: Javascript 코드 작성-->
<script>
export default {
  setup() {
    const name = 'ParkSeoYeon';

    const consoleLog = () => {
      console.log('hello world');
    }

    return {
      name, consoleLog
    }
  }
}
5. ref & reactive
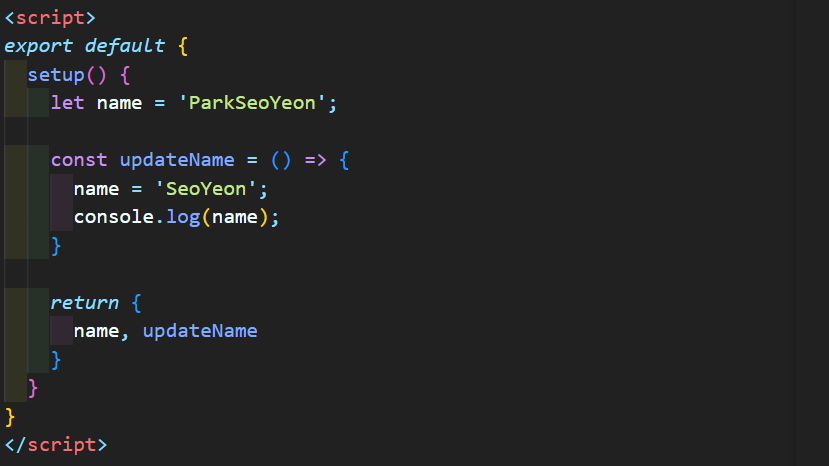
1. Button 클릭 시 이름 변하도록
🔻 이름을 변경할 것이기 때문에 const name -> let name 변경
<!--template: HTML 코드 작성-->
<template>
  <div class="name">{{ name }}</div>
  <button class="btn btn-primary" v-on:click="updateName">Click</button>
</template>

<!--script: Javascript 코드 작성-->
<script>
export default {
  setup() {
    let name = 'ParkSeoYeon';

    const updateName = () => {
      name = 'SeoYeon';
      console.log(name);
    }

    return {
      name, updateName
    }
  }
}
</script>
🔻 console에 찍을 때에는 정상적으로 update되지만, 화면에서 이름이 바뀌지는 않음

📢 일반 변수 -> Ref
일반 변수를 사용할 때에는 데이터와 변수가 일치하지 않음
2. Ref
- script에 아래 코드 추가
- const로 선언하고, 정의할 때 ref()로 묶기
- 변경할 때 변수 = ? 가 아닌 변수.value = ?으로 변경
import {ref} from 'vue';기존 코드
변경 코드
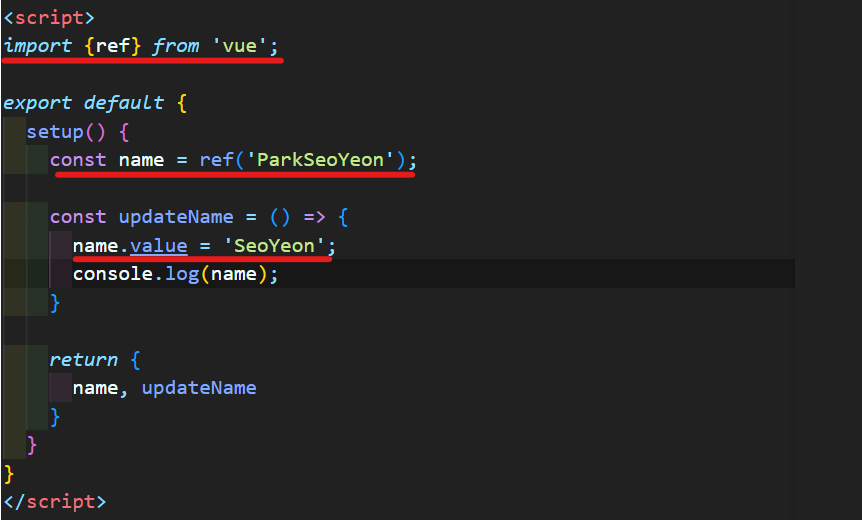
데이터가 변경되면 template에서도 동시에 변경 => Reactive 하다
결과 => 클릭 전
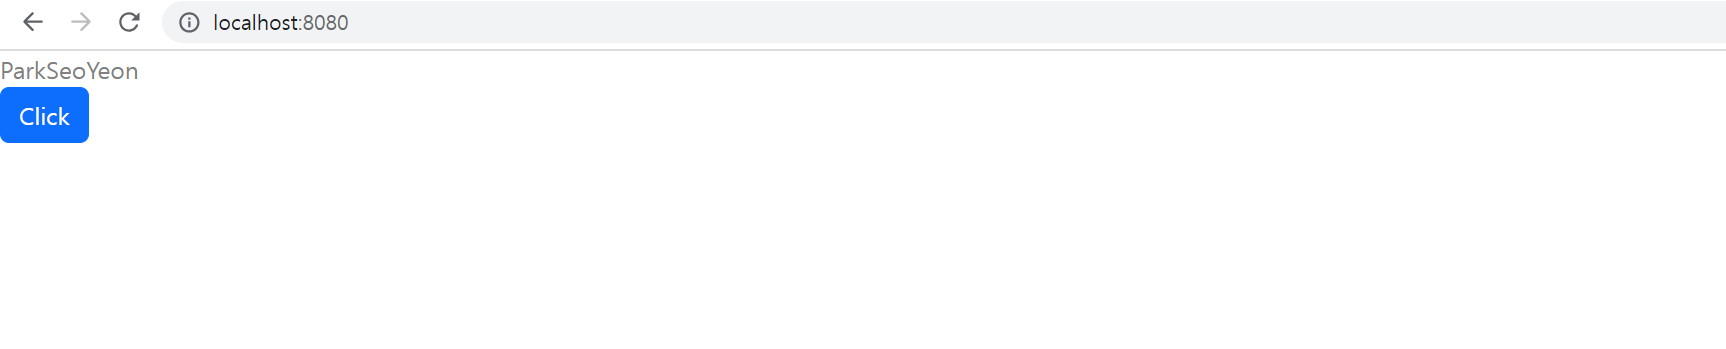
결과 => 클릭 후

3. Reactive
🔻 String, 숫자 등 기본 자료형은 Ref 사용. Object 또는 array는 Reactive 사용
1. script에 아래 코드 추가
2. 정의할 때 reactive()로 묶기
3. 변경할 때 ref처럼 변수.value = ?로 value를 사용하는 것이 아닌 변수.id = ?와 같이 object의 값을 바로 사용 가능
import {reactive} from 'vue';object 예시 코드
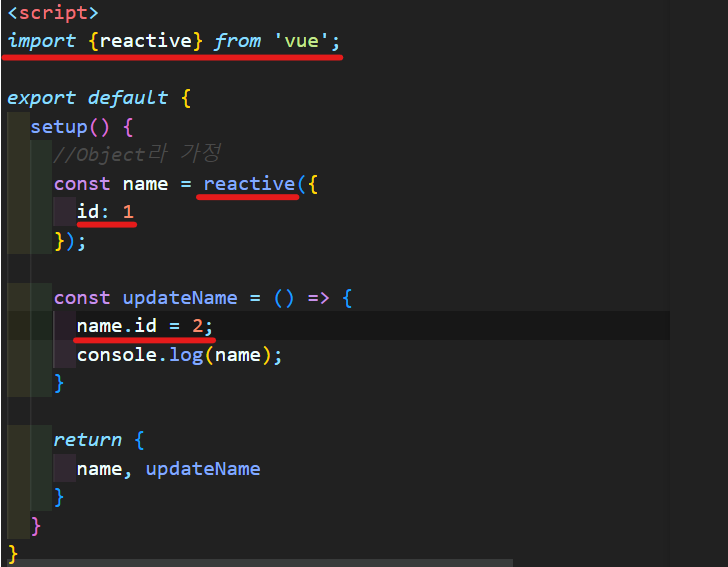
🔻 위의 name을 ref로 받을 수도 있는데 그럴 경우, name.id를 name.value.id로 작성해야함
참고
https://devmango.tistory.com/37
https://eagerprotector.tistory.com/46
참고 강의
https://www.youtube.com/watch?v=LIfuJ-69F-0&list=PLB7CpjPWqHOu6NnQJEGbofB5KO1j2ab9I&index=2
이 아래로 수정
6. 바인딩
Arrow binding