Inflation 이란?
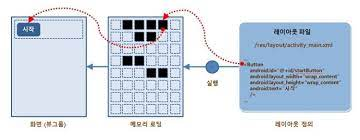
안드로이드에서는 화면을 구성하는 방법으로 XML 레이아웃을 사용합니다. 이 XML 레이아웃 파일의 내용은 앱이 실행될 때, 메모리로 로딩되어 객체화 됩니다. 이러한 과정을 '인플레이션' 이라합니다.
setContentView()
이 메소드의 역할은 크게 2가지로 나뉩니다. 첫째로는 내부적으로 화면에 나타낼 뷰를 지정해주는 역할을 하게됩니다. 두번째로 XML 레이아웃의 내용을 메모리 상에 객체화하는 역할입니다. 앞서 설명했듯, XML 레이아웃 파일이 메모리로 로딩되어 객체화 되는 과정이 인플레이션이라 하였습니다. 즉, 다시말해 setContentView() 의 역할은 인플레이션을 수행한다고 할 수 있습니다. 달리보면, setContentView() 가 호출되기 전에는 XML 레이아웃 파일의 객체들에는 접근할수 없다는 말도 됩니다. 참고해둡시다.
LayoutInflater
setContentView() 의 경우 액티비티의 화면 전체를 설정하는 역할만을 수행할 뿐, 부분 화면을 메모리에 객체화 하지는 않습니다. 그래서 부분 화면을 액티비티에 띄우고 싶다면, 안드로이드의 시스템 서비스로 제공되는 LayoutInflater 클래스를 이용해야 합니다. 간단하게 설명하자면, 부분 레이아웃을 추가하고 싶을때는 LayoutInflater 의 객체를 사용해서 뷰그룹 객체로 인플레이션 한 후 메인 레이아웃에 추가해야합니다. 아래 코드를 보면서 이해해 봅시다.
- XML 레이아웃 코드입니다.파일의 이름은 sub1.xml 입니다.
<?xml version="1.0" encoding="utf-8"?>
<LinearLayout
    xmlns:android="http://schemas.android.com/apk/res/android"
    android:layout_width="match_parent"
    android:layout_height="match_parent"
    android:orientation="vertical">

    <Button
        android:id="@+id/button"
        android:text="추가하기"
        android:layout_width="match_parent"
        android:layout_height="wrap_content"/>

    <LinearLayout
    	android:id="@+id/container"
        android:layout_width="match_parent"
        android:layout_height="match_parent"
        android:orientation="vertical"/>

  </LinearLayout>
메인레이아웃은 리니어 레이아웃, 그 안에 버튼 하나와 리니어레이아웃 하나를 추가해줬습니다. 안쪽 리니어 레이아웃에 부분화면을 인플레이터를 통해 추가해볼 예정입니다.
- 자바 소스 파일입니다.
package com.example.myexample;
중략...

public class MenuActivity extends AppCompatActivity {

    LinearLayout container;

    @Override
    protected void onCreate(Bundle savedInstanceState) {
        super.onCreate(savedInstanceState);
        setContentView(R.layout.activity_menu);

        container = findViewById(R.id.container);

        Button button = findViewById(R.id.button);
        button.setOnClickListener(new View.OnClickListener() {
            @Override
            public void onClick(View view) {
                LayoutInflater inflater = (LayoutInflater) getSystemService(Context.LAYOUT_INFLATER_SERVICE);
                inflater.inflate(R.layout.sub1,container,true);


            }
        });
    }
}
안쪽 레이아웃의 id값은 container 이고, 이를 참조하기 위하여 findViewById(R.id.container) 를 사용하여 container 변수에 할당하였습니다. 이렇게 해야 버튼을 클릭했을 때 호출되는 onClick 메서드 안에서 container 변수를 참조할 수 있습니다. 이제 부분 레이아웃의 내용을 인플레이션 합니다. getSystemService 메서드를 사용하여 LayoutInflater 객체를 참조합니다. 참조한 인플레이터의 inflate 메서드의 파라미터로 R.layout.sub1 와 container 객체를 전달합니다. 이 부분에서 container 를 id로 갖는 리니어 레이아웃 객체에 sub1.xml 파일의 레이아웃이 설정됩니다. 이 과정을 통해 부분 레이아웃에 정의된 뷰들이 메모리에 로딩되며 객체화 과정을 거치게 됩니다.
화면 전체를 차지하는 레이아웃을 추가하는 setContentView() 와는 다르게 액티비티에 부분 레이아웃을 추가하는 방법으로 인플레이터를 이용한 인플레이션 방법을 알아보았습니다.