
Code States
Front-end boost camp
Today
I
Learned
🔮 벌써 50일?! 6월 22일 수업 시작 ~ 23일 연계!
🔮 Redux 기초

- react에서 상태와 속성(props)을 이용한 컴포넌트 단위 개발 아키텍처를 배웠다면
- Redux 에서는 컴포넌트와 상태를 분리하는 패턴을 배움!
- Redux는 React없이도 사용할 수 있는 상태 관리 라이브러리
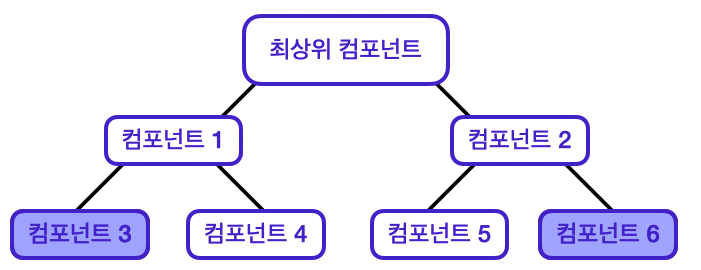
▲ React 어플리케이션 예시
- React에서의 데이터 흐름 : 컴포넌트 3 -> 컴포넌트 1 -> 최상위 컴포넌트 -> 컴포넌트 2 -> 컴포넌트 6 도달!
- 다소 비효율적!!
- 해당 상태를 직접 사용하지 않는 최상위 컴포넌트, 컴포넌트1, 컴포넌트2도 상태 데이터를 가짐
- 상태 끌어올리기, Props 내려주기를 여러번 거쳐야 함
- 애플리케이션이 복잡해질수록 데이터 흐름도 복잡해짐
- 컴포넌트 구조가 바뀐다면, 지금의 데이터 흐름을 완전히 바꿔야 할 수도?

▲ Redux를 사용했을 때 데이터 흐름
🔮 Redux 구조
- Redux 상태 관리 순서
-- 1. 상태가 변경되어야 하는 이벤트가 발생하면, 변경될 상태에 대한 정보가 담긴 Action 객체 생성
-- 2. 이 Action 객체는 Dispatch 함수의 인자로 전달
-- 3. Dispatch 함수는 Action 객체를 Reducer 함수로 전달
-- 4. Reducer 함수는 Action 객체의 값을 확인, 그 값에 따라 전역 상태 저장소 Store의 상태를 변경
-- 5. 상태가 변경되면, React는 화면을 다시 렌더링 - 즉, Action -> Dispatch -> Reducer -> Store 순서로 데이터가 단방향으로 흐른다.
🔮 Redux 세부
- store : 상태가 관리되는 오직 하나뿐인 저장소 역할
// Reducer 연결하여 Store 생성
import { createStore } from 'redux';

const store = createStore(rootReducer);- Reducer : Dispatch에게서 전달받은 Action객체의 type값에 따라서 상태를 변경시키는 함수
-- Reducer는 순수함수여야 함! 외부 요인으로 인해 기대한 값이 아닌 엉뚱한 값으로 상태가 변경되는 일이 없어야 하기 때문
-- 여러개의 Reducer를 사용하는 경우, Redux의 combineReducers 메서드를 사용해 하나의 Reducer로 합쳐줄 수 있다!
// Reducer 예시

const count = 1

// Reducer를 생성할 때에는 초기 상태를 인자로 요구합니다.
const counterReducer = (state = count, action) => {

  // Action 객체의 type 값에 따라 분기하는 switch 조건문입니다.
  switch (action.type) {

    //action === 'INCREASE'일 경우
    case 'INCREASE':
			return state + 1

    // action === 'DECREASE'일 경우
    case 'DECREASE':
			return state - 1

    // action === 'SET_NUMBER'일 경우
    case 'SET_NUMBER':
			return action.payload

    // 해당 되는 경우가 없을 땐 기존 상태를 그대로 리턴
    default:
      return state;
	}
}
// Reducer가 리턴하는 값이 새로운 상태가 됩니다.- Action : 어떤 액션을 취할 것인지 정의해 놓은 객체
-- type은 필수로 지정, 해당 Action 객체가 어떤 동작을 하는지 명시해 주는 역할
// payload가 필요 없는 경우
{ type: 'INCREASE' }

// payload가 필요한 경우
{ type: 'SET_NUMBER', payload: 5 }
-- 보통 Action을 직접 작성하기보다는 Action 객체를 생성하는 함수를 만들어 사용 -> 액션 생성자(Action Creator)
// payload가 필요 없는 경우
const increase = () => {
  return {
    type: 'INCREASE'
  }
}

// payload가 필요한 경우
const setNumber = (num) => {
  return {
    type: 'SET_NUMBER',
    payload: num
  }
}- Dispatch : Reducer로 Action을 전달해주는 함수, Dispatch의 전달인자로 Action 객체가 전달됨
// Action 객체를 직접 작성하는 경우
dispatch( { type: 'INCREASE' } );
dispatch( { type: 'SET_NUMBER', payload: 5 } );

// 액션 생성자(Action Creator)를 사용하는 경우
dispatch( increase() );
dispatch( setNumber(5) );- Recux Hooks : React-Redux에서 Redux를 사용할 때 활용할 수 있는 Hooks 메서드를 제공
-- 대표적으로 useSelector(), useDispatch()
// useDispatch() : Action 객체를 Reducer로 전달해주는 Dispatch 함수를 반환하는 메서드

import { useDispatch } from 'react-redux'

const dispatch = useDispatch()
dispatch( increase() )
console.log(counter) // 2

dispatch( setNumber(5) )
console.log(counter) // 5
// useSelector() : 컴포넌트와 state를 연결하여 Redux의 state에 접근할 수 있게 해주는 메서드
// Redux Hooks 메서드는 'redux'가 아니라 'react-redux'에서 불러옵니다.
import { useSelector } from 'react-redux'
const counter = useSelector(state => state)
console.log(counter) // 1🔮 Redux의 세 가지 원칙
✔️ Single source of truth
- 동일한 데이터는 항상 같은 곳에서 가지고 와야 함
- Redux에는 데이터를 저장하는 Store라는 단 하나뿐인 공간이 있음과 연결되는 원칙
✔️ State is read-only
- 상태는 읽기 전용!
- React에서 상태갱신함수로만 상태를 변경할 수 있었던 것처럼, Redux의 상태도 직접 변경할 수 없음
- Action 객체가 있어야만 상태를 변경할 수 있음
✔️ Changes are made with pure functions
- 변경은 순수함수로만 가능
- 상태가 엉뚱한 값으로 변경되는 일이 없도록 순수함수로 작성되어야 하는 Reducer와 연결되는 원칙
🔮 페어프로그래밍 - Cmarket Redux
페어분 따라 코드를 쳐서 완성하긴 했는데... 미완성이라 복습이 더 필요하다. 이해 후 코드 정리 예정

[무엥일기] 무엥,,, 내가 머쨍이 개발자가 될 수 이쓰까,,,