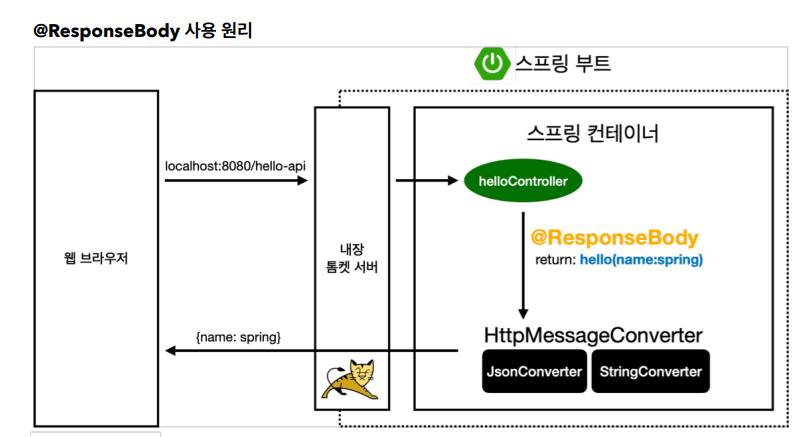
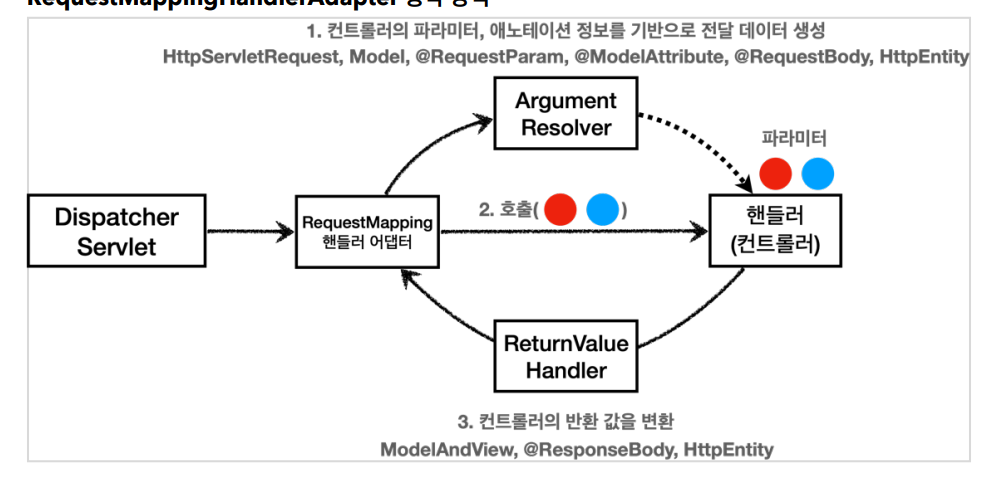
로깅
로그 레벨 trace > debug > info > warn > error
운영서버는 info 개발서버는 debug
@Controller는 반환값이 String이면 뷰 이름으로 인식
@RestController 는 반환값으로 http 메세지 바디에 바로 입력
@GetMapping("/mapping/{userId}")
public String mappingPath(@PathVariable("userId") String data) {
 log.info("mappingPath userId={}", data);
 return "ok";
}
@RequestMapping은 url 경로를 템플릿화 할수있어서 @P
athVariable로 매칭 되는 부분을 쉽게 조회 가능하다 (파라미터의 이릅이 같으면 생략 가능
요청 매핑 - API 예시
MappingClassController
@RestController
@RequestMapping("/mapping/users")
public class MappingClassController {
@GetMapping
    public String user() {
    return "get users";
}
@PostMapping
public String addUser(){
    return "post user";
}
@GetMapping("/{userId}")
public String findUser(@PathVariable String userId){
    return "get userId=" + userId;
}

@PatchMapping("/{userId}")
    public String updateUser(@PathVariable String userId){
    return "update userId="+userId;
}
@DeleteMapping("/{userId}")
    public String deleteUser(@PathVariable String userId){
    return "delete userId="+userId;
}
}
이런식으로 하면 됨
@Slf4j
@Controller
public class RequestParamController {
 /**
 * 반환 타입이 없으면서 이렇게 응답에 값을 직접 집어넣으면, view 조회X
 */
 @RequestMapping("/request-param-v1")
 public void requestParamV1(HttpServletRequest request, HttpServletResponse
response) throws IOException {
 String username = request.getParameter("username");
 int age = Integer.parseInt(request.getParameter("age"));
 log.info("username={}, age={}", username, age);
 response.getWriter().write("ok");
 }
}
단순하게 httpservelet에서 제공하는 방식으로
requestParamV4
@ResponseBody
@RequestMapping("/request-param-v4")
public String requestParamV4(String username, int age) {
 log.info("username={}, age={}", username, age);
 return "ok";
}
@ResponseBody view 조회 무시하고 http 메시지 바디에 바로 입력
단순 타입일때는 @RequestParam도 생략 가능
@RequestParam(required = true, defualtValue ="기본값 설정") 기본값이 true Map으로도 조회 가능
http 요청 파라미터 - @ModelAttribute
요청 파라미터를 받아서 필요한 객체를 만들고 그 객체에 값을 보통 넣어야함
@RequestParam String username;
@RequestParam int age;
HelloData data = new HelloData();
data.setUsername(username);
data.setAge(age);
@ResponseBody
@RequestMapping("/model-attribute-v1")
public String modelAttributeV1(@ModelAttribute HelloData helloData) {
log.info("username={}, age={}", helloData.getUsername(),
helloData.getAge());
return "ok";
}둘은 같은코드다 객체여서 생략도 가능 기본타입은 @requestParam
http 요청 파라미터 -단순 텍스트
요청 파라미터와 다르게, http 메시지 바디를 통해 데이터가 직접 넘어올때는 위에 두개를 사용 못함
@RequestBody - requestBodyStringV1
@Slf4j
@Controller
public class RequestBodyStringController {
 @PostMapping("/request-body-string-v1")
 public void requestBodyString(HttpServletRequest request,
HttpServletResponse response) throws IOException {
 ServletInputStream inputStream = request.getInputStream();
 String messageBody = StreamUtils.copyToString(inputStream,
StandardCharsets.UTF_8);
 log.info("messageBody={}", messageBody);
 response.getWriter().write("ok");
 }
}
http 메시지 바디의 데이터를 inputstream을 사용해서 직접 읽을 수 있다.
InputStream(Reader): HTTP 요청 메시지 바디의 내용을 직접 조회
HttpEntity: header body 정보를 편리하게 조회, 응답도 가능
@RequestBody - requestBodyStringV4
@ResponseBody
@PostMapping("/request-body-string-v4")
public String requestBodyStringV4(@RequestBody String messageBody) {
 log.info("messageBody={}", messageBody);
 return "ok";
}
@requestbody는 메시지 바디 정보를 편리하게 조회 가능 헤더 정보는 @RequestHeader 사용
Http 요청 메시지 - Json
RequestBodyJsonController
@Slf4j
@Controller
public class RequestBodyJsonController {
 private ObjectMapper objectMapper = new ObjectMapper();
 @PostMapping("/request-body-json-v1")
 public void requestBodyJsonV1(HttpServletRequest request,
HttpServletResponse response) throws IOException {
 ServletInputStream inputStream = request.getInputStream();
 String messageBody = StreamUtils.copyToString(inputStream,
StandardCharsets.UTF_8);
 log.info("messageBody={}", messageBody);
 HelloData data = objectMapper.readValue(messageBody, HelloData.class);
 log.info("username={}, age={}", data.getUsername(), data.getAge());
 response.getWriter().write("ok");
 }
}
http 메시지 바디에서 직접 읽어서, objectMapper를 통해 자바 객체로 변환
requestBodyJsonv5
@ResponseBody
@PostMapping("/request-body-json-v5")
public HelloData requestBodyJsonV5(@RequestBody HelloData data) {
 log.info("username={}, age={}", data.getUsername(), data.getAge());
 return data;
}
@RequestBody(메시지바디) 생략 불가 생략하면 @ModelAttribute(파라미터)가 적용됨
@RequestBody 요청
Json 요청 -> Http 메시지 컨버터 -> 객체
HTTP 응답 - 정적 리소스, 뷰 템플릿
@Controller
public class ResponseViewController {
 @RequestMapping("/response-view-v1")
 public ModelAndView responseViewV1() {
 ModelAndView mav = new ModelAndView("response/hello")
 .addObject("data", "hello!");
 return mav;
 }
 @RequestMapping("/response-view-v2")
 public String responseViewV2(Model model) {
 model.addAttribute("data", "hello!!");
 return "response/hello";
 }
 @RequestMapping("/response/hello")
 public void responseViewV3(Model model) {
 model.addAttribute("data", "hello!!");
 }
}
String 반환 = @ResponseBody 없으면 뷰를 찾고 렌더링 templates/response/hello.html 실행
있으면 메시지 바디에 직접 response/hello
void 반환 = @Controller 사용하고 http 메시지 바디 처리하는 파라미터 없으면 요청 url 참고해서 논리뷰 이름으로 사용 권장 x
Http 메시지 컨버터

http api처럼 json 데이터를 http 메시지 바디에서 직접 읽거나 쓸땐 http 메시지 컨버터를 쓴다, (뷰 템플릿으로 html을 생성해서 응답하는게 아님)
http 요청 : @RequestBody, HttpEntity(RequestEntity)
http 응답 : @ResponseBody, HttpEntity(ResponseEntity)
StringHttpMessageConverter = 미디어 타입 /
요청 @RequestBody String data
응답 @ResponseBody return "ok" 쓰기 미디어타입 text/plain
MAppingJackson2HttpMessageConverter = 미디어타입 application/json
요청 예 @RequestBody HelloData data
응답 예 @ResponseBody return helloData 쓰기 미디어타입 application/json
동작방식
http 요청 데이터 읽기
1. http 요청이 오고, 컨트롤러에서 @RequestBody, HttpEntity 파라미터를 사용
2. canRead()를 호출해서 읽을수 있는지 확인한다
2-1. 대상 클래스 타입 지원 확인, http 요청의 content-type 미디어타입 지원 확인
3. 만족하면 read() 호출
http 요청 데이터 생성
@ResponseBody로 생성될때
canWrite() 호출 만족시 write()
요청 매핑 헨들러 구조

애노테이션 기반 컨트롤러를 처리하는 RequestMappingHandlerAdaptor 는 바로 이 ArgumentResolver 를 호출해서 컨트롤러(핸들러)가 필요로 하는 다양한 파라미터의 값(객체)을 생성한다. 그리고 이렇게 파리미터의 값이 모두 준비되면 컨트롤러를 호출하면서 값을 넘겨준다