MeterialDegin2_FloatingActionButton&SnackBar&CoordinatorLayout&NestedScrollView& CollapsingToolbarLayout&BottomNavigationView
Android_with_Java
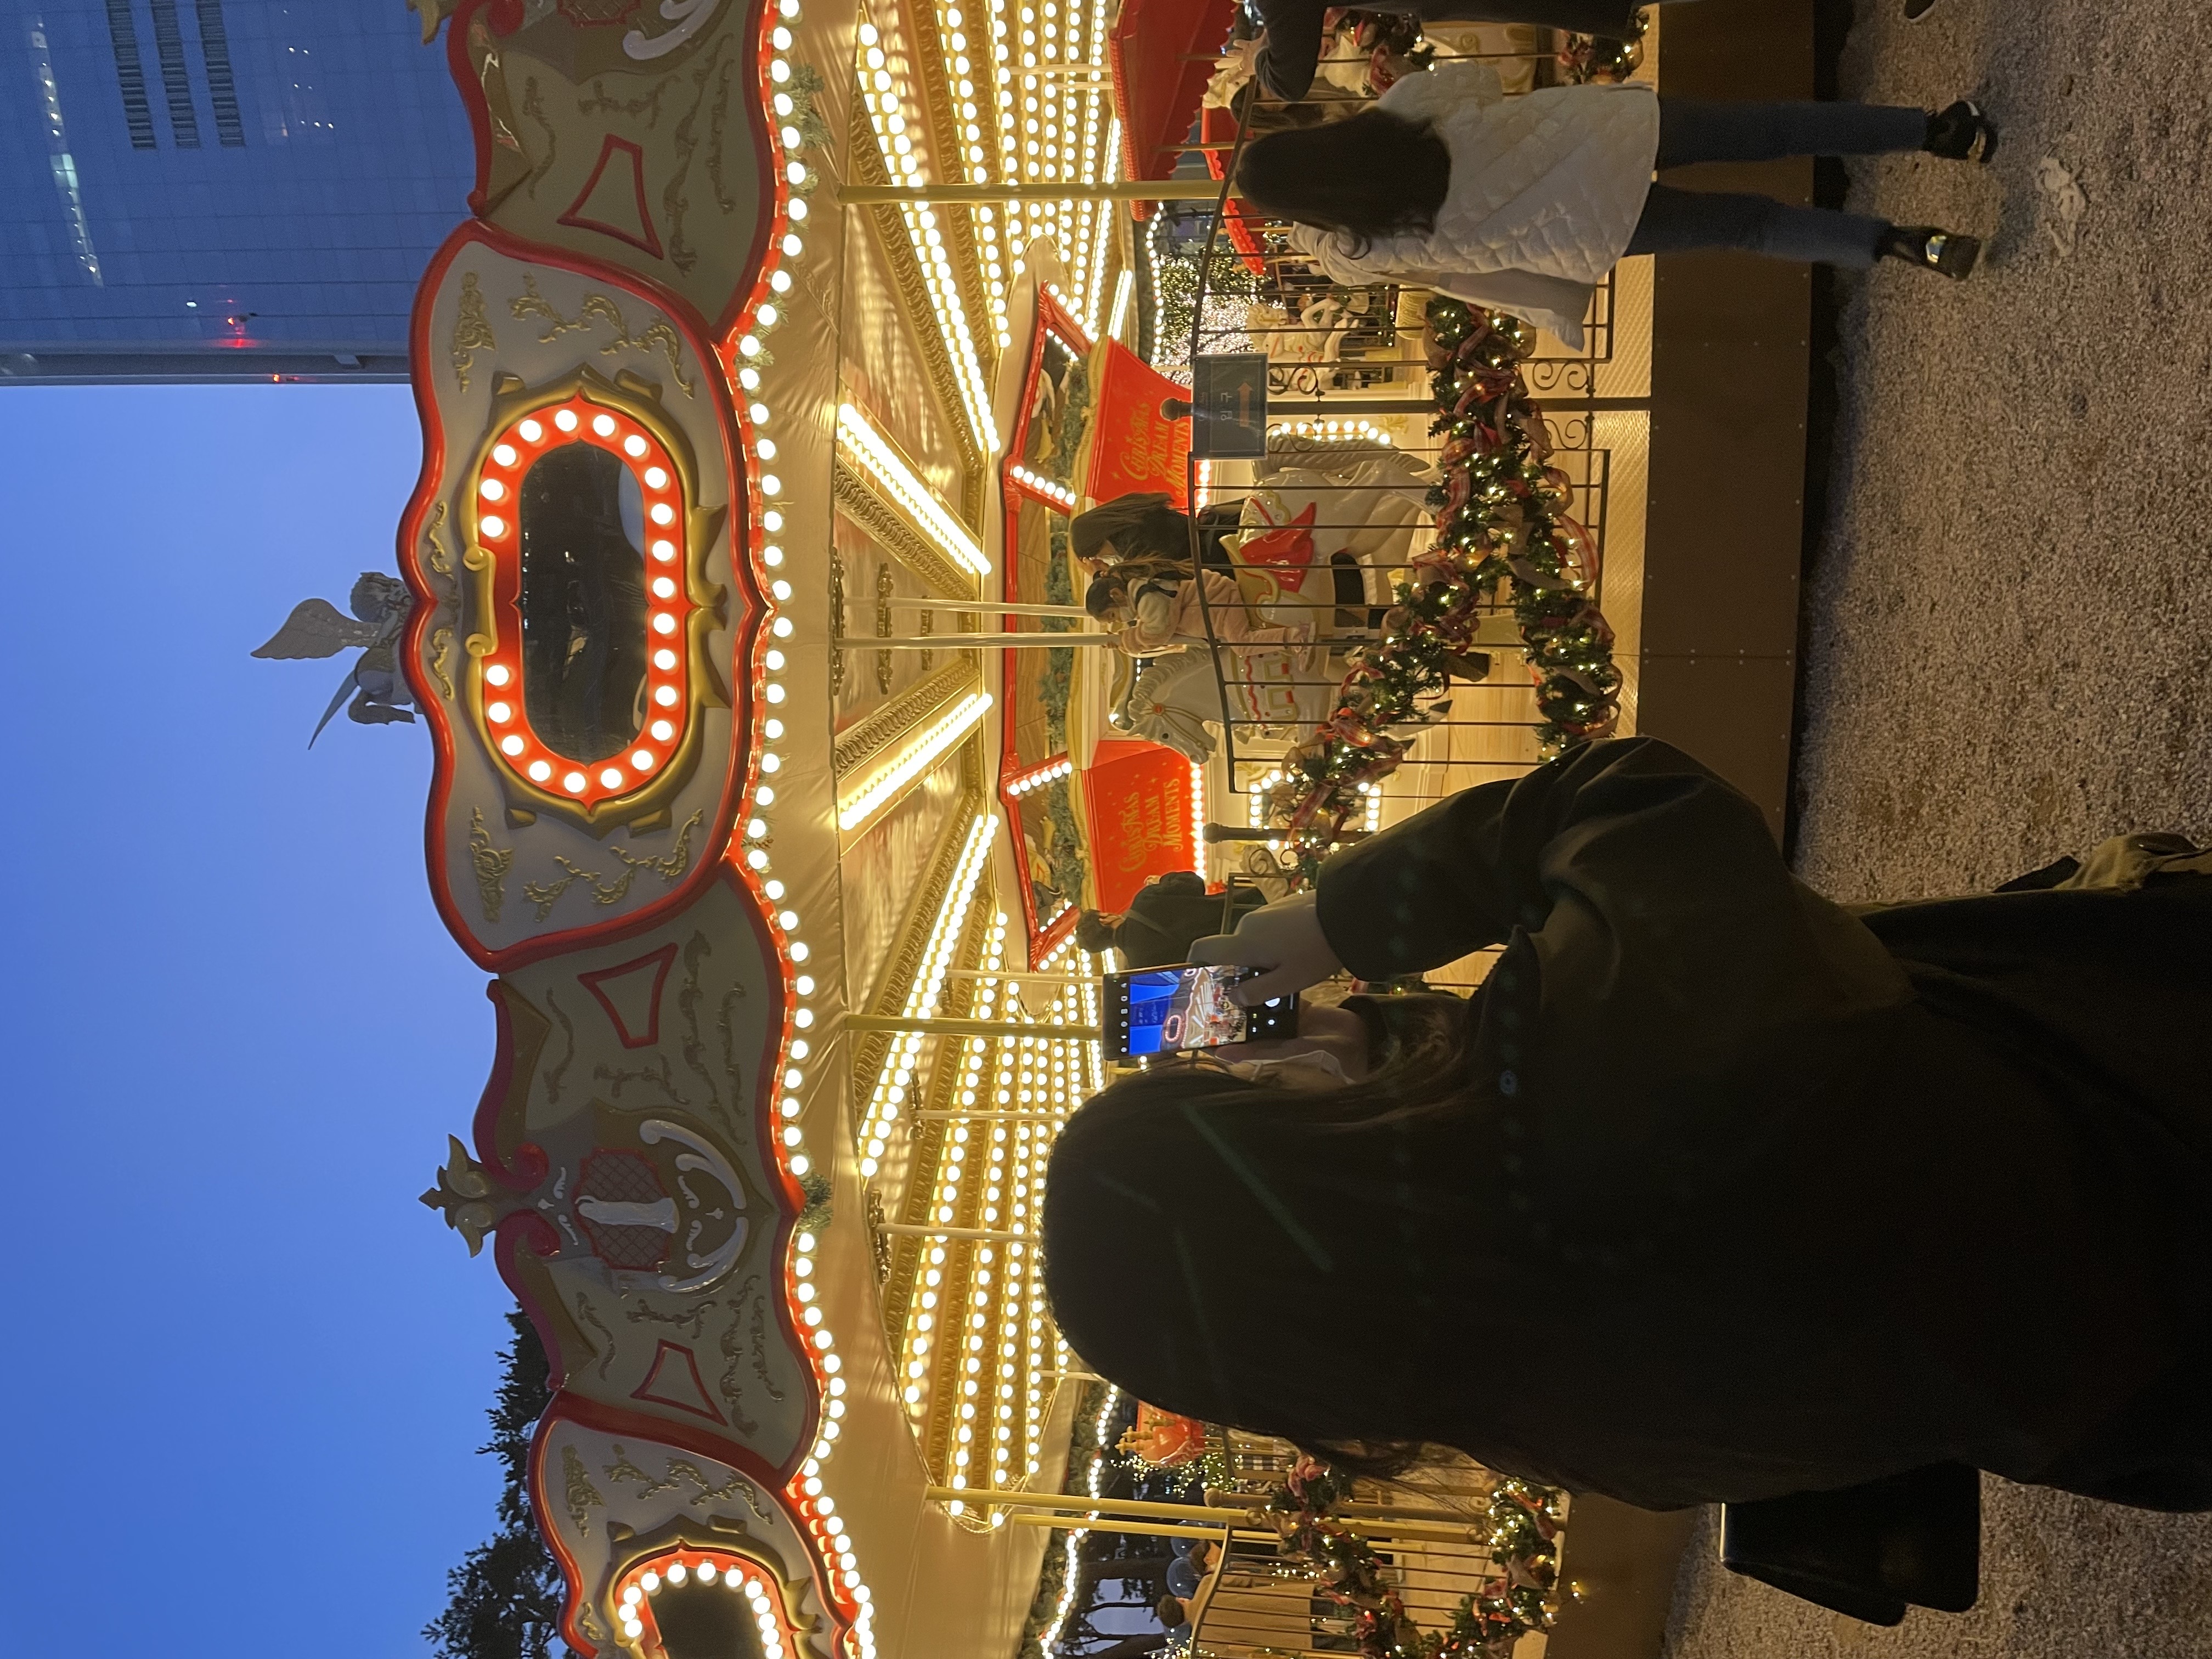
[1] FloatingActionButton
- 버튼 안 그림은 무조건 검정으로 보임
1. FloatingActionButton

- 기본 FloatingActionButton은 이미지뷰를 상속받아 만듦
- 버튼은 기본 색상이 검정색으로 보임 색 바꾸려면 app:tint="@color/white" 속성 쓰기
2. ExtendedFloatingActionButton

- 글씨를 쓸수 없는 플로팅 버튼의 확장형
- 버튼에 text 쓰기 가능
- text속성을 쓰지 않으면 그냥 일반 플로팅
버튼과 모양 같음
시용방법
<?xml version="1.0" encoding="utf-8"?>
<androidx.coordinatorlayout.widget.CoordinatorLayout xmlns:android="http://schemas.android.com/apk/res/android"
    xmlns:app="http://schemas.android.com/apk/res-auto"
    xmlns:tools="http://schemas.android.com/tools"
    android:layout_width="match_parent"
    android:layout_height="match_parent"
    tools:context=".MainActivity">

    <com.google.android.material.floatingactionbutton.FloatingActionButton
        android:id="@+id/fabtn"
        android:layout_width="wrap_content"
        android:layout_height="wrap_content"
        android:src="@drawable/baseline_add_24"
        app:tint="@color/white"
        app:backgroundTint="@color/purple_500"
        android:layout_gravity="right|bottom"
        android:layout_margin="16dp"/>

    <!-- 글씨를 쓸 수 있음 -->
    <com.google.android.material.floatingactionbutton.ExtendedFloatingActionButton
        android:id="@+id/ext_btn"
        android:layout_margin="16dp"
        android:layout_width="wrap_content"
        android:layout_height="wrap_content"
        app:icon="@drawable/baseline_add_24"
        android:text="add Item"/>

    <!-- 스낵바가 보여질 위치 코디네이터레이아웃을 배치 -->
    <androidx.coordinatorlayout.widget.CoordinatorLayout
        android:id="@+id/snackbar_container"
        android:layout_width="match_parent"
        android:layout_height="wrap_content"
        android:layout_gravity="center"
        android:layout_marginLeft="40dp"
        android:layout_marginRight="40dp"/>


</androidx.coordinatorlayout.widget.CoordinatorLayout>
package com.bsj0420.ex38floatingactionbutton;
import androidx.appcompat.app.AppCompatActivity;
import androidx.coordinatorlayout.widget.CoordinatorLayout;
import android.os.Bundle;
import android.view.View;
import android.widget.Button;
import android.widget.Toast;
import com.google.android.material.floatingactionbutton.ExtendedFloatingActionButton;
import com.google.android.material.floatingactionbutton.FloatingActionButton;
import com.google.android.material.snackbar.Snackbar;
public class MainActivity extends AppCompatActivity {
FloatingActionButton fabtn;
ExtendedFloatingActionButton extBtn;
CoordinatorLayout snackbarContainer;
@Override
protected void onCreate(Bundle savedInstanceState) {
super.onCreate(savedInstanceState);
setContentView(R.layout.activity_main);
fabtn = findViewById(R.id.fabtn);
fabtn.setOnClickListener(new View.OnClickListener() {
@Override
public void onClick(View view) {
//Toast.makeText(MainActivity.this,"클릭!!",Toast.LENGTH_SHORT).show();
Snackbar.make(view,"click!!",Snackbar.LENGTH_INDEFINITE).setAction("ok?", new View.OnClickListener() {
@Override
public void onClick(View view) {
}
}).show();
//매개변수에 view = CoordinatorLayout 말하는건데 없으면 아무 뷰나 주면 됨 그럼 화면에 바닥에 보여짐
}
});
extBtn = findViewById(R.id.ext_btn);
extBtn.setOnClickListener(new View.OnClickListener() {
@Override
public void onClick(View view) {
if(extBtn.isExtended()){
snackbarContainer = findViewById(R.id.snackbar_container);
Snackbar.make(snackbarContainer,"click_add", Snackbar.LENGTH_INDEFINITE).setAction("확인", new View.OnClickListener() {
@Override
public void onClick(View view) {
Toast.makeText(MainActivity.this, "add", Toast.LENGTH_SHORT).show();
extBtn.shrink();
}
}).show();
} else {
extBtn.extend();
}
}
});
}
}
[2] SnackBar

- Toast 대체품으로 나온 것
- Toast와 다르게 Action 기능을 넣음 (버튼 한개 추가 가능)
예제 위 FloatingActionButton에 써있음
1. 기본 생성 방법
Snackbar.make(View view,텍스트,보여질 시간).show();
view = CoordinatorLayout 말하는건데 없으면 아무 뷰나 주면 됨 그럼 화면에 바닥에 보여짐
2. 버튼 추가Snackbar.make(View view,텍스트,Snackbar.LENGTH_INDEFINITE).setAction("ok?", new View.OnClickListener() {
@Override
public void onClick(View view) {
클릭하면 해야할 행동
} }).show();Snackbar.LENGTH_INDEFINITE : 무한대로 보여져라
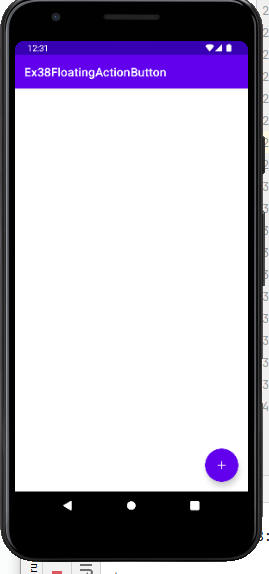
[3] CoordinatorLayout
- 내 안에 있는 View들을 조종함
- FrameLayout을 상속받음
- 배치는 layout_gravityfh 한다
제목줄 제어해보기
- 기존 제목줄은 제어 불가능
- 테마에 액션바를 NoActionBar 해줘야함
- AppBarLayout 안에 ToolBar를 넣어야만 제어가능
- contents 스크롤 할때 같이 스크롤 되는 기능, 기존 스크롤 뷰인 ScrollView, ListView, GridView 는 연동 안됨 NestedScrollView or RecyclerView 만 가능
- layout_behavior 라는 친구를 소환해야됨
툴바와 겹치지않도록 위치 조정을 해줌!
(FloatingActionButton과 SnackBar는 이 친구가 자동 생성돼서 해주는 것이엇음)
app:layout_scrollFlags="scroll"
이 속성은 Toolbar가 AppBarLayout 안에 있어야 노출됨
이 속성을 준 애만 올라감
Main.xml
<?xml version="1.0" encoding="utf-8"?>
<androidx.coordinatorlayout.widget.CoordinatorLayout xmlns:android="http://schemas.android.com/apk/res/android"
    xmlns:app="http://schemas.android.com/apk/res-auto"
    xmlns:tools="http://schemas.android.com/tools"
    android:layout_width="match_parent"
    android:layout_height="match_parent"
    tools:context=".MainActivity">

    <com.google.android.material.appbar.AppBarLayout
        android:layout_width="match_parent"
        android:layout_height="wrap_content">

        <androidx.appcompat.widget.Toolbar
            android:id="@+id/toolbar"
            android:layout_width="match_parent"
            android:layout_height="?attr/actionBarSize"
            app:titleTextColor="@color/white"
            app:layout_scrollFlags="scroll|enterAlways"/>
            <!--
            app:layout_scrollFlags="scroll|enterAlwaysCollapsed"
            -> contents가 다 내려와야 되는 것 (기본설정)

            app:layout_scrollFlags="scroll|enterAlways"
            -> contents를 내리면 언제든 툴바 튀어나옴
            -->


        <!--이자리에 보통 TabLayout-->
        <Button
            android:id="@+id/tb_btn"
            android:layout_width="match_parent"
            android:layout_height="wrap_content"
            android:backgroundTint="#A1BBA4E3"/>

    </com.google.android.material.appbar.AppBarLayout>


    <!-- 세로 스크롤이 가능한 뷰를 배치한다 1.NestedScrollView || 2. recyclerView  -->
    <!-- 영역이 겹쳐도 됨 Behabear가 알아서 끌어내려줌 -->
    <androidx.core.widget.NestedScrollView
        android:layout_width="match_parent"
        android:layout_height="match_parent"
        app:layout_behavior="com.google.android.material.appbar.AppBarLayout$ScrollingViewBehavior">

        <!-- 스트롤뷰의 주요특징
         1. view하나만 넣을 수 있음
         2 그 자긱뷰의 높이는 무조건 warpContent가 된다.-->
        <LinearLayout
            android:layout_width="match_parent"
            android:layout_height="wrap_content"
            android:orientation="vertical">

            <TextView
                android:layout_width="match_parent"
                android:layout_height="350dp"
                android:background="#4CAF50" />

            <TextView
                android:layout_width="match_parent"
                android:layout_height="350dp"
                android:background="#FF9800"/>

            <TextView
                android:layout_width="match_parent"
                android:layout_height="350dp"
                android:background="#03A9F4"/>


        </LinearLayout>

    </androidx.core.widget.NestedScrollView>


</androidx.coordinatorlayout.widget.CoordinatorLayout>
[4] NestedScrollView
- ScrollView 와 사용법 같음
스트롤뷰의 주요특징
1. view하나만 넣을 수 있음
2. 그 자식뷰의 높이는 무조건 warpContent가 된다.
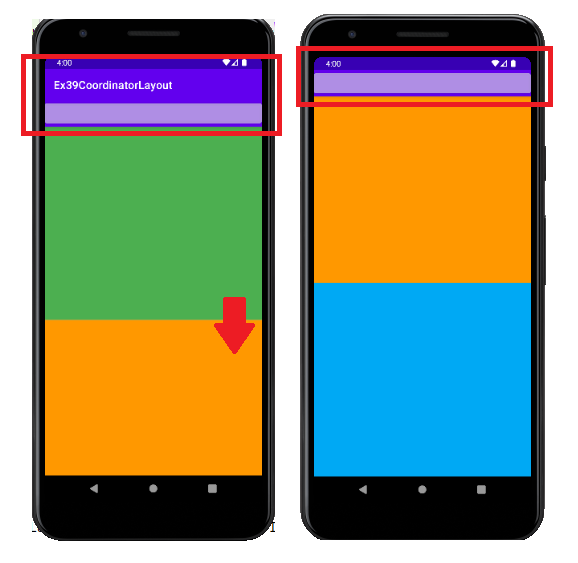
[5] CollapsingToolbarLayout
- 내가 원하는 위치까지만 스크롤 되게하는 방법
main.xml
<?xml version="1.0" encoding="utf-8"?>
<androidx.coordinatorlayout.widget.CoordinatorLayout xmlns:android="http://schemas.android.com/apk/res/android"
    xmlns:app="http://schemas.android.com/apk/res-auto"
    xmlns:tools="http://schemas.android.com/tools"
    android:layout_width="match_parent"
    android:layout_height="match_parent"
    tools:context=".MainActivity">

    <com.google.android.material.appbar.AppBarLayout
        android:id="@+id/appbar_layout"
        android:layout_width="match_parent"
        android:layout_height="340dp"
        android:theme="@style/appbar">

        <com.google.android.material.appbar.CollapsingToolbarLayout
            android:layout_width="match_parent"
            android:layout_height="match_parent"
            app:layout_scrollFlags="scroll|exitUntilCollapsed"
            app:contentScrim="@color/purple_500">
            <!--
            app:contentScrim="@color/purple_500"
            -> 완전히 작아지면 내가 설정한 색으로 바꿔라
            -->

            <ImageView
                android:layout_width="match_parent"
                android:layout_height="match_parent"
                android:src="@drawable/moana01"
                android:scaleType="centerCrop"/>

            <!-- CollapsingToolbarLayout안에서  Toolbar 스타일 안먹힘
            AppBarLayout에 appBar만의 스타일을 themes.xml에 만들어서 써야함

            -->
            <androidx.appcompat.widget.Toolbar
                android:id="@+id/toolbar"
                android:layout_width="match_parent"
                android:layout_height="?attr/actionBarSize"/>

        </com.google.android.material.appbar.CollapsingToolbarLayout>

    </com.google.android.material.appbar.AppBarLayout>

    <!-- 타이틀 옆에 버튼 놓기 -->
    <com.google.android.material.floatingactionbutton.FloatingActionButton
        android:layout_width="wrap_content"
        android:layout_height="wrap_content"
        app:fabSize="mini"
        app:layout_anchor="@id/appbar_layout"
        app:layout_anchorGravity="bottom|right"
        android:layout_margin="16dp"
        />

    <androidx.core.widget.NestedScrollView
        android:layout_width="match_parent"
        android:layout_height="match_parent"
        app:layout_behavior="@string/appbar_scrolling_view_behavior">

        <LinearLayout
            android:layout_width="match_parent"
            android:layout_height="wrap_content"
            android:orientation="vertical">

            <TextView
                android:background="#ffff0000"
                android:layout_width="match_parent"
                android:layout_height="350dp"/>

            <TextView
                android:background="#ff00ff00"
                android:layout_width="match_parent"
                android:layout_height="350dp"/>

            <TextView
                android:background="#ff0000ff"
                android:layout_width="match_parent"
                android:layout_height="350dp"/>

        </LinearLayout>


    </androidx.core.widget.NestedScrollView>


</androidx.coordinatorlayout.widget.CoordinatorLayout>
themes.xml
<resources xmlns:tools="http://schemas.android.com/tools">
    <!-- Base application theme. -->
    <style name="Theme.Ex40CollapsingToolbarLayout" parent="Theme.MaterialComponents.DayNight.NoActionBar">
        <!-- Primary brand color. -->
        <item name="colorPrimary">@color/purple_500</item>
        <item name="colorPrimaryVariant">@color/purple_700</item>
        <item name="colorOnPrimary">@color/white</item>
        <!-- Secondary brand color. -->
        <item name="colorSecondary">@color/teal_200</item>
        <item name="colorSecondaryVariant">@color/teal_700</item>
        <item name="colorOnSecondary">@color/black</item>
        <!-- Status bar color. -->
        <item name="android:statusBarColor">?attr/colorPrimaryVariant</item>
        <!-- Customize your theme here. -->


    </style>

    <!-- AppBarLayout만의 스타일 테마를 만든다 -->
    <style name="appbar">
        <!-- toolbar 제목 색상 지정-->
        <item name="titleTextColor">@color/white</item>

        <!-- 앱바 레이아웃 안에 툴바를 넣었을 떄 제목 지정하는 방법 -->
        <item name="android:textColorPrimary">@color/white</item>
        <!-- 앱바한테 옵션색 주면 안에 글씨까지 영향받음 -->
        <item name="colorControlNormal">@color/white</item>
        <!-- 옵션메뉴 아이템색 지정 -->
        <item name="android:textColor">@color/black</item>

    </style>
</resources>
option.xml
옵션메뉴에 보일 아이템들 나열
<?xml version="1.0" encoding="utf-8"?>
<menu xmlns:android="http://schemas.android.com/apk/res/android"
    xmlns:app="http://schemas.android.com/apk/res-auto">

    <item android:id="@+id/menu_aaa" android:title="aaa"></item>
    <item android:id="@+id/search" android:title="search"
        android:icon="@drawable/search" app:showAsAction="always"></item>
    <item android:id="@+id/menu_ccc" android:title="ccc"></item>

</menu>
main.java
package com.bsj0420.ex40collapsingtoolbarlayout;

import androidx.appcompat.app.AppCompatActivity;
import androidx.appcompat.widget.Toolbar;

import android.os.Bundle;
import android.view.Menu;

public class MainActivity extends AppCompatActivity {

    @Override
    protected void onCreate(Bundle savedInstanceState) {
        super.onCreate(savedInstanceState);
        setContentView(R.layout.activity_main);

        Toolbar toolbar = findViewById(R.id.toolbar);
        setSupportActionBar(toolbar);

    }

    @Override
    public boolean onCreateOptionsMenu(Menu menu) {
        getMenuInflater().inflate(R.menu.optin,menu);
        return super.onCreateOptionsMenu(menu);
    }
}
[6] Bottom
[6-1] BottomNavigationView
- menu.xml 을 이용해 손쉽게 만듦
- 바텀레이아웃은 run 한번 돌려야 미리보기에 표시됨...ㅠ 잊지말자...
★★★★★사용방법★★★★★
FagmentManager를 활용해 바텀버튼을 누르면 각각의 Fragment화면 보여주는(replace) 화면
Main.java
1. 프래그먼트가 보여질 영역과 바텀네비게이션이 보여질 화면 구분
2. res폴더에 - menu만들고 바텀에 보여질 item 개수만큼 만든다
(BottomNavigationView는 최대 다섯개까지만 메뉴 아이템 가능하다_권장 3~5개)
res - menu - menu.xml
<?xml version="1.0" encoding="utf-8"?>
<menu xmlns:android="http://schemas.android.com/apk/res/android">

    <!--
        BottomNavigationView는 최대 다섯개까지만 메뉴 아이템 가능하다
        권장 3~5개
    -->
    <item android:id="@+id/bnv_tab1" android:title="TAB1"
        android:icon="@drawable/ic_action_calrender"></item>
    <item android:id="@+id/bnv_tab2" android:title="TAB2"
        android:icon="@drawable/ic_action_home"></item>
    <item android:id="@+id/bnv_tab3" android:title="TAB3"
        android:icon="@drawable/ic_action_song"></item>

</menu>
만든 메뉴 xml 적용

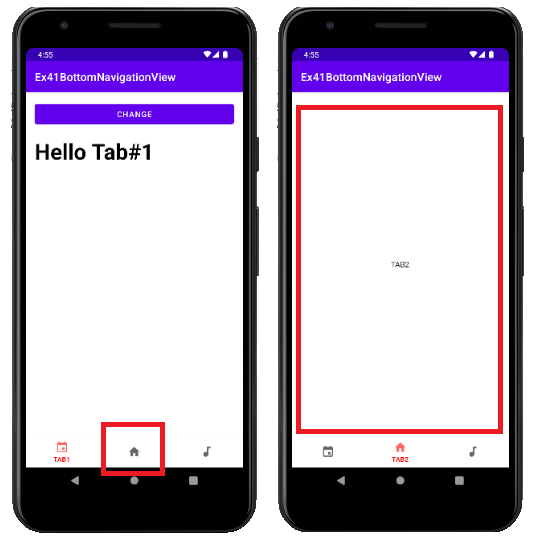
3. 선택한 바텀 아이템만 색바꾸고 텍스트 보여주기
3-1) res - color 폴더 추가 - root element가 selector인 xml 파일 생성

color.xml
<?xml version="1.0" encoding="utf-8"?>
<selector xmlns:android="http://schemas.android.com/apk/res/android">

    <!-- 선택 했을 때는 안했을때는 위 선책하면 아래 / color이 아닌 그림도 가능 -->
    <item android:color="@color/black" android:state_selected="false"/>
    <item android:color="#FF0000" android:state_selected="true"/>

</selector>
적용 화면
4. 바텀네비게이션을 클릭 했을 때 보여줄 플래그먼트 xml과 .java파일 각각 3개 생성
<?xml version="1.0" encoding="utf-8"?>
<RelativeLayout xmlns:android="http://schemas.android.com/apk/res/android"
    android:layout_width="match_parent"
    android:layout_height="match_parent">

    <TextView
        android:textColor="@color/black"
        android:text="TAB1"
        android:layout_width="wrap_content"
        android:layout_height="wrap_content"
        android:layout_centerInParent="true"/>

</RelativeLayout>
package com.bsj0420.ex41bottomnavigationview;
import android.os.Bundle;
import android.view.LayoutInflater;
import android.view.View;
import android.view.ViewGroup;
import androidx.annotation.NonNull;
import androidx.annotation.Nullable;
import androidx.fragment.app.Fragment;
public class Tab3Fragment extends Fragment {
@Nullable
@Override
public View onCreateView(@NonNull LayoutInflater inflater, @Nullable ViewGroup container, @Nullable Bundle savedInstanceState) {
return inflater.inflate(R.layout.fragment_tab3, container,false);
}
}
5. FragmentManager을 활용해서 화면 replace 하기
① 플래그먼트 객체 미리 참조변수로 만들어 놓기
② 시작할때 보여줄 Fragment를 보여주기
=> 프래그먼트의 제어는 별도의 관리자를 통해 수행함
getSupportFragmentManager().beginTransaction().add(R.id.container_fragment,fragments[0]).commit();
//getSupportFragmentManager().beginTransaction() : 수행하는 애 부름
//getSupportFragmentManager().beginTransaction().add(프래그먼트 붙일 프레임, 보여줄 프레그먼트 화면 1개);
//getSupportFragmentManager().beginTransaction().add(프래그먼트 붙일 프레임, 보여줄 프레그먼트 화면 1개).commit();
③ BottomNavigationView에 아이템 선택했을 때 반응 할 리스너(setOnItemSelectedListener()) 붙이기
🧨 onNavigationItemSelected() 리스너의 리턴 값
리턴을 ture로 하지않으면 탭이 변경되는 UI가 반영되지않음!!
main.java화면
package com.bsj0420.ex41bottomnavigationview;

import androidx.annotation.NonNull;
import androidx.appcompat.app.AppCompatActivity;
import androidx.fragment.app.Fragment;

import android.os.Bundle;
import android.view.MenuItem;

import com.google.android.material.bottomnavigation.BottomNavigationView;
import com.google.android.material.navigation.NavigationBarView;

public class MainActivity extends AppCompatActivity {

    //1. 플래그먼트 객체 미리 만들어 놓기
    Fragment[] fragments = new Fragment[3];

    //버텀 클릭하면 화면 바꾸기 위해 가져온 참조변수
    BottomNavigationView bnv;

    @Override
    protected void onCreate(Bundle savedInstanceState) {
        super.onCreate(savedInstanceState);
        setContentView(R.layout.activity_main);

        //1-1
        fragments[0] = new Tab1Fragment();
        fragments[1] = new Tab2Fragment();
        fragments[2] = new Tab3Fragment();
        //프래그먼트를 화면에 붙이지않으면 객체만 생성한것 - 메모리 영향 없음

        //2. 시작할때 보여줄 Fragment를 보여주기
        //프래그먼트의 제어는 별도의 관리자를 통해 수행함
        getSupportFragmentManager().beginTransaction().add(R.id.container_fragment,fragments[0]).commit();
        //getSupportFragmentManager().beginTransaction() : 수행하는 애 부름
        //getSupportFragmentManager().beginTransaction().add(프래그먼트 붙일 프레임, 보여줄 프레그먼트 화면 1개);
        //getSupportFragmentManager().beginTransaction().add(프래그먼트 붙일 프레임, 보여줄 프레그먼트 화면 1개).commit();


        bnv.findViewById(R.id.bnav);
        //setOnItemSelectedListener() 아이템 선택했을 때 반응 할 리스너
        bnv.setOnItemSelectedListener(new NavigationBarView.OnItemSelectedListener() {
            @Override
            public boolean onNavigationItemSelected(@NonNull MenuItem item) {

                if(item.getItemId() == R.id.bnv_tab1) getSupportFragmentManager().beginTransaction().replace(R.id.container_fragment , fragments[0]).commit();
                else if(item.getItemId() == R.id.bnv_tab2) getSupportFragmentManager().beginTransaction().replace(R.id.container_fragment , fragments[1]).commit();
                else if(item.getItemId() == R.id.bnv_tab3) getSupportFragmentManager().beginTransaction().replace(R.id.container_fragment , fragments[2]).commit();

                //리턴을 ture로 하지않으면 탭이 변경되는 UI가 반영되지않음!!
                return true;
            }
        });

    }
}
main.xml 화면
<?xml version="1.0" encoding="utf-8"?>
<LinearLayout xmlns:android="http://schemas.android.com/apk/res/android"
xmlns:app="http://schemas.android.com/apk/res-auto"
xmlns:tools="http://schemas.android.com/tools"
android:layout_width="match_parent"
android:layout_height="match_parent"
android:orientation="vertical"
tools:context=".MainActivity">
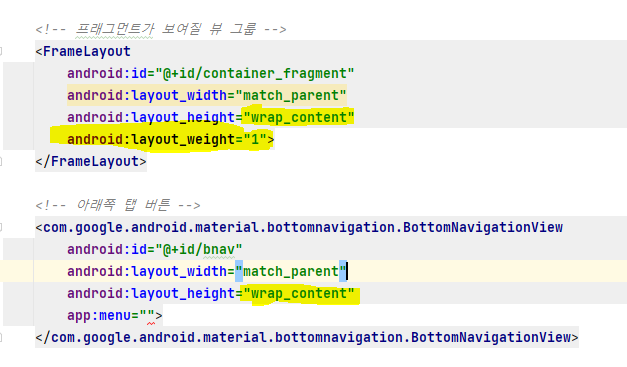
<!-- 프래그먼트가 보여질 뷰 그룹 -->
<FrameLayout
android:id="@+id/container_fragment"
android:layout_width="match_parent"
android:layout_height="wrap_content"
android:layout_weight="1">
</FrameLayout>
<!-- 아래쪽 탭 버튼 -->
<com.google.android.material.bottomnavigation.BottomNavigationView
android:id="@+id/bnav"
android:layout_width="match_parent"
android:layout_height="wrap_content"
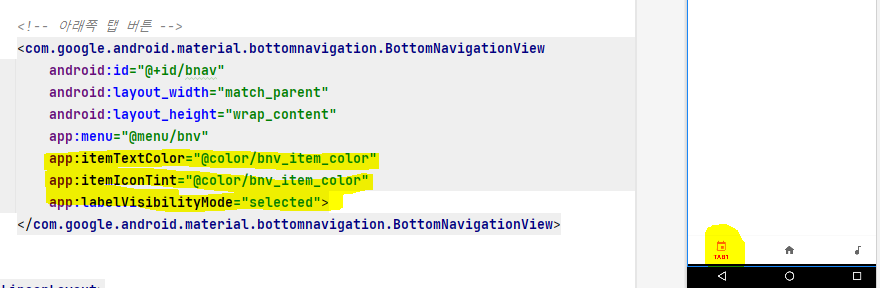
app:menu="@menu/bnv"
app:itemTextColor="@color/bnv_item_color"
app:itemIconTint="@color/bnv_item_color"
app:labelVisibilityMode="selected">
</com.google.android.material.bottomnavigation.BottomNavigationView>
</LinearLayout>
☝ LinearLayout 의 layout_weight속성을 쓸때
LinearLayout안에 뷰는 1차적으로 width, height을 쳐다보고 그 다음 layout_weight속성을 본다
때문에 길이나 넓이에 wrap_content 을 주고 android:layout_weight="1" 을 주면 wrap_content이상으로 작아지지않고 나머지를 다먹는다 라는 말임!
# 플래그먼트에 따로 기능 붙여서 활용해보기(확장)**
1. Tab1Fragment

- 버튼 누르면 text 바뀌는 화면
Tab1Fragment.xml 화면
<?xml version="1.0" encoding="utf-8"?>
<RelativeLayout xmlns:android="http://schemas.android.com/apk/res/android"
    android:layout_width="match_parent"
    android:layout_height="match_parent">

    <Button
        android:id="@+id/btn"
        android:layout_width="match_parent"
        android:layout_height="wrap_content"
        android:text="change"
        android:layout_margin="16dp"/>

    <TextView
        android:id="@+id/tv"
        android:layout_width="wrap_content"
        android:layout_height="wrap_content"
        android:text="Hello Tab#1"
        android:textColor="@color/black"
        android:textSize="40sp"
        android:textStyle="bold"
        android:layout_below="@+id/btn"
        android:layout_marginLeft="16dp"
        />

</RelativeLayout>
Tab1Fragment.java화면
package com.bsj0420.ex41bottomnavigationview;

import android.os.Bundle;
import android.view.LayoutInflater;
import android.view.View;
import android.view.ViewGroup;
import android.widget.Button;
import android.widget.TextView;

import androidx.annotation.NonNull;
import androidx.annotation.Nullable;
import androidx.fragment.app.Fragment;

public class Tab1Fragment extends Fragment {

    @Nullable
    @Override
    public View onCreateView(@NonNull LayoutInflater inflater, @Nullable ViewGroup container, @Nullable Bundle savedInstanceState) {
        return inflater.inflate(R.layout.fragment_tab1, container,false);
    }

    Button btn;
    TextView tv;

    @Override
    public void onViewCreated(@NonNull View view, @Nullable Bundle savedInstanceState) {
        super.onViewCreated(view, savedInstanceState);

        tv = view.findViewById(R.id.tv);
        btn = view.findViewById(R.id.btn);

        btn.setOnClickListener(new View.OnClickListener() {
            @Override
            public void onClick(View view) {
                tv.setText("하이하이 반가워");
            }
        });

    }
}
2. Tab2Fragment
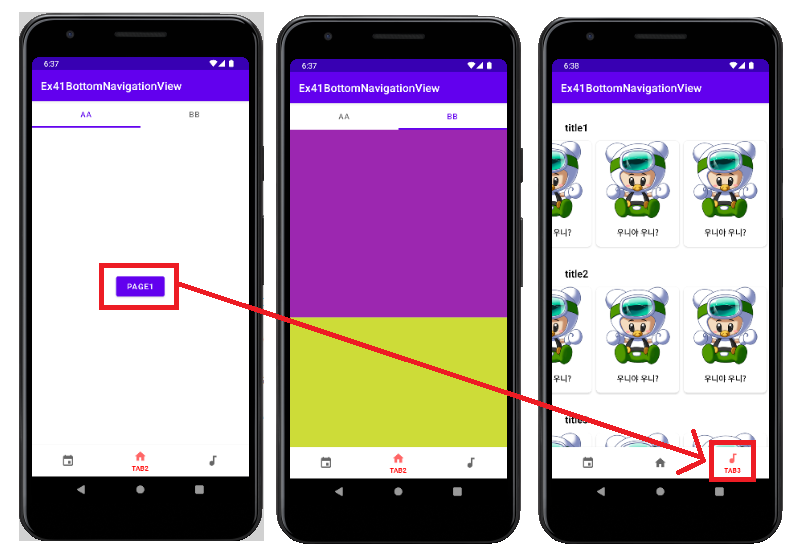
- 탭 레이아웃과 뷰페이저 사용해보기
Tab2Fragment.xml 화면
<?xml version="1.0" encoding="utf-8"?>
<RelativeLayout xmlns:android="http://schemas.android.com/apk/res/android"
    android:layout_width="match_parent"
    android:layout_height="match_parent">

    <com.google.android.material.tabs.TabLayout
        android:id="@+id/tab_layout"
        android:layout_width="match_parent"
        android:layout_height="wrap_content"/>

    <androidx.viewpager2.widget.ViewPager2
        android:id="@+id/pager"
        android:layout_width="match_parent"
        android:layout_height="match_parent"
        android:layout_below="@+id/tab_layout"/>

</RelativeLayout>
Tab2Fragment_tab1.xml 화면
<?xml version="1.0" encoding="utf-8"?>
<RelativeLayout xmlns:android="http://schemas.android.com/apk/res/android"
    android:layout_width="match_parent"
    android:layout_height="match_parent">

    <Button
        android:id="@+id/btn"
        android:layout_width="wrap_content"
        android:layout_height="wrap_content"
        android:text="page1"
        android:layout_centerInParent="true"/>

</RelativeLayout>
Tab2Fragment_tab1.java
package com.bsj0420.ex41bottomnavigationview;

import android.os.Bundle;
import android.view.LayoutInflater;
import android.view.View;
import android.view.ViewGroup;
import android.widget.Button;

import androidx.annotation.NonNull;
import androidx.annotation.Nullable;
import androidx.fragment.app.Fragment;

public class AaFragmentTab2 extends Fragment {

    @Nullable
    @Override
    public View onCreateView(@NonNull LayoutInflater inflater, @Nullable ViewGroup container, @Nullable Bundle savedInstanceState) {
        return inflater.inflate(R.layout.tab2_fragment_aa, container, false);
    }

    Button btn;

    @Override
    public void onViewCreated(@NonNull View view, @Nullable Bundle savedInstanceState) {
        super.onViewCreated(view, savedInstanceState);

        btn = view.findViewById(R.id.btn);

        btn.setOnClickListener(new View.OnClickListener() {
            @Override
            public void onClick(View view) {
                //메인 액티비티에 바텀네비게이션뷰의 탭 위치 변경
                MainActivity ac =(MainActivity)getActivity(); //액티비티 부르기

                ac.bnv.setSelectedItemId(R.id.bnv_tab3); //세번째 탭으로 이동
            }
        });

    }
}
Tab2Fragment_tab2.xml
<?xml version="1.0" encoding="utf-8"?>
<RelativeLayout xmlns:android="http://schemas.android.com/apk/res/android"
    android:layout_width="match_parent"
    android:layout_height="match_parent">

    <androidx.core.widget.NestedScrollView
        android:layout_width="match_parent"
        android:layout_height="match_parent">

        <LinearLayout
            android:layout_width="match_parent"
            android:layout_height="wrap_content"
            android:orientation="vertical">

            <TextView
                android:layout_width="match_parent"
                android:layout_height="340dp"
                android:background="#9C27B0"/>

            <TextView
                android:layout_width="match_parent"
                android:layout_height="340dp"
                android:background="#CDDC39"/>


            <TextView
                android:layout_width="match_parent"
                android:layout_height="340dp"
                android:background="#03A9F4"/>

        </LinearLayout>

    </androidx.core.widget.NestedScrollView>

</RelativeLayout>
Tab2Fragment_tab2.java
package com.bsj0420.ex41bottomnavigationview;

import android.os.Bundle;
import android.view.LayoutInflater;
import android.view.View;
import android.view.ViewGroup;
import android.widget.Button;

import androidx.annotation.NonNull;
import androidx.annotation.Nullable;
import androidx.fragment.app.Fragment;
import androidx.recyclerview.widget.RecyclerView;

import java.util.ArrayList;

public class BbFragmentTab2 extends Fragment {

    @Nullable
    @Override
    public View onCreateView(@NonNull LayoutInflater inflater, @Nullable ViewGroup container, @Nullable Bundle savedInstanceState) {
        return inflater.inflate(R.layout.tab2_fragment_bb, container, false);
    }
}
pagerAdapter.java
package com.bsj0420.ex41bottomnavigationview;

import androidx.annotation.NonNull;
import androidx.fragment.app.Fragment;
import androidx.fragment.app.FragmentActivity;
import androidx.viewpager2.adapter.FragmentStateAdapter;

public class Tab2PagerAdapter extends FragmentStateAdapter {

    Fragment[] fragments = new Fragment[2];

    public Tab2PagerAdapter(@NonNull FragmentActivity fragmentActivity) {
        super(fragmentActivity);

        fragments[0] = new AaFragmentTab2();
        fragments[1] = new BbFragmentTab2();

    }

    @NonNull
    @Override
    public Fragment createFragment(int position) {
        return fragments[position];
    }

    @Override
    public int getItemCount() {
        return fragments.length;
    }
}
Tab2Fragment.java화면
package com.bsj0420.ex41bottomnavigationview;

import android.os.Bundle;
import android.view.LayoutInflater;
import android.view.View;
import android.view.ViewGroup;

import androidx.annotation.NonNull;
import androidx.annotation.Nullable;
import androidx.fragment.app.Fragment;
import androidx.viewpager2.widget.ViewPager2;

import com.google.android.material.tabs.TabLayout;
import com.google.android.material.tabs.TabLayoutMediator;

public class Tab2Fragment extends Fragment {

    public View onCreateView(@NonNull LayoutInflater inflater, @Nullable ViewGroup container, @Nullable Bundle savedInstanceState) {
        return inflater.inflate(R.layout.fragment_tab2, container, false);
    }

    TabLayout tabLayout;
    ViewPager2 pager;
    Tab2PagerAdapter adapter;

    String[] titles = {"aa","bb"};

    //탭과 붙여주는 Mediator


    @Override
    public void onViewCreated(@NonNull View view, @Nullable Bundle savedInstanceState) {
        super.onViewCreated(view, savedInstanceState);

        tabLayout = view.findViewById(R.id.tab_layout);
        pager = view.findViewById(R.id.pager);
        adapter = new Tab2PagerAdapter(getActivity());
        pager.setAdapter(adapter);

        new TabLayoutMediator(tabLayout, pager, new TabLayoutMediator.TabConfigurationStrategy() {
            @Override
            public void onConfigureTab(@NonNull TabLayout.Tab tab, int position) {
                tab.setText(titles[position]);
            }
        }).attach();

    }
}
3. Tab3Fragment
- 리사이클러뷰 넣기
1.카드뷰 먼저 만들기
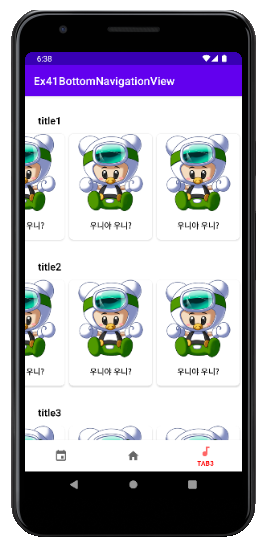
Tab3Fragment.xml 화면
<?xml version="1.0" encoding="utf-8"?>
<RelativeLayout xmlns:android="http://schemas.android.com/apk/res/android"
    android:layout_width="match_parent"
    android:layout_height="match_parent"
    xmlns:app="http://schemas.android.com/apk/res-auto">

    <androidx.core.widget.NestedScrollView
        android:layout_width="match_parent"
        android:layout_height="match_parent">

        <LinearLayout
            android:layout_width="match_parent"
            android:layout_height="wrap_content"
            android:orientation="vertical">

            <TextView
                android:layout_marginTop="24dp"
                android:layout_marginLeft="16dp"
                android:padding="8dp"
                android:textColor="@color/black"
                android:textStyle="bold"
                android:textSize="18sp"
                android:text="title1"
                android:layout_width="wrap_content"
                android:layout_height="wrap_content"/>

            <androidx.recyclerview.widget.RecyclerView
                android:id="@+id/recyclerView1"
                android:layout_width="match_parent"
                android:layout_height="200dp"
                app:layoutManager="androidx.recyclerview.widget.LinearLayoutManager"
                android:orientation="horizontal"/>

            <TextView
                android:layout_marginTop="24dp"
                android:layout_marginLeft="16dp"
                android:padding="8dp"
                android:textColor="@color/black"
                android:textStyle="bold"
                android:textSize="18sp"
                android:text="title2"
                android:layout_width="wrap_content"
                android:layout_height="wrap_content"/>

            <androidx.recyclerview.widget.RecyclerView
                android:id="@+id/recyclerView2"
                android:layout_width="match_parent"
                android:layout_height="200dp"
                app:layoutManager="androidx.recyclerview.widget.LinearLayoutManager"
                android:orientation="horizontal"/>

            <TextView
                android:layout_marginTop="24dp"
                android:layout_marginLeft="16dp"
                android:padding="8dp"
                android:textColor="@color/black"
                android:textStyle="bold"
                android:textSize="18sp"
                android:text="title3"
                android:layout_width="wrap_content"
                android:layout_height="wrap_content"/>

            <androidx.recyclerview.widget.RecyclerView
                android:id="@+id/recyclerView3"
                android:layout_width="match_parent"
                android:layout_height="200dp"
                app:layoutManager="androidx.recyclerview.widget.LinearLayoutManager"
                android:orientation="horizontal"/>
        </LinearLayout>

    </androidx.core.widget.NestedScrollView>

</RelativeLayout>
recycleItem.xml
<?xml version="1.0" encoding="utf-8"?>
<androidx.cardview.widget.CardView xmlns:android="http://schemas.android.com/apk/res/android"
    android:layout_width="150dp"
    android:layout_height="match_parent"
    xmlns:app="http://schemas.android.com/apk/res-auto"
    android:layout_margin="4dp"
    app:cardCornerRadius="8dp">


    <ImageView
        android:id="@+id/iv"
        android:src="@drawable/uni"
        android:layout_width="match_parent"
        android:layout_height="140dp"/>

    <TextView
        android:id="@+id/tv"
        android:layout_gravity="bottom|center_horizontal"
        android:layout_margin="16dp"
        android:textColor="@color/black"
        android:textStyle="bold"
        android:layout_width="wrap_content"
        android:layout_height="wrap_content"
        android:text="우니야 우니?"/>


</androidx.cardview.widget.CardView>
recyclerAdapter.java
package com.bsj0420.ex41bottomnavigationview;

import android.content.Context;
import android.view.LayoutInflater;
import android.view.View;
import android.view.ViewGroup;
import android.widget.ImageView;
import android.widget.TextView;

import androidx.annotation.NonNull;
import androidx.recyclerview.widget.RecyclerView;

import java.util.ArrayList;

public class Tab3RecyclerAdapeter extends RecyclerView.Adapter<Tab3RecyclerAdapeter.VH> {

    Context context;
    ArrayList<Tab3RecyclerItem> items;

    public Tab3RecyclerAdapeter(Context context, ArrayList<Tab3RecyclerItem> items) {
        this.context = context;
        this.items = items;
    }

    @NonNull
    @Override
    public Tab3RecyclerAdapeter.VH onCreateViewHolder(@NonNull ViewGroup parent, int viewType) {

        View itemView = LayoutInflater.from(context).inflate(R.layout.recycler_item_tab3, parent,false);

        return new VH(itemView);
    }

    @Override
    public void onBindViewHolder(@NonNull Tab3RecyclerAdapeter.VH holder, int position) {

    }

    @Override
    public int getItemCount() {
        return items.size();
    }

    class VH extends RecyclerView.ViewHolder {

        TextView tv;
        ImageView iv;

        public VH(@NonNull View itemView) {
            super(itemView);

            tv = itemView.findViewById(R.id.tv);
            iv = itemView.findViewById(R.id.iv);
        }
    }
}
recycleItem.java
package com.bsj0420.ex41bottomnavigationview;

public class Tab3RecyclerItem {

    String name;
    int imgId;

    public Tab3RecyclerItem(String name, int imgId) {
        this.name = name;
        this.imgId = imgId;
    }
}
Tab3Fragment.java화면
package com.bsj0420.ex41bottomnavigationview;

import android.os.Bundle;
import android.view.LayoutInflater;
import android.view.View;
import android.view.ViewGroup;

import androidx.annotation.NonNull;
import androidx.annotation.Nullable;
import androidx.fragment.app.Fragment;
import androidx.recyclerview.widget.RecyclerView;

import java.util.ArrayList;

public class Tab3Fragment extends Fragment {

    @Nullable
    @Override
    public View onCreateView(@NonNull LayoutInflater inflater, @Nullable ViewGroup container, @Nullable Bundle savedInstanceState) {
        return inflater.inflate(R.layout.fragment_tab3, container,false);
    }

    ArrayList<Tab3RecyclerItem> items = new ArrayList<>();

    RecyclerView recyclerView;
    Tab3RecyclerAdapeter adapeter;

    ArrayList<Tab3RecyclerItem> items2 = new ArrayList<>();

    RecyclerView recyclerView2;
    Tab3RecyclerAdapeter adapeter2;

    ArrayList<Tab3RecyclerItem> items3 = new ArrayList<>();

    RecyclerView recyclerView3;
    Tab3RecyclerAdapeter adapeter3;

    @Override
    public void onViewCreated(@NonNull View view, @Nullable Bundle savedInstanceState) {
        super.onViewCreated(view, savedInstanceState);

        recyclerView = view.findViewById(R.id.recyclerView1);
        adapeter = new Tab3RecyclerAdapeter(getActivity(),items);
        recyclerView.setAdapter(adapeter);

        recyclerView2 = view.findViewById(R.id.recyclerView2);
        adapeter2 = new Tab3RecyclerAdapeter(getActivity(),items2);
        recyclerView2.setAdapter(adapeter2);

        recyclerView3 = view.findViewById(R.id.recyclerView3);
        adapeter3 = new Tab3RecyclerAdapeter(getActivity(),items3);
        recyclerView3.setAdapter(adapeter3);

    }

    //onCreate()
    //프레그먼트가 화면을 만들기 전에 한번 실행되는 곳
    @Override
    public void onCreate(@Nullable Bundle savedInstanceState) {
        super.onCreate(savedInstanceState);

        //여기서 데이터를 추가
        items.add(new Tab3RecyclerItem("우니",R.drawable.uni));
        items.add(new Tab3RecyclerItem("우니2",R.drawable.uni));
        items.add(new Tab3RecyclerItem("우니3",R.drawable.uni));
        items.add(new Tab3RecyclerItem("우니4",R.drawable.uni));

        items2.add(new Tab3RecyclerItem("우니",R.drawable.uni));
        items2.add(new Tab3RecyclerItem("우니2",R.drawable.uni));
        items2.add(new Tab3RecyclerItem("우니3",R.drawable.uni));
        items2.add(new Tab3RecyclerItem("우니4",R.drawable.uni));
        items2.add(new Tab3RecyclerItem("우니4",R.drawable.uni));
        items2.add(new Tab3RecyclerItem("우니4",R.drawable.uni));

        items3.add(new Tab3RecyclerItem("우니",R.drawable.uni));
        items3.add(new Tab3RecyclerItem("우니2",R.drawable.uni));
        items3.add(new Tab3RecyclerItem("우니3",R.drawable.uni));
        items3.add(new Tab3RecyclerItem("우니4",R.drawable.uni));

    }
}