[1] 위치기반 서비스 LBS
- 이미 백그라운드에서 돌아가고 있는 서비스임
- 배그라운드로 돌아가고 있는 애들은 Service가 붙어 있음
- 위치 기반은 인터넷을 사용해서 퍼미션 받아야함

1. Location Manager
- Contenxt 안에 있음
- 플렛폼(운영체제)에 적용되어 있어서 버전이 업그레이드 되면 호환성문제가 생긴다
💡 디바이스에서 위치정보를 제공하는 장치 여러개이다 이런것들을 위치정보 제공자(Location Provider) 라고 부른다!
디바이스에서 제공하느 프로바이더의 종류들
1. gps : 인공위성을 이용하는 것, 실내에서 또는 날씨가 안좋으면 못함, 정확도 제일 정확
2. network : 위공위성이 안될 때 쓰는것 기지국을 기반으로해서 내 위치 찾음
3. passive : gps, metwork 다 안될때 쓴느 것, 언젠가 내가 다른 앱에서 얻었던 정보로 찾음
4. fused : 구글 지도에서 사용하고 있는 라이브러리, 가장 최신의 정보, 실외에선 gps 쓰고 실내에서는 네트위크로 바꾸는 거 알아서 해줌List<String> providers = locationManager.getAllProviders(); StringBuffer buffer = new StringBuffer(); for (String provider : providers) { buffer.append(provider + ", "); }

위치 정보 얻어오기 사용법
-
위치정보 관리자 객체 소환 (Context한테

얻어옴) -
퍼미션 받기 -> 근데 GPS용이 동적퍼미션임
-
동적퍼미션 작업하기
①ACCESS_FINE_LOCATION에 대한 퍼미션만 받으면 알아서 ACCESS_COARSE_LOCATION 퍼미션도 받아진다
int checkPermission = checkSelfPermission(퍼미션 받을 애); => 퍼미션 리턴 int 0/-1 로 옴
②PackageManager.PERMISSION_DENIED 거부되어 있을 경우 체크

③ 퍼미션 요청및 결과를 받아주는 대행사(permissionLauncher) 객체 생성

④ 프로바이더 종류별로 if 분기 처리
🧨 주의!) locationManager.getLastKnownLocation 도 퍼미션을 안받은 거 체크 꼭 해줘야 오류가 없어잠!!
void clickBtn() {
//여기서도 퍼미션을 안받은 거 체크 꼭 해줘야 오류가 없어잠!!
if (ActivityCompat.checkSelfPermission(this, Manifest.permission.ACCESS_FINE_LOCATION) != PackageManager.PERMISSION_GRANTED && ActivityCompat.checkSelfPermission(this, Manifest.permission.ACCESS_COARSE_LOCATION) != PackageManager.PERMISSION_GRANTED) {
return;
}
Location location = null;
//얜 int checkPermission = checkPermission(Manifest.permission.ACCESS_FINE_LOCATION);이 필요함
if (locationManager.isProviderEnabled("fused")) {
location = locationManager.getLastKnownLocation("fused"); //getLastKnownLocation : 이 메소드가 더 일반적
}else if( locationManager.isProviderEnabled("gps")){
location= locationManager.getLastKnownLocation("gps");
}else if( locationManager.isProviderEnabled("network")){
location= locationManager.getLastKnownLocation("network");
}
if( location == null ){
tv_my_locationInfo.setText("내 위치 못 찾겠어!");
}else{
//위도, 경도 얻어오기
double latitude= location.getLatitude();
double longitude= location.getLongitude();
tv_my_locationInfo.setText(latitude +" , " + longitude);
}
}실시간 위치 정보 얻어오기
requestLocationUpdates(provader, 얼마나 자주, 얼마나 움직이면, 로케이션 리스너)
① 프로바이더 별 requestLocationUpdates 분기처리
② 얘도 명시적으로 동적퍼미션 필요함
③ LocationListener 만들기

④ 실시간 위치 정보 그만 받기 위한 버튼

총 코드
package com.bsj0420.ex65locationmanager;
import androidx.activity.result.ActivityResultCallback;
import androidx.activity.result.ActivityResultLauncher;
import androidx.activity.result.contract.ActivityResultContracts;
import androidx.annotation.NonNull;
import androidx.appcompat.app.AppCompatActivity;
import androidx.core.app.ActivityCompat;
import android.Manifest;
import android.content.Context;
import android.content.pm.PackageManager;
import android.location.Location;
import android.location.LocationListener;
import android.location.LocationManager;
import android.os.Bundle;
import android.widget.TextView;
import android.widget.Toast;
import java.util.List;
public class MainActivity extends AppCompatActivity {
LocationManager locationManager;
TextView tv, tv_my_locationInfo, tv3;
@Override
protected void onCreate(Bundle savedInstanceState) {
super.onCreate(savedInstanceState);
setContentView(R.layout.activity_main);
tv = findViewById(R.id.tv);
tv3 = findViewById(R.id.tv3);
tv_my_locationInfo = findViewById(R.id.tv_my_locationInfo);
//위치정보 관리자 객체 소환
locationManager = (LocationManager) getSystemService(Context.LOCATION_SERVICE);
//디바이스에서 위치정보를 제공하는 장치 여러개
//이런것들을 위치정보 제공자(Location Provider) 라고 부름
//디바이스에서 제공하느 프로바이더의 종류들을 먼저 확인해보기
List<String> providers = locationManager.getAllProviders();
	StringBuffer buffer = new StringBuffer();
    for (String provider : providers) {
       buffer.append(provider + ", ");
    }
tv.setText(buffer.toString());
// 내 위치 얻어오기.
findViewById(R.id.btn).setOnClickListener(v -> clickBtn());
findViewById(R.id.btn_myLodation_load).setOnClickListener(v -> clickBtn2()); //위치 실시간 반영
findViewById(R.id.btn_end).setOnClickListener(v -> clickBtn3()); //위치 갱신 종료
// 위치정보제공에 대한 동적퍼미션
int checkPermission = checkSelfPermission(Manifest.permission.ACCESS_FINE_LOCATION); //얘만 받으면 코어스는 알아서 받아짐
if (checkPermission == PackageManager.PERMISSION_DENIED) { //거부되어 있다면...
permissionLauncher.launch(Manifest.permission.ACCESS_FINE_LOCATION);
}
}
//퍼미션 요청및 결과를 받아주는 대행사 객체 생성
ActivityResultLauncher<String> permissionLauncher = registerForActivityResult(new ActivityResultContracts.RequestPermission(), new ActivityResultCallback<Boolean>() {
@Override
public void onActivityResult(Boolean result) {
if (result) Toast.makeText(MainActivity.this, "위치 허용", Toast.LENGTH_SHORT).show();
else Toast.makeText(MainActivity.this, "위치정보 제공 불허", Toast.LENGTH_SHORT).show();
}
});
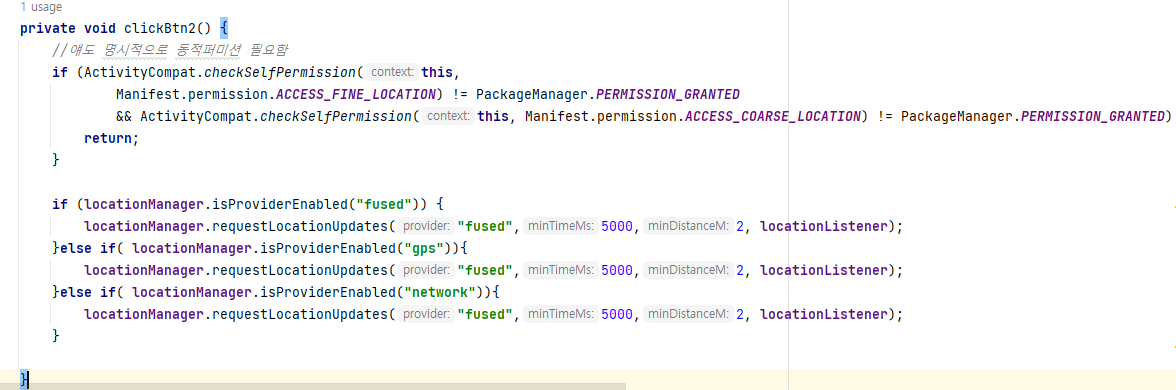
private void clickBtn2() {
//얘도 명시적으로 동적퍼미션 필요함
if (ActivityCompat.checkSelfPermission(this,
Manifest.permission.ACCESS_FINE_LOCATION) != PackageManager.PERMISSION_GRANTED
&& ActivityCompat.checkSelfPermission(this, Manifest.permission.ACCESS_COARSE_LOCATION) != PackageManager.PERMISSION_GRANTED) {
return;
}
if (locationManager.isProviderEnabled("fused")) {
locationManager.requestLocationUpdates("fused",5000,2, locationListener);
}else if( locationManager.isProviderEnabled("gps")){
locationManager.requestLocationUpdates("fused",5000,2, locationListener);
}else if( locationManager.isProviderEnabled("network")){
locationManager.requestLocationUpdates("fused",5000,2, locationListener);
}
}
//로케이션 리스너 중복사용 하기위해 따로 만듦
LocationListener locationListener = new LocationListener() {
@Override
public void onLocationChanged(@NonNull Location location) {
double latitud = location.getLatitude();
double longitude = location.getLongitude();
tv3.setText(latitud +" , " + longitude);
}
};
private void clickBtn3() {
//내 위치 자동 갱신 종료
locationManager.removeUpdates(locationListener);
}
void clickBtn() {

    //여기서도 퍼미션을 안받은 거 체크 꼭 해줘야 오류가 없어잠!!
    if (ActivityCompat.checkSelfPermission(this, Manifest.permission.ACCESS_FINE_LOCATION) != PackageManager.PERMISSION_GRANTED && ActivityCompat.checkSelfPermission(this, Manifest.permission.ACCESS_COARSE_LOCATION) != PackageManager.PERMISSION_GRANTED) {
            return;
        }

        Location location = null;
        //얜 int checkPermission = checkPermission(Manifest.permission.ACCESS_FINE_LOCATION);이 필요함
        if (locationManager.isProviderEnabled("fused")) {
            location = locationManager.getLastKnownLocation("fused"); //getLastKnownLocation : 이 메소드가 더 일반적
        }else if( locationManager.isProviderEnabled("gps")){
            location= locationManager.getLastKnownLocation("gps");
        }else if( locationManager.isProviderEnabled("network")){
            location= locationManager.getLastKnownLocation("network");
        }

        if( location == null ){
            tv_my_locationInfo.setText("내 위치 못 찾겠어!");
        }else{
            //위도, 경도 얻어오기
            double latitude= location.getLatitude();
            double longitude= location.getLongitude();

            tv_my_locationInfo.setText(latitude +" , " + longitude);
        }
    }
}2. Fused
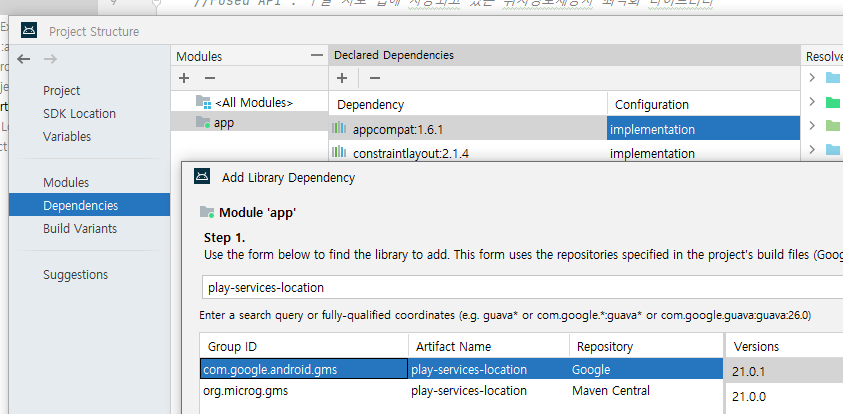
- 구글에 있는 API를 가지고 와서 하는 것
- 구글 지도 앱에 사용되고 있는 위치정보제공자 최적화 라이브러리
- 대부분 이거 더 많이 씀
- 구글 기능 라이브러리 추가 : play-services-location (File-Project Structure)
- 내 위치 실시간으로 얻어오려면 이게 젤 좋다
사용방법
① 구글 기능 라이브러리 추가 : play-service-location
② FusedLocationProviderClient providerClient; 참조변수로 등록
③ 동적 퍼미션 필수
1. 매니패스트에 등록
2. checkSelfPermission(매니패스트에쓴거)

- 퍼미션 요청 대행사 : 런처로 결과 받기
- registerForActivityResult(어떤것에 대한것인지 , 결과리스너)

④ 위치정보 최적화 객체 얻어오기

⑤ 위치정보 최적화를 위한 기준이 필요함 - 사용자의 요구사항이 제각각 일까봐

⑥ 위치 정보 갱신 요청

⑦ requestLocationUpdates()의 2번째 매개변수를 위한 애

⑧ 액티비티가 안보이면 자동 종료 콜백 메소드 : onPause

총 코드
package com.bsj0420.ex66locationfused;
import androidx.activity.result.ActivityResultCallback;
import androidx.activity.result.ActivityResultLauncher;
import androidx.activity.result.contract.ActivityResultContracts;
import androidx.annotation.NonNull;
import androidx.appcompat.app.AppCompatActivity;
import android.Manifest;
import android.content.pm.PackageManager;
import android.location.Location;
import android.os.Bundle;
import android.os.Looper;
import android.widget.TextView;
import android.widget.Toast;
import com.google.android.gms.location.FusedLocationProviderClient;
import com.google.android.gms.location.LocationCallback;
import com.google.android.gms.location.LocationRequest;
import com.google.android.gms.location.LocationResult;
import com.google.android.gms.location.LocationServices;
public class MainActivity extends AppCompatActivity {
//Fused API : 구글 지도 앱에 사용되고 있는 위치정보제공자 최적화 라이브러리
//구글 기능 라이브러리 추가 : play-service-location
FusedLocationProviderClient providerClient;
TextView tv;
@Override
protected void onCreate(Bundle savedInstanceState) {
super.onCreate(savedInstanceState);
setContentView(R.layout.activity_main);
tv = findViewById(R.id.tv);
findViewById(R.id.btn).setOnClickListener(view -> click());
}
private void click() {
//동적 퍼미션 필수
int permissionResult = checkSelfPermission(Manifest.permission.ACCESS_FINE_LOCATION);
if(permissionResult == PackageManager.PERMISSION_DENIED){
resultLauncher.launch(Manifest.permission.ACCESS_FINE_LOCATION); //퍼미션 요청
return;
}
//위치정보 최적화 객체 얻어오기
providerClient = LocationServices.getFusedLocationProviderClient(this);
//위치정보 최적화를 위한 기준이 필요함 - 사용자의 요구사항이 제각각 일까봐
LocationRequest locationRequest = LocationRequest.create();
locationRequest.setPriority(LocationRequest.PRIORITY_HIGH_ACCURACY); //우선 순위 - PRIORITY_HIGH_ACCURACY: 정확도
locationRequest.setInterval(5000); //갱신 주기
//위치 정보 갱신 요청
providerClient.requestLocationUpdates(locationRequest,locationCallback, Looper.getMainLooper());
//looper : 뱔도의 스레드로 움직임
}
//위치정보 갱신떄마다 발동하는 콜백 메소드 객체
LocationCallback locationCallback = new LocationCallback() {
@Override
public void onLocationResult(@NonNull LocationResult locationResult) {
super.onLocationResult(locationResult);
Location location = locationResult.getLastLocation();
double latitud = location.getLatitude();
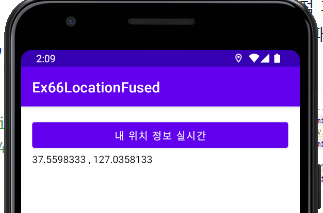
double longitude = location.getLongitude();
tv.setText(latitud +" , " + longitude);
}
};
//액티비티가 화면에서 안보이기 시작할 떄 자동으로 발동하는 콜백 메소드 : onPause
@Override
protected void onPause() {
super.onPause();
//자동 갱신 종료
if(providerClient!=null){ //시작 중일때만
providerClient.removeLocationUpdates(locationCallback);
}
}
//퍼미션 요청 대행사 : registerForActivityResult(어떤것에 대한것인지 , 결과리스너)
ActivityResultLauncher<String> resultLauncher = registerForActivityResult(new ActivityResultContracts.RequestPermission(), result -> {
if(result) Toast.makeText(this, "위치 허용", Toast.LENGTH_SHORT).show();
else Toast.makeText(this, "위치 불허", Toast.LENGTH_SHORT).show();
});
}
3. GeoCoder
-
위도 경도로 주소를 보여줌
-
플렛폼 라이브러리로 제공
-
지오코딩 작업은 구글 지도서버를 이용한다 -> 인터넷을 사용함 : 퍼미션을 받아야함(인터넷 정적퍼미션)

1) 주소 -> 좌표 [ 지오코딩 ]
geocoder.getFromLocationName(주소, 맥스결과);
맥스결과: 같은 좌표 안에 여러개의 주소( ex 상호가 여러개)가 등록되어 있을 수 있어서 좌료 결과 리스트로 반환
사용방법

① 지오코딩 해주는 녀석 부름 - 위치 안주면 전세계 탐색하느라 늦음

② 주소로 위도 경도 가져오기

③ 리스트로 넘어온 주소 출력

좌표 값으로 지도에 표현

- Intent로 지도앱으로 이동
- 인텐트 액션 값으로 존재
 private void clickMap() {

    //지도앱 실행 시키는 Inent
    Intent intent = new Intent(Intent.ACTION_VIEW); //지도앱만의 액션 값

    //지도의 좌표 uri
    Uri uri = Uri.parse("geo:"+ latitude +","+longitude+"?q="+latitude+","+longitude+"&z=10");
    //q : 좌표
    //zoom : 1~25

    intent.setData(uri);
    startActivity(intent);

    }
2) 좌표 -> 주소 [역 지오코딩]
geocoder.getFromLocation(위도,경도,맥스숫자)
사용방법

① 지오코딩 해주는 녀석 부름 - 위치 안주면 전세계 탐색하느라 늦음
② 좌표로 주소 가져오기 getFromLocation(위도,경도,맥스결과)

③ 리스트로 넘어온 주소 출력
-> 근데 주소 한번에 못가져 오고 나라/ 상세주소 등등 get따로 해야됨
총 코드
package com.bsj0420.ex66locationgeocoding;
import androidx.appcompat.app.AlertDialog;
import androidx.appcompat.app.AppCompatActivity;
import android.content.Intent;
import android.location.Address;
import android.location.Geocoder;
import android.net.Uri;
import android.os.Bundle;
import android.widget.EditText;
import java.io.IOException;
import java.util.List;
import java.util.Locale;
public class MainActivity extends AppCompatActivity {
EditText et_adrs, et_lat, et_lng;
Double latitude, longitude;
@Override
protected void onCreate(Bundle savedInstanceState) {
super.onCreate(savedInstanceState);
setContentView(R.layout.activity_main);
et_adrs = findViewById(R.id.et_adrs);
et_lat = findViewById(R.id.et_lat);
et_lng = findViewById(R.id.et_lng);
findViewById(R.id.btn).setOnClickListener(view -> clickBtn());
findViewById(R.id.btn2).setOnClickListener(view -> clickBtn2());
findViewById(R.id.btn_map).setOnClickListener(view -> clickMap());
}
//좌표 -> 주소 [역 지오코딩]
private void clickBtn2() {
double latitud = Double.parseDouble(et_lat.getText().toString());
double longitude= Double.parseDouble(et_lng.getText().toString());
//지오 코더만들기
Geocoder geocoder = new Geocoder(this, Locale.KOREA);
try {
List<Address> addresses =geocoder.getFromLocation(latitud,longitude,3);
StringBuffer buffer = new StringBuffer();
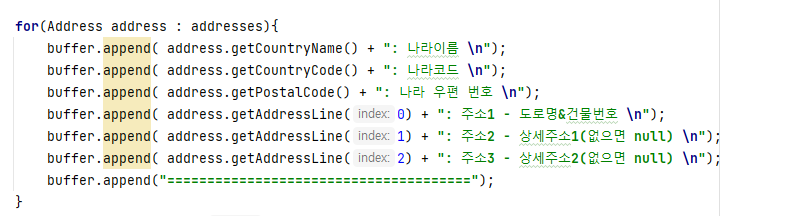
for(Address address : addresses){
buffer.append( address.getCountryName() + ": 나라이름 \n");
buffer.append( address.getCountryCode() + ": 나라코드 \n");
buffer.append( address.getPostalCode() + ": 나라 우편 번호 \n");
buffer.append( address.getAddressLine(0) + ": 주소1 - 도로명&건물번호 \n");
buffer.append( address.getAddressLine(1) + ": 주소2 - 상세주소1(없으면 null) \n");
buffer.append( address.getAddressLine(2) + ": 주소3 - 상세주소2(없으면 null) \n");
buffer.append("======================================");
}
new AlertDialog.Builder(this).setMessage(buffer.toString()).create().show();
} catch (IOException e) {
throw new RuntimeException(e);
}
}
//주소 -> 좌표 [ 지오코딩 ]
//지오코딩 작업은 구글 지도서버를 이용한다 -> 인터넷을 사용함 : 퍼미션을 받아야함(인터넷 정적퍼미션)
private void clickBtn() {
String addr = et_adrs.getText().toString(); //검색주소
//지오코딩 해주는 녀석 부름
Geocoder geocoder = new Geocoder(this, Locale.KOREA);
try {
List<Address> addresses = geocoder.getFromLocationName(addr, 3);
//getFromLocationName(주소, 맥스결과)
// - 맥스결과: 같은 좌표 안에 여러개의 주소( ex 상호가 여러개)가 등록되어 있을 수 있어서 좌료 결과 리스트로 반환
StringBuffer buffer = new StringBuffer();
for (Address address : addresses ) {
buffer.append(address.getLatitude() + ", " + address.getLongitude() + "\n");
}
//지도에 보여줄 좌표값 - 첫번째의 값 가져옴
latitude = addresses.get(0).getLatitude();
longitude = addresses.get(0).getLongitude();
new AlertDialog.Builder(this).setMessage(buffer.toString()).create().show();
} catch (IOException e) {
throw new RuntimeException(e);
}
}
//지도앱 실행!!
private void clickMap() {
//지도앱 실행 시키는 Inent
Intent intent = new Intent(Intent.ACTION_VIEW); //지도앱만의 액션 값
//지도의 좌표 uri
Uri uri = Uri.parse("geo:"+ latitude +","+longitude+"?q="+latitude+","+longitude+"&z=10");
//q : 좌표
//zoom : 1~25
intent.setData(uri);
startActivity(intent);
}
}
[2] Map API
1. Google
https://developers.google.com/?hl=ko
결제 계정 필요
projectStructure -> play-services-maps 추가
2. Naver
결제 계정 필요
3. Kakao
https://apis.map.kakao.com/android/guide/
AVD에선 안돌아감...
- 카카오 디벨롭에서 파일 다운받고 설정
- 매니패스트에서 설정
<?xml version="1.0" encoding="utf-8"?>
<manifest xmlns:android="http://schemas.android.com/apk/res/android"
    xmlns:tools="http://schemas.android.com/tools">

    <!-- 1. 퍼미션 추가 -->
    <uses-permission android:name="android.permission.INTERNET"/>
    <uses-permission android:name="android.permission.ACCESS_FINE_LOCATION"/>
    <!-- 2. 이것도 추가해야됨 -->
    <uses-permission android:name="android.permission.ACCESS_COARSE_LOCATION"/>
    <!-- 원래 동적퍼미션도 추가해야되지만 내 위치 기능 사용하지 않는다면 퍼미션 없어도 됨 -->

    <application
        android:allowBackup="true"
        android:dataExtractionRules="@xml/data_extraction_rules"
        android:fullBackupContent="@xml/backup_rules"
        android:icon="@mipmap/ic_launcher"
        android:label="@string/app_name"
        android:roundIcon="@mipmap/ic_launcher_round"
        android:supportsRtl="true"
        android:theme="@style/Theme.Ex68KakaoMap"
        tools:targetApi="31"
        android:usesCleartextTraffic="true">
        <!-- 3. 1.1 카카오 지도가 http를 사용함 때문에 http 사용하는 속성 필요 -->

        <activity
            android:name=".MainActivity"
            android:exported="true">
            <intent-filter>
                <action android:name="android.intent.action.MAIN" />

                <category android:name="android.intent.category.LAUNCHER" />
            </intent-filter>
        </activity>

        <!-- 4. 앱키 추가 : meta-data는 이곳에서 쓴다 -->
        <meta-data android:name="com.kakao.sdk.AppKey" android:value="XXXXXXXXXXXXXXXXXXXXXXXXXXXX"/>
    </application>

</manifest>-
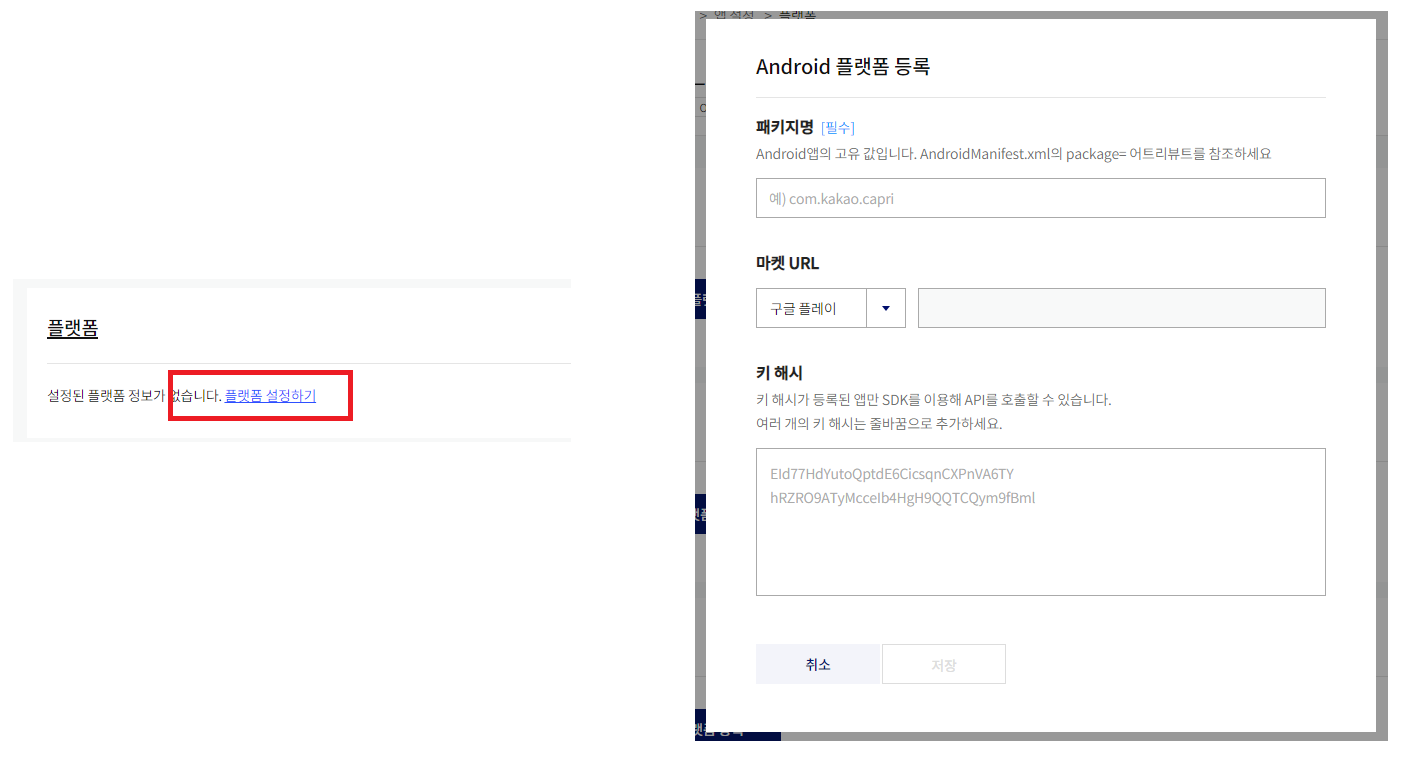
키발급하고 앱 플렛폼 등록
-
키 해시 등록
https://developers.kakao.com/docs/latest/ko/getting-started/sdk-android
🧨키 해시는 컴퓨터/릴리즈마다 다르다 (다 등록해줘야함)
- 지도 앱 다루기 (소스)
package com.bsj0420.ex68kakaomap;

import androidx.appcompat.app.AppCompatActivity;

import android.os.Bundle;
import android.util.Log;
import android.view.ViewGroup;

import com.kakao.util.maps.helper.Utility;

import net.daum.mf.map.api.MapPOIItem;
import net.daum.mf.map.api.MapPoint;
import net.daum.mf.map.api.MapView;

public class MainActivity extends AppCompatActivity {

    //카카오맵 API는 AVD에서 동작 안됨, 실 디바이스나 mac os의 M1, M2 환경에서 가능함

    //카카오 개발자 사이트의 가이드 문서를 통해서 따라하면 라이브러리를 추가

    @Override
    protected void onCreate(Bundle savedInstanceState) {
        super.onCreate(savedInstanceState);
        setContentView(R.layout.activity_main);

        //키 해시 값 얻어오기
        String keyHash = Utility.getKeyHash(this);
        Log.i("keyHash",keyHash);

        //맵뷰객체 생성 및 뷰그룹에 붙이기
        MapView mapView = new MapView(this);

        ViewGroup mapViewContainer = findViewById(R.id.container_mapview);
        mapViewContainer.addView(mapView);

        //여기까지만 작성해도 지도 보임 - AVD에선 안보이고 그냥 꺼짐...

        //가이드 문서에 지도를 다루는 코드들 소개되어 있음

        // 중심점 변경
        mapView.setMapCenterPoint(MapPoint.mapPointWithGeoCoord(37.53737528, 127.00557633), true);

        // 줌 레벨 변경
        mapView.setZoomLevel(7, true);

        // 중심점 변경 + 줌 레벨 변경
        mapView.setMapCenterPointAndZoomLevel(MapPoint.mapPointWithGeoCoord(37.5617, 127.8304), 7, true);

        // 줌 인
        mapView.zoomIn(true);

        // 줌 아웃
        mapView.zoomOut(true);

        //마커 표시하기 (POI)
        MapPOIItem marker = new MapPOIItem();
        marker.setItemName("나의 마커");
        marker.setTag(1);
        marker.setMapPoint(MapPoint.mapPointWithGeoCoord(37.5608,127.0345)); //위도 경도
        marker.setMarkerType(MapPOIItem.MarkerType.BluePin);
        marker.setSelectedMarkerType(MapPOIItem.MarkerType.YellowPin);

        mapView.addPOIItem(marker);
    }
}