[1]Layout
1. Relative Layout
- 기본적으로 좌측 상단에 놓는다
- ~의 왼쪽 ~오른쪽에 배치하기 위해 id가 필수
- 특정한 위치에 배치할 때 상대적으로 배치 가능
위치 선정
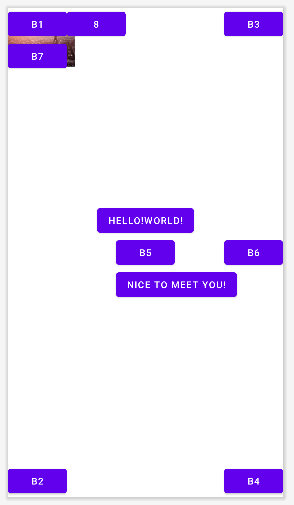
① layout_alignParentRight : 부모에 맞추기
② layout_centerVertical : 세로 센터
③ layout_centerHorizontal : 가로 센터
④ layout_centerInParent : 부모의 정중앙
⑤ layout_below : ~의 밑에
⑥ layout_toRightOf : ~의 오른쪽
⑦ layout_alignLeft : 정렬 맞추기
<?xml version="1.0" encoding="utf-8"?>
<RelativeLayout xmlns:android="http://schemas.android.com/apk/res/android"
    xmlns:app="http://schemas.android.com/apk/res-auto"
    xmlns:tools="http://schemas.android.com/tools"
    android:layout_width="match_parent"
    android:layout_height="match_parent"
    tools:context=".MainActivity">

    <!-- 기본 위치 -->
    <Button
        android:id="@+id/b1"
        android:layout_width="wrap_content"
        android:layout_height="wrap_content"
        android:text="b1"/>

    <!-- 화면 왼쪽 아래 -->
    <Button
        android:id="@+id/b2"
        android:layout_width="wrap_content"
        android:layout_height="wrap_content"
        android:text="b2"
        android:layout_alignParentBottom="true"/>

    <!-- 상단 오른쪽 -->
    <Button
        android:id="@+id/b3"
        android:layout_width="wrap_content"
        android:layout_height="wrap_content"
        android:text="b3"
        android:layout_alignParentRight="true"/>

    <!-- 화면 오른쪽 아래
    한번에 가는 방법은 없음 오른쪽으로 붙이고 아래로 내리기-->
    <Button
        android:id="@+id/b4"
        android:layout_width="wrap_content"
        android:layout_height="wrap_content"
        android:text="b4"
        android:layout_alignParentRight="true"
        android:layout_alignParentBottom="true"/>

    <!-- 정중앙 -->
    <Button
        android:id="@+id/b5"
        android:layout_width="wrap_content"
        android:layout_height="wrap_content"
        android:text="b5"
        android:layout_centerInParent="true"/>

    <!-- 화면 오른쪽 가운데 -->
    <Button
        android:id="@+id/b6"
        android:layout_width="wrap_content"
        android:layout_height="wrap_content"
        android:text="b6"
        android:layout_centerVertical="true"
        android:layout_alignParentRight="true"/>

    <!-- b1 버튼 밑에 -->
    <Button
        android:id="@+id/b7"
        android:layout_width="wrap_content"
        android:layout_height="wrap_content"
        android:text="b7"
        android:layout_below="@+id/b1"/>

    <!-- b1 버튼 오른쪽 -->
    <Button
        android:id="@+id/b8"
        android:layout_width="wrap_content"
        android:layout_height="wrap_content"
        android:text="8"
        android:layout_toRightOf="@+id/b1"/>

    <!-- b5 버튼 바로 위 -->
    <Button
        android:id="@+id/b9"
        android:layout_width="wrap_content"
        android:layout_height="wrap_content"
        android:text="Hello!World!"
        android:layout_above="@+id/b5"
        android:layout_centerHorizontal="true"/>

    <!-- 시작점 정렬 -->
    <Button
        android:id="@+id/b10"
        android:layout_width="wrap_content"
        android:layout_height="wrap_content"
        android:text="Nice to meet you!"
        android:layout_below="@+id/b5"
        android:layout_alignLeft="@id/b5"/>

    <!-- 원래는 마지막에 만든 애가 위에 오지만
     버튼은 우선순위가 높아서 위에 놓인다 -->
    <ImageView
        android:layout_width="100dp"
        android:layout_height="100dp"
        android:src="@drawable/paris"/>


</RelativeLayout>
2. Frame Layout
- Relative나 LinearLayout 보다 먼저 만들어짐
- 겹치는 특징말곤 아무런 능력이 없다
- 탭버튼과 함께 잘 씀 레이아웃 세개를 겹쳐놓고 visible을 사용해 보였다 안보였다하게 함
- 화면을 통째로 바꿀 때 쓴다
- Relative도 되지만 기능이 많아 더 무거워서 Frame을 쓴다!!
<?xml version="1.0" encoding="utf-8"?>
<LinearLayout xmlns:android="http://schemas.android.com/apk/res/android"
    xmlns:app="http://schemas.android.com/apk/res-auto"
    xmlns:tools="http://schemas.android.com/tools"
    android:layout_width="match_parent"
    android:layout_height="match_parent"
    tools:context=".MainActivity"
    android:padding="16dp"
    android:orientation="vertical">

    <LinearLayout
        android:layout_width="match_parent"
        android:layout_height="wrap_content"
        android:orientation="horizontal"
        android:gravity="center">

        <Button
            android:id="@+id/btn_syd"
            android:layout_width="wrap_content"
            android:layout_height="wrap_content"
            android:text="sydney"
            android:layout_marginRight="5dp"/>

        <Button
            android:id="@+id/btn_pr"
            android:layout_width="wrap_content"
            android:layout_height="wrap_content"
            android:text="paris"
            android:layout_marginRight="5dp"/>

        <Button
            android:id="@+id/btn_ny"
            android:layout_width="wrap_content"
            android:layout_height="wrap_content"
            android:text="newyork" />

    </LinearLayout>

    <FrameLayout
        android:layout_width="match_parent"
        android:layout_height="match_parent">

        <!-- 첫번째 화면 레이아웃 -->
        <LinearLayout
            android:id="@+id/sy"
            android:layout_width="match_parent"
            android:layout_height="match_parent"
            android:orientation="vertical"
            android:gravity="center">

            <ImageView
                android:layout_width="200dp"
                android:layout_height="200dp"
                android:src="@drawable/sydney"
                />

            <TextView
                android:layout_width="wrap_content"
                android:layout_height="wrap_content"
                android:text="시드니"
                android:textStyle="bold"
                android:textSize="24sp"
                android:textColor="@color/black"/>
        </LinearLayout>

        <!-- 두번째 화면 레이아웃 -->
        <LinearLayout
            android:id="@+id/pr"
            android:layout_width="match_parent"
            android:layout_height="match_parent"
            android:orientation="vertical"
            android:gravity="center"
            android:visibility="gone">

            <TextView
                android:layout_width="wrap_content"
                android:layout_height="wrap_content"
                android:text="파리"
                android:textStyle="bold"
                android:textSize="24sp"
                android:textColor="@color/black"/>

            <ImageView
                android:layout_width="200dp"
                android:layout_height="200dp"
                android:src="@drawable/paris"
                />

        </LinearLayout>

        <!-- 세번째 화면 레이아웃 -->
        <LinearLayout
            android:id="@+id/ny"
            android:layout_width="match_parent"
            android:layout_height="match_parent"
            android:orientation="vertical"
            android:gravity="center"
            android:visibility="gone">

            <ImageView
                android:layout_width="200dp"
                android:layout_height="200dp"
                android:src="@drawable/newyork"
                />

        </LinearLayout>

    </FrameLayout>


</LinearLayout>
package com.bsj0420.ex08framelayout;
import androidx.appcompat.app.AppCompatActivity;
import android.os.Bundle;
import android.view.View;
import android.widget.Button;
import android.widget.LinearLayout;
public class MainActivity extends AppCompatActivity {
Button btn_syd, btn_ny, btn_pr;
LinearLayout sy, pr, ny;
@Override
protected void onCreate(Bundle savedInstanceState) {
super.onCreate(savedInstanceState);
setContentView(R.layout.activity_main);
btn_syd = findViewById(R.id.btn_syd);
btn_ny = findViewById(R.id.btn_ny);
btn_pr = findViewById(R.id.btn_pr);
sy = findViewById(R.id.sy);
pr = findViewById(R.id.pr);
ny = findViewById(R.id.ny);
btn_syd.setOnClickListener(listener);
btn_ny.setOnClickListener(listener);
btn_pr.setOnClickListener(listener);
}
View.OnClickListener listener = new View.OnClickListener() {
@Override
public void onClick(View view) {
int id = view.getId();
if(id == R.id.btn_syd) {
sy.setVisibility(View.VISIBLE);
pr.setVisibility(View.GONE);
ny.setVisibility(View.GONE);
} else if (id == R.id.btn_ny) {
sy.setVisibility(View.GONE);
pr.setVisibility(View.GONE);
ny.setVisibility(View.VISIBLE);
} else if (id == R.id.btn_pr) {
sy.setVisibility(View.GONE);
pr.setVisibility(View.VISIBLE);
ny.setVisibility(View.GONE);
}
}
};
View.OnClickListener listener2 = new View.OnClickListener() {
@Override
public void onClick(View view) {
int id = view.getId();
sy.setVisibility(View.GONE);
pr.setVisibility(View.GONE);
ny.setVisibility(View.GONE);
if(id == R.id.btn_syd) sy.setVisibility(View.VISIBLE);
else if (id == R.id.btn_ny) ny.setVisibility(View.VISIBLE);
else if (id == R.id.btn_pr) pr.setVisibility(View.VISIBLE);
}
};
}3. Table Layout
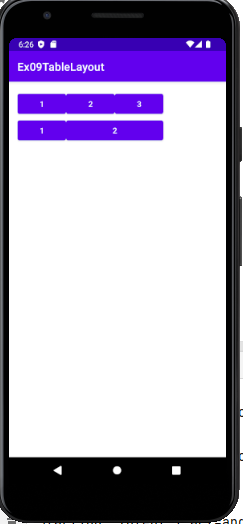
- TableLayout은 LinearLayout을 상속받음
- TableLayout은 기본적으로 vertical
- TableRow은 layout_width와 layout_height이 자동 warp_content이다
문제점
- 중첩 구조라 코드 좋지않다
- 세로 병합 안됨
화면 예제
<?xml version="1.0" encoding="utf-8"?>
<LinearLayout xmlns:android="http://schemas.android.com/apk/res/android"
    xmlns:app="http://schemas.android.com/apk/res-auto"
    xmlns:tools="http://schemas.android.com/tools"
    android:layout_width="match_parent"
    android:layout_height="match_parent"
    android:orientation="vertical"
    android:padding="16dp"
    tools:context=".MainActivity">

<!--    기본적으로 버티컬-->
    <TableLayout
        android:layout_width="match_parent"
        android:layout_height="156dp">

        <TableRow>
            <!-- layout_width와  layout_height이 자동 warp
            -->
            <Button android:text="1"></Button>
            <Button android:text="2"></Button>
            <Button android:text="3"></Button>
        </TableRow>ㅁ

        <TableRow>
            <Button android:text="1"></Button>
            <Button android:text="2" android:layout_span="2"></Button>
        </TableRow>

    </TableLayout>

</LinearLayout>
4. Grid Layout
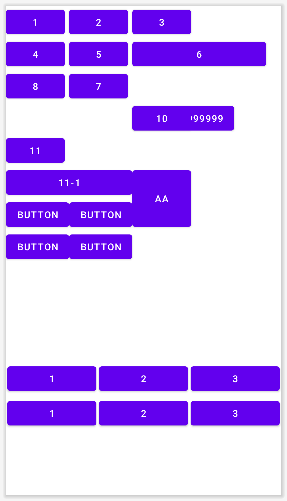
- Table Layout의 단점을 개선한 GridLayout
- 격자 배치 구조
- 세로 / 가로 병합 다 가능함
활용
<?xml version="1.0" encoding="utf-8"?>
<RelativeLayout xmlns:android="http://schemas.android.com/apk/res/android"
    xmlns:app="http://schemas.android.com/apk/res-auto"
    xmlns:tools="http://schemas.android.com/tools"
    android:layout_width="match_parent"
    android:layout_height="match_parent"
    tools:context=".MainActivity">

    <GridLayout
        android:layout_width="match_parent"
        android:layout_height="350dp"
        android:orientation="horizontal"
        android:columnCount="3">

        <!-- width,height은 자동 wrap_content : 생략가능 -->
        <Button android:text="1"/>
        <Button android:text="2"/>
        <Button android:text="3"/>
        <Button android:text="4"/>
        <Button android:text="5"/>
        <Button android:text="6" android:layout_width="200dp"/>

        <!-- 칸 위치를 지정할 수도 있음. -->
        <Button android:text="7" android:layout_column="1"/>
        <Button android:text="8" android:layout_column="0"/>

        <!-- 줄, 칸 위치 모두를 지정할 수 도 있음. -->
        <Button android:text="9999999999999" android:layout_row="3" android:layout_column="2"/>

        <!-- 줄, 칸을 지정하면 겹치게 배치도 가능함  -->
        <Button android:text="10" android:layout_row="3" android:layout_column="2"/>

        <!-- 칸 병합  : 공간만 차지하고 사이즈는 커지지않음
            칸 사이즈 늘리려면 layout_gravity="fill_horizontal" 속성을 준다
        -->
        <Button android:text="11" android:layout_columnSpan="2" />
        <Button android:text="11-1" android:layout_columnSpan="2" android:layout_gravity="fill_horizontal"/>

        <!-- 줄 병합 -->
        <Button android:text="aa" android:layout_rowSpan="2" android:layout_gravity="fill_vertical"/>

        <Button android:text="button"/>
        <Button android:text="button"/>
        <Button android:text="button"/>
        <Button android:text="button"/>

    </GridLayout>


    <!-- 가로축 균등하게 -->
    <GridLayout
        android:layout_alignParentBottom="true"
        android:layout_width="match_parent"
        android:layout_height="200dp"
        android:orientation="horizontal"
        android:columnCount="3">

        <Button android:text="1" android:layout_columnWeight="1" android:layout_margin="2dp"></Button>
        <Button android:text="2" android:layout_columnWeight="1" android:layout_margin="2dp"></Button>
        <Button android:text="3" android:layout_columnWeight="1" android:layout_margin="2dp"></Button>

    </GridLayout>


</RelativeLayout>
5. Constraint Layout
- 디자인 모드를 편하게 쓰기 위해서 등장
- Frame Layout 상속받아 만듦
- layout_constraintHorizontal_bias : 화면을 비율로 나눠 놓아주는 속성
화면 예제

<?xml version="1.0" encoding="utf-8"?>
<androidx.constraintlayout.widget.ConstraintLayout xmlns:android="http://schemas.android.com/apk/res/android"
    xmlns:app="http://schemas.android.com/apk/res-auto"
    xmlns:tools="http://schemas.android.com/tools"
    android:layout_width="match_parent"
    android:layout_height="match_parent"
    tools:context=".MainActivity">


    <Button
        android:id="@+id/b1"
        android:text="b1"
        android:layout_width="wrap_content"
        android:layout_height="wrap_content"
        app:layout_constraintTop_toTopOf="parent"
        app:layout_constraintLeft_toLeftOf="parent"
        android:layout_margin="5dp"/>

    <Button
        android:id="@+id/b2"
        android:text="b2"
        android:layout_width="wrap_content"
        android:layout_height="wrap_content"
        app:layout_constraintBottom_toBottomOf="parent"
        app:layout_constraintRight_toRightOf="parent"
        android:layout_margin="5dp"/>

    <Button
        android:id="@+id/b3"
        android:text="b3"
        android:layout_width="wrap_content"
        android:layout_height="wrap_content"
        app:layout_constraintLeft_toRightOf="@+id/b1"
        app:layout_constraintTop_toTopOf="parent"
        android:layout_margin="5dp"/>

    <Button
        android:id="@+id/b4"
        android:text="b4"
        android:layout_width="wrap_content"
        android:layout_height="wrap_content"
        app:layout_constraintLeft_toLeftOf="parent"
        app:layout_constraintRight_toRightOf="parent"
        app:layout_constraintTop_toTopOf="parent"
        app:layout_constraintBottom_toBottomOf="parent"/>

<Button
        android:id="@+id/b5"
        android:text="b4"
        android:layout_width="wrap_content"
        android:layout_height="wrap_content"
        app:layout_constraintLeft_toLeftOf="parent"
        app:layout_constraintRight_toRightOf="parent"
        app:layout_constraintTop_toTopOf="parent"
        app:layout_constraintBottom_toBottomOf="parent"
        app:layout_constraintHorizontal_bias="0.2"/>

</androidx.constraintlayout.widget.ConstraintLayout>
6. Scroll View
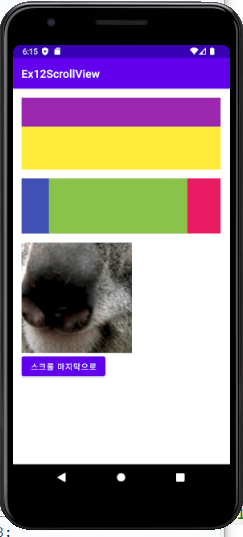
- View를 상속받은 애
- 기본 안드로이드는 스크롤 기능 없음
- 가로 스크롤은 안됨 (HorizontalScrollView 따로 존재)
☝ 스크롤 뷰 절대규칙 2가지
1. 스크롤 뷰 안에 자식뷰는 오직 1개만 놓을 수 있다
2. 높이 같은 무조건 wrap_content
ScrollView VS HorizontalScrollView
<?xml version="1.0" encoding="utf-8"?>
<LinearLayout xmlns:android="http://schemas.android.com/apk/res/android"
   xmlns:app="http://schemas.android.com/apk/res-auto"
   xmlns:tools="http://schemas.android.com/tools"
   android:layout_width="match_parent"
   android:layout_height="match_parent"
   android:orientation="vertical"
   android:padding="16dp"
   tools:context=".MainActivity">


   <!--
   스크롤 뷰 절대규칙 2가지
   1. 스크롤 뷰 안에 자식뷰는 오직 1개만 놓을 수 있다
   2. 높이 같은 무조건 wrap_content
   -->

   <ScrollView
       android:layout_width="match_parent"
       android:layout_height="130dp">

       <LinearLayout
           android:layout_width="match_parent"
           android:layout_height="wrap_content"
           android:orientation="vertical">

           <TextView
               android:layout_width="match_parent"
               android:layout_height="300dp"
               android:background="#FF0000"/>

           <TextView
               android:layout_width="match_parent"
               android:layout_height="300dp"
               android:background="#9C27B0" />

           <TextView
               android:layout_width="match_parent"
               android:layout_height="300dp"
               android:background="#FFEB3B"/>

       </LinearLayout>

   </ScrollView>

   <HorizontalScrollView
       android:layout_width="match_parent"
       android:layout_height="100dp"
       android:layout_marginTop="16dp">

       <!-- 자식객체 하나만, 너비는 무조건 warp_content -->
       <LinearLayout
           android:layout_width="wrap_content"
           android:layout_height="match_parent"
           android:orientation="horizontal">

           <TextView
               android:layout_width="250dp"
               android:layout_height="match_parent"
               android:background="#3F51B5"/>

           <TextView
               android:layout_width="250dp"
               android:layout_height="match_parent"
               android:background="#8BC34A"/>

           <TextView
               android:layout_width="250dp"
               android:layout_height="match_parent"
               android:background="#E91E63"/>

       </LinearLayout>


   </HorizontalScrollView>


   <!-- 가로세로 모두 되려면 중첩으로 사용  -->
   <ScrollView
       android:id="@+id/sc"
       android:layout_width="200dp"
       android:layout_height="200dp"
       android:layout_marginTop="16dp">

       <HorizontalScrollView
           android:layout_width="match_parent"
           android:layout_height="wrap_content">

           <ImageView
               android:src="@drawable/koala"
               android:layout_width="wrap_content"
               android:layout_height="wrap_content"/>

       </HorizontalScrollView>


   </ScrollView>


   <!-- 버튼 클릭하면 스크롤 끝가지 이동 -->
   <Button
       android:id="@+id/btn"
       android:layout_width="wrap_content"
       android:layout_height="wrap_content"
       android:text="스크롤 마지막으로"/>


</LinearLayout>
package com.bsj0420.ex12scrollview;
import androidx.appcompat.app.AppCompatActivity;
import android.os.Bundle;
import android.view.View;
import android.widget.Button;
import android.widget.ScrollView;
public class MainActivity extends AppCompatActivity {
ScrollView sc;
Button btn;
@Override
protected void onCreate(Bundle savedInstanceState) {
super.onCreate(savedInstanceState);
setContentView(R.layout.activity_main);
btn = findViewById(R.id.btn);
sc = findViewById(R.id.sc);
btn.setOnClickListener(new View.OnClickListener() {
@Override
public void onClick(View view) {
sc.fullScroll(View.FOCUS_DOWN); //맨 아래로
}
});
}
}
[2]CompoundButton(복합 버튼)
1. checkBox
- 멀티플 초이스용
- 기본 체크박스는 가로세로 wrap_content으로 만드는게 구글 권장사항
<?xml version="1.0" encoding="utf-8"?>
<LinearLayout xmlns:android="http://schemas.android.com/apk/res/android"
    xmlns:app="http://schemas.android.com/apk/res-auto"
    xmlns:tools="http://schemas.android.com/tools"
    android:layout_width="match_parent"
    android:layout_height="match_parent"
    tools:context=".MainActivity"
    android:orientation="vertical"
    android:padding="16dp">


    <CheckBox
        android:id="@+id/ch01"
        android:layout_width="wrap_content"
        android:layout_height="wrap_content"
        android:text="apple"
        android:checked="true"
        />

    <CheckBox
        android:id="@+id/ch02"
        android:layout_width="wrap_content"
        android:layout_height="wrap_content"
        android:text="Banana"
        />

    <CheckBox
        android:id="@+id/ch03"
        android:layout_width="wrap_content"
        android:layout_height="wrap_content"
        android:text="Orange"
        />

    <Button
        android:id="@+id/btn"
        android:layout_width="match_parent"
        android:layout_height="wrap_content"
        android:layout_marginTop="8dp"
        android:text="확인"/>

    <TextView
        android:id="@+id/tv"
        android:layout_width="wrap_content"
        android:layout_height="wrap_content"
        android:layout_gravity="center"
        android:textSize="26sp"
        android:padding="8dp"
        android:layout_marginTop="8dp"
        android:textColor="@color/black"
        android:textStyle="bold"/>


</LinearLayout>
package com.bsj0420.ex05compoundbotton;
import androidx.appcompat.app.AppCompatActivity;
import android.os.Bundle;
import android.view.View;
import android.widget.Button;
import android.widget.CheckBox;
import android.widget.CompoundButton;
import android.widget.TextView;
import android.widget.ToggleButton;
import java.util.ArrayList;
import java.util.List;
public class MainActivity extends AppCompatActivity {
//액티비틱 보여줄 뷰둘의 참조변수는 가급적 멤버변수로
CheckBox ch01 , ch02, ch03;
Button btn;
TextView tv;
@Override
protected void onCreate(Bundle savedInstanceState) {
super.onCreate(savedInstanceState);
setContentView(R.layout.activity_main);
ch01 = findViewById(R.id.ch01);
ch02 = findViewById(R.id.ch02);
ch03 = findViewById(R.id.ch03);
btn = findViewById(R.id.btn);
tv = findViewById(R.id.tv);
//미리 체크되도록 하는 법
ch03.setChecked(true);
//[1] 버튼을 클릭 했을 때 반응하기 위해서 버튼 클릭 이벤트를 듣는 리스너 객체를 생성 및 설정
btn.setOnClickListener(new View.OnClickListener() {
@Override
public void onClick(View view) {
//1. setText()는 글자를 바꿔치기 해서 한개 이상 안나옴
// if(ch01.isChecked()) tv.setText(ch01.getText().toString());
// if(ch02.isChecked()) tv.setText(ch02.getText().toString());
// if(ch03.isChecked()) tv.setText(ch03.getText().toString());
//2.
// String s = "";
// if(ch01.isChecked()) s += ch01.getText().toString();
// if(ch02.isChecked()) s += ch02.getText().toString();
// if(ch03.isChecked()) s += ch03.getText().toString();
//
// tv.setText(s);
}
});
//[2] 체크박스가 클릭될때마다 바뀌는 메소드
ch01.setOnCheckedChangeListener(changeListener);
ch02.setOnCheckedChangeListener(changeListener);
ch03.setOnCheckedChangeListener(changeListener);
//체크상태변경을 듣는 리스너 객체 생성 - 멤버변수 위치에
CompoundButton.OnCheckedChangeListener changeListener = new CompoundButton.OnCheckedChangeListener() {
@Override
public void onCheckedChanged(CompoundButton compoundButton, boolean b) { //(눌린애, boolean)
String s = "";
if(ch01.isChecked()) s += ch01.getText().toString();
if(ch02.isChecked()) s += ch02.getText().toString();
if(ch03.isChecked()) s += ch03.getText().toString();
tv.setText(s);
}
};
}2. radioBox
- 싱글 초이스용
- 만들때 한 그룹으로 묶어줘야함 radioGroup으로 만들어줘야하고 radioGroup은 LinearLayout을 상속받고 있다
- 라디오는 그룹 단위로 제어한다
라디오버튼 전용 리스너
두번째 파라미터 i = 선택된 라디오버튼의 아이디
<?xml version="1.0" encoding="utf-8"?>
<LinearLayout xmlns:android="http://schemas.android.com/apk/res/android"
    xmlns:app="http://schemas.android.com/apk/res-auto"
    xmlns:tools="http://schemas.android.com/tools"
    android:layout_width="match_parent"
    android:layout_height="match_parent"
    tools:context=".MainActivity"
    android:orientation="vertical"
    android:padding="16dp">

    <RadioGroup
        android:id="@+id/rdGp"
        android:layout_width="match_parent"
        android:layout_height="wrap_content"
        android:orientation="horizontal">

        <RadioButton
            android:id="@+id/rb_kor"
            android:text="대한민국"
            android:layout_width="wrap_content"
            android:layout_height="wrap_content"
            android:checked="true"/>

        <RadioButton
            android:id="@+id/rb_ame"
            android:text="미국"
            android:layout_width="wrap_content"
            android:layout_height="wrap_content"/>

        <RadioButton
            android:id="@+id/rb_ital"
            android:text="이탈리아"
            android:layout_width="wrap_content"
            android:layout_height="wrap_content"/>

    </RadioGroup>

    <Button
        android:id="@+id/btn"
        android:layout_width="match_parent"
        android:layout_height="wrap_content"
        android:layout_marginTop="8dp"
        android:text="확인"/>

    <TextView
        android:id="@+id/tv"
        android:layout_width="wrap_content"
        android:layout_height="wrap_content"
        android:layout_gravity="center"
        android:textSize="26sp"
        android:padding="8dp"
        android:layout_marginTop="8dp"
        android:textColor="@color/black"
        android:textStyle="bold"/>


    <!-- 점수 매기는 애 -->
    <RatingBar
        android:id="@+id/rating"
        android:layout_width="wrap_content"
        android:layout_height="wrap_content"
        android:numStars="6"
        android:stepSize="0.5"/>


</LinearLayout>
package com.bsj0420.ex06radiobutton;
import androidx.appcompat.app.AppCompatActivity;
import android.os.Bundle;
import android.view.View;
import android.widget.Button;
import android.widget.RadioButton;
import android.widget.RadioGroup;
import android.widget.RatingBar;
import android.widget.TextView;
public class MainActivity extends AppCompatActivity {
//라디오 그룹으로 제어함 라디오 버튼은 안불러와도 됨
RadioGroup rdGp;
// RadioButton rb_kor;
// RadioButton rb_ame;
// RadioButton rb_ital;
Button btn;
TextView tv;
@Override
protected void onCreate(Bundle savedInstanceState) {
super.onCreate(savedInstanceState);
setContentView(R.layout.activity_main);
rdGp = findViewById(R.id.rdGp);
btn = findViewById(R.id.btn);
tv = findViewById(R.id.tv);
//[1] 버튼 누를때마다 라디오버튼 제어
btn.setOnClickListener(new View.OnClickListener() {
@Override
public void onClick(View view) {
//라디오버튼 중에 선택된 녀석의 글씨를 얻어와서 텍스트뷰에 보여주기
//라디오그룹에게 체크된 라디오버튼의 id를 얻어오기
int id = rdGp.getCheckedRadioButtonId();
//체크된 id의 라디오버튼 객체를 참조하기
RadioButton rb = findViewById(id);
//텍스트뷰에 선택한 값 보여주기
tv.setText(rb.getText().toString());
}
});
//[2] 라디오그룹 전용 리스너
//라디오버튼 체크상태가 변경될때 마다 반응하는 리스너는 버튼들에 붙이지 말고
//라디오그룹에 붙여서 한번에 제어하는 것을 권장함
rdGp.setOnCheckedChangeListener(new RadioGroup.OnCheckedChangeListener() {
@Override
public void onCheckedChanged(RadioGroup radioGroup, int i) {
//두번째 파라미터 i: 선택된 라디오버튼의 아이디
RadioButton rb = findViewById(i);
tv.setText(rb.getText().toString());
}
});
//RatingBar 이벤트 처리 해보기
RatingBar ratingBar = findViewById(R.id.rating);
ratingBar.setOnRatingBarChangeListener(new RatingBar.OnRatingBarChangeListener() {
@Override
public void onRatingChanged(RatingBar ratingBar, float v, boolean b) {
//두번째 파라미터 v = 래이팅 값
tv.setText("별점 : "+ v);
}
});
}
}3. Toggle(switch)
<?xml version="1.0" encoding="utf-8"?>
<LinearLayout xmlns:android="http://schemas.android.com/apk/res/android"
    xmlns:app="http://schemas.android.com/apk/res-auto"
    xmlns:tools="http://schemas.android.com/tools"
    android:layout_width="match_parent"
    android:layout_height="match_parent"
    tools:context=".MainActivity"
    android:orientation="vertical"
    android:padding="16dp">

    <!-- 토글 버튼 -->
    <ToggleButton
        android:id="@+id/tgBtn"
        android:layout_width="wrap_content"
        android:layout_height="wrap_content"
        android:textOff="꺼짐"
        android:textOn="켜짐"/>

    <Switch
        android:layout_width="wrap_content"
        android:layout_height="wrap_content"
        android:text="사운드"/>

</LinearLayout>
package com.bsj0420.ex05compoundbotton;
import androidx.appcompat.app.AppCompatActivity;
import android.os.Bundle;
import android.view.View;
import android.widget.Button;
import android.widget.CheckBox;
import android.widget.CompoundButton;
import android.widget.TextView;
import android.widget.ToggleButton;
import java.util.ArrayList;
import java.util.List;
public class MainActivity extends AppCompatActivity {
//액티비틱 보여줄 뷰둘의 참조변수는 가급적 멤버변수로
CheckBox ch01 , ch02, ch03;
Button btn;
TextView tv;
ToggleButton tgBtn;
@Override
protected void onCreate(Bundle savedInstanceState) {
super.onCreate(savedInstanceState);
setContentView(R.layout.activity_main);
tv = findViewById(R.id.tv);
//[1] 버튼을 클릭 했을 때 반응하기 위해서 버튼 클릭 이벤트를 듣는 리스너 객체를 생성 및 설정
btn.setOnClickListener(new View.OnClickListener() {
@Override
public void onClick(View view) {
// 토글 버튼
tgBtn = findViewById(R.id.tgBtn);
tgBtn.setOnCheckedChangeListener(new CompoundButton.OnCheckedChangeListener() {
@Override
public void onCheckedChanged(CompoundButton compoundButton, boolean b) {
//두번째 파라미터 : boolean값 - 체크된 값 true/false
tv.setText("체크 상태 : " + b);
}
});
}
}
보조기억장치