Activity
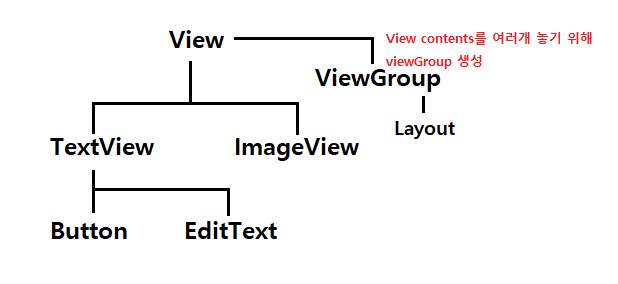
- 액티비티는 view 클래스의 능력을 상속받은 클래스들만 놓여질 수 있다
[1] 자바 VS XML 화면구성
자바로만 화면 꾸며보기
package com.bsj93.ex01hellobyjava;

import androidx.appcompat.app.AppCompatActivity;

import android.os.Bundle;
import android.text.Layout;
import android.view.View;
import android.view.ViewGroup;
import android.widget.Button;
import android.widget.LinearLayout;
import android.widget.TextView;

public class MainActivity extends AppCompatActivity {

    //화면에 보이는 뷰들의 참조변수는 가급적 멤버변수로
    TextView tv;
    Button btn;
    LinearLayout layout;

    @Override
    protected void onCreate(Bundle savedInstanceState) {
        super.onCreate(savedInstanceState);
        //setContentView(R.layout.activity_main);


        //자바언어만으로 화면 꾸며보기
        //액티비티는 view 클래스의 능력을 상속받은 클래스들만 놓여질 수 있다

        //글씨를 보여주는 TextView 객체로 생성 및 설정
        //모든 뷰들은 생성할 떄 context를 줘야함 : this
        tv = new TextView(this);
        tv.setText("Hello zito Hello");

        //액티비티에 tv붙이기
        //this.setContentView(tv); //this는 내거 안에서 구분할때 쓰는 거니까 생략 가능~!
        //setContentView(tv);

        //버튼기능을 가진 객체 생성 및 실행
        btn = new Button(this);
        btn.setText("클릭");

        //setContentView(btn); // set : 설정 - set을 하면 기존걸 지워버리고 내걸로 가라치기함

        //액티비티는 한번에 1개의 뷰만 놓여질 수 있다

        //2개 이상의 기능을 놓기 위해 ViewGroup을 쓴다
        //여러개인 뷰를 배치하려면 Layout ViewGroup 클래스 필요

        //그 중 LinearLayout 사용해보기
        layout= new LinearLayout(this);
        layout.setOrientation(LinearLayout.VERTICAL);

        //레이아웃에 뷰들을 추가
        layout.addView(tv);
        layout.addView(btn);

        setContentView(layout);

        //버튼 클릭했을 때 글씨 변경
        View.OnClickListener listener = new View.OnClickListener() {
            @Override
            public void onClick(View view) {
                //이 리스너가 감시하는 버튼의 클릭되면 자동발동하는 메소드
                tv.setText("bye zito bye bye");
            }
        };
        btn.setOnClickListener(listener);

    }
}
XML
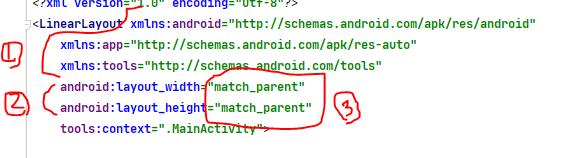
① 네임스페이스 설정
② view는 가로 세로 없음 무조건 에러
③ 수치 : 3가지 올 수 있다
- 숫자 쓰기 : dp(해상도 상관없는 애) 쓰는 것이 젤 좋음
- warpcontent : content사이즈 만하게
- match_parent : 부모 사이즈에 맞게 full로
☝ 단위 정하기
dp : view 크기, 해상도 상관없이 맞춰줌
sp : 글씨 사이즈, 핸드폰 설정 크기와 연동됨(16sp가 기준)
xml에 쓰이는 @은 R.class(리소스폴더 관리자) 를 부르는 애다
1) 자주쓰는 속성
<?xml version="1.0" encoding="utf-8"?>
<LinearLayout xmlns:android="http://schemas.android.com/apk/res/android"
    xmlns:app="http://schemas.android.com/apk/res-auto"
    xmlns:tools="http://schemas.android.com/tools"
    android:layout_width="match_parent"
    android:layout_height="match_parent"
    tools:context=".MainActivity"
    android:background="#F3F3F3"
    android:orientation="vertical">

    <!--
    1) background
    View 의 것
    ImageView - background는 이미지를 사이즈에 꽉 채움 : 조절안됨
    -->
    <TextView
        android:layout_width="match_parent"
        android:layout_height="wrap_content"
        android:textAlignment="center"
        android:textSize="30sp"
        android:text="안녕 시드니"
        android:textColor="#5C00FF"
        android:textStyle="bold"
        android:background="#FFEB3B"
        android:layout_marginTop="20dp"
        android:padding="16dp"/>

    <!--
    2) visibility 속성
    invisible : 글씨만 안보이기
    gone : 공간까지 숨기기
    -->
    <TextView
        android:layout_marginTop="15dp"
        android:layout_width="match_parent"
        android:layout_height="wrap_content"
        android:text="안녕하세요"
        android:textSize="24sp"
        android:textStyle="bold"
        android:textAlignment="center"
        android:visibility="invisible"
        />

    <ImageView
        android:layout_marginTop="15dp"
        android:layout_width="match_parent"
        android:layout_height="200dp"
        android:background="@drawable/sydney"
        />

    <!--
    3) gravity
    콘텐츠 정렬
    -->
    <TextView
        android:layout_width="match_parent"
        android:layout_height="wrap_content"
        android:text="콘텐츠 정렬"
        android:background="@color/purple_200"
        android:padding="8dp"
        android:textStyle="bold"
        android:gravity="center"/>


    <!--
    3) layout_gravity
    뷰정렬 layout 마다 다르게 보임
    -->
    <TextView
        android:layout_width="wrap_content"
        android:layout_height="wrap_content"
        android:padding="8dp"
        android:textStyle="bold"
        android:text="뷰 정렬"
        android:background="@color/teal_700"
        android:layout_gravity="center"/>

    <!--
    4) font 설정
    -->
    <TextView
        android:layout_width="match_parent"
        android:layout_height="wrap_content"
        android:padding="8dp"
        android:textStyle="bold"
        android:text="뷰 정렬"
        android:textSize="20sp"
        android:fontFamily="@font/aaa"
        android:background="@color/teal_200"
        android:layout_gravity="center"/>

    <!--
    5) 문자열을 xml파일로 만들어서 리소스 활용하기
       - 안드로이드는 하드코딩 싫어함
       - 국제화 등을 위해 따로 관리하길 권장함
       - Ctrl - : string에 등록한 글씨로 보임
         Ctrl + : string에 등록한 참조변수로 보임
    -->
    <TextView
        android:layout_width="match_parent"
        android:layout_height="wrap_content"
        android:padding="8dp"
        android:textStyle="bold"
        android:text="@string/text_view_stringRes"
        android:textSize="20sp"
        android:background="@color/purple_200"
        android:layout_gravity="center"/>

    <!--
    6) autoLink 주소
       하이퍼링크 걸기
    -->
    <TextView
        android:layout_width="match_parent"
        android:layout_height="wrap_content"
        android:text="www.naver.com"
        android:textSize="48sp"
        android:autoLink="web"/>


</LinearLayout>
☝ red 폴더 추가
res는 내가 마음대로 폴더를 만들 수 없다 res가 가진 모든 폴더 찾아 추가하기

2) 버튼 클릭 시 텍스트 변경
<?xml version="1.0" encoding="utf-8"?>
<LinearLayout xmlns:android="http://schemas.android.com/apk/res/android"
    xmlns:app="http://schemas.android.com/apk/res-auto"
    xmlns:tools="http://schemas.android.com/tools"
    android:layout_width="match_parent"
    android:layout_height="match_parent"
    android:orientation="vertical"
    android:padding="16dp"
    tools:context=".MainActivity">

    <TextView
    	android:id="@+id/textView_tv"
        android:layout_width="match_parent"
        android:layout_height="wrap_content"
        android:text="Hello"
        android:textSize="30sp"
        android:gravity="center"
        android:textStyle="bold"
        android:textColor="@color/black"
        android:layout_marginTop="200dp"/>

    <!-- 버튼은 text 다 대문자로 나옴
    android:textAllCaps="false" => 내가 쓴대로 나옴
    -->
    <Button
    	android:id="@+id/button_btn"
        android:layout_width="match_parent"
        android:layout_height="wrap_content"
        android:text="Button"
        android:textAllCaps="false"
        android:textStyle="bold"
        android:textSize="16sp"
        android:layout_margin="48dp"/>
</LinearLayout>
🧨 xml 언어를 통해 만든 view 객체들을 찾아와서 참조변수에 대입해줘야함!!!!!!(핵심!!!)
-> activity는 객체를 찾는 메소드를 갖고 있다
findViewById(R.id.idName)
💡 id를 R. 해서 부르는 이유
리소스는 R.java라는 애가 관리한다
R은 자바로 만들어진 애라 class파일을 가지고 있다
R의 class 파일 안에는 res의 폴더 이름이 변수명인 이너클래스(static)로 관리하고 그것들에 저장된 애들한테 번호(int로)를 매겨 관리한다 abcd 순서로 가져다 놓음
package com.bsj93.ex01hellobyjava;

import androidx.appcompat.app.AppCompatActivity;

import android.os.Bundle;
import android.text.Layout;
import android.view.View;
import android.view.ViewGroup;
import android.widget.Button;
import android.widget.LinearLayout;
import android.widget.TextView;

public class MainActivity extends AppCompatActivity {

    //화면에 보이는 뷰들의 참조변수는 가급적 멤버변수로
    TextView tv;
    Button btn;
    LinearLayout layout;

    @Override
    protected void onCreate(Bundle savedInstanceState) {
        super.onCreate(savedInstanceState);
        //setContentView(R.layout.activity_main);


        //자바언어만으로 화면 꾸며보기
        //액티비티는 view 클래스의 능력을 상속받은 클래스들만 놓여질 수 있다

        //글씨를 보여주는 TextView 객체로 생성 및 설정
        //모든 뷰들은 생성할 떄 context를 줘야함 : this
        tv = new TextView(this);
        tv.setText("Hello zito Hello");

        //액티비티에 tv붙이기
        //this.setContentView(tv); //this는 내거 안에서 구분할때 쓰는 거니까 생략 가능~!
        //setContentView(tv);

        //버튼기능을 가진 객체 생성 및 실행
        btn = new Button(this);
        btn.setText("클릭");

        //setContentView(btn); // set : 설정 - set을 하면 기존걸 지워버리고 내걸로 가라치기함

        //액티비티는 한번에 1개의 뷰만 놓여질 수 있다

        //2개 이상의 기능을 놓기 위해 ViewGroup을 쓴다
        //여러개인 뷰를 배치하려면 Layout ViewGroup 클래스 필요

        //그 중 LinearLayout 사용해보기
        layout= new LinearLayout(this);
        layout.setOrientation(LinearLayout.VERTICAL);

        //레이아웃에 뷰들을 추가
        layout.addView(tv);
        layout.addView(btn);

        setContentView(layout);

        //버튼 클릭했을 때 글씨 변경
        View.OnClickListener listener = new View.OnClickListener() {
            @Override
            public void onClick(View view) {
                //이 리스너가 감시하는 버튼의 클릭되면 자동발동하는 메소드
                tv.setText("bye zito bye bye");
            }
        };
        btn.setOnClickListener(listener);

    }
}
보조기억장치