React.js
Today I Learned ... react.js
🙋♂️ Reference Book
🙋 My Dev Blog
리액트를 다루는 기술 DAY 18
- Redux Middleware
Redux 미들웨어
- 미들웨어에서는 특정 조건에 따라 액션을 무시할수도 있고, 특정 조건에 따라 액션 정보를 가로채서 변경한 후 리듀서에게 전달할 수도 있음.
-> 이러한 리덕스 미들웨어의 속성을 사용하여 네트워크 요청 등의 비동기 작업을 관리하면 유용.
redux-logger 사용
- 우리가 직접 생성한 loggerMiddleware.js 보다 훨씬 잘 만들어진 라이브러리임.
$ yarn add redux-loggerindex.js
import React from 'react';
import ReactDOM from 'react-dom/client';
import App from './App';
import './index.css'
import { applyMiddleware, createStore } from 'redux';
import { Provider } from 'react-redux';
import rootReducer from './modules';
// import loggerMiddleWare from './lib/loggerMiddleware';
import { createLogger } from 'redux-logger';


const logger = createLogger();
const store = createStore(rootReducer, applyMiddleware(logger));

const root = ReactDOM.createRoot(document.getElementById('root'));
root.render(
  <Provider store={store}>
    <App />
  </Provider>
);- redux-logger 라이브러리의
createLogger함수를 임포트한 후,
const logger= createLogger();을 해서 applyMiddleware 함수의 인자로 넣어줌.
console창 결과
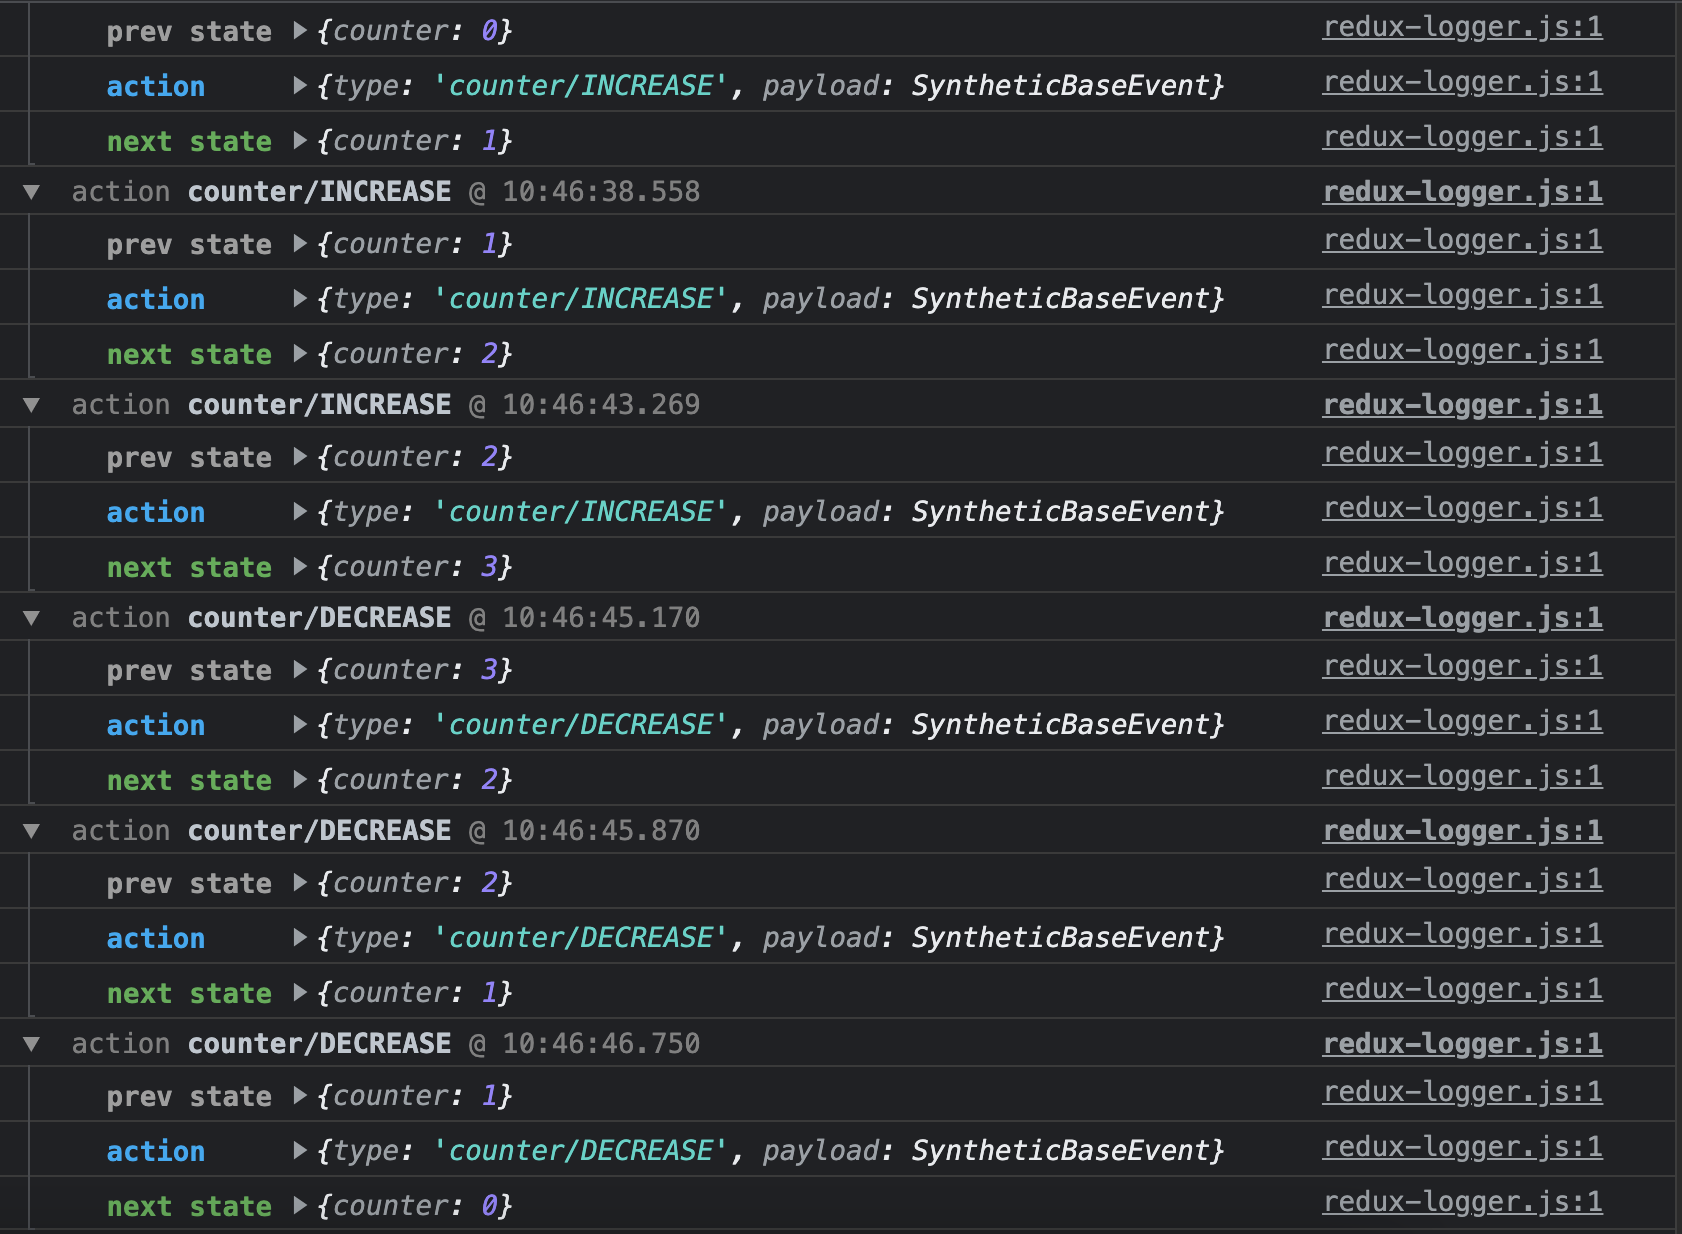 - 콘솔에 색상도 입혀지고, 액션 타입 뒤에 액션 디스패치 시간도 나타남.
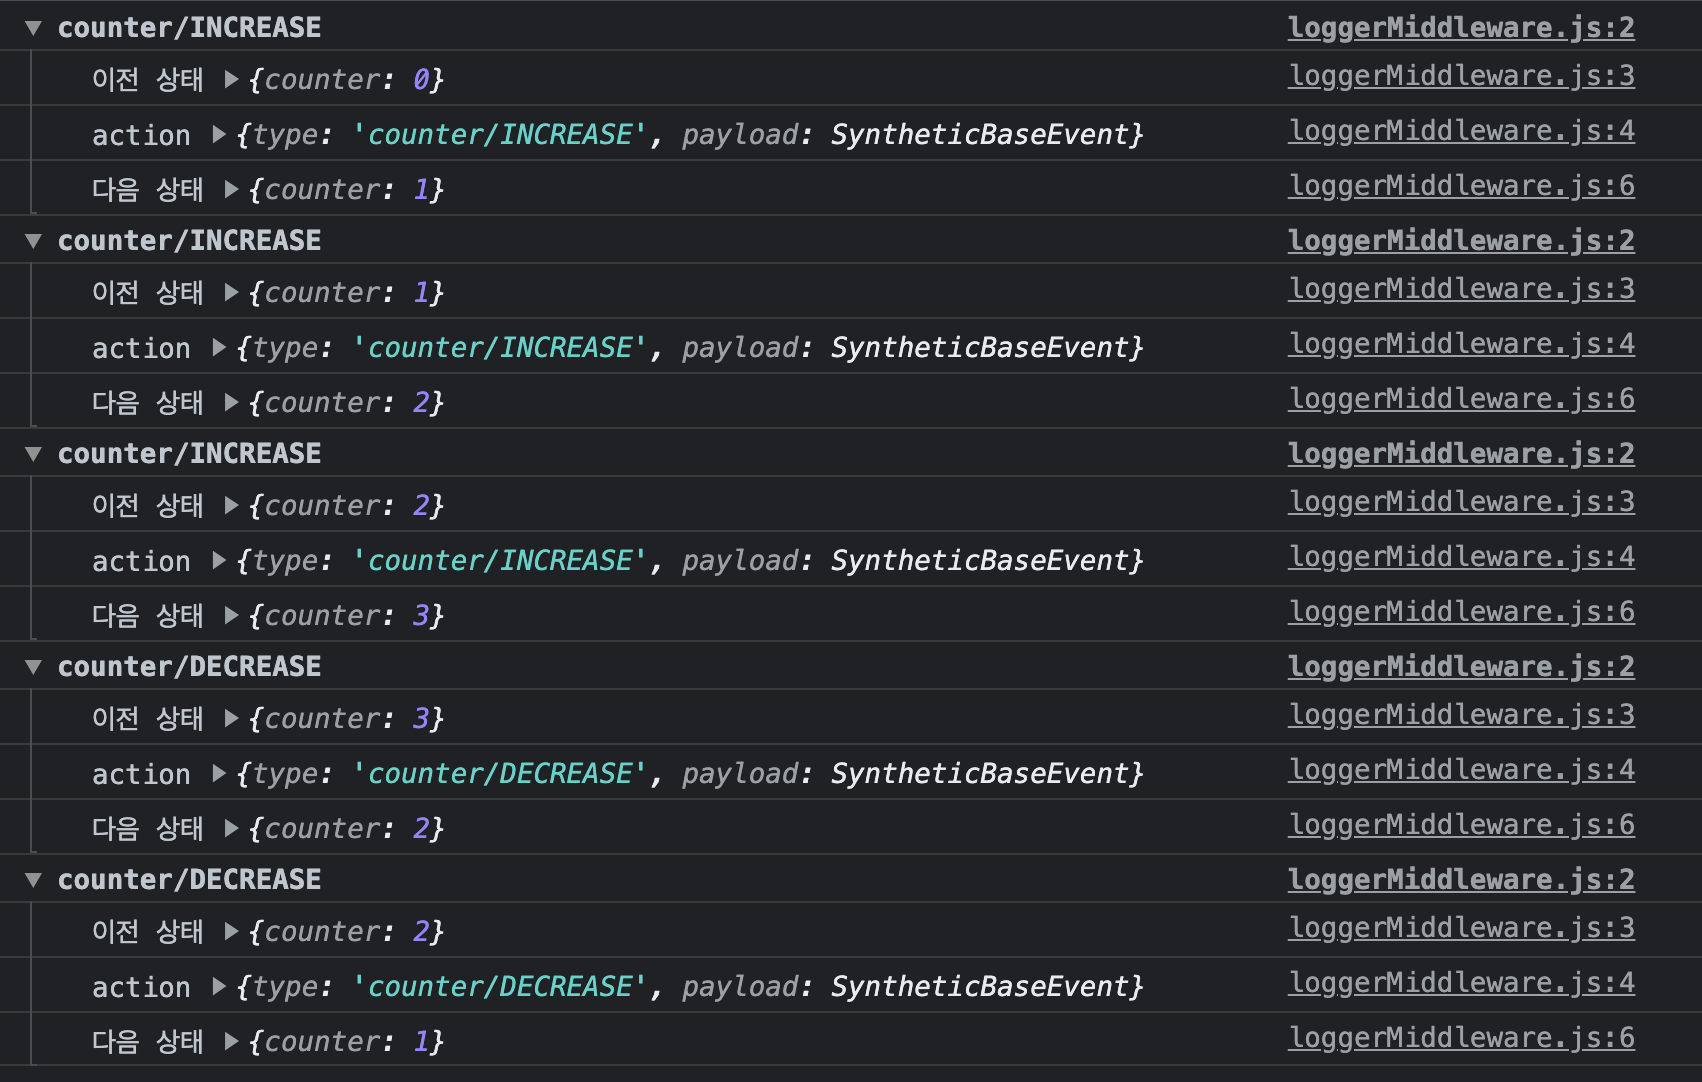
cf- loggerMiddleware.js 사용시
- 여기서는 직접 loggerMiddleware.js 에서 console.group과 console.log로 작성해줬었음.
비동기 작업을 처리하는 미들웨어
- 비동기 작업시 도움을 주는 미들웨어는 매우 다양함.
- 이 프로젝트에서는
redux-thunk와redux-saga를 사용함.
| redux-thunk | redux-saga |
|---|---|
| 객체가 아닌 함수형태의 액션을 디스패치 해줌 | 특정 액션이 디스패치 될 때, 정해진 로직에 따라 다른 액션을 디스패치 시키는 규칙을 작성하여 비동기 작업 처리 |
1. redux-thunk
- 리덕스의 창시자인 Dan Abranmov가 만든 라이브러리.
- 공식 메뉴얼에서도 이 미들웨어로 비동기 작업을 다룸.
🙋♂️ Thunk 란?
- 특정 작업을 나중에 할 수 있도록 미루기 위해서 함수 형태로 감싼 형태.
-> 함수가 호출되어야만 실행됨. (함수를 리턴하는 함수. 고차함수)
- redux-thunk 라이브러리를 사용하면 thunk 함수를 생성해서 디스패치 할 수 있다.
-> 리덕스 미들웨어가 thunk 함수를 전달받아 store.dispatch와 store.getState를 인자로 넣어 호출해줌.
const sampleThunk = () => (dispatch, getState) => {
 	// 현재 state 참조 가능
    // 새 액션 디스패치 가능
}
redux-thunk 미들웨어 적용
1) 패키지 설치
$ yarn add redux-thunk2) import ReduxThunk
index.js
import React from 'react';
import ReactDOM from 'react-dom/client';
import App from './App';
import './index.css'
import { applyMiddleware, createStore } from 'redux';
import { Provider } from 'react-redux';
import rootReducer from './modules';
// import loggerMiddleWare from './lib/loggerMiddleware';
import { createLogger } from 'redux-logger';
import ReduxThunk from 'redux-thunk';


const logger = createLogger();
const store = createStore(rootReducer, applyMiddleware(logger, ReduxThunk));

const root = ReactDOM.createRoot(document.getElementById('root'));
root.render(
  <Provider store={store}>
    <App />
  </Provider>
);- createStore(rootReducer, applyMiddleware(logger, ReduxThunk))
-> applyMiddleware 함수의 두번째 인자로ReduxThunk를 넣어줌.
3) Thunk 생성함수
redux-thunk의 액션 생성함수는 일반 액션 객체를 반환하지 않고, 함수를 반환함.- counter 모듈의 액션 생성함수인 increaseAsync, decreaseAsync 함수를 만들어보자.
modules/counter.js
// Thunk 함수 (=고차함수. 두번째 인자로 dispatch, getState를 줄수있음)
export const increaseAsync = () => dispatch => {
    setTimeout(() => {
        dispatch(increase());
    }, 1000);
};

export const decreaseAsync = () => dispatch => {
    setTimeout(() => {
        dispatch(decrease());
    }, 1000);
};
4) CounterContainer 수정
container/CounterContainer.js
import { connect } from "react-redux";
import { increaseAsync, decreaseAsync } from "../modules/counter";
import Counter from "../components/Counter";

const CounterContainer = ({ number, increaseAsync, decreaseAsync }) => {
    return (
        <Counter
            number={number}
            onIncrease={increaseAsync}
            onDecrease={decreaseAsync}
        />
    );
};

export default connect(
    state => ({
        number: state.counter
    }),
    {
        increaseAsync,
        decreaseAsync
    }
)(CounterContainer);
console창 결과
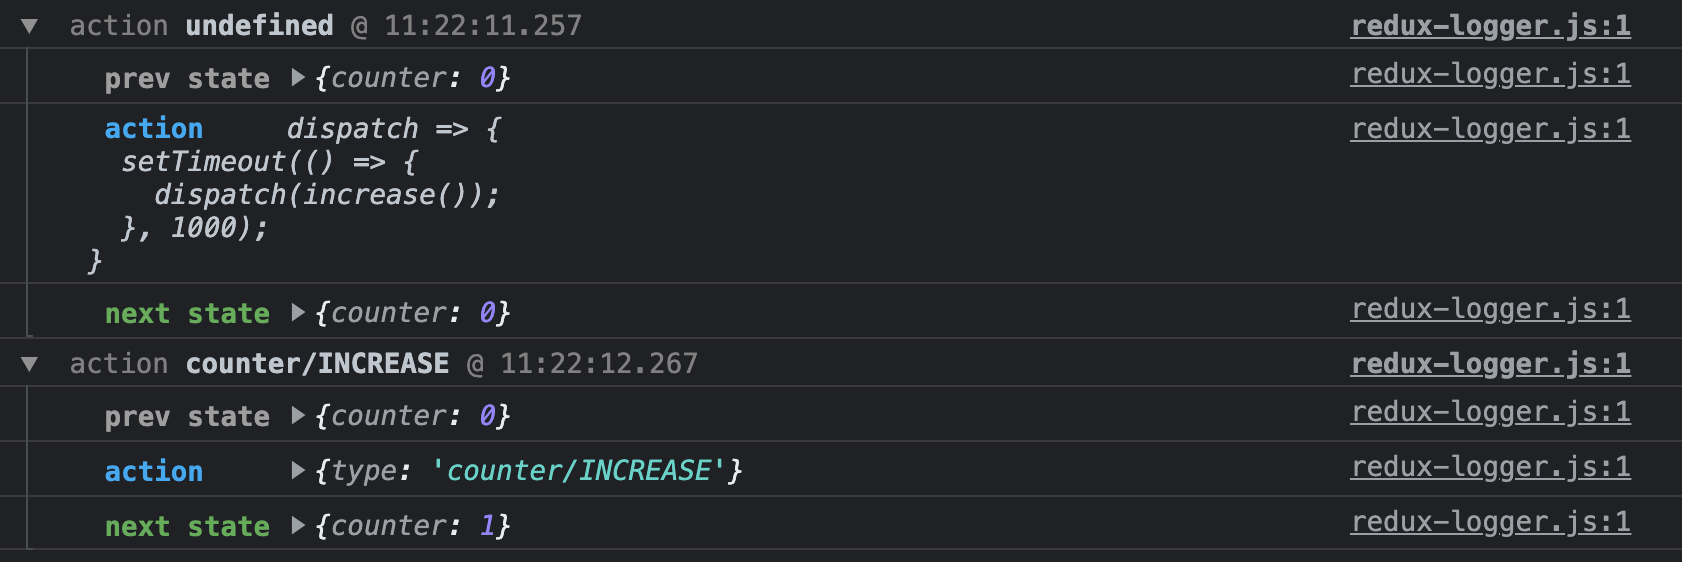
- 처음에 +1버튼을 누르면 콘솔이 찍히는데, prev state, next state 모두 0이다.
-> 이때 action 객체를 보면dispatch => { setTimeout(...)}함수임을 알 수 있다.
-
즉, increaseAsync함수는 액션 생성함수지만 함수를 리턴한다.
-> 리턴한 함수에 의해 1초 후에 액션 객체가 생성되는 것. -
1초 후, 1이 증가하면서 콘솔이 다시 한번 찍힌다.
-> action 객체를 보면 정상적으로 객체타입이 나온다.
웹 요청 비동기 작업 처리 (axios)
- JSONPlaceholder 에서 제공하는 가짜 API를 사용.
- API 호출시 주로 Promise 기반 웹 클라이언트인
axios를 사용함.
🔺 Axios란?
Axios는 node.js와 브라우저를 위한 Promise 기반 HTTP 클라이언트 입니다.
서버 사이드에서는 네이티브 node.js의 http 모듈을 사용하고,
클라이언트(브라우저)에서는 XMLHttpRequests를 사용합니다.
1. API 함수화
$ yarn add axioslib/api.js
import axios from 'axios';

export const getPost = id =>
    axios.get(`https://jsonplaceholder.typicode.com/posts/${id}`);

export const getUsers = id =>
    axios.get(`https://jsonplaceholder.typicode.com/users`);
= API를 모두 함수화 해줌.
각 API를 호출하는 함수를 따로 작성하면, 나중에 사용할 때 가독성도 좋고 유지보수도 용이함.
2. 리듀서 생성
- API를 사용하여 데이터를 받아와 상태를 관리할 리듀서 생성.
modules/sample.js
import { handleActions } from 'redux-actions';
import * as api from '../lib/api';

// 액션 타입 선언. (한 request당 3개의 액션)

const GET_POST = 'sample/GET_POST';
const GET_POST_SUCCESS = 'sample/GET_POST_SUCCESS';
const GET_POST_FAILURE = 'sample/GET_POST_FAILURE';

const GET_USERS = 'smaple/GET_USERS';
const GET_USERS_SUCCESS = 'smaple/GET_USERS_SUCCESS';
const GET_USERS_FAILURE = 'smaple/GET_USERS_FAILURE';


// thunk 함수 생성 (함수를 리턴하는 액션 생성함수)

export const getPost = id => async dispatch => {
    dispatch({ type: GET_POST }); // 요청 시작
    try {
        const response = await api.getPost(id);
        dispatch({
            type: GET_POST_SUCCESS,
            payload: response.data
        });
    } catch (e) {
        dispatch({
            type: GET_POST_FAILURE,
            payload: e,
            error: true
        });
        throw e;
    }
};

export const getUsers = () => async dispatch => {
    dispatch({ type: GET_USERS }); // 요청 시작
    try {
        const response = await api.getUsers();
        dispatch({
            type: GET_USERS_SUCCESS,
            payload: response.data
        });
    } catch (e) {
        dispatch({
            type: GET_USERS_FAILURE,
            payload: e,
            error: true
        });
        throw e;
    }
};

// initialState 선언

const initialState = {
    loading: {
        GET_POST: false,
        GET_USERS: false
    },
    post: null,
    users: null
};


// reducer 함수
const sample = handleActions(
    {
        [GET_POST]: state => ({
            ...state,
            loading: {
                ...state.loading,
                GET_POST: true
            }
        }),
        [GET_POST_SUCCESS]: (state, action) => ({
            ...state,
            loading: {
                ...state.loading,
                GET_POST: false // 로딩 완료(요청완료)
            },
            post: action.payload
        }),
        [GET_POST_FAILURE]: (state, action) => ({
            ...state,
            loading: {
                ...state.loading,
                GET_POST: false
            },
        }),

        [GET_USERS]: state => ({
            ...state,
            loading: {
                ...state.loading,
                GET_USERS: true
            }
        }),
        [GET_USERS_SUCCESS]: (state, action) => ({
            ...state,
            loading: {
                ...state.loading,
                GET_USERS: false
            },
            users: action.payload
        }),
        [GET_USERS_FAILURE]: (state, action) => ({
            ...state,
            loading: {
                ...state.loading,
                GET_USERS: false
            },
        })
    },
    initialState
);

export default sample;
⚡️ thunk 함수 형태
export const thunkFunc = () => (async) dispatch => {
	// 비동기 안에 dispatch()
  	// setTimeout 또는 (async의 경우) await / try-catch
}
3. rootReducer로 합쳐줌
modules/index.js
import { combineReducers } from 'redux';
import counter from './counter';
import sample from './sample';

const rootReducer = combineReducers({
    counter,
    sample
});

export default rootReducer;
4. 프레젠테이셔널 컴포넌트 작성
components/Sample.js
const Sample = ( loadingPost, loadingUsers, post, users ) => {

    return (
        <div>
            <section>
                <h1>포스트</h1>
                {loadingPost && '로딩 중...'}
                {!loadingPost && post && (
                    <div>
                        <h3>{post.title}</h3>
                        <h3>{post.body}</h3>
                    </div>
                )}
            </section>
            <hr />
            <section>
                <h1>사용자 목록</h1>
                {loadingUsers && '로딩중 ...'}
                {!loadingUsers && users && (
                    <ul>
                        {users.map(user => (
                            <li key={user.id}>
                                {user.username} ({user.email})
                            </li>
                        ))}
                    </ul>
                )}
            </section>
        </div>
    );
}

export default Sample;- 데이터를 불러와서 렌더링 할때는 유효성 검사를 해줘야 함.
{!loadingUsers && users && (
  // JSX
 }
-> 아직 users가 undefined 인데 user.id나 user.email을 불러오려면 에러가 발생함.
또한, map 함수에 undefined가 들어가면 에러가 발생될 수 있음.
5. 컨테이너 컴포넌트 생성
containers/SampleContainer.js
import { useEffect } from "react";
import { connect } from "react-redux";
import Sample from "../components/Sample";

import { getPost, getUsers } from '../modules/sample'; // thunk 함수

const SampleContainer = ({
    getPost,
    getUsers,
    post,
    users,
    loadingPost,
    loadingUsers
}) => {

    useEffect(() => {
        getPost(1);
        getUsers(1);
    }, [getPost, getUsers]);

    return (
        <Sample
            post={post}
            users={users}
            loadingPost={loadingPost}
            loadingUsers={loadingUsers}
        />
    );
}

export default connect(
    ({ sample }) => ({
        post: sample.post,
        users: sample.users,
        loadingPost: sample.loading.GET_POST,
        loadingUsers: sample.loading.GET_USERS
    }),
  {
    getPost,
    getUsers
  }
)(SampleContainer);
6. App 렌더링
- CounterContainer을 대신 SampleContainer을 렌더링함.
App.js
import SampleContainer from "./containers/SampleContainer";

function App() {
  return (
    <div>
      <SampleContainer/>
    </div>
  );
}

export default App;
리팩토링
- API를 요청할 때 마다 thunk 함수를 작성하는 것과, 로딩 상태(loadingPost, loadingUsers)를 reduce 함수에서 관리하는 것은 번거로움.
-> 반복되는 로직이므로, 따로 분리하여 코드의 양을 줄일 수 있음.
creteRequsetThunk 모듈 생성
lib/createRequestThunk.js
export default function createRequestThunk(type, request) {
    // 성공 및 실패 액션타입 정의
    const SUCCESS = `${type}_SUCCESS`;
    const FAILURE = `${type}_FAILURE`;

    return params => async dispatch => {
        dispatch({ type }); // dispatch({type: GET_USERS}) - 시작 안내
        try {
            const response = await request(params);
            dispatch({
                type: SUCCESS,
                payload: response.data
            });
        } catch (e) {
            dispatch({
                type: FAILURE,
                payload: e,
                error: true
            });
            throw e;
        }
    };
}
🔻 example
createRequestThunk('GET_USERS', api.getUsers);-> 참고로 api.getUsers는 axios.get(url) 이다. 즉, request line.
sample 모듈 (수정)
- 수정 전
export const getPost = id => async dispatch => {
    dispatch({ type: GET_POST }); // 요청 시작
    try {
        const response = await api.getPost(id);
        dispatch({
            type: GET_POST_SUCCESS,
            payload: response.data
        });
    } catch (e) {
        dispatch({
            type: GET_POST_FAILURE,
            payload: e,
            error: true
        });
        throw e;
    }
};- 수정 후
export const getPost = createRequestThunk(GET_POST, api.getPost);loading 모듈 생성
- reducer 내부에서 loading상태를 관리할 필요가 없도록 loading 모듈을 생성.
import { createAction, handleActions } from "redux-actions";

const START_LOADING = 'loading/START_LOADING';
const FINISH_LOADING = 'loading/FINISH_LOADING';

/*

요청을 위한 액션 타입을 payload로 설정 (ex- sample/GET_POST)

*/

export const startLoading = createAction(
    START_LOADING,
    requestType => requestType
);

export const finishLoading = createAction(
    FINISH_LOADING,
    requestType => requestType
);

const initialState = {};

const loading = handleActions(
    {
        [START_LOADING]: (state, action) => ({
            ...state,
            [action.payload]: true
        }),
        [FINISH_LOADING]: (state, action) => ({
            ...state,
            [action.payload]: false
        })
    },
    initialState
);

export default loading;
- 요청이 시작되면 아래 액션을 디스패치함.
{
   type: 'loading/START_LOADING,
   payload: 'sample/GET_POST
}
loading 리듀서함수가 관리하고 있는 state에서 sample/GET_POST 값을 true로 설정해줌.
- 만약 기존 state에 sample/GET_POST 필드가 없다면, 새로 값을 설정해줌.
createRequestThunk 수정
import { startLoading, finishLoading } from "../modules/loading";

export default function createRequestThunk(type, request) {
    // 성공 및 실패 액션타입 정의
    const SUCCESS = `${type}_SUCCESS`;
    const FAILURE = `${type}_FAILURE`;

    return params => async dispatch => {
        dispatch({ type }); // dispatch({type: GET_USERS}) - 시작 안내
        try {
            const response = await request(params);
            dispatch({
                type: SUCCESS,
                payload: response.data
            });
            dispatch(finishLoading(type));  // 👈 추가
        } catch (e) {
            dispatch({
                type: FAILURE,
                payload: e,
                error: true
            });
            dispatch(finishLoading(type));  // 👈 추가
            throw e;
        }
    };
}
SampleContainer.js
- 로딩상태 조회 가능.
...
export default connect(
    ({ sample, loading }) => ({
        post: sample.post,
        users: sample.users,
        loadingPost: loading['sample/GET_POST'], // 👈 추가
        loadingUsers: loading['sample/GET_USERS']
    }),
    {
        getPost,
        getUsers
    }
)(SampleContainer);
connect 함수의 첫번째 인자는 mapStateToProps로, state를 받아온다.
인자로 ({ sample, loading })과 같이 구조분해 할당을 해서 state.sample, state.loading을 받아옴.
sample 모듈 수정
- 불필요한 (중복된)코드를 제거함.
...
// reducer 함수
const sample = handleActions(
    {
        [GET_POST_SUCCESS]: (state, action) => ({
            ...state,
            post: action.payload
        }),

        [GET_USERS_SUCCESS]: (state, action) => ({
            ...state,
            users: action.payload
        }),
    },
    initialState
);_SUCCESS를 제외한 나머지 필드들을 모두 지워준다.- loading을 관리해주던 코드를 다 지워준다.
-> loading 중에 대한 상태를 관리할 필요가 X.
에러시 (실패시) 코드를 관리하고 싶다면,
_FAILURE이 붙은 액션을 리듀서에서 처리해주면 됨.
또는, 컨테이너 컴포넌트에서 try-catch문을 이용하여 에러를 조회할 수 있음.
try-catch문
containers/SampleContainer.js
- 수정 전
...
useEffect(() => {
        getPost(1);
        getUsers(1);
    }, [getPost, getUsers]);
...- 수정 후
useEffect(() => {
        const fn = async () => {
            try {
                await getPost(1);
                await getUsers(1);
            } catch (e) {
                console.log(e);
            }
        };
        fn();
}, [getPost, getUsers]);- useEffect 안에서 async 함수를 쓰려면 반드시 내부에서 선언 후 호출해줘야 한다.
redux-saga
- 자바스크립트의
Generator문법과 함께 사용됨. - 함수를 작성 할때, 함수를 특정 구간에 멈춰놓거나 원할 때 다시 돌아가게 할 수도 있음.
제네레이터 함수
function* generatorFunction() {
    console.log('안녕하세요?');
    yield 1;
    console.log('제너레이터 함수');
    yield 2;
    console.log('function*');
    yield 3;
    return 4;
}

const generator = generatorFunction(); // 제네레이터 객체 반환
function*이라는 키워드를 사용하여 정의함.- 제네레이터 함수를 호출하면, 제네레이터 객체를 반환함.
- 일반 함수는 여러 값을 return 하는것이 불가하지만, 제네레이터 함수에서는 가능.
generator.next()를 호출해야만 코드가 실행되며,yield를 한 값을 반환하고 코드의 흐름을 멈춤.
-> { value: ___ , done: false } 형태의 객체를 반환함.- 흐름이 멈추고 나서 다시
generator.next()를 하면 코드가 실행됨.
액션 모니터링
function* watchGenerator() {
    console.log('모니터링 시작!');
    while(true) {			 // 무한루프. 계속 모니터링
        const action = yield;
        if (action.type === 'HELLO') {
            console.log('안녕하세요?');
        }
        if (action.type === 'BYE') {
            console.log('안녕히가세요.');
        }
    }
}
-> 사용방법
const watch = watchGenerator();

watch.next();   // 모니터링 시작
watch.next({ type: 'HELLO' });  // '안녕하세요?'
watch.next({ type: 'BYE' });  // '안녕히가세요.'
위와 같은 원리로 redux-saga에서는 액션을 모니터링하고,
특정 액션이 발생했을 때 원하는 코드를 실행시킴.
1. saga 생성
- 우선, redux-saga/effects 에서
delay,put함수를 임포트함.
import { delay, put } from 'redux-saga/effects';redux-saga에서는 제너레이터 함수를 "사가" 라고 부름.
function* increaseSaga() {
  yield delay(1000); // 1초를 기다립니다.
  yield put(increase()); // put은 특정 액션을 디스패치 해줍니다.
}
function* decreaseSaga() {
  yield delay(1000); // 1초를 기다립니다.
  yield put(decrease()); // put은 특정 액션을 디스패치 해줍니다.
}
2. rootSaga 생성
redux-saga/effects의 all 함수를 통해 루트 사가를 생성.
(reducer을 합치는 combineReducers와 비슷한 느낌)
modules/index.js
import { all } from 'redux-saga/effects';

const rootReducer = combineReducers({ counter, posts });
export function* rootSaga() {
  yield all([counterSaga()]); // all 은 배열 안의 여러 사가를 동시에 실행시켜줍니다.
}
3. redux-saga 미들웨어 생성
src/index.js
...
import createSagaMiddleware from 'redux-saga';

const customHistory = createBrowserHistory();
const sagaMiddleware = createSagaMiddleware(); // 사가 미들웨어를 만듭니다.

const store = createStore(
  rootReducer,
  // logger 를 사용하는 경우, logger가 가장 마지막에 와야합니다.
  composeWithDevTools(
    applyMiddleware(
      ReduxThunk.withExtraArgument({ history: customHistory }),
      sagaMiddleware, // 사가 미들웨어를 적용하고
      logger
    )
  )
); // 여러개의 미들웨어를 적용 할 수 있습니다.

sagaMiddleware.run(rootSaga); // 루트 사가 실행 (run)
...
정리
- react-thunk는 비동기 처리시 일반 함수로 이루어져 있어 간편하지만
redux-saga는 진입 장벽이 있는 편. (but. 복잡한 경우에는 더욱 효율적)
- 미들웨어를 사용하지 않고 컴포넌트 단에서 API 요청을 해도 됨.
BUT. 좀 더 편하게 하기 위해 사용하는 것임.
-> 컴포넌트단에서 하는 것이 편하다면 편한대로 하면 됨.