React.js
Today I Learned ... react.js
🙋♂️ React.js Lecture
🙋 My Dev Blog
하이어오더 컴포넌트
Do IT! React Part 5 - 하이어오더 컴포넌트
* * *
커링 (currying)
function multiply(a, b) {
  return a * b;
}

// multiply 재활용
function multiplyTwo(a) {
  return multiply(a, 2);
}- n배 함수를 생성해주는 커링 함수 생성.
function multiplyX(x) {
  return function(a) {
    return multiply(a, x);
  }
}

// arrow Func.
const multiplyX = x => a => multiply(a, x);-
multiplyX 함수는 인자 x를 받아 이름 없는 함수를 반환하고,
이름 없는 함수는 다시 인자 a를 받아서 multiply(a,x)의 실행 값을 반환한다. -
이전 시간에 배웠던 withStyles() 함수를 사용시 두개의 소괄호를 붙였던 것도 바로 이런 원리임.
multiply(x,y)로는 인자를 한꺼번에 전달할 필요가 없고, 함수를 재활용하기 어려움
커링 함수는 인자를 나눠 받아 실행 가능함!
export default withStyles(({ color, size }) => ({
  errorText: {
    fontSize: size.sm,
    color: color.error,
  }
}))(CheckBox); // 소괄호
다른 커링 예제
-> (x * a) * b) + c를 구현하는 함수.
// a=2, b=3, c=4 / x=10 대입
const equation = (a, b, c) => x => ((x * a) * b) + c;
const formula = equation(2, 3, 4);
const x = 10;
const result= formula(x); - formula() 는
x => ((x * 2) * 3) + 4의 구조를 가진 함수. - formula()에 인수인 x에 10을 대입함.
인자를 나중에 받아 실행할 함수를 생성해주는 equation()과 같은 함수를 '커링함수' 라 한다.
커링 응용하기
- 커링은 하이어오더 컴포넌트에서 사용됨.
- 커링을 잘 사용하면 +나 * 연산자를 최소화하여 함수만으로 구현할 수 있음.
const multiply = (a, b) => a * b;
const add = (a, b) => a + b;

// 커링 함수
const multiplyX = x => a => multiplay(a, 2);
const addX = x => a => add(x, a);
const addFour = addX(4);
const multiplyTwo = multiplyX(2);
const multiplyThree = multiply(3);
// 커링 중첩
const formula = x => addFour(multiplyThree(multiplyTwo(x)));커링은 함수의 인자를 다시 구성하여 필요한 함수를 만드는 패턴을 의미한다.
- 인자의 순서, 개수에 따라 비슷한 함수를 반복해서 작성해야 하는 경우, 커링을 이용하면 된다.
- 커링으로 묶인 함수들을 쉽게 유지, 보수 가능하다.
함수 조합 기법
						// 함수 진행 순서 :   <---------
const formula = x => addFour(multiplyThree(multiplyTwo(x)));- 사람이 함수의 적용 흐름을 한번에 이해하기 어려움 -> 가독성 떨어짐.
- 이럴때, 커링 함수를 순서대로 조합하는
compose()함수를 만들면 됨!
- 배열 메서드인 reduce를 사용하면 함수를 조합해주는 함수를 만들 수 있음.
[multiplyTwo, multiplyThree, addFour].reduce(<func>, function(k) {return k});
// <func> 부분에 함수를 조합하는 코드를 넣을 것.
// function(k) {return k}는 초기값임.
arr.reduce(callback[, initialValue])
첫번째 인수로는 각 요소로 반복할 콜백함수를 넣고, (콜백 인수 = acc, cur, index, this)
두번째 인수로는 초기값을 넣어준다.
[multiplyTwo, multiplyThree, addFour].reduce(
  function (prevFunc, nextFunc) {
    return function(value) {
      return nextFunc(prevFunc(value));
    };
  },
  function(k) {return k}  // 맨처음으로 초기값 함수가 조합됨
  )
prevFunc는 아존 함수 = acc를 가리키고,
nextFunc는 = cur을 가리킨다.
<조합 과정>
- 우선, 맨 처음으로 초기값이
prevFunc로 들어가고,nextFunc인 multiplyTwo와 조합된다.
function(value) {
  return multiplyTwo(k => k)(value));
}- 두 함수가 조합된 것이 acc(
prevFunc)로 들어가고, 인덱스가 넘어가서nextFunc는 multiplyThree가 되고, 조합된다.
function(value) {
  return multiplyThree(
    funtion(value) {
      return multiplyTwo(
        (k => k)(value)
      );
    }(value)
  );
}- 세 함수가 조합된 것이
prevFunc로 들어가고, 인덱스가 넘어가서nextFunc는 addFour()이 되고, 조합된다.
function(value) {
    return addFour(
        function (value) {
            return multiplyThree(
                function (value) {
                    return multiplyTwo(
                        (k => k)(value)
                    );
                }(value)
            );
        }(value)
    );
}- 배열 안에 지정된 함수만 조합하는 임의의 함수로 조합할 수 있도록.
- reduce()를 반환하는 함수를 정의하고, 함수의 인자로 배열을 전달.
function compose(funcArr) {   // 인수로 배열이 들어감
    return funcArr.reduce(    // reduce를 리턴하는 함수
        function (prevFunc, nextFunc) {
            return function (value) {
                return nextFunc(prevFunc(value));
            }
        },
        function (k) { return k; }
    );
}

const formulaWithCompose = compose([multiplyTwo, multiplyThree, addFour]);🙋♀️ 실무에서 사용하는 compose() 함수
function compose() {
    const funcArr = Array.prototype.slice.call(arguments); // 유사배열 객체(arguments)를 배열로 만듬
    return funcArr.reduce(
        function (prevFunc, nextFunc) {
            return function (value) {
                return nextFunc(prevFunc(value));
            }
        },
        function (k) { return k; }
    );
}

const formulaWithCompose = compose(multiplyTwo, multiplyThree, addFour);
- 인수로 배열이 아닌 각 함수를 값으로 전달하고, 유사배열객체인
arguments객체를 slice.call()하여 배열로 만듬.- 유사배열 -> 배열로 만들기 위해 간접호출을 이용했음. (그냥 slice하면 안되고, Array.prototype.slice 해야함)
+) 만약, 여러개의 인자를 갖는 함수를 조합하려면?
- arguments 객체와 nextFunc의 인자로
apply()를 이용해 인자를 여러개 받아 처리 가능.
| apply | call |
|---|---|
| 배열 형태로 args를 바인딩 | 값 형태로 args를 바인딩 |
function compose() {
    const funcArr = Array.prototype.slice.call(arguments); 만듬
    return funcArr.reduce(
        function (prevFunc, nextFunc) {
            return function () { // 👈 여기서 인수로 받던 value 없애고, arg로 대체
                const args = Array.prototype.slice.call(arguments); // arguments 객체를 배열로 만듬
                return nextFunc(prevFunc.apply(null, args)); // this 바인딩은 X. args만. (apply - 배열 형태로 전달)
            }
        },
        function (k) { return k; }
    );
}
전개 연산자 사용 (spread)
- apply와 arguments객체를 사용하지 않고(간접호출 X) 배열 형태로 인수를 표현할 수 있다.
- ES6에 등장한 spread 연산자 (...) 를 이용.
function compose(...funcArr) {   // compose(1,2,3)이면? - funcArr = [1,2,3]
    return funcArr.reduce(
        function (prevFunc, nextFunc) {
            return function (...args) {   // arguments 객체를 배열로 펼친 것
                return nextFunc(prevFunc(...args));
            }
        },
        function (k) { return k; }
    );
}
함수 조합 실행하기
- compose 함수를 실행
//       compose 사용시 - 함수 진행 방향 :   ------------------->
const formulaWithCompose = compose(multiplyX(2), multiplyX(3), addX(4));

//       조합함수 미사용시 - 함수 진행 방향 :   <-----------------
const formulaWithCompose = addX(4)(multiplyX(<3)(multiplyX(2)));
하이어오더 컴포넌트
'디자인 패턴' 이란?
- 디자인 패턴 = 코드 중 활용도가 높은 구현 방식을 모아둔 비밀 레시피.
- 코드의 구조를 더 견고히 하고, 손쉽게 재활용 가능
-> ex) 커링(currying), IIFE(모듈 패턴) 등
데코레이터 패턴
- cf> 상속 패턴
📌 상속 패턴
공통기능은 부모로부터 물려받고, 추가기능만 구현하여 중복 코드를 줄임.
단, 여러 부모의 속성을 동시에 가질 경우 문제 발생.
- 상속 구조에는 한 부모 클래스를 기준으로 상속받는 클래스들을 여러 갈래로 제작하면서,
기존의 상속 구조를 그대로 사용할 수 있는 경우도 있지만,
상속 구조를 그대로 사용할 수 없고 변경해야 하는 경우도 생긴다.
<문제점>
- 원치 않은 상속이 생길 수 있고,
- 중간에 낀 컴포넌트의 자식 컴포넌트가 생긴다면? - 또다시 상속 구조를 변경해야 함.
- 상속 구조가 깊어져서 상속 항목들을 한눈에 파악할 수 X
기존의 구조를 해치지 않으면서, 원하는 기능만 상속받기 위한 디자인 패턴 '데코레이터 패턴' 이 등장.
✅ 데코레이터 패턴
- 클래스 간의 종속성 없이 기능만 공유.
- 상속 구조에 따라 기능을 물려받는 상속패턴과는 달리 필요한 기능만 탑재하여 독립된 객체를 생성.
- 상속 구조와 관계 없이, 상위 클래스도 각 기능을 따로 탑재하여 생성 가능.
** 상속 패턴에서는 Button 컴포넌트 안에 기능이 들어있었지만, 데코레이터 패턴에서는 각 기능이 분리된 것.
-> 자바스크립트에서는 데코레이터 패턴을 구현하기 위해 '커링'을 사용함.
.jpg)
'하이어오더 컴포넌트' 란?
- 자바스크립트의 고차함수(higher-order function)에서 유래됨.
- 즉, 커링 함수 = 고차 함수 (함수를 리턴하는 함수)
- 하이어오더 컴포넌트는 함수형/클래스형 컴포넌트 모두 반환 가능.
- 기존 컴포넌트의 기능을 덧입혀 새 컴포넌트로 반환하는 함수를 말함.
** 하이어오더 컴포넌트가 반환하는 컴포넌트 = 확장 컴포넌트
// ✅ 하이어오더 컴포넌트는 = 확장 컴포넌트(함수형 or 클래스형) 반환
// 1. 함수형 컴포넌트 반환
function higherOrderComponent(Component) {
    return function Enhanced(props) {
        return <Component {...props} />;
    }
}

// 2. 클래스형 컴포넌트 반환
function higherOrderComponent(Component) {
    return class Enhanced extends React.Component {
        render() {
            return <Component {...this.props} />;
        }
    }
}- 하이어오더 컴포넌트는 기존 컴포넌트에 연결된 프로퍼티를 모두 전달해줘야 함
- 기존 컴포넌트를 확장한 컴포넌트이므로, 기존 컴포넌트로 모든 프로퍼티를 전달해줘야 함. (부모->자식)
- spread 연산자(...)로 확장 컴포넌트에 전달된 모든 프로퍼티를 기존 컴포넌트의 프로퍼티로 전달함.
->...props/...this.props
- 하이어오더 컴포넌트와 확장 컴포넌트의 이름은 with로 시작.
- 하이어오더와 하이어오더가 리턴하는 확장 컴포넌트는 모두 with로 시작해야한다.
/src/component/withHoC.jsx
import React from 'react';

export default function withHoC(WrappedComponent) {
  return class WithHoC extends React.Component {
    render() {
      return <WrappedComponent {...this.props} />;
    }
  };
}
- 스토리파일 생성
/src/stories/WithHoCStory.jsx
import React from 'react';
import { storiesOf } from '@storybook/react';

import Button from '../component/Button';
import Text from '../component/Test';
import withHoC from '../component/withHoC';

const ButtonWithHoC = withHoC(Button);
const TextWithHoC = withHoC(Text);

storiesOf('WithHoC', module)
  .add('기본 설정', () => (
    <div>
      <ButtonWithHoC>안녕</ButtonWithHoC>
      <TextWithHoC>하세요</TextWithHoC>
    </div>
  ))
  .add('large 예제', () => (
    <div>
      <ButtonWithHoC large>안녕</ButtonWithHoC>
      <TextWithHoC large>하세요</TextWithHoC>
    </div>
  ));
❗️ 참고
- Button 컴포넌트와 Text 컴포넌트는 이전시간에 style컴포넌트로 해놨기 때문에
(withStyles함수를 임포트해서 default 스타일과 그 외 스타일들을 설정해놨다.)- 두 컴포넌트를 확장한 ButtonWithHoC, TextWithHoc 모두 똑같이 스타일이 적용된다.
> npm run storybook- 개발자도구(devTool) : 크롬 React devTool - Component 탭
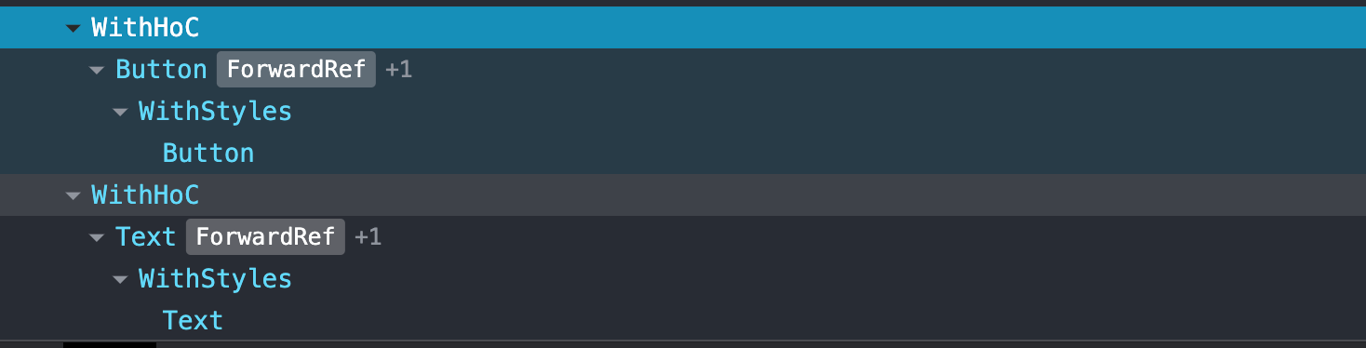
위와 같이 컴포넌트의 계층 구조를 파악할 수 있다.
-
하이어오더 컴포넌트의 반환값인 WithHoC(확장 컴포넌트)로 인해 TextWithHoC, ButtonWithHoC이 아닌 'WithHoC'라고 이름이 출력되는 것. -> 동일한 하이어오더 컴포넌트를 사용했으므로
-
WithStyles는 WithStyles 하이어오더 컴포넌트로 확장한 컴포넌트이다.
(Button의 export 부분 - 즉, export default withStyles(내용)(Button)에서 withStyles는 하이어오더)
-> Button, Text 컴포넌트를 WithStyles > WithHoC 순서로 감싼 것임.
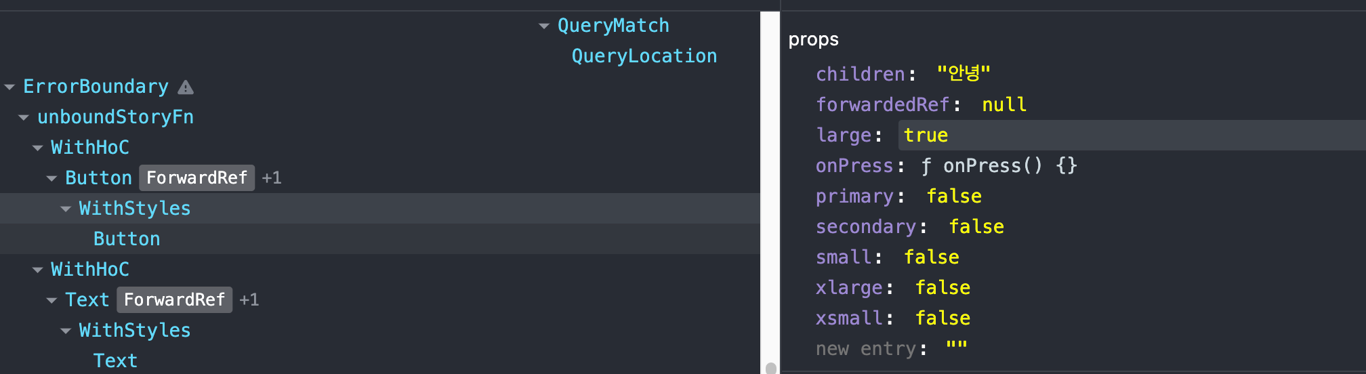
->props중에 large가 true이다!
-> large(기존 컴포넌트의 프로퍼티)값이 전달되어 스타일이 적용된다. -> (WithStyles)

- WithHoC의 프로퍼티중 large: true / WithStyles의 프로퍼티중 large: true (모든 계층)
- 기존 컴포넌트의 프로퍼티값인 large가 확장 컴포넌트인 WithHoC에 전달된 것.
- 확장 컴포넌트가 기존 컴포넌트의 이름을 함께 출력
- 하이어오더 컴포넌트가 같으면, 이름에 하이어오더 컴포넌트가 출력된다. (위에서 WithHoc)
- 디버깅시 혼란을 야기할 수 있으므로, 기존 컴포넌트 이름을 함께 출력하면 된다!
- 다른 확장 컴포넌트에서 정의된 displayName 표시
/src/component/withHoC.jsx (수정)
import React from 'react';

export default function withHoC(WrappedComponent) {
  const { displayName, name } = WrappedComponent;
  const WrappedComponentName = displayName || name;  // 기본값 name
  return class WithHoC extends React.Component {
    static displayName = `withHoC(${WrappedComponentName})`;
    render() {
      return <WrappedComponent {...this.props} />;
    }
  };
}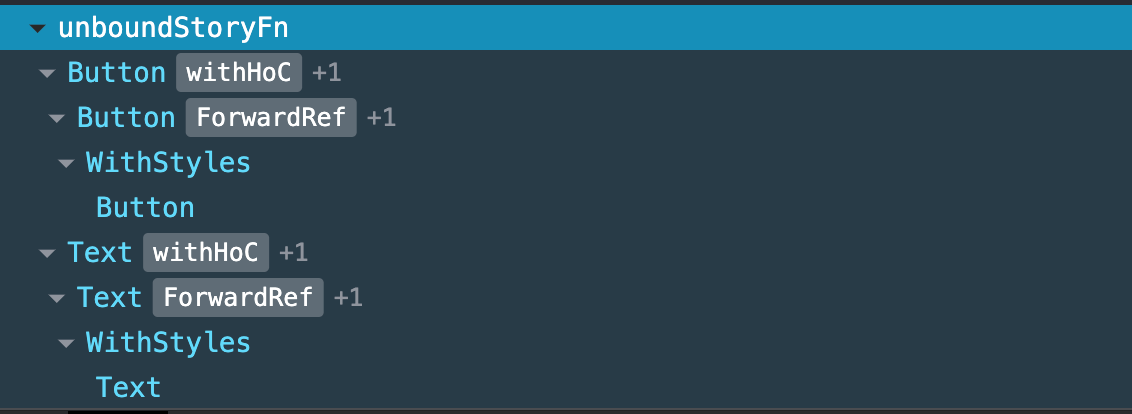
이전과 비교
** WithHoC - Button - WithStyles - Button
-> Button, Text 모두 하이어오더 컴포넌트인 WithHoC이라고 떠서 디버깅시 혼란스러움.
** Button(withHoC) - Button - WithStyles - Button
-> 각각의 확장 컴포넌트 이름이 떠서 혼란X
로딩 표시 화면 컴포넌트
- 하이어오더 컴포넌트 구조
- withLoading 함수(=하이어오더 컴포넌트) 생성
-> 확장 컴포넌트를 반환하는 함수를 반환.
/src/component/withLoading.jsx
import React from "react";

export default function withLoading(WrappedComponent) {
    const { displayName, name: componentName } = WrappedComponent;
    const wrappedComponentName = displayName || componentName;

    function WithLoading(props) {
        return (
            <WrappedComponent {...props} />
        );
    }
    WithLoading.displayName = `withLoading(${wrappedComponentName})`; // static 프로퍼티임
    return WithLoading; // 컴포넌트를 return하는 함수를 return
}isLoading프로퍼티 조건 추가
- boolean 타입의 isLoading 프로퍼티를 추가해서, true면 '로딩중' 이라는 메시지가 출력되도록 함.
import React from 'react';

export default function withLoading(WrappedComponent) {
  const { displayName, name: componentName } = WrappedComponent;
  const wrappedComponentName = displayName || componentName;

  function WithLoading(props) {
    if (props.isLoading) return '로딩중';   // 👈 이부분 추가됨
    return <WrappedComponent {...props} />;
  }
  WithLoading.displayName = `withLoading(${wrappedComponentName})`;
  return WithLoading;
}🙋♀️ MY IDEA
- 삼항연산자로 한꺼번에 표시해도 되지 않나?
return (
         props.isLoading ? '로딩중' : <WrappedComponent {...props} />
);
- ❗️ 단,
isLoading프로퍼티는 확장 컴포넌트에는 필요하지 않음.
-> 원래는 모든 프로퍼티를 확장 프로퍼티에 전달하지만, isLoading은 제외하고 전달하자.
- isLoading 제외한 프로퍼티 전달
import React from 'react';

export default function withLoading(WrappedComponent) {
  const { displayName, name: componentName } = WrappedComponent;
  const wrappedComponentName = displayName || componentName;

  function WithLoading({ isLoading, ...otherProps }) {    // Rest Params(...)로 나머지 props 저장
    if (isLoading) return '로딩중';   // isLoading은 withLoading()함수 내에서만 쓰고,

    return <WrappedComponent {...otherProps} />;  // 나머지 props만 전달함
  }
  WithLoading.displayName = `withLoading(${wrappedComponentName})`;
  return WithLoading;
}- 로딩 메시지 변경 (loadingMsg를 인수로 받음)
- 기본값은 ''로딩중'' 이고, withLoading()함수의 인수로 메시지를 전달받을 수 있게.
import React from 'react';

export default function withLoading(WrappedComponent, loadingMsg = '로딩중') {  // loadingMsg 파라미터 추가 (기본값 할당)
  const { displayName, name: componentName } = WrappedComponent;
  const wrappedComponentName = displayName || componentName;

  function WithLoading({ isLoading, ...otherProps }) {
    if (isLoading) return loadingMsg;   // 여기에 인수로 받은 메시지 출력

    return <WrappedComponent {...otherProps} />;
  }
  WithLoading.displayName = `withLoading(${wrappedComponentName})`;
  return WithLoading;
}
🚫 BUT!
하이어오더 컴포넌트를 만들 때는 '컴포넌트 인자를 하나만 전달한다' 는 규칙이 존재.
위 예제에서는 임의로 loadingMsg라는 인자를 추가했으므로 규칙을 어긴 셈임.🔻 대신, 다중 커링을 활용하자!
- 다중 커링 - 하이어오더 컴포넌트 반환
- 첫번째 커링 함수 (default function 부분)을 통해 출력 메시지를 인수로 전달받고,
하이어오더 컴포넌트 (withloading) 내부에 전달하면 됨.
- 즉, 하이어오더 컴포넌트를 감싸는 함수를 생성.
(이 함수는 하이어오더 컴포넌트를 반환-> 하이어오더 컴포넌트는 확장 컴포넌트를 반환)
import React from 'react';

export default function (loadingMsg = '로딩중') {    // 1️⃣ withLoading을 감싸는 커링함수
  return function withLoading(WrappedComponent) {  // 2️⃣
    const { displayName, name: componentName } = WrappedComponent;
    const wrappedComponentName = displayName || componentName;

    function WithLoading({ isLoading, ...otherProps }) {
      if (isLoading) return loadingMsg;

      return <WrappedComponent {...otherProps} />;
    }
    WithLoading.displayName = `withLoading(${wrappedComponentName})`;
    return WithLoading;
  };
}
- WithLoading 스토리 추가
import React from 'react';
import { storiesOf } from '@storybook/react';

import Text from '../component/Test';
import Button from '../component/Button';
import withLoading from '../component/withLoading';

const TextWithLoading = withLoading('텍스트 로딩중')(Text);  // 1️⃣ 첫번째 커링함수에 loadingMsg 전달
const ButtonWithLoading = withLoading(<Button disabled>버튼 로딩중</Button>)(Button); // 1️⃣ 첫번째 커링함수에 loadingMsg를 감싼 Button 전달
// 2️⃣ 두번째 커링, 즉 withLoading (하이어 컴포넌트)에는 WrappedComponent인 Text와 Button 전달

storiesOf('WithLoading', module)
  .add('기본설정', () => (
    <div>
      <ButtonWithLoading>안녕</ButtonWithLoading>
      <TextWithLoading>하세요</TextWithLoading>
    </div>
  ))
  .add('isLoading시', () => (
    <div>
      <ButtonWithLoading isLoading>안녕</ButtonWithLoading>
      <TextWithLoading isLoading>하세요</TextWithLoading>
    </div>
  ));
깨달음 👀
이제야 이중 커링을 이해했다!두겹의 함수(..)(..)형태는 알고보니
첫번째 ()안에 값을 첫번째 커링의 인수로 전달하고,
두번째 ()안에 값은 두번째 커링의 인수로 전달한 것이였다!
복습
- 다시 살펴보는 withStyles() 함수
-> 이중 커링 구조 = (...)(...)
export default withStyles(() => ())(Button);
// 첫번째 ()안에는 콜백함수(...styles)가 들어감 -> 첫번째 커링의 인수로 전달됨
// 두번째 ()안에는 Button 컴포넌트가 들어감 -> 두번째 커링의 인수로 전달됨.