React Project
Firebase 연결
- 파이어베이스 어플리케이션 생성
- firebase.js 생성 후 SDK 등록
인증(Auth) 기능 구현
- Google, Facebook, Apple, Twitter, Github, MS 등 많은 로그인 방법이 존재.
- 이번에는 Password Authentication 을 사용.
createUserWithEmailAndPassword
회원가입
// SignUp.jsx
import { getAuth } from 'firebase/auth';

const SignUp = () => {
  const navigate = useNavigate();
  const [firebaseError, setFirebaseError] = useState("");

  const auth = getAuth();
  const handleSignupAndLogin = (email, password) => {
    createUserWithEmailAndPassword(auth, email, password)
    .then((user) => {
      // 리덕스 스토어에 저장

      navigate('/');
    })
    .catch(error => {
      return error && setFirebaseError("이메일 또는 패스워드가 일치하지 않습니다.");
    })
  }

  return (
    <Form
      title={"가입하기"}
      getDataForm={handleSignupAndLogin}
      firebaseError={firebaseError}
      />
  )

}
// Form.jsx
const Form = ({title, getDataForm, firebaseError}) => {
const { register, handleSubmit, formState:{ errors }, reset } = useForm({
mode: 'onChange'
});
const onSubmit = ({email, password}) => {
getDataForm(email, password);
reset(); // input 비워줌
}
}
...
{firebaseError && <span>{firebaseError}</span>}
로그인
const SignIn = () => {
  const navigate = useNavigate();
  const [firebaseError, setFirebaseError] = useState("");

  const auth = getAuth();
  const handleLogin = (email, password) => {
    signInWithEmailAndPassword(auth, email, password)
    .then(user => {
      navigate('/')
    })
    .catch(error => {
      return error && setFirebaseError("이메일 또는 패스워드가 일치하지 않습니다.");
    })
  }

    return (
    <Form
      title={"로그인"}
      getDataForm={handleLogin}
      firebaseError={firebaseError}
      />
  )
}
Redux Setting
-
store에 slice.js 파일 생성
/store/user/user.slice.js,
/store/order/order.slice.js,
/store/categories/categories.slice.js,
/store/cart/cart.slice.js,
/store/products/product.slice.js,
/store/products/products.slice.js 파일 생성. -
메인 스토어 - index.js 생성
// store/index.js
export const store = configureStore({
  reducer: {
    userSlice,
    ... // 추후 추가
  }
});
userSlice
- user.slice.js
// store/user/user.slice.js

const initialState = localStorage.getItem("user")
? JSON.parse(localStorage.getItem("user") || "")
: {
  email: "",
  token: "",
  id: ""
};

export const userSlice = createSlice({
  name: "user",
  initialState,
  reducers: {
    setUser: (state, action) => {
      state.email = action.payload.email;
      state.token = action.payload.token;
      state.id = action.payload.id;

      localStorage.setItem("user", JSON.stringify(state));
    },
    removeUser: (state) => {
      state.email = "";
      state.token = "";
      state.id = "";

      localStorage.setItem("user", JSON.stringify(state));
    }
  }
});

// 액션 생성자 (slice.actions) -> dispatch(actionName)
export const { setUser, removeUser } = userSlice.actions;
export default userSlice.reducer;
Store 등록
// main.jsx

import { Provider } from 'react-redux';
import { store } from './store';

...

<Provider store={store}>
  <App />
</Provider>
Dispatch
- SignIn, Login 할 때, (setUser) 액션 디스패치 하고 navigate 하도록
// SignUp.jsx
import { setUser } from '../../store/user/user.slice';
import { getAuth } from 'firebase/auth';
const SignUp = () => {
const dispatch = useDispatch();
const navigate = useNavigate();
const [firebaseError, setFirebaseError] = useState("");
const auth = getAuth();
const handleSignupAndLogin = (email, password) => {
createUserWithEmailAndPassword(auth, email, password)
.then((userCredential) => {
// 리덕스 스토어에 저장
dispatch(setUser({
email: userCredential.user.email,
token: userCredential.user.refreshToken,
id: userCredential.user.uid
}))
navigate('/');
})
.catch(error => {
return error && setFirebaseError("이메일 또는 패스워드가 일치하지 않습니다.");
})
}
return (
<Form
title={"가입하기"}
getDataForm={handleSignupAndLogin}
firebaseError={firebaseError}
/>
);
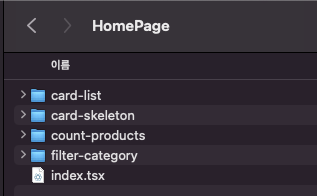
} 폴더 구조
지금까지 나는 한 페이지를 구성하는 컴포넌트들은 Components 폴더에 넣었는데,
여기서는 pages/HomePage 폴더 안에 폴더를 추가해서 하는 방식이다.
추가로, 페이지 컴포넌트 자체도 폴더로 구분해서 index.jsx로 생성하는 것이 차이.
useSelector, useDispatch
const category = useSelector((state) => state.categoriesSlice);
// state에는 여러 slice들이 다 들어있음. (userSlice, categoriesSlice, ...)
const dispatch = useDispatch();
const getActiveCategory = () => {
dispatch(setActiveCategory(name)); // action.payload로 바로 전달함
}Custom Hook (Redux)
- 추후 TypeScript 적용 시 수정 예정
import { useDispatch } form 'react-redux';

const useAppDispatch = () = useDispatch();
const useAppSelector = useSelector;
Fake Store API
- 상품 정보, 카테고리, 정렬 등
- 장바구니 등
- CardList
Redux Action: fetchProducts (API 호출해서 정보 가져옴) -> ProductsSlice
extraReducers
- reducers 는 액션함수를 생성함과 동시에 해당 액션함수에 대응하는 역할을 함.
- extraReducers 는 사용자가 slice reducer 내에서 액션함수에 접근할 수 있게하지만,
- extraReducers 내에서 액션함수를 생성하지 않는다는 점이 reducers 프로퍼티와의 가장 큰 차이임.
- Promise의 진행 상태에 따라서 리듀서를 실행할 수 있음.
-> 결론: slice reducer 에 맵핑된 내부 액션함수가 아닌, 외부의 액션을 참조하기 위해 사용.
import { createAsyncThunk, createSlice } from "@reduxjs/toolkit";
import axios from "axios";

export const fetchProducts = createAsyncThunk(
    "products/fetchProducts",
    async (category: string, thunkAPI) => {
        try {
            let response;
            if (category) {
                response = await axios.get<IProduct[]>(`https://fakestoreapi.com/products/category/${category}`);
            } else {
                response = await axios.get<IProduct[]>("https://fakestoreapi.com/products");
            }

            return response.data; //payload
        } catch (error) {
            return thunkAPI.rejectWithValue("Error loading products");
        }

    }
)

...

const initialState: ProductsType = {
    products: [],
    isLoading: false,
    error: "",
}

export const productsSlice = createSlice({
    name: 'products',
    initialState,
    reducers: {},
    extraReducers: (builder) => {
        builder
            .addCase(fetchProducts.pending, (state) => {
                state.isLoading = true;
            })
            .addCase(fetchProducts.fulfilled, (state, action) => {
                state.isLoading = false;
                state.products = action.payload;
            })
            .addCase(fetchProducts.rejected, (state, action) => {
                state.isLoading = false;
                state.error = action.payload as string;
            })
    }
})


export default productsSlice.reducer;- 상태에 따라 (pending, fulfulled, rejected) state를 업데이트 할 수 있음.
- 참고 문서
React Loading Skeleton
- react-loading-skeleton 라이브러리
import "react-loading-skeleton/dist/skeleton.css";
import Skeleton from 'react-loading-skeleton';

...

{ isLoading && <Skeleton height={350} /> }

기억은 한계가 있지만, 기록은 한계가 없다.