
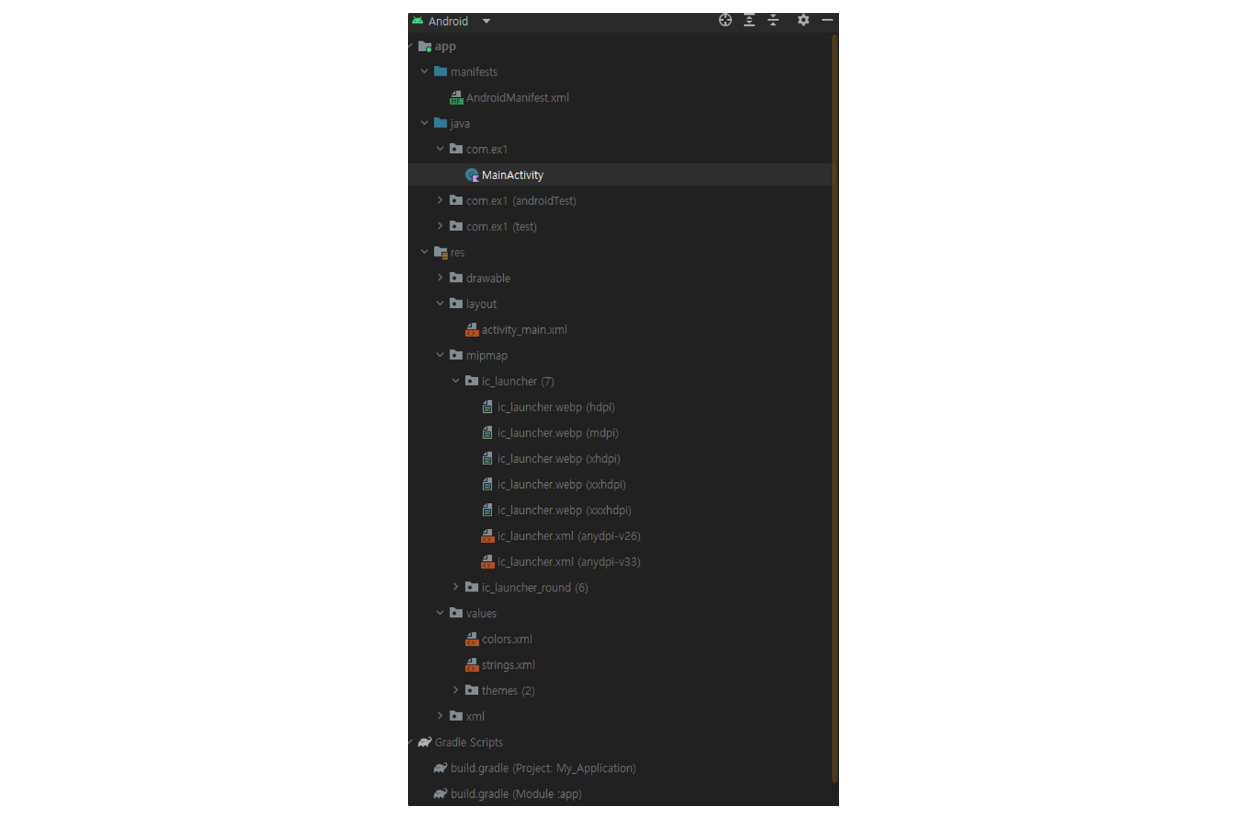
디렉터리 파일 구조
AndroidManifest.xml
- 앱의 메인 환경 파일이다.
<?xml version="1.0" encoding="utf-8"?>
<manifest xmlns:android="http://schemas.android.com/apk/res/android"
    xmlns:tools="http://schemas.android.com/tools">

    <application
        android:allowBackup="true"
        android:dataExtractionRules="@xml/data_extraction_rules"
        android:fullBackupContent="@xml/backup_rules"
        android:icon="@mipmap/ic_launcher"
        android:label="@string/app_name"
        android:supportsRtl="true"
        android:theme="@style/Theme.MyApplication"
        tools:targetApi="31">
        <activity
            android:name=".MainActivity"
            android:exported="true">
            <intent-filter>
                <action android:name="android.intent.action.MAIN" />

                <category android:name="android.intent.category.LAUNCHER" />
            </intent-filter>
        </activity>
    </application>

</manifest>-
manifest
-
태그를 통해 이 문서가 manifest에 관련된 문서라는 것을 시스템이 알 수 있음
-
‘xmlns:android’는 android라는 네임스페이스를 선언
-
‘package’의 경우 해당 어플리케이션이 속한 패키지 이름을 지정
-
-
application
-
애플리케이션의 정보 정의
-
android:allowBack
- 백업 및 복구 기능을 사용할 것인가 여부(기본값 : true)
-
android:icon
- 어플리케이션 전체를 위한 아이콘과 각각의 컴포넌트를 위한 아이콘
-
android:label
- 어플리케이션을 나타내는 사용자가 읽을 수 있는 라벨
- 간단히 말해 어플 이름
-
android:roundIcon
- 적응형 아이콘 적용
-
android:supportsRtl
- 어플리케이션의 RTL(Right-To-Left) 지원 여부
- RTL : 오른쪽에서 왼쪽으로 글씨를 읽는 경우 지원
-
android:theme
- 어플리케이션 안의 모든 기능들의 기본 테마 정의
-
activity 태그
- 어플리케이션의 시각적 사용자 인터페이스 요소인 액티비티 선언
- 모든 액티비티는 manifest의 activity 태그에 등록해야 함
-
android:name
- 액티비티의 클래스명 설정
-
android:exported
- 이 액티비티가 외부에서 실행될 수 있는지 없는지 설정
- 외부에서 호출할 수 있으면 true
- MainActivity는 런처에서 실행해야 하므로 항상 true
-
intent-filter 태그
- 수신할 intent를 지정한다.
- action 태그
- 수신할 action명을 지정. 런처에서 클릭하는 아래 action의 Intent가 생성
- android.intent.action.MAIN
- 런처에서 클릭하면 첫 액티비티로 해당 액티비티를 시작
- action 태그는 하나만 존재 가능
- category 태그
- 액션과 함께 수신할 Intent의 특징을 나타내는 항목
- android.intent.category.LAUNCHER
- 이 액티비티가 최초 액티비티, 시스템의 애플리케이션 시작 관리자 목록으로 게재
- category 태그는 여러 개 존재 가능
- 런처에서 클릭하면 해당 액티비티를 실행한다는 뜻
-
MainActivity.kt
package com.ex1

import androidx.appcompat.app.AppCompatActivity
import android.os.Bundle

class MainActivity : AppCompatActivity() {
    override fun onCreate(savedInstanceState: Bundle?) {
        super.onCreate(savedInstanceState)
        setContentView(R.layout.activity_main)
    }
}-
AppCompatActivity를 상속 받아 사용
- AppCompatActivity는 Activity의 서브 클래스
-
onCreate( )
-
액티비티가 실행될 때 시스템이 호출하는 함수
-
setContentView( ) 함수를 통해 화면을 출력
-
R.layout.activity_main을 매개변수로 지정하였으므로 res/layout/activity_main.xml을 사용하여 화면을 구성
-
activity_main.xml
<?xml version="1.0" encoding="utf-8"?>
<androidx.constraintlayout.widget.ConstraintLayout xmlns:android="http://schemas.android.com/apk/res/android"
    xmlns:app="http://schemas.android.com/apk/res-auto"
    xmlns:tools="http://schemas.android.com/tools"
    android:layout_width="match_parent"
    android:layout_height="match_parent"
    tools:context=".MainActivity">

    <TextView
        android:layout_width="wrap_content"
        android:layout_height="wrap_content"
        android:text="Hello World!"
        app:layout_constraintBottom_toBottomOf="parent"
        app:layout_constraintEnd_toEndOf="parent"
        app:layout_constraintStart_toStartOf="parent"
        app:layout_constraintTop_toTopOf="parent" />

</androidx.constraintlayout.widget.ConstraintLayout>-
ConstraintLayout
-
루트 요소인 ConstraintLayout은 자식 요소들의 위치를 상대적으로 배치
-
여기서는 자식인 TextView의 배치를 담당
-
추후 Layout에서 상세히 설명
-
-
TextView
-
문구를 화면에 표시하는 view
-
View 객체를 상속 받음
-
여기서는 Hello world!를 출력
-
Gradle
-
안드로이드 빌드 자동화 시스템
-
bulid.gralde 파일을 통해 여러가지 환경 설정
-
프로젝트를 위한 build.gradle과 모듈을 위한 build.gradle 존재
-
안드로이드 스튜디오 plugin과 Gradle은 항상 버전을 맞춰줘야 함
-
gradle-wrapper.properties에서 Gradle 버전 확인
-
project structure에서 plugin 정보 확인
-
안드로이드 공식 홈페이지에 plugin과 gradle 버전 매칭 정보 확인
-
프로젝트 수준의 Gradle
plugins { id 'com.android.application' version '7.4.2' apply false id 'com.android.library' version '7.4.2' apply false id 'org.jetbrains.kotlin.android' version '1.8.0' apply false }-
모든 모듈을 위한 최상위 설정을 목적
-
plugins
- gradle이 build할 때 사용할 plugin 선언
- kotlin 버전 지정
- 모듈 gradle 파일에서 버전 없이 이름만으로 사용. 대부분 application으로 생성하지만 library도 가능
-
-
모듈 수준의 Gradle
plugins { id 'com.android.application' id 'org.jetbrains.kotlin.android' } android { namespace 'com.ex1' compileSdk 33 defaultConfig { applicationId "com.ex1" minSdk 24 targetSdk 33 versionCode 1 versionName "1.0" testInstrumentationRunner "androidx.test.runner.AndroidJUnitRunner" } buildTypes { release { minifyEnabled false proguardFiles getDefaultProguardFile('proguard-android-optimize.txt'), 'proguard-rules.pro' } } compileOptions { sourceCompatibility JavaVersion.VERSION_1_8 targetCompatibility JavaVersion.VERSION_1_8 } kotlinOptions { jvmTarget = '1.8' } } dependencies { implementation 'androidx.core:core-ktx:1.7.0' implementation 'androidx.appcompat:appcompat:1.6.1' implementation 'com.google.android.material:material:1.8.0' implementation 'androidx.constraintlayout:constraintlayout:2.1.4' testImplementation 'junit:junit:4.13.2' androidTestImplementation 'androidx.test.ext:junit:1.1.5' androidTestImplementation 'androidx.test.espresso:espresso-core:3.5.1' }-
모듈에 대한 특성 정의
-
파일을 수정하면 Sync Now를 이용해 프로젝트에 반영해야 함
-