1. html 안에는 head와 body로 이루어져있다
- head에는 body말고 나머지에 필요한 것들이 다 들어있다 가령 title, 아이콘, 구글 엔진이 내 사이트를 퍼가기 좋게 만드는 것들 body는 내 눈에 보이는 밑 부분이다.- div태그 : 구역을 묶어주는 친구
- P : 문단
- h1 : 제목
- span : 전체 글 중, 특정 글자를 선택 할 때 사용
- a : 하이퍼링크(href와 사용)
- image
- button
- hr : 가로선
2. 기본기
-
텍스트 중앙정렬 : text-align :
-
이미지 불러오기 : background-image : url("이미지 url")
-
이미지 조정하기 : background-size : cover / background-position : center
-
padding : 안쪽으로 px을 준다
-
margin : 바깥쪽으로 px을 준다
-
로그인 페이지를 가운데로 옮기고 싶다면?
-> 일단은 div로 묶은 다음에,
background-color : green을 줘서 어느정도 대강 감을 잡고
width:300px를 준다음, margin : auto; 를 준다면 가운데 정렬이 된다. -
만약 버튼을 가운데로 옮기고 싶다면?
width:100px;
margin:auto;
display:block;
display : block으로 속성을 바꾼다.
- 내용물을 가운데로 정렬하고 싶다면?
diplay : flex;
flex-direction : column;
ustify-content : center;
align-items : center;
-> column 대신 row로 바꾸게 되면 나란히 배치가됨
-
hover를 사용해보자
-> .mytitle > button:hover{
border: 2px solid white;
color: yellow;
} -> 마우스를 위로 올리면 해당 속성대로 변함 -
이미지를 넣어보고 어둡게해보자
-> background-image: linear-gradient(0deg, rgba(0, 0, 0, 0.5), rgba(0, 0, 0, 0.5)), url("https://movie-phinf.pstatic.net/20210715_95/1626338192428gTnJl_JPEG/movie_image.jpg");
-
class는 중첩이 가능하다
-><button class="btn my-color">이런 .btn과 .my-color가중첩이 가능하다. -
폰트를 넣어보도록 하자
https://fonts.google.com/?subset=korean 를 검색해서 마음에드는 폰트 클럭
+select this style 을 누르고 <link href~> 를 복사하고
<title></title>밑에 복사
그리고<style> * { font-family: 'Black Han Sans', sans-serif}를 넣어주면 끝 -
핸드폰 사이즈로 맞추기
-> .wrap{
max-width:1200px;
width:95%;
}
.mypost{
max-width:500px;
width:95%
}
max-width와 %를 사용하면 됨 -
CSS 불러오기
-><link rel="stylesheet href="mystyle.css'> -
부트스트랩
시작 템플릿을 복사해서 사용하면 됨
다음 https://getbootstrap.com/docs/4.0/components/buttons/ 여기 들어가서 복붙 후 사용하면됨 -
card 부트스트랩을 가운데로 정렬하고 싶다면?
-> div로 묶은다음, width:900px정도 주고, margin:auto; 주면 끝
3.자바스크립트
- 자바스크립트 사용법
<script> function hey(){alert('안녕')</script>
<button>버튼</button>
-> 변수, 자료형, 함수, 조건문, 반복문만 알면 됨
-
변수
->
let a = 2
let b = 3
a+b =? 5
let first_name = 'bumkyu'
let last_name = 'park'
first_name + last_name = 'bumkyupark' -
자료 담는 법을 알아보자(1)
->
let a_list =['수박', '참외', '배']
a_list[0] = 수박
a_list[1]= 참외
추가하는법
a_list.push('포도')
let b_list =['철수','영희']
a_list.push(b_list) -> b_list(철수,영희)추가가 가능함
-> 고로 a_list[4][0] = '철수' 라는 값이 나옴
-
자료 담는 법을 알아보자(2)
-> let a_dict = {'name':'bob,'age':27}
a_dict['name'] = 'bob' -
기본함수들
let a = 100
나머지 구하기
a&8 = 4
a&3 = 1
- 이메일 나누기
let myemail = sparta@gmail.com
myemail.split('@') = "sparta","gmail.com"
myemail.split('@')[1] = "gmail.com"
myemail.split('@')[1].split('.') = "gmail", "com"
myemail.split('@')[1].split('.')[0] ="gmail"
-
함수 조건문, 반복문
함수 : 정해진 동작을 한다
-
function sum(num1,num2){
return num1+num2
}
let result = sum(2,3)
result = 5
여기서 num1 = 2, num2 = 3이 되고 return이 된다.
return은 끝내고 나를 변신시켜줘 라는 뜻이다.
-
function mysum(num1,num2){
alert('안녕')
return num1+num2
}
let result2 = mysum(2,3) = ?
-> alert이 뜨고 차례대로 result2 = 5가 나온다.
-
functoin mysum(num1,num2){
alert('안녕')
}
mysum(1,2)
-> -
function sum(a,b){
console.log('계산을하자')
return a+b
}
let result = sum(2,3)
console.log(result) -
조건문
function is_adult(age){
if(age>20){
alert('성인입니다.')
}else{
alert('아닙니다.')
}}
-> console.log(is_adult(숫자입력))let age = 24
if( age > 20 ){
console.log('성인입니다.')
} else{
console.log('청소년입니다')
}
-> 성인입니다.let 성별 = '남성'
if( age > 20 && 성별 =='남성'){
console.log('성인 남성입니다.')
} else{
console.log('청소년입니다')
}
-> 성인남성입니다.
-
반복문
for (let i =0, i<10; i++)
console.log(i) }
-> 0부터 9까지 나옴 -
let people =['철수','영희','민수','형준','기남','동희']
people.length = 6이나옴 -
let a_list =['사과','배', '감', '딸기']
for (let i=0; i<a_list.length; i++){
console.log(a_list[i])
} -> i가 0부터 1개씩 커지면서 내용물을 실행시킨다.
언제까지? a_list.length의 길이까지 커진다. -
반복문예시
let scores = [
{'name':'철수', 'score':90},
{'name':'영희', 'score':85},
{'name':'민수', 'score':70},
{'name':'형준', 'score':50},
{'name':'기남', 'score':68},
{'name':'동희', 'score':30},
]
scores[0] = 철수 90
scores[1]['score'] = 85-> for (let i=0; i<scores.length; i++){
if(scores[i]['score']>70){
console.log(scores[i]['name'])
-> 철수,영희
for(let i = 0; i< scores.length; i++){
- let name = scores[i]['name']
let score = scores[i]['score']
console.log(name,score)}
-> 철수 90, 영희 85, 민수 70 등등..
-
for(let i = 0; i< scores.length; i++){
let name = scores[i]['name']
let score = scores[i]['score']
if(score < 70){
console.log(name,score)}
}
-> 기남 68, 형준 50 , 동희 30
미세먼지 반복문
-
for ( let i = 0; i < mise_list.length; i++){
console.log(mise_list[i]) } -
for ( let i = 0; i < mise_list.length; i++){
let gu_name = mise_list[i]['MSRSTE_NM']
let gu_mise = mise_list[i]['IDEX_MVL']
console.log(gu_name,gu_mise)}
-
40보다 작은 미세먼지 농도를 찾는다면?
for ( let i = 0; i < mise_list.length; i++){
let gu_name = mise_list[i]['MSRSTE_NM']
let gu_mise = mise_list[i]['IDEX_MVL']
if(gu_mise< 40 ){
console.log(gu_name,gu_mise)}
따릉이현황 반복문
-
for( let i = 0; i<bikes.length; i++) {
console.log(bikes[i])}
for ( let i= 0; i<bikes.length; i++) {
let name = bikes[i]['stationName']
let bike = bikes[i]['parkingBikeCnt']
console.log(name,bike)}
카운트&홀수짝수 만들기
let count = 0; -> 몇번 눌렀는지 알려면 값을 저장하는놈이 필요함
function hey(){
count +=1; -> 카운트를 하나 증가해줘야 겠지?
if(count % 2 == 0){ -> 어떤 수를 2로 나누었을 때 나머지가 0이면 짝수란 소리임
alert('짝수입니다.')
}else{
alert('홀수입니다.')
}
}
***
JQuery
-
jquery를 먼저 사용하려면
-> 1.import를 해야한다
-> 2. google cdn을 복사해서 title 밑에 복붙해야한다.input id에 id="article-url"을 기입 후, jquery를 이용해서 입력을 해보자
jquery를 이용해서 찾을 때는 -> ('#article-url').val() 을 입력하면 검색어에 어떤 것을 입력했는 지 알 수 잇음('#article-url').val('장영실')을 입력하면 검색어에 장영실로 변경이됨
-
CSS로 지칭이 가능함
$('#post-box').show()
$('#post-box').hide()
$('#post-box').css('width')

$('#post-box').css('width','700px') <- width 수정
$('#post-box').css('display')
포스팅박스 열기 버튼을 바꿔보도록 해보자
- id="btn-posting-box"
$('#btn-posting-box').text('바꾸고 싶은 명') - 이제 post-cards를 추가해보도록 할게요.
id='cards-box' - let temp_html = `cards-box 코드를 복사`` (백틱사용)
- let temp_html = `cards-box 코드를 복사`` (백틱사용)
- temp_html 로 확인
- temp_html 로 확인
- $('#cards-box').append(temp_html)을 입력하면 복사가됨
- $('#cards-box').append(temp_html)을 입력하면 복사가됨
백틱을 이용해 title 변경하기
- let title ="바꾸고 싶은 이름"
- 코드 중간에 ${title}을 넣게되면 '바꾸고 싶은 이름' 으로 변경이 됨
- 코드 중간에 ${title}을 넣게되면 '바꾸고 싶은 이름' 으로 변경이 됨
Jquery 적용하기
1. 포스팅박스 열고 닫기 버튼 만들기
를 만든다
-> 그리고 원래 기본으로 안뜨게 하려면 .posting-box에서 display:none을 주면 됨
2. 포스팅박스 열고 닫기 버튼 만들기(b)
 <script>
function open_box(){
$('#post-box').show()
}
function close_box(){
$('#post-box').hide()
}
</script>
Jquery 통해 예제문제 풀어보기
- 버튼을 눌렀을 때 입력한 글자로 얼럿 띄우기
- 버튼을 눌렀을 때 칸에 아무것도 없으면 "입력하세요!" 얼럿 띄우기
-> let txt = $('#input-q1').val()로 설정을 해준 뒤
if(txt == ''){
alert('아무것도 없음')
{ else{
alert(txt)}
} - 이메일 판별 함수 만들기
2-1. 버튼을 눌렀을 때 입력받은 이메일로 얼럿 띄우기
2-2. 이메일이 아니면(@가 없으면) '이메일이 아닙니다'라는 얼럿 띄우기
[완성본]2-3. 이메일 도메인만 얼럿 띄우기1. let txt = $('#input-q2).val() -> 우선 입력어를 txt로 설정 2. if(txt.includes('@') == true) -> includes 함수를 이용해서 @이 포함됬는지 여부를 파악. 3. alert(txt.split('@')[1].split('.')[0] -> split 함수를 이용해서, @ 기점으로 나누고 추가로 '.' 기점으로 다시 나눈다. - HTML 붙이기/지우기 연습
3-1. 이름을 입력하면 아래 나오게 하기
[완성본]3-2. 다지우기 버튼을 만들기
-> 번외로 다 지우기 버튼 만들기let txt = $('#input-q3').val() let temp_html = `<li>${txt}</li>` -> 추가/불러오기 할 때는 백틱과 $를 쓴다. $('#names-q3').append(temp_html) -> append 함수를 통해서 글 추가하기
$('#names-q3').empty() -> empty 함수를 통해서 한번에 제거 가능
- HTML 붙이기/지우기 연습
AJAX우선 JSONView를 설치한다.
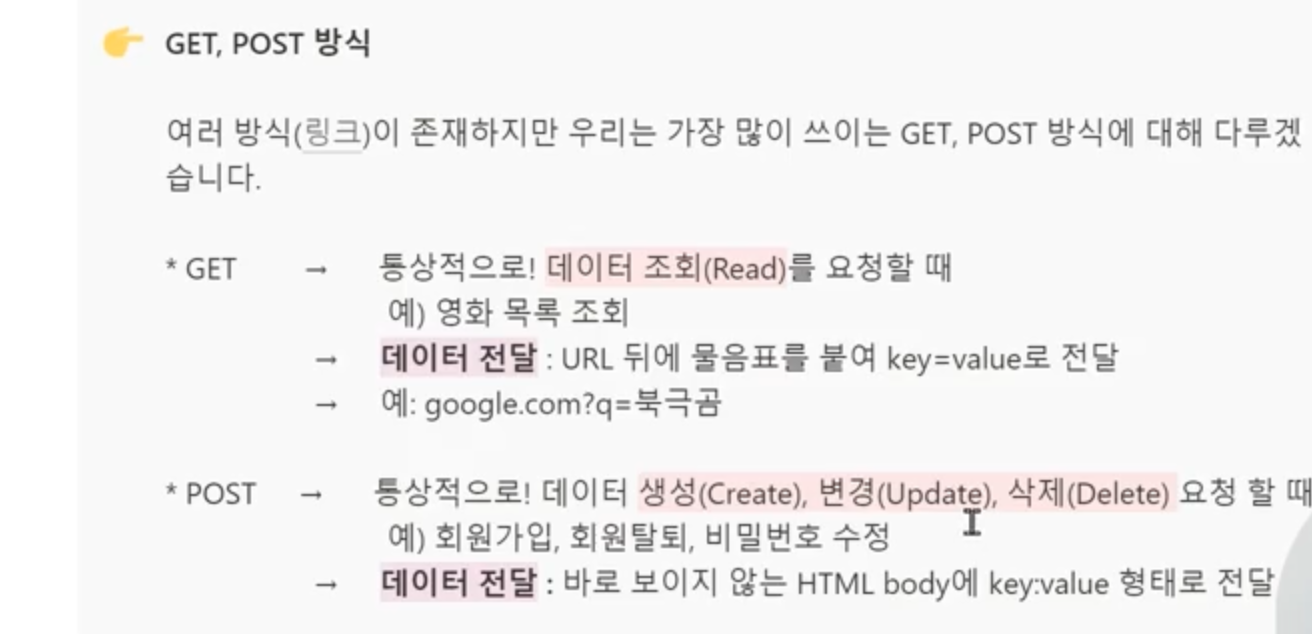
- API는 은행창구와 같다.
GET - 통상적으로 데이터를 조회 할 때 (영화 목록 조회, 브라우저에 엔터를 치는 행위)
POST - 통상적으로 데이터 생성, 변경, 삭제 요청 할 때(회원가입, 회원탈퇴, 비밀번호수정)
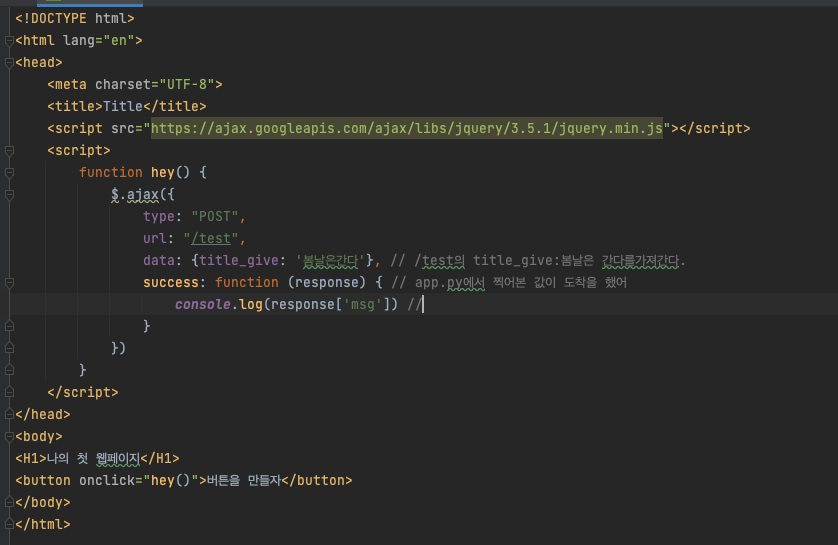
-> ajax는 jquery를 import한 페이지에서만 사용이가능하다.- ajax 기본골격
-> response에 모든 값이 들어옴$.ajax({ type: "GET", url: "http://openapi.seoul.go.kr:8088/6d4d776b466c656533356a4b4b5872/json/RealtimeCityAir/1/99", -> API주소 data: {}, success: function(response){ console.log(response) } })
이제 하나를 자세하게 들어가보자$.ajax({ type: "GET", url: "http://openapi.seoul.go.kr:8088/6d4d776b466c656533356a4b4b5872/json/RealtimeCityAir/1/99", data: {}, success: function(response){ console.log(response['RealtimeCityAir']['row'][0]) -> 조금 더 자세하게 볼 수 있음 } })
- ajax 기본골격
- 이제 반복문을 돌려보자
 $.ajax({
type: "GET",
url: "http://openapi.seoul.go.kr:8088/6d4d776b466c656533356a4b4b5872/json/RealtimeCityAir/1/99",
data: {},
success: function(response){
   let rows = response['RealtimeCityAir']['row']
 for(let i=0; i < rows.length; i++){
 let gu_name = rows[i]['MSRSTE_NM']
     let gu_mise = rows[i]['IDEX_MVL']
     if(gu_mise<70){
     console.log(gu_name,gu_mise)
 }}

}
})
서울시 OpenAPI(실시간 미세먼지 상태)를 이용하기
function q1() {
$.ajax({
  type: "GET",
  url: "http://openapi.seoul.go.kr:8088/6d4d776b466c656533356a4b4b5872/json/RealtimeCityAir/1/99",
  data: {},
  success: function(response){
    let rows = response['RealtimeCityAir']['row'] -> 우선 rows를 ajax를 이용하여 지칭
    for (let i=0; rows.length > i; i++){    -> 반복문
      let gu_name = rows[i]['MSRSTE_NM']  -> gu_name을 지칭
      let gu_mise = rows[i]['IDEX_MVL'] -> gu_mise를 지칭
      console.log(gu_name,gu_mise)
    }

  }
})
        }
반복문을 이용하여 추가하기
 function q1() {
           $('#names-q1').empty() -> 반복안되게 지워버리기
        $.ajax({
 type: "GET",
 url: "http://openapi.seoul.go.kr:8088/6d4d776b466c656533356a4b4b5872/json/RealtimeCityAir/1/99",
 data: {},
 success: function(response){
   let rows = response['RealtimeCityAir']['row']
   for (let i=0; rows.length > i; i++){
     let gu_name = rows[i]['MSRSTE_NM']
     let gu_mise = rows[i]['IDEX_MVL']

     let temp_html =`<li>${gu_name} : ${gu_mise}</li>` -> temp_html을 통해 백틱으로 temp_html 설정
     $('#names-q1').append(temp_html) -> 추가하기
   }

 }
})
       }
미세먼지 수치가 70 이상인 곳 빨간색으로 칠하기
function q1() {
          $('#names-q1').empty()
       $.ajax({
type: "GET",
url: "http://openapi.seoul.go.kr:8088/6d4d776b466c656533356a4b4b5872/json/RealtimeCityAir/1/99",
data: {},
success: function(response){
  let rows = response['RealtimeCityAir']['row']
  for (let i=0; rows.length > i; i++){
    let gu_name = rows[i]['MSRSTE_NM']
    let gu_mise = rows[i]['IDEX_MVL']

      let temp_html = ``  -> 우선 백틱으로 지정(일단 빈 문자열을 만들어야함)
      if(gu_mise > 70){
          temp_html =`<li class="bad">${gu_name} : ${gu_mise}</li>`
      } else{
           temp_html =`<li>${gu_name} : ${gu_mise}</li>`
      }


    $('#names-q1').append(temp_html)
  }

}
})
      }
서울시 따릉이 데이터로 연습해보기
<script>
function q1() {
  $('#names-q1').empty()
$.ajax({
type: "GET",
url: "http://spartacodingclub.shop/sparta_api/seoulbike",
data: {},
success: function(response){
let rows =   response['getStationList']['row']
 for(let i=0; i < rows.length; i++){
   let name = rows[i]['stationName']
   let rack = rows[i]['rackTotCnt']
   let bike = rows[i]['parkingBikeTotCnt']

   let temp_html =``

   if(bike < 5){
temp_html=`<tr class="red">
    <td>${name}</td>
    <td>${rack}</td>
    <td>${bike}</td>
</tr>`
   }else{
     temp_html=`<tr>
    <td>${name}</td>
    <td>${rack}</td>
    <td>${bike}</td>
</tr>`
   }


   $('#names-q1').append(temp_html)

 }

}
})
}
</script>- 이미지 바꾸기 : $('#아이디값').attr('src', 이미지url)
텍스트 바꾸기 : $('#아이디값').text(바꾸고싶은 텍스트)
르탄이 나와로 ajax 연습해보기
<script>
function q1() {
$.ajax({
type: "GET",
url: "http://spartacodingclub.shop/sparta_api/rtan",
data: {},
success: function(response){
  let url = response['url']
  let msg = response['msg']

  $('#img-rtan').attr('src', url) -> 'src'를 -> url로 바꾸는 코드
  $('#text-rtan').text(msg) -> text 바꾸는 코드

}
})
}
</script>
날씨 온도 api로 추가하기
      <script>
        $(document).ready(function(){
            $.ajax({
              type: "GET",
              url: "http://spartacodingclub.shop/sparta_api/weather/seoul",
              data: {},
              success: function(response){
                  let temp = response['temp']
                  let city = response['city']
                 $('#temp').text(temp)
                 $('#city').text(city)

                }
              })
        });


    </script>
</head>
<body>
    <div class="mypic">
        <h1>10센치 팬명록</h1>
        <p>현재기온 <span id="temp">36</span>도</p>
        <p>현재위치 <span id="city"></span></p>
    </div>
실습, 아이유 팬명록 만들기
  <script>
    $.ajax({
type: "GET",
url: "http://spartacodingclub.shop/sparta_api/weather/seoul",
data: {},
success: function(response){
    let temp =response['temp']
    let location =response['city']
    $('#temp').text(temp)
    $('#location').text(location)
}
})

</script>

</head>

<body>
<div class="mytitle">

  <div class="text">
      <h1>아이유 팬명록</h1>
    <p>현재기온 : <span id="temp">00.0</span>도 / 현위치 :<span id="location"></span></p>
  </div>
ajax 복습하기
<script>
$(document).ready(function(){
listing();
});

function listing() {
$('#cards-box').empty()
$.ajax({
type: "GET",
url: "http://spartacodingclub.shop/web/api/movie",
data: {},
success: function(response){
let movies = response['movies']
for (let i = 0 ; i < movies.length; i++) {
let movie = movies[i]
let title = movie['title']
let desc = movie['desc']
let image = movie['image']
let comment = movie['comment']
let star = movie['star']

let star_image = '⭐'.repeat(star) -> 별점 넣는 방법

let temp_html = `<div class="col">
<div class="card h-100">
<img src="${image}"
class="card-img-top">
<div class="card-body">
<h5 class="card-title">${title}</h5>
<p class="card-text">${desc}</p>
<p>${star_image}</p> -> 별점 넣는 방법
<p class="mycomment">${comment}</p>
</div>
</div>
</div>`
$('#cards-box').append(temp_html)
}
}
})
}

function open_box(){
$('#post-box').show()
}
function close_box(){
$('#post-box').hide()
}
</script> 
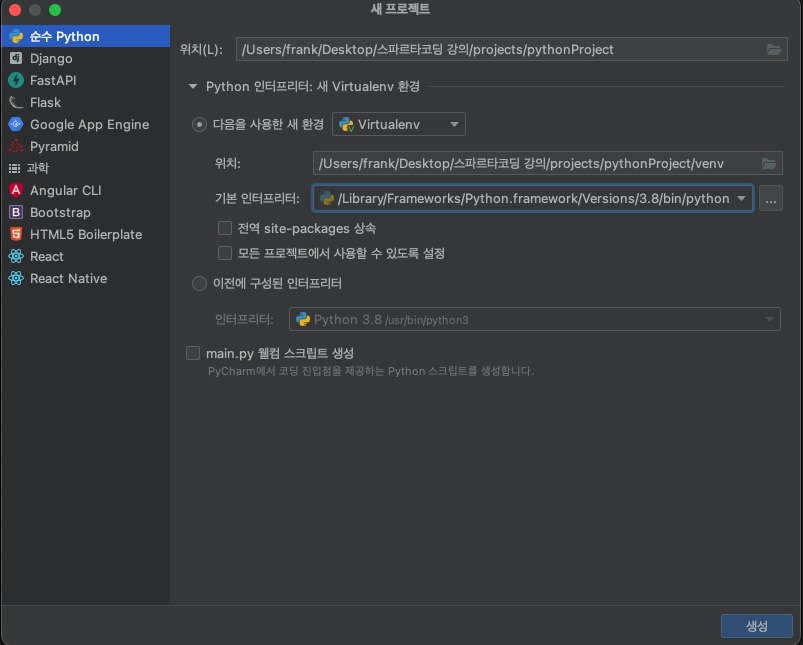
-> 파이썬 초기 셋팅
파이썬 시작
(변수,자료형,함수,조건문,반복문)
-
print('hello sparta') -> 실행
-
a=2, b=3 a+b(print) => 실행을 하면 5라는 값이 나옴
-
a_list =['사과','배','감'], print(a_list[1]) -> 감이 나옴
-
a_dict={
'name':'bob',
'age':27} -> print(a_dict['name']) => 'bob' -
def sum(a,b):
return a + b -> 나를 얘로 변신시켜라 라는 뜻
result = sum(1,2)
print(result) -> 3이 찍힌다.
조건문
  def is_adult(age):

    if age > 15:
        print('성인입니다.')
    else:
        print('청소년 입니다.')

is_adult(16)  -> 성인입니다.
반복문
fruits = ['사과','배','배','감','수박','귤','딸기','사과','배','수박']


count = 0
for aaa in fruits:
    if aaa =='사과':
        count +=1

print(count)
people = [{'name': 'bob', 'age': 20},
{'name': 'carry', 'age': 38},
{'name': 'john', 'age': 7},
{'name': 'smith', 'age': 17},
{'name': 'ben', 'age': 27}]
for ppp in people:
if ppp['age'] > 20: -> 20살 이상인 사람들의 name은?
print(ppp['name'])설치해야할 것들
- requests
- bs4
- pymongo
- dnspython
requests 시연해보기
import requests # requests 라이브러리 설치 필요
r = requests.get('http://spartacodingclub.shop/sparta_api/seoulair')
rjson = r.json()
rows = rjson['RealtimeCityAir']['row']
for row in rows:
gu_name = row["MSRSTE_NM"]
gu_mise = row["IDEX_MVL"]
if gu_mise < 60:
print(gu_name)
-> for 아무거나적기 in rows
웹스크롤링
  import requests
from bs4 import BeautifulSoup

headers = {'User-Agent' : 'Mozilla/5.0 (Windows NT 10.0; Win64; x64)AppleWebKit/537.36 (KHTML, like Gecko) Chrome/73.0.3683.86 Safari/537.36'}
data = requests.get('https://movie.naver.com/movie/sdb/rank/rmovie.naver?sel=pnt&date=20210829',headers=headers)

soup = BeautifulSoup(data.text, 'html.parser')


#old_content > table > tbody > tr:nth-child(3) > td.title > div > a
#old_content > table > tbody > tr:nth-child(4) > td.title > div > a

movies = soup.select('#old_content > table > tbody > tr')

for movie in movies:
    a = movie.select_one('td.title>div>a')
    if a is not None:
     print(a.text)
크롤링2
  import requests
from bs4 import BeautifulSoup

headers = {'User-Agent' : 'Mozilla/5.0 (Windows NT 10.0; Win64; x64)AppleWebKit/537.36 (KHTML, like Gecko) Chrome/73.0.3683.86 Safari/537.36'}
data = requests.get('https://movie.naver.com/movie/sdb/rank/rmovie.naver?sel=pnt&date=20210829',headers=headers)

soup = BeautifulSoup(data.text, 'html.parser')


#old_content > table > tbody > tr:nth-child(3) > td.title > div > a
#old_content > table > tbody > tr:nth-child(4) > td.title > div > a

movies = soup.select('#old_content > table > tbody > tr')

for movie in movies:
    a = movie.select_one('td.title>div>a')
    if a is not None:
     title = a.text
     rank = movie.select_one(' td:nth-child(1) > img')
     star = movie.select_one('  td.point')
     print(star.text)
데이터베이스(DB)의 실체
- db를 쓰는 이유는 나중에 잘 찾기 위해서이다.
- db에는 Index라는 순서대로 데이터들이 잘 정렬이 되어있다.
- db에는 2가지 종류가 있다.
- SQL - 조금 더 정형화 되어있음
- NO SQL - 그때그때 마다 쌓여있음 (대표적인게 몽고DB)
DB는 그냥 프로그램임
내 컴퓨터에도 DB를 깔 수 있지만, 클라우드 에서도 DB설치가 가능함
이제 클라우드를 빌려서 쓰는 몽고DB를 사용해보자
몽고db를 설치해보자
오류가 난다면 certifi를 설치하고 아래와 같이 입력하자
from pymongo import MongoClient
import certifi
ca = certifi.where()

client = MongoClient('mongodb+srv://test:sparta@cluster0.wff24uo.mongodb.net/Cluster0?retryWrites=true&w=majority', tlsCAFile=ca)
db = client.dbsparta


doc = {
  'name':'bob',
  'age':27
}

from pymongo import MongoClient
import certifi
ca = certifi.where()

client = MongoClient('mongodb+srv://test:sparta@cluster0.wff24uo.mongodb.net/Cluster0?retryWrites=true&w=majority', tlsCAFile=ca)
db = client.dbsparta


doc = {
  'name':'bob',
  'age':27
}

db.users.insert_one(doc) 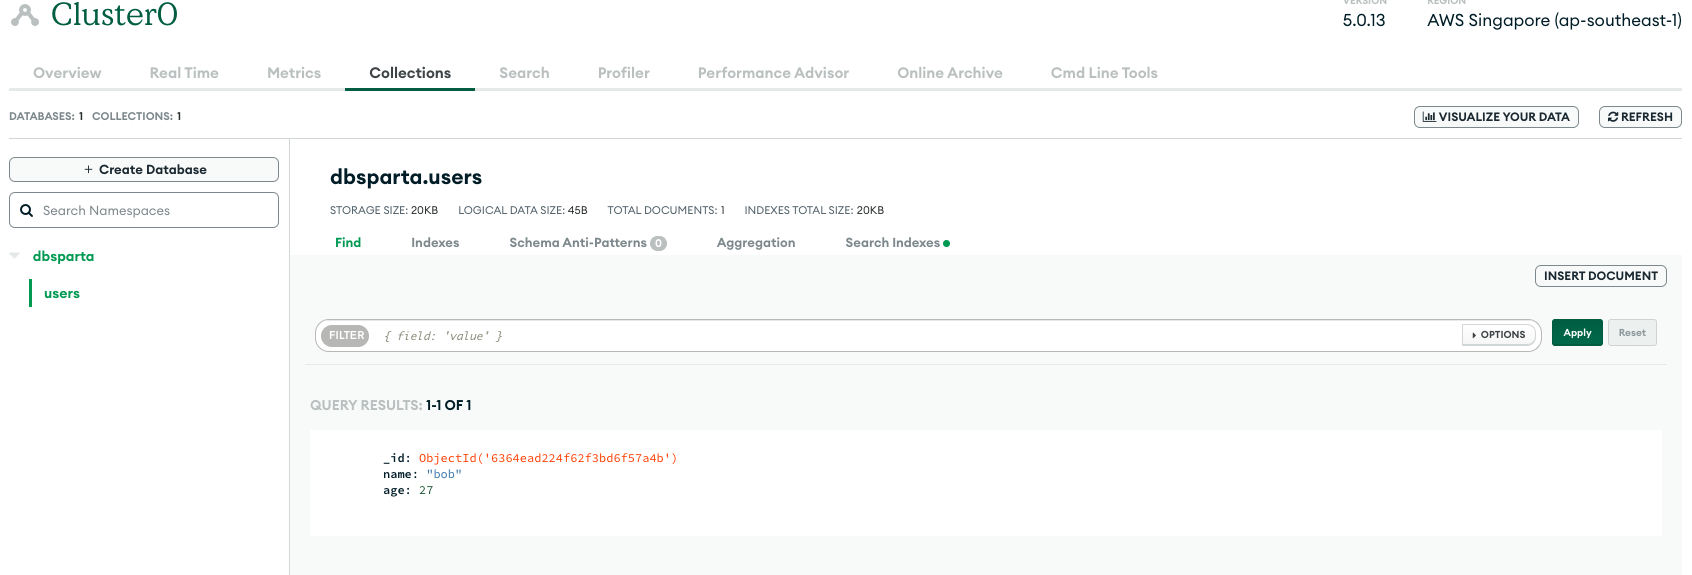
위와 같이 나오면 성공!
영화 평점 크롤링 한 것을, 이제 db에 올려보도록 하자
  import requests
from bs4 import BeautifulSoup
from pymongo import MongoClient
import certifi
ca = certifi.where()
client = MongoClient('mongodb+srv://test:sparta@cluster0.wff24uo.mongodb.net/Cluster0?retryWrites=true&w=majority', tlsCAFile=ca)
db = client.dbsparta
headers = {'User-Agent' : 'Mozilla/5.0 (Windows NT 10.0; Win64; x64)AppleWebKit/537.36 (KHTML, like Gecko) Chrome/73.0.3683.86 Safari/537.36'}
data = requests.get('https://movie.naver.com/movie/sdb/rank/rmovie.naver?sel=pnt&date=20210829',headers=headers)
soup = BeautifulSoup(data.text, 'html.parser')
movies = soup.select('#old_content > table > tbody > tr')
for movie in movies:
    a = movie.select_one('td.title > div > a')
    if a is not None:
            title = a.text
            star = movie.select_one('td.point').text
            rank = movie.select_one('td:nth-child(1) > img')['alt']
  doc = {
                'title':title,
                'rank':rank,
                'star':star
            }
            db.movies.insert_one(doc)
크롤링 기본준비
import requests
from bs4 import BeautifulSoup
from pymongo import MongoClient
import certifi
ca = certifi.where()
client = MongoClient('mongodb+srv://test:sparta@cluster0.wff24uo.mongodb.net/Cluster0?retryWrites=true&w=majority', tlsCAFile=ca)
db = client.dbsparta
headers = {'User-Agent' : 'Mozilla/5.0 (Windows NT 10.0; Win64; x64)AppleWebKit/537.36 (KHTML, like Gecko) Chrome/73.0.3683.86 Safari/537.36'}
data = requests.get('https://movie.naver.com/movie/sdb/rank/rmovie.naver?sel=pnt&date=20210829',headers=headers)
soup = BeautifulSoup(data.text, 'html.parser')
3강 숙제 크롤링(지니)
import requests
from bs4 import BeautifulSoup
headers = {'User-Agent' : 'Mozilla/5.0 (Windows NT 10.0; Win64; x64)AppleWebKit/537.36 (KHTML, like Gecko) Chrome/73.0.3683.86 Safari/537.36'}
data = requests.get('https://www.genie.co.kr/chart/top200?ditc=M&rtm=N&ymd=20210701',headers=headers)
soup = BeautifulSoup(data.text, 'html.parser')
trs = soup.select('#body-content > div.newest-list > div > table > tbody > tr')
for tr in trs:
rank = tr.select_one('td.number').text[0:2].strip()
title = tr.select_one('td.info > a.title.ellipsis').text.strip()
artist = tr.select_one('a.artist.ellipsis').text
print(rank,title,artist)
4강 프레임워크를 설정해보자
- 설치해야될 것
-flask
Get 방식과 Post 방식을 살펴보자
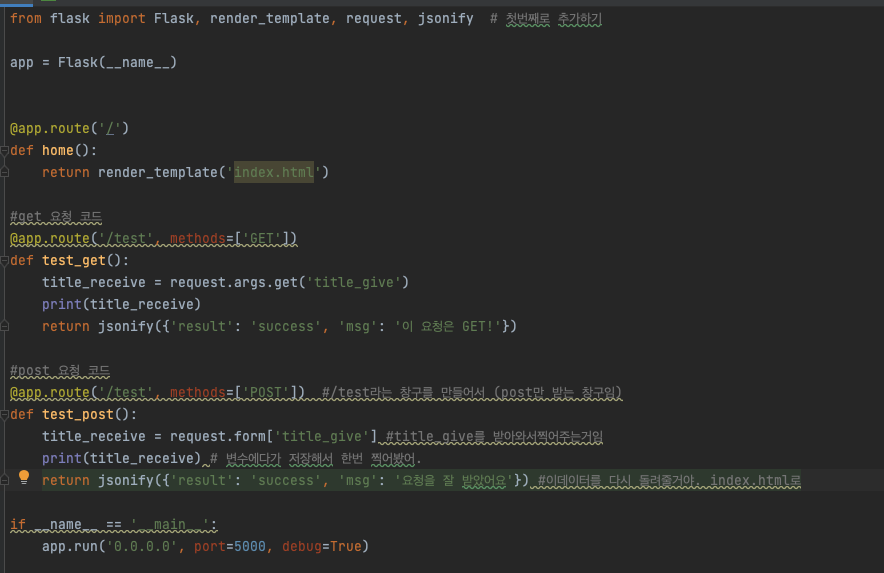
실습을 해보자
- templates, static 폴더 만들고, app.py를 만들자
- flask, pymongo, dnspython, ceritifi, requests,bs4 도 설치한다.
4-7강의
app.py
