AOP 관점 지향 프로그래밍 - Aspect Oriented Programming
AOP는 Aspect Oriented Programming의 약자로, 여러 객체에 공통으로 적용할 수 있는 기능을 분리해서 재사용성을 높여주는 프로그래밍 기법이다. AOP는 핵심 기능과 공통 기능의 구현을 분리함으로써 핵심 기능을 구현한 코드의 수정 없이 공통 기능을 적용 할 수 있게 만들어 준다.
-
AOP의 기본 개념은 핵심 기능에 공통 기능을 삽입하는 것이다. 즉 핵심 기능의 코드를 수정하지 않으면서 공통 기능의 구현을 추가하는 것이 AOP이다.
-
특정한 함수 호출 전이나 후에 어떠한 공통적인 처리가 필요할 때 사용 -> AOP
- 로깅
- 트랜잭션
- 인증
-
OOP로 처리하기에는 다소 까다로운 부분을 AOP라는 처리 방식을 도입하여 손쉽게 공통 기능을 추가/수정/삭제 할 수 있도록 함
핵심 기능의 공통 기능을 삽입하는 방법
- 컴파일 시점에 코드에 공통 기능을 삽입하는 방법
- AOP 개발 도구가 소스 코드를 컴파일 하기 전에 공통 구현 코드를 소스에 삽입하는 방식으로 동작
- 클래스 로딩 시점에 바이트 코드에 공통 기능을 삽입하는 방법
- 클래스를 로딩할 때 바이트 코드에 공통 기능을 클래스에 삽입하는 방식으로 동작
- 1번과 2번 방법은 스프링 AOP에서는 지원하지 않으며 AspectJ와 같이 AOP 전용 도구를 사용해서 적용할 수 있다.
- 런타임에 프록시 객체를 생성해서 공통 기능을 삽입하는 방법
- 스프링이 제공하는 AOP 방식 프록시를 이용한 방법으로 코드 중간에 프록시 객체를 생성하는 것이다.
- 실제 객체의 기능을 실행하기 전, 후에 공통 기능을 호출한다.
- 스프링 AOP는 프록시 객체를 자동으로 만들어준다.
- 상위 타입의 인터페이스를 상속받은 프록시 클래스를 직접 구현할 필요가 없고, 공통 기능을 구현한 클래스만 알맞게 구연하면 된다.
- AOP에서 공통 기능을 AspectJ라고 한다.
AOP의 기본 개념들
-
Advice
- 조언, AOP에서 실제로 적용하는 기능(로깅, 트랜잭션, 인증 등)을 뜻함
- 언제 공통 관심 기능을 핵심 로직에 적용할 지를 정의한다. 예를 들어 메서드를 호출하기 전(언제)에 '트랜잭션 시작'(공통기능) 기능을 적용한다는 것을 정의한다.
-
Join point (연결 가능 지점)
- 모듈화된 특정 기능이 실행될 수 있는 연결 포인트
- Advice를 적용 가능한 지점을 의미한다. 메서드 호출, 필드 값 변경 등이 Joinpoint에 해당한다.
- 스프링은 프록시를 이용해서 AOP를 구현하기 때문에 메서드 호출에 대한 Joinpoint만 지원한다.
-
Pointcut
- Join point 중에서 해당 Aspect를 적용할 대상을 뽑을 조건식
- Joinpoint의 부분 집합으로서 실제 Advice가 적용되는 Joinpoint를 나타낸다.
- 스프링에서 정규 표현식이나 AspectJ의 문법을 이용하여 Pointcut을 정의할 수 있다.
-
Weaving
- Advice를 비즈니스 로직 코드에 삽입하는 것을 말함
-
Aspect
-
여러 클래스나 기능에 걸쳐서 있는 관심사, 그리고 그것들을 모듈화함
-
AOP 중에서 가장 많이 활용되는 부분은 @Transactional (트랜잭션 관리) 기능
-
-
Target Object
- Advice가 적용될 대상 오브젝트
-
AOP Proxy
-
대상 오브젝트에 Aspect를 적용하는 경우 Advice를 덧붙이기 위해 하는 작업을 AOP Proxy라고 한다.
-
주로 CGLIB(Code Generation Library, 실행 중에 실시간으로 코드를 생성하는 라이브러리) 프록시를 사용하여 프록싱 처리를 한다.
-
Advice의 종류
스프링은 프록시를 이용해서 메서드 호출 시점에 Aspect를 적용한다.
- Before Advice
- 대상 객체의 메서드 호출 전에 공통 기능을 실행한다.
- After Returning Advice
- 대상 객체의 메서드가 익셉션 없이 실행된 이후에 공통 기능을 실행한다.
- After Throwing Advice
- 대상 객체의 메서드를 실행하는 도중 익셉션이 발생한 경우에 공통 기능을 실행한다.
- After Advice
- 익셉션 발생 여부에 상관없이 대상 객체의 메서드 실행 후 공통 기능을 실행한다. (try - catch - finally의 finally와 비슷하다.)
- Around Advice
- 대상 객체의 메서드 실행 전, 후 또는 익셉션 발생 지점에 공통 기능을 실행된다.
보통 Around Advice 기능을 많이 사용된다. 대상 객체의 메서드를 실행하기 전/후, 익셉션 발생 시점 등 다양한 시점에 원하는 기능을 삽입할 수 있기 때문이다. 캐시 기능, 성능 모니터링 기능과 같은 Aspect를 구현할 때에는 Around Advice를 주로 이용한다.
AspectJ 지원
AspectJ는 AOP를 제대로 사용하기 위해 꼭 필요한 라이브러리이다.
기본적으로 제공되는 Spring AOP로 다양한 기법(Pointcut 등)의 AOP를 사용할 수 없다.
- Aspect의 생성
package org.xyz;
import org.aspectj.lang.annotation.Aspect;

@Aspect
@Component  // Component를 붙인 것은 해당 Aspect를 스프링의 Bean으로 등록해서 사용하기 위함
public class UsefulAspect {

}- Pointcut 선언
package org.xyz;
import org.aspectj.lang.annotation.Aspect;

@Aspect
@Component  // Component를 붙인 것은 해당 Aspect를 스프링의 Bean으로 등록해서 사용하기 위함
public class UsefulAspect {

	@Pointcut("execution(* transfer(..))")
	private void anyOldTransfer() {}
}- 해당 Aspect의 Advice(실행할 액션)이 적용될 Join point를 찾기 위한 패턴 또는 조건 생성
- 포인트 컷 표현식이라고 부름
- Pointcut 결합
package org.xyz;
import org.aspectj.lang.annotation.Aspect;

@Aspect
@Component  // Component를 붙인 것은 해당 Aspect를 스프링의 Bean으로 등록해서 사용하기 위함
public class UsefulAspect {

	@Pointcut("execution(public * *(..))")
	private void anyPublicOperation() {} //public 메서드 대상 포인트 컷

	@Pointcut("within(com.xyz.myapp.trading..*)")
	private void inTrading() {} // 특정 패키지 대상 포인트 컷

	@Pointcut("anyPublicOperation() && inTrading()")
	private void tradingOperation() {} // 위의 두 조건을 and(&&) 조건으로 결합한 포인트 컷
}
Advice 정의
Pointcut 들을 활용하여 Pointcut의 전/후/주변에서 실행될 액션을 정의함
Before Advice
dataAccessOperation()이라는 미리 정의된 포인트 컷의 바로 전에 doAccessCheck가 실행
import org.aspectj.lang.annotation.Aspect;
import org.aspectj.lang.annotation.Before;

@Aspect
public class BeforeExample {

    @Before("com.xyz.myapp.CommonPointcuts.dataAccessOperation()")
    public void doAccessCheck() {
        // ...
    }
}
After Returning Advice
dataAccessOperation()라는 미리 정의된 포인트컷에서 return이 발생된 후 실행
import org.aspectj.lang.annotation.Aspect;
import org.aspectj.lang.annotation.AfterReturning;

@Aspect
public class AfterReturningExample {

    @AfterReturning("com.xyz.myapp.CommonPointcuts.dataAccessOperation()")
    public void doAccessCheck() {
        // ...
    }
}
Around Advice
businessService()라는 포인트컷의 전/후에 필요한 동작을 추가함
import org.aspectj.lang.annotation.Aspect;
import org.aspectj.lang.annotation.Around;
import org.aspectj.lang.ProceedingJoinPoint;

@Aspect
public class AroundExample {

    @Around("com.xyz.myapp.CommonPointcuts.businessService()")
    public Object doBasicProfiling(ProceedingJoinPoint pjp) throws Throwable {
        // start stopwatch
        Object retVal = pjp.proceed();
        // stop stopwatch
        return retVal;
    }
}
@Aspect, @Pointcut, @Around를 이용한 AOP 구현
개발자는 공통 기능을 제공하는 Aspect 구현 클래스를 만들고 자바 설정을 이용해서 Aspect를 어디에 적용할지 설정하면 된다.
Asepct는 @Aspect 어노테이션을 이용해서 구현한다. 프록시는 스프링 프레임워크가 알아서 만들어준다.
 @Aspect //Advice와 Pointcut을 함께 제공
    public class ExeTimeAspect {

        @Pointcut("execution(public * chap07..*(..))") //공통 기능을 적용할 대상을 설정
        private void publicTarget() {
        }

        @Around("publicTarget()") //Around Advice를 설정, 공통 기능을 적용한다는 것을 의미, publicTarget메서드에 정의한 Pointcut에 공통 기능을 적용한다는 것을 의미
        public Object measure(ProceedingJoinPoint joinPoint) throws Throwable {// ProceedingJoinPoint 파라미터는 프록시 대상 객체의 메서드를 호출할 때 사용
            long start = System.nanoTime();
            try {
                Object result = joinPoint.proceed(); // porceed() 메서드를 사용해서 실제 대상 객체의 메서드를 호출, 이 메서드를 호출하면 이전과 이후에 공통 기능을 위한 코드를 위치시키면 된다.
                return result;
            } finally {
                long finish = System.nanoTime();
                Signature sig = joinPoint.getSignature();
                System.out.printf("%s.%s(%s) 실행 시간 : %d ns\n",
                        joinPoint.getTarget().getClass().getSimpleName(),
                        sig.getName(), Arrays.toString(joinPoint.getArgs()),
                        (finish - start));
            }
        }

    }
    @Configuration
    @EnableAspectJAutoProxy // @Aspect를 공통 기능으로 적용하기 위해 @EnableAspectJAutoProxy 어노테이션을 설정해줘야 한다. 스프링은 @Aspect 어노테이션이 붙은 빈 객체를 찾아서 빈 객체의 @Pointcut 설정과 @Around 설정을 사용한다.
    public class AppCtx {

        @Bean
        public ExeTimeAspect exeTimeAspect() {
            return new ExeTimeAspect();
        }

        @Bean
        public Calculator calculator() {
            return new RecCalculator();
        }

    }
    public class MainAspect {
        public static void main(String[] args) {
            AnnotationConfigApplicationContext ctx =
                    new AnnotationConfigApplicationContext(AppCtx.class);

            Calculator cal = ctx.getBean("calculator", Calculator.class);
            long fiveFact = cal.factorial(5);
            System.out.println("cal.factorial(5) = " + fiveFact);
            System.out.println(cal.getClass().getName());
            ctx.close();
        }

    }
public interface Calculator {
public long factorial(long num);
}
public class RecCalculator implements Calculator {
@Override
public long factorial(long num) {
if (num == 0)
return 1;
else
return num * factorial(num - 1);
}
}
public class MainAspect {
public static void main(String[] args) {
AnnotationConfigApplicationContext ctx =
new AnnotationConfigApplicationContext(AppCtx.class);
Calculator cal = ctx.getBean("calculator", RecCalculator.class); // 오류 발생
// Calculator cal = ctx.getBean("calculator", Calculator.class);
long fiveFact = cal.factorial(5);
System.out.println("cal.factorial(5) = " + fiveFact);
System.out.println(cal.getClass().getName());
ctx.close();
}
}스프링은 AOP를 위한 프록시 객체를 생성할 때 한다. RecCalculator 클래스가 Calculator 인터페이스를 상속하므로 Calculator 인터페이스를 상속받은 프록시 객체를 생성한다. 따라서 위에 코드처럼 빈의 실제 타입이 RecCalculator라고 하더라도 Calculator 이름에 해당하는 빈 객체의 타입은 Calculator 인터페이스를 상속받은 프록시 타입이 된다.
// 설정 클래스
// AOP 적용시 RecCalculator가 상속받은 Calculator 안터페이스를 이용해서 프록시 생성
@Configuration
@EnableAspectJAutoProxy
public class AppCtx {
	@Bean
	public Calculator calculator() {
		return new RecCalculator();
	}
}

// 자바코드:
// calculator 빈의 실제 타입은 Callculator를 상속한 프록시 타입이므로
// RecCalculator로 타입을 반환을 할 수 없기 때문에 익셉션 발생
해결 방법
@EnableAspectJAutoProxy(proxyTargetClass = true)
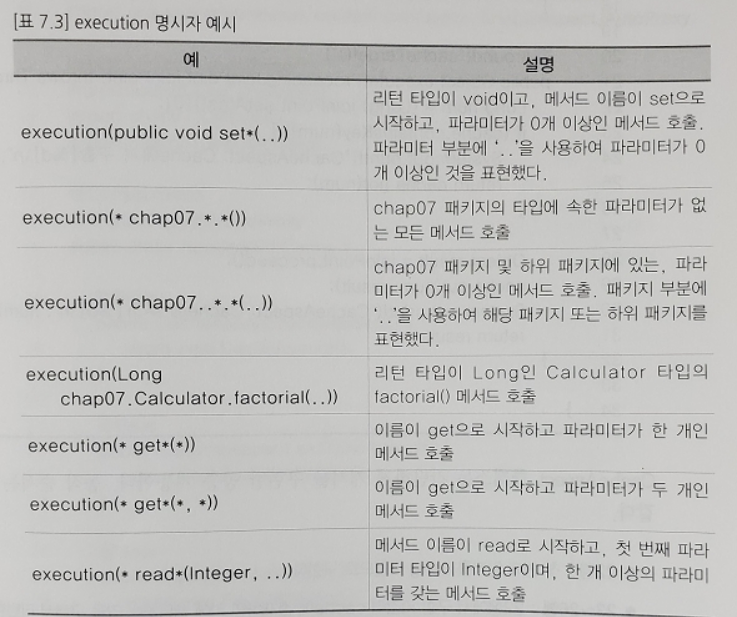
// 인터페이스가 아닌 자바 클래스를 상속받아 프록시를 생성한다.execution 명시자 표현식
@Pointcut("execution(public * chap7..*(..))")
private void publicTarget(){}
execution 명시자는 Advice를 적용할 메서드를 지정할 때 사용한다.
execution(수식어 패턴? 리턴타입패턴 클래스이름패턴?메서드이름패턴(파라미터패턴))- 수식어 패턴 : 생략 가능, public, protected 등이 사용된다. 스프링 AOP는 public 메서드만 적용 가능하다.
- 리턴 타입 패턴 : 리턴 타입을 명시
- 클래스 이름 패턴 : 클래스 이름을 명시
- 메서드 이름 패턴 : 메서드 이름을 명시
- 파라미터 패턴 : 매칭될 파라미터에 대해서 명시
- 각 패턴은 ' * '을 이용하여 모든 값을 표현할 수 있다. 또한 ' .. '(점 두 개)을 이용하여 0개이상이라는 의미를 표현할 수 있다.
@Order 어노테이션
-
@Order 어노테이션을 클래스에 붙이면 @Order 어노테이션에 지정한 값에 따라 적용 순서를 결정한다.
-
@Order 어노테이션의 값이 작으면 먼저 젹용하고 크면 나중에 적용된다.
@Aspect
@Order(2)
public class CacheAspect {
	...
}
//-------------------------------------------------
@Aspect
@Order(1)
public class CacheAspect2 {
	...
}
@Around의 Pointcut 설정과 @Pointcut 재사용
@Pointcut 어노테이션이 아닌 @Around 어노테이션에 execution 명시자를 직접 지정 할 수 있다.
/*@Pointcut("execution(public * chap07..*(long))")
	public void cacheTarget() {
}*/

@Around("execution(public * chap07..*(..))")
public Object execute(ProceedingJoinPoint joinPoint) throws Throwable {
  ...
 }
@Pointcut 재사용
@Pointcut("execution(public * chap07..*(long))")
	private void cacheTarget() {
}

@Around("cacheTarget()") // 기존에 사용했던 방법이다. 이 방법으로 코드를 재사용 할 수 있다.
public Object execute(ProceedingJoinPoint joinPoint) throws Throwable {
  ...
}
cacheTarget() 메서드는 private 이기 때문에 이 경우 같은 클래스에 있는 @Around 어노테이션에만 해당 설정을 사용 할 수 있다. 만약 다른 클래스에서도 사용하고 싶다면 cacheTarget() 를 public 으로 바꾸면 된다. 그리고 해당 Pointcut의 완전한 클래스 이름을 포함한 메서드 이름을 @Around 어노테이션에서 사용하면 된다.
@Around("aspect.ExeTimeAspect.publicTarget()") // 완전한 클래스 이름
public Object execute2(ProceedingJoinPoint joinPoint) throws Throwable {
  ...
}
만약 여러 클래스에서 동일한 Pointcut을 사용하고 싶다면 하나의 클래스에서 Pointcut을 정의 후 사용하면 더욱 Pointcut 관리가 편리해진다.
