
저번 1편 에서 이어지는 내용이다.
3.redux 전반적인 흐름.
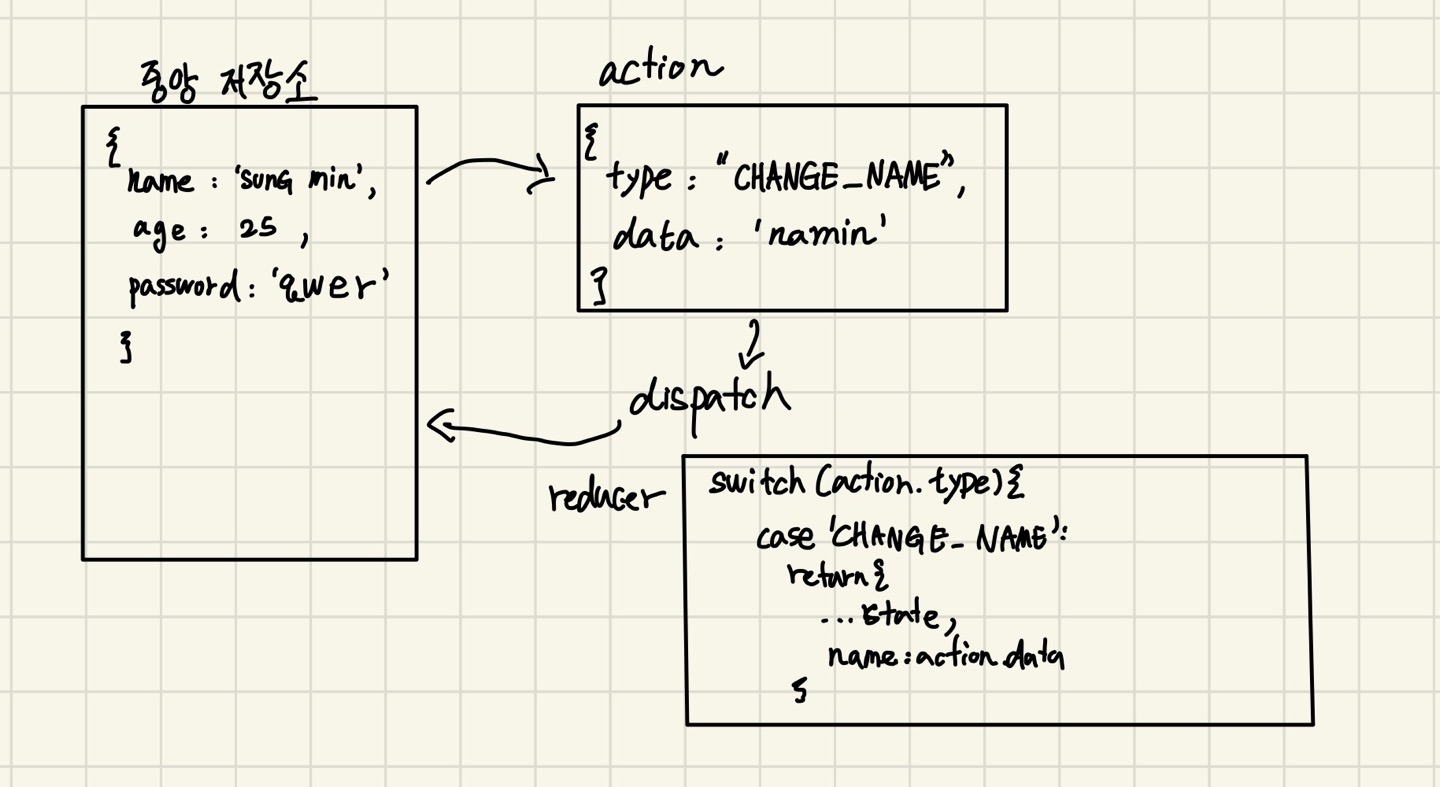
먼저 중앙저장소에 데이터가 저장이 되있다.이제 리덕스를 통해서 수정,추가,조회,삭제가 가능하겠죠?
redux에서는 데이터를 바꿀려면 action 이라는게 필요하다.action은 객체여야하고 type:"무슨 일을 할지 결정" 해야한다.
const changeName = (data) =>{
	return{ //action 은 꼭 객체로 반환을 해야한다.
    	type:"CHANGE_NAME",
      	data, //바꾸실 데이터
    }
}
reducer 를 통해 action 을 받아와서 읽고 action.type 에 의해서 중앙저장소에 상태를 바꿔준다.(실직적인 바꿔주는 함수)
const initialized = { //state 초기화하는 객체
 	name:"sungmin",
  	age:25,
  	password:'qwer'

}

const reducer=(state=initialized,action)=>{
  	switch(action.type){
      case 'CHANGE_NAME':
        return{// 객체로 반환해야한다.
         	...state,
          	name:action.data
        }
    }

}
reducer 를 통해서 객체로 반환하는 이유는 추적 하기 위해서이다.
새로운 객체로 반환해야 히스토리가 생기기 때문이다. 참조해서 값을 바꾸면 리덕스에서 히스토리가 생기지않아 추적하기가 힘들다.
4.리덕스 실제 구현하기
앞서 1번째 블로그에서 configureStore.js 코드를 다시한번 가져오겠다.
import { createWrapper } from "next-redux-wrapper";
import { applyMiddleware, compose, createStore } from "redux";
import {composeWithDevTools} from 'redux-devtools-extension'; // 개발툴 연결을 하기위한 라이브러리.
import reducer from '../reducers'; //reducers/index.js에서

const configureStore = () =>{
    const middlewares = [];// saga,thunk 넣는곳.
    const enhancer = process.env.NODE_ENV === 'production' ?
    compose(applyMiddleware(...middlewares)):
    composeWithDevTools(applyMiddleware(...middlewares));
  // 개발중이면 개발툴 연결시키고 아니면 연결안시킨다.
    const store = createStore(reducer,enhancer); // 여기서
 // reducer 부분을 어떻게 구현했는지 볼것이다.
    return store;
};

const wrapper = createWrapper(configureStore,{
    debug:process.env.NODE_ENV === 'development',
});

export default wrapper;
먼저 reducers 폴더를 만들고 index.js 파일을 과 크게 나눌수있는 리듀서 들을 따로 파일로 분리해놓는다.
이번에는 예제를 user.js 유저다루는리듀서랑 post.js 포스트관련정보를 다루는 이듀서를 작성하고 index.js 에서 combine 작업을 진행 할 것이다.
먼저 user.js
export const initialized ={ // 초기화 값
    isLoggedIn: false,
    user:null,
    signUpData:{},
    loginData:{}
}

export const loginAction =(data)=>{ //action
    return  {
        type:"LOG_IN",
        data
    }
}

export const logoutAction =()=>{ //action
    return {
        type:"LOG_OUT"
    }
}

const reducer = (state=initialized,action)=>{ //reducer
    switch(action.type){
        case "LOG_IN":
            return { //새로운 객체 반환.
                ...state,
                isLoggedIn:true,
                user:action.data,
            }
        case "LOG_OUT":
            return {
                ...state,
                isLoggedIn:false,
                user:null
            }
        default:
            return state;
    }

}


export default reducer;
post.js
export const initialized ={
    mainPosts:[]
}

const reducer = (state=initialized,action)=>{
    switch(action.type){
        default:
            return state;
    }

}


export default reducer;
index.js
import { HYDRATE } from "next-redux-wrapper";
import { combineReducers } from "redux"; //combine 해주는 함수
import user from './user'; //user reducer
import post from './post'; // post reducer

const rootReducer = combineReducers({
    index:(state={},action)=>{ // 초반에 정보를 개발자 툴 및 콘솔창에 보여준다.
        switch(action.type){
            case HYDRATE:
                console.log('HYDRATE',action);
                return {...state,...action.payload}
            default:
                return state;


        }
    },
    user, // 이런식으로 리듀서를 넣어주면 알아서 combine 해준다.
    post,
});

export default rootReducer
5.dispatch 하는 방법.
import { loginAction } from '../reducers/user'; // 필요한 action 가지고옴
import { useDispatch } from 'react-redux';// dispatch 함수를 react-redux에서 가져온다.


const LoginForm = () => {
    const dispatch = useDispatch() // 디스패치 호출 및 할당.

    const [id,setId] = useInput('')
    const [password,setPassword] = useInput('');

    const onSubmit = useCallback(()=>{
            //event.preventDefault();
            console.log(id,password);
            dispatch(loginAction({id,password}));// 디스패치 사용법. dispatch(action 콜백함수(변경할 데이터));
        },
    [id,password],)


    return (
			...
    )
}


export default LoginForm