NSAttributedString
텍스트 자체에 스타일을 설정할 수 있는 텍스트 타입
일반적으로 UI Component의 텍스트의 속성은
UI Component의 스타일을 따른다.
예를 들어 textView에 작성되는 텍스트는
textView.font = .systemfont( ~~)다음과 같이 textView자체에 지정된 폰트 스타일을 따르게 된다.
그러나 이렇게 UI componet의 스타일을 따르지 않고
텍스트(string) 자체에 스타일을 지정하고자 할 때 NSAttributedString을 사용한다.
- 예시
1) attributes 설정
let attributes : [NSAttributedString.key: Any] = []- NSAttributedString.key 로 설정할 수 있는 것들
- font : 폰트
- paragraphStyle : 문단
- NSParagraphStyle, default => defaultParagraphStyle
- foregroundColor : 글자 색
- UIColor, default => blackColor
- backgroundColor : 배경 색
- UIColor, default => nil(배경 색 없음)
- underlineStyle : 밑줄
- NSNumber containing integer, default 0: no underline
- shadow
- NSShadow, default nil(그림자 없음)
- textEffect : 텍스트 효과
- NSString, default nil(효과 없음)
key 종류 더 보기
- NSAttributedString.key 사용해보기
let attributes : [NSAttributedString.key] = [
	 .font: UIFont.systemFont(ofSize: 20.0, weight: .semibold),
     .foregroundColor: UIColor.systemBlue,
     .paragraphStyle: paragraphStyle,
     .backgroundColor: UIColor.lightGray,
     .underlineStyle: NSNumber(value: 1),
     .textEffect: NSAttributedString.TextEffectStyle.letterpressStyle
]
- font(폰트) 는 systemFont(ofSize: 20.0, weight: .semibold)
- foregroundColor(글자색) 은 UIColor.systemBlue
- backgroundColor(배경색) 은 UIColor.lightGray
- underlineStyle(밑줄)은 NSNumber(value: 1) (= 밑줄 있음)
+ NSNumber(value: 0) ( = 밑줄 없음, default) - textEffect(효과) 는NSAttributedString.TextEffectStyle.letterpressStyle
으로 설정하고
let paragraphStyle = NSMutableParagraphStyle()
paragraphStyle.lineSpacing = 10.0
문단 스타일은 다음과 같이 NSMutableParagraphStyle() 객체로
따로 설정해주어야 한다.
2) Text에 attribute 적용하기
let text = NSAttributedString(string: "Lorem Ipsum is simply dummy text of the printing and typesetting industry. Lorem Ipsum has been the industry's standard dummy text ever since the 1500s, when an unknown printer took a galley of type and scrambled it to make a type specimen book. It has survived not only five centuries, but also the leap into electronic typesetting, remaining essentially unchanged. It was popularised in the 1960s with the release of Letraset sheets containing Lorem Ipsum passages, and more recently with desktop publishing software like Aldus PageMaker including versions of Lorem Ipsum.", attributes: attributes)
- 설정한 attribute로 보여줄 text를 다음과 같이 NSAttributedString 객체로 만들고
3) attributedText 설정
textView.attributedText = text- 해당 text를 보여줄 UI component의 attributedText로 설정해준다.
4) 실행 화면
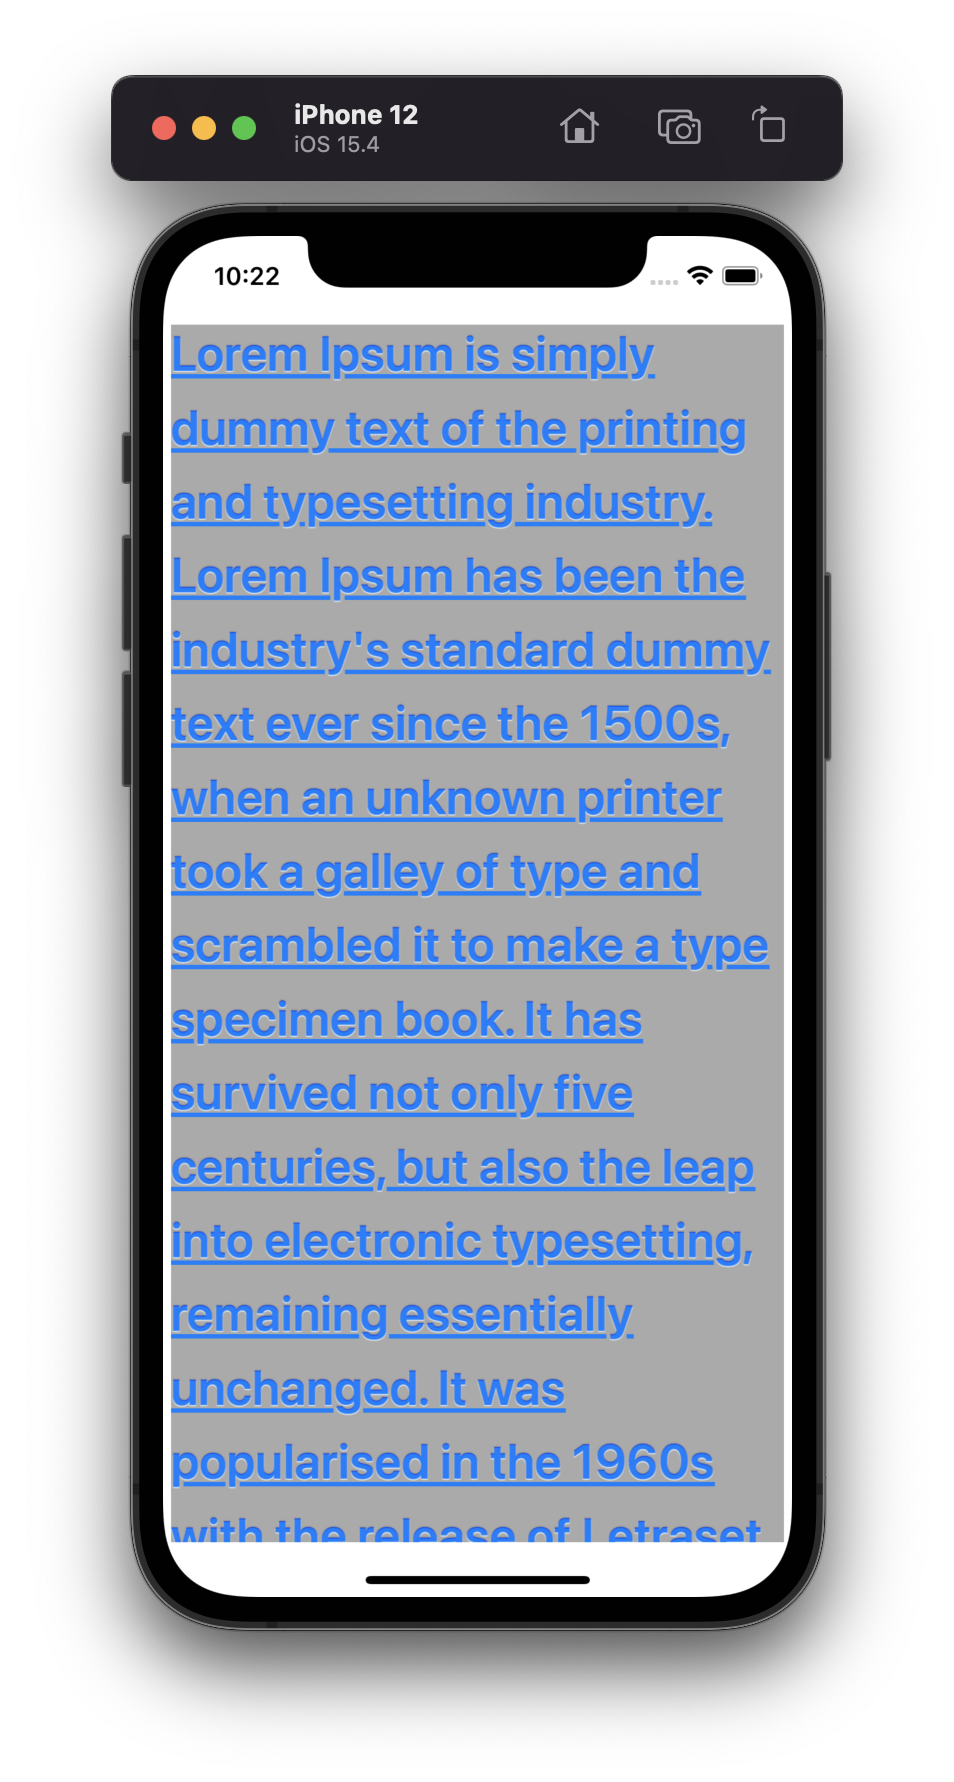
다음과 같이 텍스트에 속성이 설정이 된다.
NSMutableAttributedString
NSAttributedString의 특정 범위에 다양한 스타일(색상,자간, 행간 등)을 설정할 수 있는 텍스트 타입
NSAttributedString 을 사용할 때와 똑같지만 특정 범위에 적용할 추가 attribute를 생성해주어야한다는 차이가 있다.
- 예시
1) 추가 Attributes 생성하기
let attributes : [NSAttributedString.key] = [
	 .font: UIFont.systemFont(ofSize: 20.0, weight: .semibold),
     .foregroundColor: UIColor.systemBlue,
     .paragraphStyle: paragraphStyle,
     .backgroundColor: UIColor.lightGray,
     .underlineStyle: NSNumber(value: 1),
     .textEffect: NSAttributedString.TextEffectStyle.letterpressStyle
]

let additionalAttributes : [NSMutableAttributedString.Key: Any] = [
	.foregroundColor: UIColor.systemRed,
    .font: UIFont.systemFont(ofSize: 30.0, weight: .thin)
]- 기본적으로 적용될 텍스트 스타일과 특정 범위에만 적용될 텍스트 스타일을 각각 만든다.
2) Text에 attribute 적용하기
let text = NSMutableAttributedString(string: "Lorem Ipsum is simply dummy text of the printing and typesetting industry. Lorem Ipsum has been the industry's standard dummy text ever since the 1500s, when an unknown printer took a galley of type and scrambled it to make a type specimen book. It has survived not only five centuries, but also the leap into electronic typesetting, remaining essentially unchanged. It was popularised in the 1960s with the release of Letraset sheets containing Lorem Ipsum passages, and more recently with desktop publishing software like Aldus PageMaker including versions of Lorem Ipsum.", attributes: attributes)
- 이때 이번에는 NSAttributedString 객체가 아니라
NSMutableAttributedString 객체로 text를 생성해야한다.
3) Text에 추가 attribute 적용하기
text.addAttributes(additionalAttributes, range: NSRange(location: 5, length: 27) )- 다음과 같이 특정 범위와, 특정 범위에만 적용될 attribute를 설정한다.
4) attributedText 설정
textView.attributedText = text- 해당 text를 보여줄 UI component의 attributedText로 설정해준다
5) 실행화면
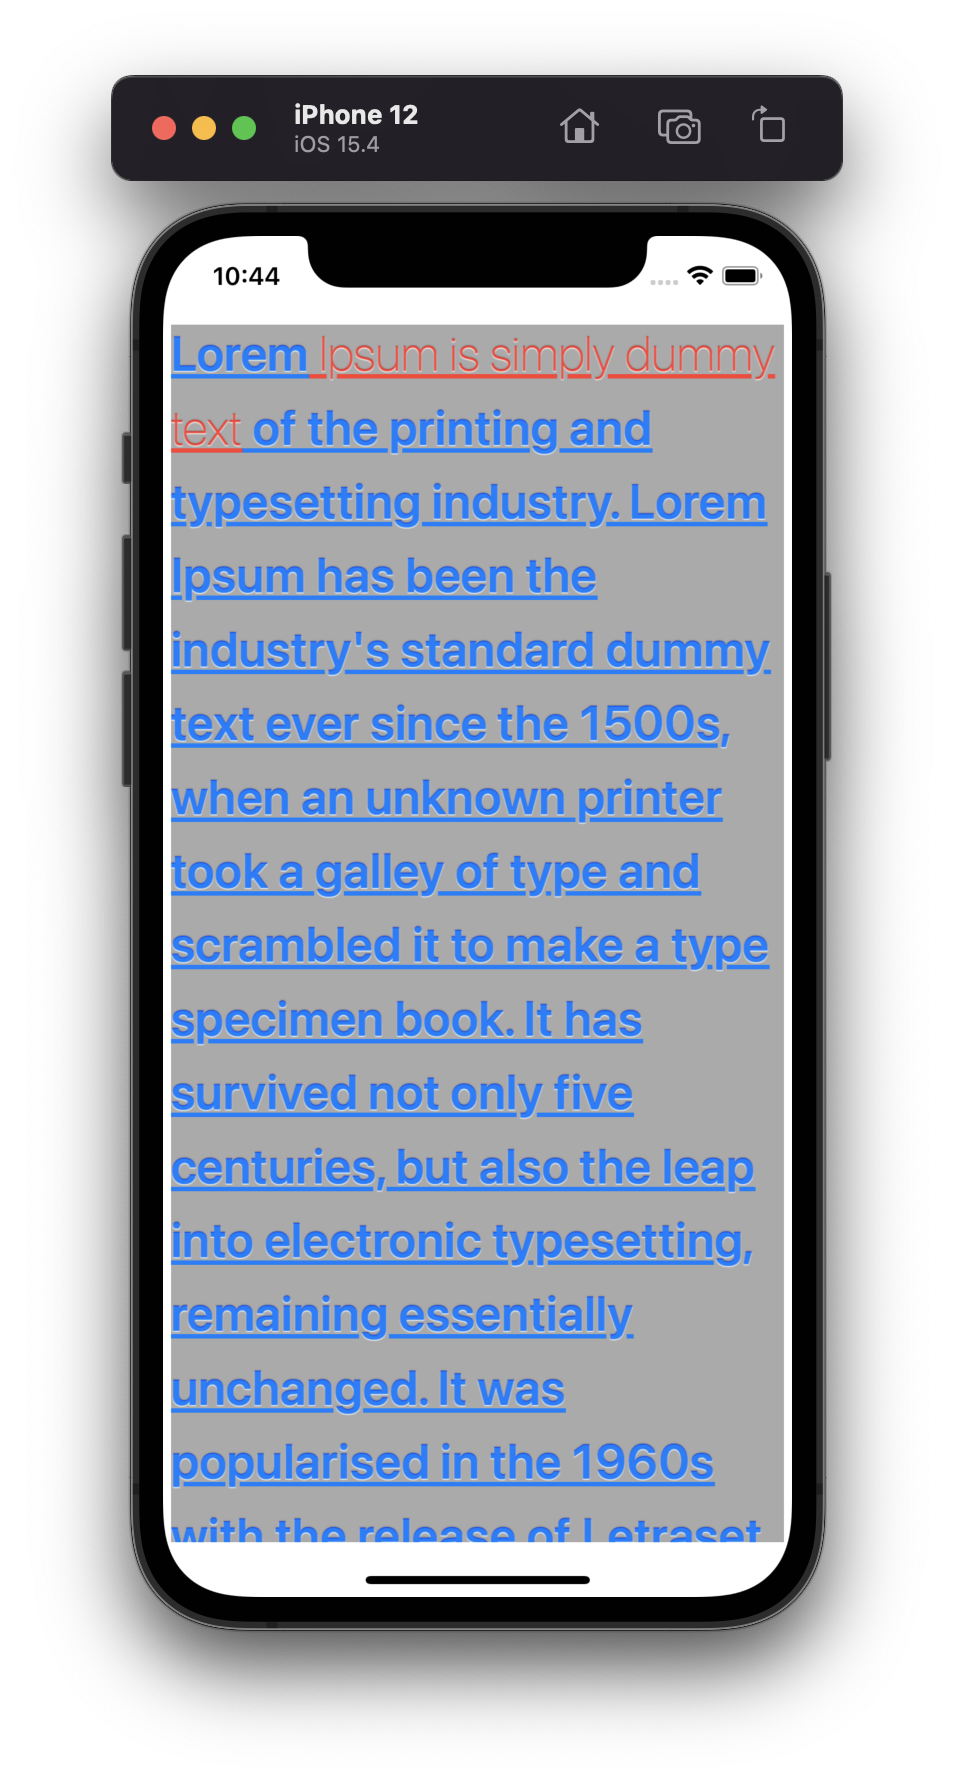
- 실행하면 다음과 같이 나타나게 된다.