
- 익명함수: 이름이 없는 함수로, 즉시 실행이 필요한 경우 사용
	function() {
	//code
}();- 일반 함수 선언식
function 함수명() {
	//code
}
ex)
function Say(str, count){
	for(var i=0; i< count; i++){
    document.write(str+"<br/>");
    }
 }
function Hap(start,end,num){
	let sum=0
    for(let i=start; i<=end; i++){
      if(i % num == 0){
      sum += i;
      }
    }
    document.write(
    	start+"부터" + end+ "까지의 정수 중"+num+"의 배수의 합: "+sum);
}
- Hap(10,50,3); //10부터 50까지 3의배수의 합- 함수 표현식
const 변수명 = function 함수명 (){
//code
}- 함수 호출
변수명();

function a(name){
	console.log(name);
    }
a('banana');
a('apple');
출력-> banana
	  apple
//name변수에 할당됨

- function a(name, price){
	console.log(name+"는" + price + "원 입니다.");
    }
    a('banana', 2000);
// 또는 array
 function a(arr){
 	console.log(arr[0] + "는" + arr[1] + "원 입니다.");
 }
 a(['banana', 2000]);
// 또는 object
 function a(obj){
 	console.log(obj.name + "은" + abj.price + "원 입니다.");
    }
a({name:'apple', price: 2000});- return문
function sum(num1, num2){
	return num1 + num2;
   }
   const sum_result_1 = sum(10,20);
   const sum_result_2 = sum(40,30);

   const sum_result = sum_result_1 + sum_result_2;

console.log('총 합은' + sum_result + '입니다');- 화살표 함수(arrow function)
const sum = (num1, num2) => { return num1 + num2; } const result = sum(10,20); console.log(result); ->코드 줄임 const sum = (num1,num2) => num1 + num2; const result = sum(10,20); console.log(result); - 화살표 함수
 function outer(x){
 	return function inner(){
   	return x * x;
       }
   }
//화살표 함수로 변경 하기
const outer = (x) => () => x * x;
- 타이머
setTimeout(함수, 시간) 시간동안 1번만 실행
setInterval(함수, 시간) 매시간마다 계속 실행
clearInterval 타이머종료
시간 :1000 -> 1초 ms단위
- setTimeOut(function(){
    alert('3초가 지났습니다');
}, 3000);
let intervalId = setInterval(function(){
    alert('< p>'+new Date()+'< /p>');
}, 1000);
setTimeOut(function(){
    clearInterval(intervalId);
}, 10000);- document.getElementbyId(id);
태그에 있는 id속성을 사용하여 해당 태그에 접근하여 하고싶은 작업을 할 때 쓰는 함수
javascript 에서 id로 무언가 선택할 때는 document.getElementById 라고 써서 선택할 수 있다.
해당id가 없는 경우 null 에러가 발생
id가 없는 요소에 접근하려면 document.querySelector() 사용
- *여기서 무언가는 title이라고 하자.
- console.log(document.getElementById);
- const title = document.getElementById ("title");
-
span이 두개 있을 경우
첫번째 span을 불러올때: document.querySelector("#quote span:first-child");
두번째 span을 불러올때:document.querySelector("#quote span:last-child");
< div id="quote">
< span>< /span>
< span>< /span>
< / div> -
.getElementByClassName()
주어진 클래스를 가진 모든 자식 엘리먼트의 클래스네임을 가져온다
ex)
document.getElementById('main').getElementsByClassName('test');
main이라는 id를 가진 요소의 하위 요소들중 test라는 클래스를 가진 모든 요소를 반환 -
element.getElementsByClassName('red test')
red와 test라는 클래스를 모두 포함하고 있는 요소를 반환 -
document.createElement()
새로운 객체 생성
이미지를 추가할때 보통 사용 -
document.body.appendChild(//img변수)
body에 html을 추가할때 사용 -
let matches = element.getElementsByClassName('colorbox');
while (matches.length > 0){
matches.item(0).classList.add('hueframe');
matches[0].classList.remove('colorbox');
}
colorbox 클래스를 가진 모든 자식요소를 찾고, item(0)을 호출해 hueframe이라는 클래스를 추가.
그리고 colorbox 클래스를 제거.
만약 다른요소가 남아있다면 item(0)이 될것이다 -
.innerText
요소의 내부 텍스트를 가져온다
.querySelector(".Hello h1"); //하나의 요소를 출력, 첫번째 요소만 가져옴
.querySelector("#Hello"); == .getElementById("Hello"); 같음
.querySelectAll("Hello"); //하나의 리스트 전체를 출력 -
.innerHTML
해당 element의 html전체를 가져온다 (공백까지 모두) -
modul.exports = {}
현재 모듈에 대한 정보를 갖고있는 객체, 예약어, 빈객체를 참조함
exports.
module.exports를 참조함
require
항상 module.exports를 리턴받음 -
템플릿 리터럴
${변수}로 사용 -
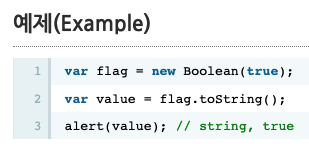
toString()
객체의 상태에 따라 문자열 true or flase를 리턴
숫자에서 문자로 출력됨
toString(2) 으로 2진수로 변환
- 기수의 값은 최소 2부터 36까지
- 10진수 외의 다른 진수를 10진수로 변환할때는 전역 함수인 parseInt()을 사용한다.
let baseTenInt = 10;
  console.log(baseTenInt.toString(2));
  // "1010"이 출력됨
-
숫자에서 문자로 출력하며 거꾸로 출력
let a = x.toString().split("").reverse(); -
전개연산자 spread operator
[...변수].reverse()
배열이나 객체에서 element들을 꺼내어, 복사 -
.trim() 공백제거
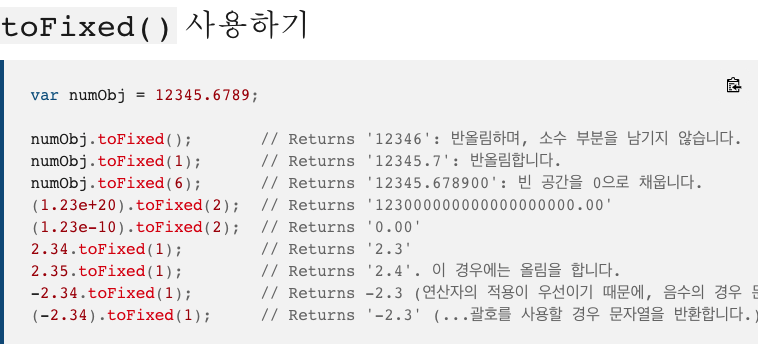
.toFixed() 실수 끝자리가 반올림돼서 출력됨
-
toggle()
on/off switch의 개념
add()와 remove() 메서드를 한번에 쓸수있는 합쳐진개념
보통 click 이벤트에 classList를 이용하여 toggle로 css로 style을 준 클래스명을 on/off한다
변수명.addEventListener('click', function(){
변수명.classList.toggle('클래스명');
}); -
classList 클래스를 여러개 쓸때 사용
className 전에있던 클래스를 덮어버리고 새걸로 생성됨 -
addEventListener : 특정객체에 이번트를 등록함
e.preventDefault() : html에서 a태그나 submit tag등의 고유의 동작(링크이동),기본값을 중단함 -
Math
Math.random() 10 -> 0~10사이의 숫자들중에서 랜덤됨
Math.random() 변수.length -
Math객체 참고자료
https://blog.naver.com/hadaboni80/221730573470 -
localStorage
작은 데이타베이스 , 값을 저장해줌
보는방법: F12->Application->Local Storage->file://
구글링 -> local Storage API
localStorage.setItem("키", "값") //저장
localStorage.getItem("key") ->"value //키로 불러오기
localStorage.removeItem("key") //삭제
string을 JSON.parse(localStorage.getItem("변수")) 에 넣으면 배열이 만들어짐 -
const 변수 = new Date();
실시간의 날짜, 시간을 리턴 -
날짜를 리턴하고 String으로 감싸기
const hours = String(date.getHours()); -
padStart(원하는자릿수, "앞쪽에 추가할 숫자 또는 문자");
빈공간을 원하는 수나 문자로 채우고 싶을때 사용
ex)
const str1 = 5;
console.log(str1.padStart(2, '0')); //05 -
append() 가장뒤에 추가
prepend() 가장앞에 추가
-
navigator.geolocation.getCurrentPosition()
실행시 브라우저에서 위치좌표를 준다 wifi, gps, 위치 등등
getCurrentPosition은 argument가 2개 필요함 (참,예외) -
JSON.stringify()
값이나 객체, 배열을 통째로 JSON문자열로 변환 -
.toUpperCase()
모든 문자열을 대문자로 변환
.toLowerCase()
모든 문자열을 소문자로 변환 -
charAt(인수) 반대: s.charAt(변수.length-1)
인수번째의 문자를 읽어낸다
ex) "javascript".charAt(2) -> 'v' -
substring(인수, 인수)
문자열을 읽어 낸다
ex)
"javascript".substring(1, 3) -> "ava"
indexOf(인수) / lastindexOf(뒤에서 부터 읽어줌)
- 인수가 들어있는 위치를 알려줌
- ex) "javascript".indexOf("s") -> 4
- 문자열(string)에서 특정 문자열(searchvalue)을 찾고,
검색된 문자열이 '첫번째'로 나타나는 위치 index를 리턴- 찾는 문자열이 없으면 -1을 리턴
- 문자열을 찾을 때 대소문자를 구분
-
이벤트가 실행이 안된다면 이벤트리스너가 있는지 확인
-
findIndex
객체에 주로 쓰이는 함수
찾는 객체가 몇번째 인덱스에 있는지 찾는 함수
//id가 3인 인덱스 반환
const todo = todos.find(todo => todo.id === 3);
출력-> 2- find
찾아낸 값 자체를 반환
//id가 3인 객체 반환
const todo = todos.find(todo => todo.id === 3);
출력-> {id: 3, text: "객체와 배열 배우기", done: true}