Satori란?
공식 문서 : https://github.com/vercel/satori
HTML과 CSS를 SVG로 변환할 수 있는 라이브러리입니다.
Satori를 이용해서 svg를 만들때 두가지 인자를 넘겨주어야 하는데, (element, options)
그중 필수적으로 필요한 것은 아래와 같습니다.
- 이미지를 만들 dom element
- 이미지 크기 (width, height)
- svg 안 text의 font
satori는 서버에서 svg 이미지를 만드는 라이브러리로,
Next.js 환경에서 사용한다면 getServerSideProps 등을 이용하여 Server Side에서 실행해야합니다.
또한, safoti에서 텍스트를 그릴때 기본적으로 <text>가 아닌 <path> in SVG로 그립니다.
그렇기 때문에 텍스트를 그릴 font를 지정해주어야 합니다.
저같은 경우에는 google fonts를 이용해 server에서 font를 fetch해서 사용하였습니다.
Satori로 svg 만들기
satori 공식문서에서는 밑과 같이 지정하고 있습니다.
// api.jsx
import satori from 'satori'

const svg = await satori(
  <div style={{ color: 'black' }}>hello, world</div>,
  {
    width: 600,
    height: 400,
    fonts: [
      {
        name: 'Roboto',
        // Use `fs` (Node.js only) or `fetch` to read the font as Buffer/ArrayBuffer and provide `data` here.
        data: robotoArrayBuffer,
        weight: 400,
        style: 'normal',
      },
    ],
  },
)
이중 <div style={{ color: 'black' }}>hello, world</div> 부분이 그려주는 dom element 이고,
width: 600,
height: 400,
fonts: [
  {
    name: 'Roboto',
    data: robotoArrayBuffer,
    weight: 400,
    style: 'normal',
  },
],
},
이부분이 option을 지정해주는 부분입니다.
1. dom element 만들기
저 같은 경우에는 원하는 dom element가 복잡하여 따로 컴포넌트로 분리하였습니다.
const DomElement = ({src, text} : {src : string, text : string}) => {
  return (
    <div
      style={{
        ...
      }}
    >
      <img src={src} alt="image src" width={329} height={389} />
      <span
        style={{
          ...
        }}
      >
        {text}
      </span>
    </div>
  );
};
2. font 불러오기
satori option에 넣을 font를 받아와야 합니다.
저는 google fonts에서 NotoSansKr 폰트를 선택하였습니다.
NotoSans google fonts : https://fonts.google.com/noto/specimen/Noto+Sans+KR
fetchFont
async function fetchFont(fontFamily = 'Noto+Sans+KR', fontWeight = 700): Promise<ArrayBuffer | null> {
  const API = `https://fonts.googleapis.com/css2?family=${fontFamily}:wght@${fontWeight}`;

  const css = await (
    await fetch(API, {
      headers: {
        'User-Agent':
          'Mozilla/5.0 (BB10; Touch) AppleWebKit/537.1+ (KHTML, like Gecko) Version/10.0.0.1337 Mobile Safari/537.1+',
      },
    })
  ).text();

  const resource = css.match(/src: url\((.+)\) format\('(opentype|truetype)'\)/);

  if (!resource) return null;

  const res = await fetch(resource[1]);

  return res.arrayBuffer();
}
satori option으로 font를 넣을 떄는 ArrayBuffer 형식이어야 하므로,
서버에서 font를 다운 받고, res.arrayBuffer()를 통해 ArrayBuffer 타입으로 변환하여 리턴하였습니다.
option 설정하기
const notoSansScFont = await fetchFont();
if (!notoSansScFont) return { props: {} };

// 서버에서 이미지 만듬
const imageOptions: SatoriOptions = {
  width: 329,
  height: 389,
  fonts: [
    {
      name: 'Noto Sans KR',
      data: notoSansScFont,
      weight: 700,
      style: 'normal',
    },
  ],
};
width, height, font를 원하는 대로 지정해 option 객체를 생성합니다.
await fetchFont()를 이용하여 서버에서 폰트를 불러와야 하므로, 이 로직은 Server Side에서 실행되어야 합니다.
4. satori로 svg 만들기
마지막으로 지정한 element와 options을 가지고 satori로 svg를 생성하면 됩니다.
async function createOGImage(element: ReactNode, option: SatoriOptions) {
  const svg = await satori(element, option);

  return svg;
}
createOGImage의 리턴값은 svg string입니다.
5. 서버에서 생성한 svg를 client로 넘겨주기
지금까지의 전체 로직은 모두 Server Side에서 돌아가야 합니다.
따라서 getServerSideProps안에서 실행되어야 합니다.
export async function getServerSideProps() {
  const notoSansScFont = await fetchFont();
  if (!notoSansScFont) return { props: {} };

  // 서버에서 이미지 만듬
  const imageOptions: SatoriOptions = {
     ...
  };

  const ogImage = await createOGImage(<DomElement />, imageOptions);

  return {
    props: {
      ogImage,
    },
  };
}

async function createOGImage(element: ReactNode, option: SatoriOptions) {
  const svg = await satori(element, option);

  return svg;
}

async function fetchFont(fontFamily = 'Noto+Sans+KR', fontWeight = 700): Promise<ArrayBuffer | null> {
  const API = `https://fonts.googleapis.com/css2?family=${fontFamily}:wght@${fontWeight}`;

  const css = await (
    await fetch(API, {
      headers: {
        'User-Agent':
          'Mozilla/5.0 (BB10; Touch) AppleWebKit/537.1+ (KHTML, like Gecko) Version/10.0.0.1337 Mobile Safari/537.1+',
      },
    })
  ).text();

  const resource = css.match(/src: url\((.+)\) format\('(opentype|truetype)'\)/);

  if (!resource) return null;

  const res = await fetch(resource[1]);

  return res.arrayBuffer();
}
svg string을 생성하고 props로 image를 넘겨줍니다.
6. 브라우저에 생성한 svg를 보여주기
서버에서 svg string을 넘겨받아, dom에 삽입해야 합니다.
여러 방법이 있겠지만, 그중 강제로 html에 삽입하는 방식을 사용하였습니다.
export async function getServerSideProps() {
  return {
    props: {
      ogImage,
    },
  };
}

function Page({ ogImage }: { ogImage: string }) {
  return (
    <div>
      <div
        dangerouslySetInnerHTML={{
          __html: ogImage,
        }}
      />
    </div>
  );
}
dangerouslySetInnerHTML를 이용해 강제로 string을 dom애 삽입합니다.
결과
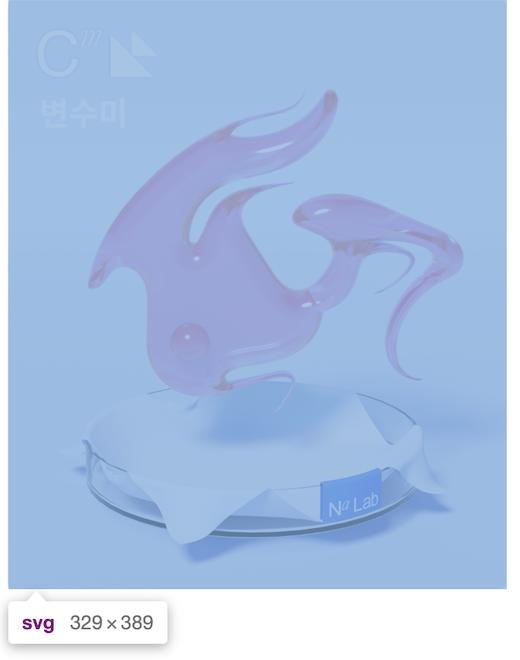
- 이미지 위에 이름을 삽입한 svg를 생성
관련 PR 링크 : https://github.com/depromeet/na-lab-client/pull/381
참고