
💎 오늘의 목표
Redux를 사용하여 장바구니 기능 구현하기 🛒
😯 Redux란?

Redux는 상태 관리를 도와주는 라이브러리이다. 리액트에서 컴포넌트가 많아지면 상위에서 하위로 데이터를 보내 줄 때 수많은 props를 거쳐야 하는데, 이렇게 되면 상태 관리가 복잡해지게 된다. (이것이 바로 Props drilling)
이러한 문제점을 해결하기 위해 사용하는 것이 바로 Redux이다. 리덕스는 전역으로 상태를 관리해 주는 저장소를 제공해 준다. 따라서 컴포넌트들이 props 없이 state 공유가 가능해진다.
설치하기
npm install @reduxjs/toolkit react-redux터미널에 위 코드를 입력하여 Redux Toolkit을 설치해 준다.
세팅하기
먼저 src 폴더에 store.js 파일을 생성한 뒤 아래 코드를 작성한다.
store.js
import { configureStore } from '@reduxjs/toolkit'

export default configureStore({
  reducer: {

  }
})
그리고 index.js로 가서 아래 코드를 작성해 준다.
index.js
...

import { Provider } from 'react-redux';
import store from './store.js';

const root = ReactDOM.createRoot(document.getElementById('root'));
root.render(
  // <React.StrictMode>
  <Provider store={store}> // 이 부분이 추가됨!
    <BrowserRouter>
      <App />
    </BrowserRouter>
  </Provider>
  // </React.StrictMode>
);

reportWebVitals();
이렇게 하면 세팅까지 끝!
문법 알기
store에 state 보관하기
이제 store.js, 즉 Redux store에 여러 개의 state들을 보관할 수가 있는데, state를 보관하는 문법은 아래와 같다.
import { configureStore, createSlice } from '@reduxjs/toolkit'

let 변수명 = createSlice({ /* state 하나를 slice라고 부름 */
    name : 'state이름',
    initialState : 'state값'
})

export default configureStore({
  reducer: {
    작명 : state이름.reducer
  }
})
store에 보관한 state 가져오기
useSelector((state)=>{return state})이렇게 작성하면 저장해 놓은 state를 꺼내 쓸 수 있다. 😀
store의 state 변경하기
Step1💡 state 변경 함수 만들기
store.js
let 변수명 = createSlice({ /* state 하나를 slice라고 부름 */
    name : 'state이름',
    initialState : 'state값'
    reducers : {
        함수명(state){
            return 함수 실행 시 수행될 코드
        }
    }
})
Step2💡 export 하기
store.js
export let { 함수명 } = 변수명.actionsStep3💡
dispatch( state변경함수() )작성하기
버튼 클릭 시 함수가 실행되는 예시로 설명해 보았다.
Cart.js
import { useDispatch } from 'react-redux';
import { 함수명 } from './../store.js';

function 컴포넌트명(){
	let dispatch = useDispatch()

    return(
    	<button onClick={()=>{
    		dispatch(함수명())
    	}}></button>
    )
}

...
🛒 이제 진짜 장바구니 만들기
store.js
import { configureStore, createSlice } from '@reduxjs/toolkit'
import user from './store/userSlice'

let stock = createSlice({
    name : 'stock',
    initialState : [10,11,12]
})

let cart = createSlice({
    name : 'cart',
    initialState : [
        {id : 0, name : 'White and Black', count : 2},
        {id : 2, name : 'Grey Yordan', count : 1}
    ],
    reducers : {
        addCount(state, action){
            let i = state.findIndex((a)=>{ return a.id == action.payload })
            state[i].count++
        },
        addCart(state, action){
            state.push(action.payload)
        }
    }
})

export let {addCount, addCart} = cart.actions

export default configureStore({
  reducer: {
    user : user.reducer,
    stock : stock.reducer,
    cart : cart.reducer
  }
})
Cart.js
import { Table } from 'react-bootstrap'
import { useDispatch, useSelector } from 'react-redux';
import { changeName, increase } from './../store/userSlice.js';
import store from '../store.js';
import { addCount } from '../store.js';

function Cart(){

    let state = useSelector((state)=>{return state})
            /* Redux store에 있는 state 가져다 씀 */
    let cart = state.cart
    let dispatch = useDispatch()

    return(
        <>
            <h6>{state.user.age}살 {state.user.name} 님의 장바구니</h6>
            <button onClick={()=>{
                dispatch(increase(10))
            }}>이름 변경</button>
            <button onClick={()=>{
                dispatch(changeName())
            }}>나이 변경</button>

            <Table>
            <thead>
                <tr>
                    <th>#</th>
                    <th>상품명</th>
                    <th>수량</th>
                    <th>변경하기</th>
                </tr>
            </thead>
            <tbody>
                {
                    cart.map((a,i)=>
                        <tr key={i}>
                            <td>{cart[i].id}</td>
                            <td>{cart[i].name}</td>
                            <td>{cart[i].count}</td>
                            <td><button onClick={()=>{dispatch(addCount(cart[i].id))}}>+</button></td>
                        </tr>
                    )
                }
            </tbody>
            </Table>
        </>
    )
}

export default Cart;
Detail.js
...

import { addCart } from "./../store.js"
import { useDispatch } from "react-redux";
...

function Detail(props) {

  ...

    let dispatch = useDispatch()
	...
                    <button className="btn btn-danger" onClick={()=>{
                        dispatch(addCart({id:item.id, name:item.title, count: 1}))
                    }}>주문하기</button>
	...
구현 화면은 아래와 같다.
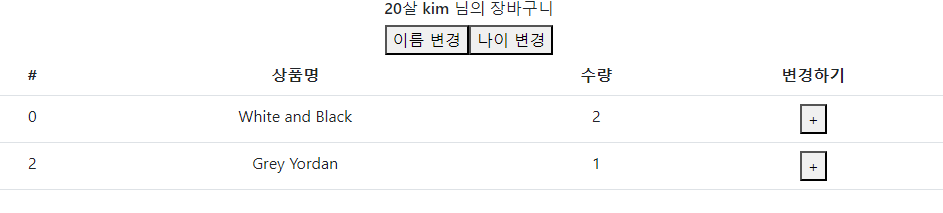
장바구니에서 이름, 나이, 수량을 간단하게 변경해 볼 수 있다.

또한 상세 페이지에서 '주문하기' 버튼 클릭 시 장바구니에 추가되는 기능 또한 구현해 보았다. 👍

풀스택 개발자 기록집 📁