Props
props는 부모 컴포넌트로부터 자식 컴포넌트에 데이터를 보낼 수 있게 해주는 방법이다.
props는 왜 필요할까
const SaveBtn = () => {
      return (
        <button
          style={{
            backgroundColor: "green",
            color: "white",
            padding: "10px 20px",
            border: 0,
            borderRadius: 10,
          }}
        >
          save
        </button>
      );
    };
const btn1 = () { ... }
const btn2 = () { ... }
const btn3 = () { ... }
...
같은 스타일을 공유하면서 text만 다른 button 1억개가 있다고 치자. 배경색을 바꾸려면 1억개를 다 바꿔줘야 한다.
(유지보수가 힘들다)
그래서 html과 비슷하게 property를 줘서
<img src="~~~" />
<input type="text" />
코드를 재사용할 수 있도록 한 것이다. 그렇다면 위의 코드를 바꿔보자.
const Btn = (props) => {
      return (
        <button
          style={{
            backgroundColor: "green",
            color: "white",
            padding: "10px 20px",
            border: 0,
            borderRadius: 10,
          }}
        >
          {props.text}
        </button>
      );
    };
const App() = () => {
  return (
    <div>
      <Btn text="save" a={"x"}/>
      <Btn text="continue" a={"y"}/>
    </div>
  );
}
React는 자동으로 property(prop)를 {text:"save"}처럼 오브젝트로 만들고, 이 오브젝트가 내가 만든 컴포넌트의 첫번째 argument로 주어진다.
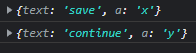
위에서 전달한 props를 console.log 해보면 다음과 같다.
또, props는 오브젝트 이기 때문에 다음과 같이 쓸수도 있다.
const Btn = ({text}) => {
      return (
        <button
          style={{
            backgroundColor: "green",
            color: "white",
            padding: "10px 20px",
            border: 0,
            borderRadius: 10,
          }}
        >
          {text}
        </button>
      );
    };
}
*props에는 함수도 보낼 수 있다.
React Memo
아래 처럼 save와 continue 버튼을 만들었다고 할때,
const Btn = ({ text, changeValue }) => {
      return (
        <button
          onClick={changeValue}
          style={{
            backgroundColor: "tomato",
            color: "white",
            padding: "10px 20px",
            border: 0,
            borderRadius: 10,
          }}
        >
          {text}
        </button>
      );
    };
    const App = () => {
      const [value, setValue] = React.useState("save");
      const changeValue = () => setValue("revert");
      return (
        <div>
          <Btn text={value} changeValue={changeValue} />
          <Btn text="continue" />
        </div>
      );
    };
React룰(state가 변경되면 컴포넌트를 다시 렌더링한다.) 에 따라서 부모의 state가 바뀌었으므로 컴포넌트 렌더링을 다시 하게되는데 여기서 바뀌지 않은 continue 버튼도 렌더링 되는 문제가 생긴다. 여기서 continue 버튼이 다시 렌더링 되는것을 원치 않을 때, React Memo를 사용할 수 있다.
(props가 변경되지 않는다는 조건 하에)
<div>
  <Btn text={value} changeValue={changeValue} />
  <Btn text="continue" />
</div>
위의 버튼은 props가 바뀌는 반면에, 아래것은 고정되어있다. 이 상황에서 React Memo를 사용할 수 있는 것이다.
const MemorizedBtn = React.memo(Btn);
    const App = () => {
      const [value, setValue] = React.useState("save");
      const changeValue = () => setValue("revert");
      return (
        <div>
          <MemorizedBtn text={value} changeValue={changeValue} />
          <MemorizedBtn text="continue" />
        </div>
      );
    };
이렇게 하면, props가 바뀌는 컴포넌트만 변경된다.
propTypes
prop types는 실수를 방지한다.
(string이 와야 할 자리에 숫자가 온다던가, 일부 prop을 넣는 것을 까먹거나)
실수를 한 코드가 유효한 코드여서, 어떠한 에러도 뜨지 않을때가 있다. 이렇게 되면 실행했을 때는 오류 없이 실행되지만 내가 생각한대로 돌아가지 않을 경우가 생긴다.
이런 경우를 방지하기 위해, 최소한 warning이라도 보기 위해서 propTypes를 사용한다.
Btn.propTypes = {
  text: PropTypes.string.isRequired,
  size: PropTypes.number,
};
이렇게 해둘 경우 콘솔창에서 warning을 보여준다.
