😎 ReactQuill 에디터를 활용하여 에디터 구현
react-quill 설치
https://www.npmjs.com/package/react-quill
yarn add react-quill
npm install react-quill
ReactQuill 에디터 사용으로 인한 이슈 발생 및 해결 1
- 쇼핑몰 웹 제작이었기에 이미지까지 추가할 수 있는 react quill editor를 활용한 상품 등록을 구현해야 했다.
- 이슈 발생 1 : axios를 활용해 에디터에 이미지를 넣어 서버에 보내는 작업은 그 당시 저에게 생소한 작업이었고 해당 에디터에 이미지를 업로드하면 그 이미지는 base64로 변경되어 img태그 src로 들어갔고 서버에 저장하는 과정에서 오류가 발생하였다.
- 해결 : 오류를 해결하기 위해 백엔드에 axios를 이용하여 이미지를 formData로 보내 url을 받아와 img태그 src에 넣어 이슈를 해결했습니다.
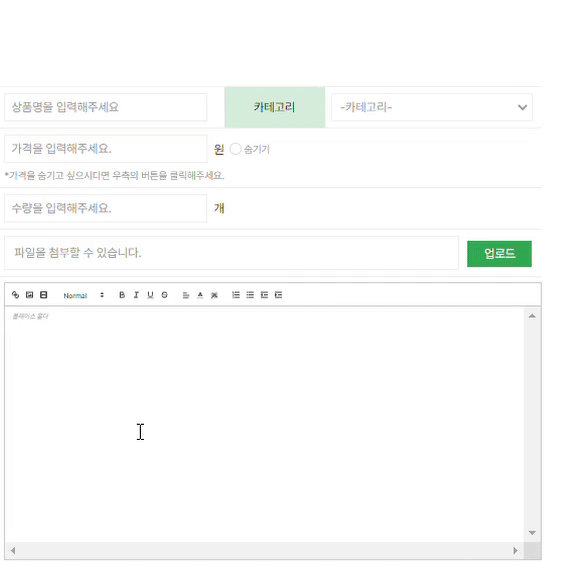
에디터는 재사용을 위해 따로 컴포넌트해서 빼두었다.
import React from 'react';
import ReactQuill from 'react-quill';
import 'react-quill/dist/quill.snow.css';
// 이미지 크기 조절하는 것(오류가 나서 꺼놈, 모듈 설치해야함)
// import { ImageResize } from 'quill-image-resize-module-ts';
import axios from 'axios';
import { Cookies } from 'react-cookie';
import './editor.css';

// Quill.register('modules/imageResize', ImageResize);

export const EditorWr = (props: any) => {
  const cookies = new Cookies();
  const jwt = cookies.get('accessToken');
  //에디터
  const quillRef: any = React.useRef<ReactQuill>();

  const imageHandler = async () => {
    const input: any = document.createElement('input');
    input.setAttribute('type', 'file');
    input.setAttribute('accept', 'image/*');
    input.click();
//formData로 이미지 구현
    input.addEventListener('change', async () => {
      const formData = new FormData();
      const file = input.files;
      const fileUrl: any = [...file];
      for (let i = 0; i < file.length; i++) {
        const nowUrl = URL.createObjectURL(file[i]);
        fileUrl.push(nowUrl);
      }
      for (let i = 0; i < file.length; i++) {
        formData.append('file', fileUrl[i]);
      }

      formData.append('type', props.type);
      formData.append('targetId', props.targetId);
//이미지를 formData로 서버에 api post로 보내고 다시 api get하여 받은
      // url값을 에디터 태그로 활용
      //이렇게 안하고 이미지를 그냥 에디터에 넣어버리면
      // 64bit 태그로 html tag로 저장된다.
      // 이 태크는 너무 길기에 좋지 않다.
      await axios({
        method: 'post',
        url: `${process.env.REACT_APP_API_URL}/file/upload`,
        headers: {
          Authorization: jwt,
          'Content-Type': 'multipart/form-data',
        },
        data: formData,
      }).then((res) => {
        axios({
          method: 'get',
          url: `${process.env.REACT_APP_API_URL}/file/list/${props.type}/
${props.targetId}`,
          headers: {
            Authorization: jwt,
            'Content-Type': 'multipart/form-data',
          },
        }).then((res) => {
          const IMG_URL = [];
          for (let i = 0; i < res.data.length; i++) {
            const URL =
              process.env.REACT_APP_BASE_URL +
                  res.data[i].filePath + res.data[i].fileName;
            IMG_URL.push(URL);
          }
          const editor = quillRef.current.getEditor();
          const range = editor.getSelection();

          editor.insertEmbed(range.index, 'image', IMG_URL[res.data.length - 1]);
        });
      });
    });
  };

  const modules = React.useMemo(() => {
    return {
      toolbar: {
        container: [
          ['link', 'image', 'video'],
          [{ header: [1, 2, 3, 4, 5, 6, false] }],
          ['bold', 'italic', 'underline', 'strike'],
          [{ align: [] }, { color: [] }, { background: [] }],
          [{ list: 'ordered' }, { list: 'bullet' }, { indent: '-1' }, { indent: '+1' }],
        ],
        handlers: {
          image: imageHandler,
        },
      },
    };
  }, []);
  const formats = [
    'font',
    'header',
    'bold',
    'italic',
    'underline',
    'strike',
    'list',
    'bullet',
    'indent',
    'link',
    'image',
    'video',
    'align',
    'color',
    'size',
    'background',
  ];
  return (
    <>
      <ReactQuill
        ref={(element: any) => {
          quillRef.current = element;
        }}
        theme='snow'
        placeholder='플레이스 홀더'
        value={props.descriptEdit || ''}
        onChange={(e: any) => props.setDescriptEdit(e)}
        modules={modules}
        formats={formats}
        style={{ margin: '1% 0 1% 1%' }}
      />
    </>
  );
};
에디터 css
.ql-editor {
  min-height: 5rem !important;
  /* max-height: 800px; */
  overflow: hidden;
  overflow-y: scroll;
  overflow-x: scroll;
}
😎 에디터 내용 브라우저에 띄우기

<S.Description id='description' dangerouslySetInnerHTML=
  {{ __html: data.contents }} />
react-quill은 css가 따로 안먹어서 임의로 만들어주었다.
//에디터
export const Description = styled.div`
  width: 100%;
  h1 {
    font-size: 0.64rem;
  }
  h2 {
    font-size: 0.56rem;
  }
  h3 {
    font-size: 0.48rem;
  }
  h4 {
    font-size: 0.4rem;
  }
  h5 {
    font-size: 0.32rem;
  }
  h6 {
    font-size: 0.24rem;
  }
  p {
    font-size: 0.16rem;
  }
  span {
    font-size: 0.16rem;
  }
  h1 > span {
    font-size: 0.64rem;
  }
  h2 > span {
    font-size: 0.64rem;
  }
  h3 > span {
    font-size: 0.64rem;
  }
  h4 > span {
    font-size: 0.64rem;
  }
  h5 > span {
    font-size: 0.64rem;
  }
  h6 > span {
    font-size: 0.64rem;
  }
  p > span {
    font-size: 0.16rem;
  }
  .ql-align-center {
    text-align: center;
  }
  .ql-align-right {
    text-align: right;
  }
}`;
에디터 용량 이슈 발생 및 해결 2
- 추가적 이슈 발생 2 : 이미지 용량과 에디터에 들어가는 내용의 용량이 1048576 bytes을 넘으면 에러가 발생
- 해결 : 이 문제는 백엔드와 소통 후에 DB에서 설정한 크기 문제라는 것을 발견했고 백엔드 측에서 크기를 늘려 이슈를 해결
그 후..
결과적으로, 사진 추가되는 에디터를 만들어 쇼핑몰의 퀄리티를 더욱 높일 수 있게 되었으며 문제 해결 능력과 커뮤니케이션 능력이 향상되었다. 또한, 에디터 작업에 대한 통창력과 서버 흐름에 대해서도 배울 수 있는 시간이었다.