Angular
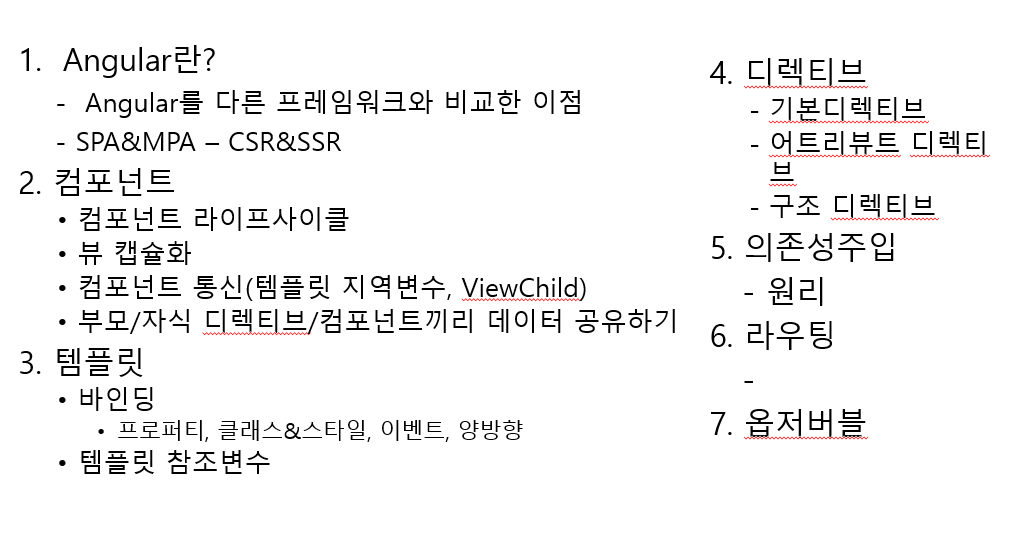
목차
Angular
1. 소개
- Angular는 SPA(Single Page Application) 개발을 위한 구글의 오픈소스 자바스크립트 프레임워크이다.
- Angular는 HTML과 TypeScript로 클라이언트 애플리케이션을 개발할 때 사용하는 플랫폼이자 프레임워크이다.
1)✨ SPA,MPA & CSR,SSR 페이지 구성방식 및 렌더링방식 설명
페이지 구성 방식
SPA(Single Page Application)
- 원하는 부분만 클라이언트에서 동적으로 갈아 끼울 수 있는 방식(클릭한 부분만 변경)
- 웹 어플리케이션을 필요한 정적리소스를 초반 한번에 모두 다운로드 받고 그 이후 새로운 페이지 요청이 있을 때 페이지 갱신에 필요한 데이터만 전달 받아서 클라이언트 페이지를 갱신 -AJAX방식
❗️화면 깜빡임 없음
MPA(Multiple Page Application)
- 전통적인 웹 페이지 구성 방식
- 탭을 이동할 때마다 서버로부터 새로운 html을 받아와서 페이지 전체를 재렌더링
- MPA를 사용하는 사이트들이 있긴 했지만 AJAX방식가 등장하면서 SPA방식 채택
- MPA는 새로운 요청이 있을 때마다 서버에서 이미 렌더링 된 정적 리소스를 받아온다.
❗️화면 깜빡임 있음
렌더링 방식
CSR(Client Side Rendering)
클라이언트 측에서 렌더링 하는 방식
SSR(Server Side Rendring)
서버 측에서 렌더링 하는 방식
요청할 때 즉시 만드니까 데이터가 달라져서 미리 만들어두기 어려운 페이지에 적합
❗️CSR과 SSR은 Client와 Server 중 어느 쪽(side)에서 Rendering을 준비하냐에 따라 나눠지는 개념이다.
페이지 구성 방식 !== 렌더링 방식
SPA !== CSR
MPA !== SSR
페이지가 몇개인가? 또는 렌더링을 어디서 하느냐에 따라 달라질 수 있기 때문에 다른 개념이다.
CSR의 동작 과정과 특징
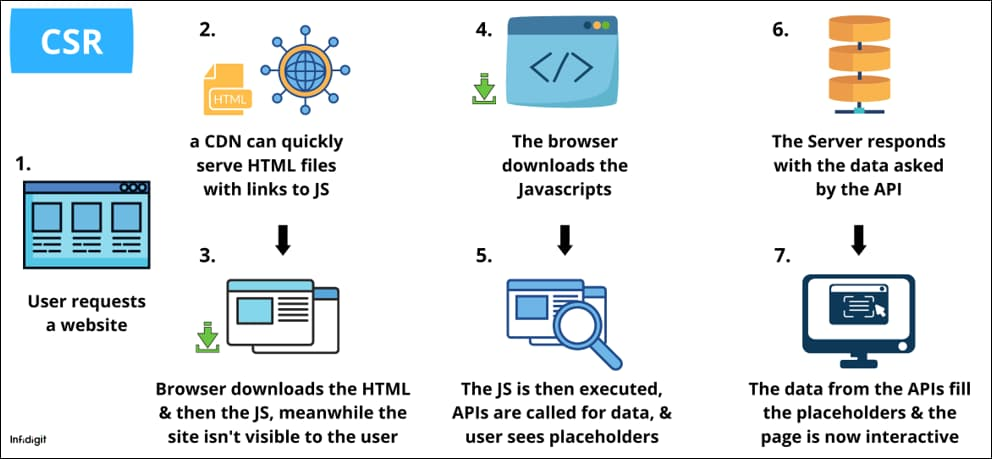
- 서버는 빈 뼈대(서버부하가 적음)만 있는 HTML로 응답을 보내준다.
- 브라우저가 연결된 JS링크를 통해 서버로부터 다시 JS파일을 다운로드 받고 JS를 이용해 동적으로 페이지를 만들어서 브라우저 렌더링한다.
단점 : 브라우저가 JS파일을 다운받고 동적으로 DOM을 생성하는 시간을 기다려야 하기 때문에 초기 로딩 속도가 느림. 하지만 이 후 구동 속도 빠름.
장점 : 클라이언트 측에서 연산 라우팅 등을 모두 직접 처리하기 때문에 반응속도가 빠르고 UX도 우수하다.
SSR의 동작 과정과 특징
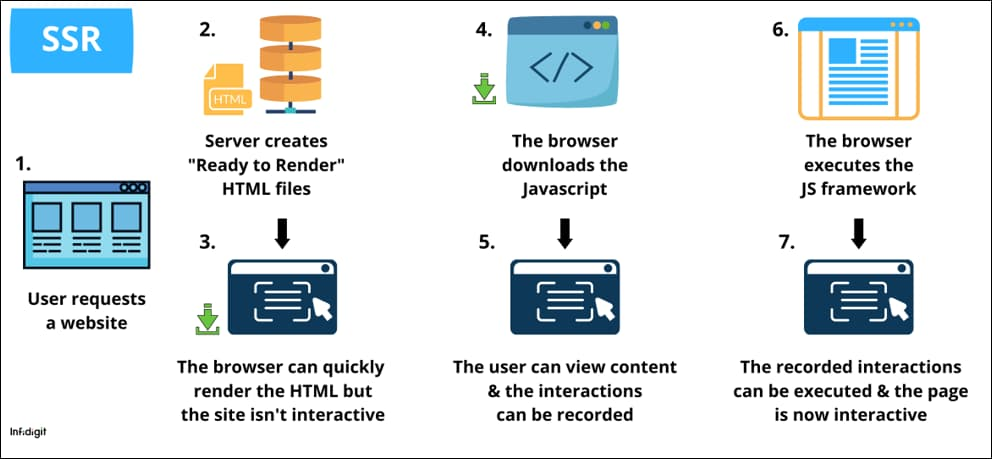
- 서버에서 렌더링 준비를 마친 HTML을 브라우저의 응답으로 전달하는 부분에서 모든 데이터가 HTML에 담겨진 채로 브라우저에 전달되기 때문에 검색엔진 최적화에 유리.
- SEO(검색 엔진 최적화) : 검색엔진이 이해하기 쉽도록 홈페이지의 구조와 페이지를 개발해 검색 결과 상위에 노출될 수 있도록 하는 작업.
https://library.gabia.com/contents/domain/4359/
- SEO(검색 엔진 최적화) : 검색엔진이 이해하기 쉽도록 홈페이지의 구조와 페이지를 개발해 검색 결과 상위에 노출될 수 있도록 하는 작업.
- 자바스크립트 코드를 다운받고 실행하기 전에 사용자가 화면을 볼 수 있다는 점.
- JS 다운로드를 기다려야 했던 CSR보다 초기 구동 속도가 빠름
단)사용자가 버튼을 클릭하고 이동하려 해도 아무런 반응이 없을 수 있다.
- JS 다운로드를 기다려야 했던 CSR보다 초기 구동 속도가 빠름
- SSR안에는 TTV(Time TO View)와 TTI 간에 시간 간격이 존재하는 단점.
반면)CSR은 JS가 동적으로 DOM을 생성하기 때문에 HTML은 JS로직이 모두 완전히 연결된 상태라 사용자가 보는 시점과 이용할 수 있는 시점이 동일하다.
CSR과 SSR의 가장 큰 차이점은 Client와 Server 중 어느 쪽(Side)에서 rendering을 준비하느냐에 달려있다.
| CSR | SSR | |
|---|---|---|
| 장점 |
● 화면 깜빡임이 없음 ● 초기 코딩 이 후 구동 속도가 빠름 ● TTV와 TTI사이 간극이 없음 ● 서버 부하 분산 |
● 초기 구동 속도가 빠름 ● SEO에 유리함 |
| 단점 |
● 초기 로딩 속도가 느림 ● SEO에 불리함 |
● 화면 깜빡임이 있음 ● TTV와 TTI사이 간극이 있음 ● 서버 부하가 있음 |
angular에서는 Angular Universal을 이용하여 서버 사이드 렌더링을 수행한다.
1.2) Angular CLI
Angular CLI는 간단한 명령어를 사용하여 Angular 프로젝트 스캐폴딩(scaffolding)을 생성, 실행, 빌드할 수 있으며 Angular의 다양한 구성 요소를 선별적으로 추가할 수 있는 커맨드-라인 인터페이스(Command Line Interface)이다.
Vue에서는 Vue CLI가 따로 있다.
1.3) Angular의 장점
- 컴포넌트 기반 개발
- TypeScript의 도입
- 개발 도구의 통합 및 개발 환경 구축 자동화
다른 차이점 : react와 vue는 라이브러리이고 라우터나 상태관리를 할 경우 따로 npm으로 설치를 해야한다. 상태관리는 종류도 여러가지있다. 하지만, Angular는 자체적인 내장모듈을 가지고 있다. 대표적으로 Angular의 RxJS는 비동기통신 및 상태관리 등 여러 기능을 포함하고 있다.
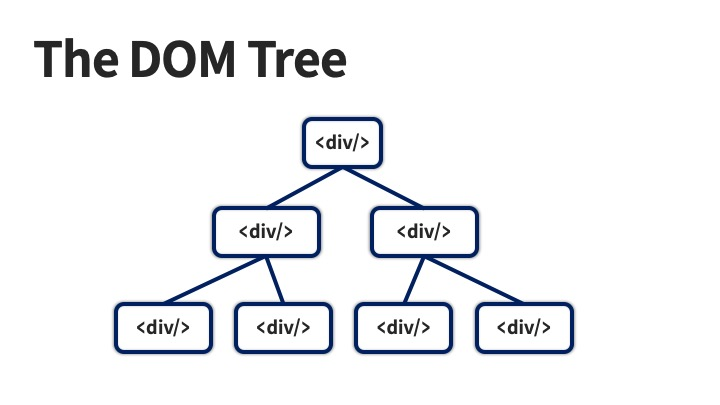
2. 컴포넌트
Angular 애플리케이션에는 페이지 DOM의 최상위에 위치하는 컴포넌트가 존재한다. 이 컴포넌트를 최상위 컴포넌트라고 한다.
Angular 컴포넌트는 TypeScript 클래스로 정의된다.
컴포넌트 = 컴포넌트 클래스 + 템플릿 구성
컴포넌트 클래스
컴포넌트 클래스는 애플리케이션 데이터와 로직을 처리한다.
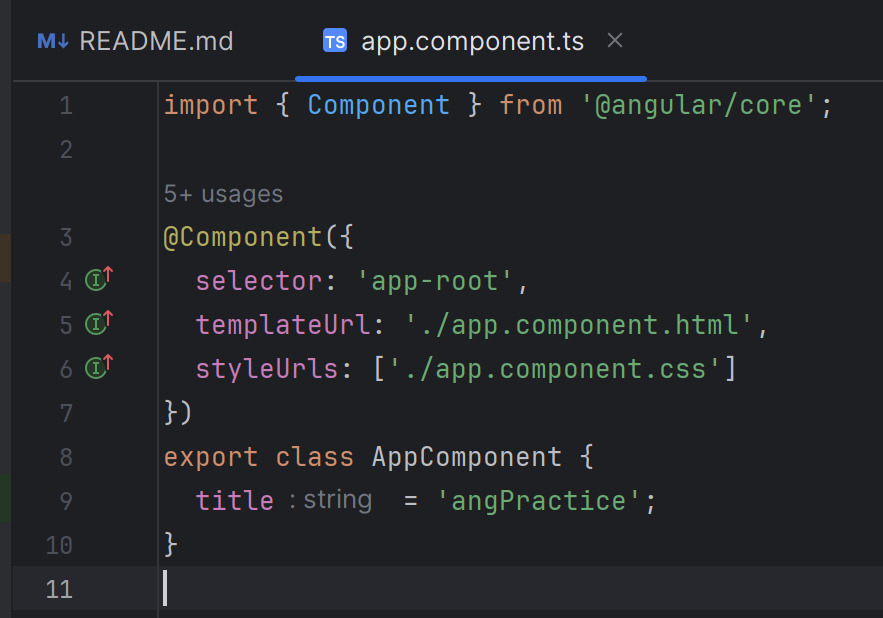
// app.component.ts

import { Component } from '@angular/core';

@Component({
  selector: 'app-root',
  templateUrl: './app.component.html',
  styleUrls: ['./app.component.css']
})
export class AppComponent {
  title = 'My Angular App';
  message = 'Hello, Angular!';
}AppComponent는 Angular의 Component 데코레이터를 사용하여 정의된 클래스이다. 이 클래스이다. 이 클래스는 컴포넌트의 동작과 상태를 정의하고 있다.
title과 message는 컴포넌트의 속성으로 사용되고 나중에 템플릿에서 바인딩될 것이다.
템플릿
템플릿은 화면에 표시할 HTML을 정의한다.
<!-- app.component.html -->
<div>
  <h1>Title</h1>
  <p>message</p>
</div>
app.component.html 은 AppComponent의 템플릿을 정의한다.
결론 : 이렇게 정의된 컴포넌트 클래스와 템플릿은 Angular 애플리케이션에서 사용되며, 클래스의 인스턴스는 런타임에 생성되고 템플릿은 해당 인스턴스와 연결되어 뷰를 생성한다.
컴포넌트 라이프 사이클
ngOnInit()
ngOnInit
- ngOnInit은 Angular 컴포넌트의 라이프사이클 훅 중 하나
angular
ngOnInit(){
	console.log("초기화")
}
ngOnInit() vs Constructor
ConStructor(생성자)
- 생성자는 TypeScript 또는 JavaScript 클래스의 일부로, 객체가 생성될 때 자동으로 호출되는 메서드이다.
- Angular 컴포넌트 클래스에서도 생성자를 사용할 수 있다.
- 컴포넌트 인스턴스가 생성될 때 초기화 로직을 수행하는 데 주로 사용
- Angular의 의존성 주입 시스템을 이용하여 서비스 등을 주입받을 수 있다.
❗️Angular 라이프사이클과 관련이 없는 일반적인 클래스 생성자로, 뷰 초기화와 관련된 작업은 여기서 수행하지 않는 것이 좋다.
import { Component } from '@angular/core';

@Component({
  selector: 'app-example',
  template: '<p>Angular Component</p>',
})
export class ExampleComponent {
  constructor() {
    // 컴포넌트 인스턴스 생성 시 실행되는 로직
  }
}
@ngOnChanges()
@ngOnChanges
- 입력 프로퍼티의 변화를 감지하고 그에 따른 동작을 수행
- 메서드를 사용하여 변화에 대한 처리 구현
import { Component, OnChanges, Input } from '@angular/core';

@Component({
  selector: 'app-child',
  template: 'Child Component',
})
export class ChildComponent implements OnChanges {
  @Input() data: any;

  ngOnChanges() {
    // Handle changes to 'data' input property
  }
}
결론
공통점
두 기술 모두 데이터의 변화를 감지하고 그에 따른 동작을 수행하는 기능을 제공하는 공통점
차이점
Angular의@ngOnChanges는 주로 입력 프로퍼티의 변화를 감지
ue의watch는 특정 데이터 속성의 변화를 감지
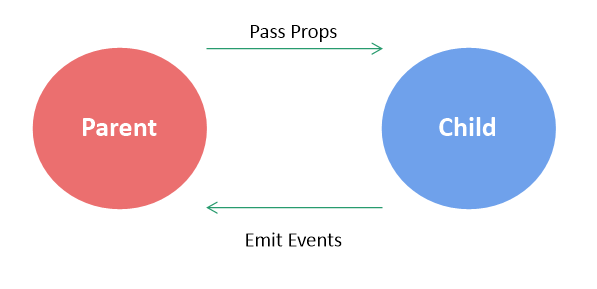
상위/하위 컴포넌트 데이터 공유
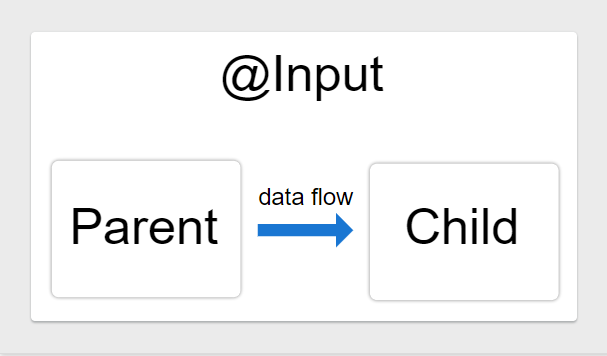
@Input
@Input() 데코레이터는 자식 컴포넌트/디렉티브에 있는 특정 프로퍼티가 부모 컴포넌트/디렉티브에서 받는다는 것을 지정하는 데코레이터이다.
@Input()데코레이터는 부모-자식 관계에서만 사용할 수 있다.
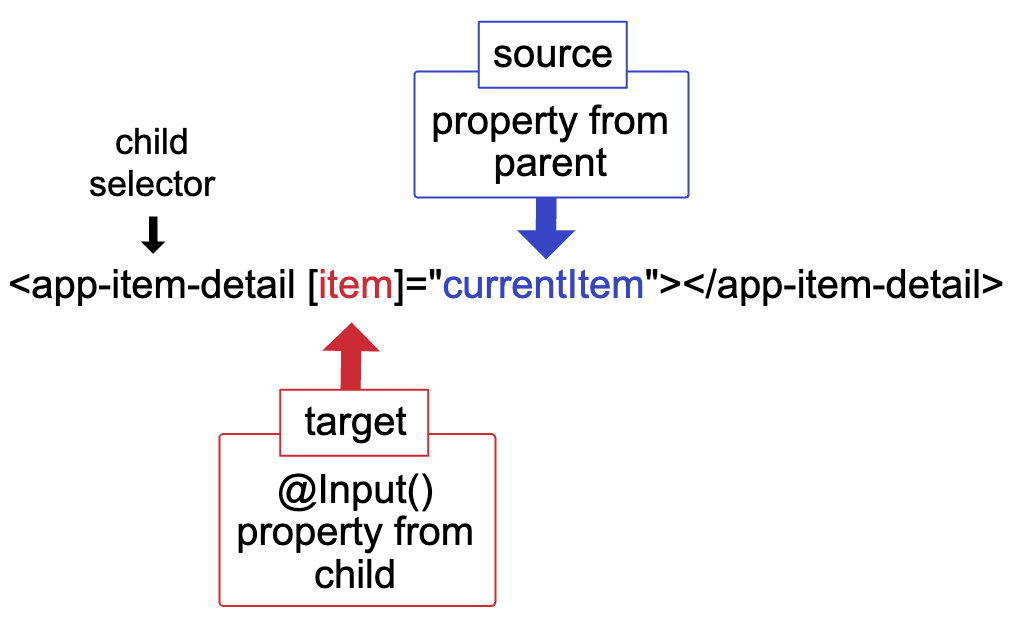
부모컴포넌트에서 설정
<!--src/app/app.component.html -->
<app-item-detail [item]="currentItem"></app-item-detail>
//src/app/app.component.ts
export class AppComponent {
currentItem = 'Television';
}자식컴포넌트에서 설정
//src/app/item-detail/item-detail.componet.ts
import { Component, Input } from '@angular/core';

@Component({
	selector : 'app-todo-item,
  	template : `
		<p>Today's item : {{item}}</p>
	`
})

export class ItemDetailComponent{
	@Input() item = '';
}
setter
입력 프로퍼티를 세터(setter)로 가로챌 수 있다.
//src/app/item-detail/item-detail.componet.ts
import { Component, Input } from '@angular/core';

@Component({
	selector : 'app-todo=item,
  	template : `
		<p>Today's item : {{item}}</p>
	`
})

export class ItemDetailComponent{
	@Input()
  	get item() : string { return this._item }
  	set item(item : string){
    	this._item = (item && item.trim()) || null;
    }
  	private _item = '';
}
//상위 컴포넌트
<template>
  <Modal :modalStatus="modalStatus" />
</template>
<script>

export default{
    data(){
		return{
        	modalStatus : false
        }
  	}
}
</script>
//하위 컴포넌트
<template>
<div v-if="modalStatus == true">
</div>
</template>
<script>
export default{
name : "modal",
props : {
modalStatus : Boolean
}
}
</script>@Output
자식 컴포넌트/디렉티브에 @Output() 데코레이터를 사용하면 부모 컴포넌트/디렉티브로 데이터를 전달
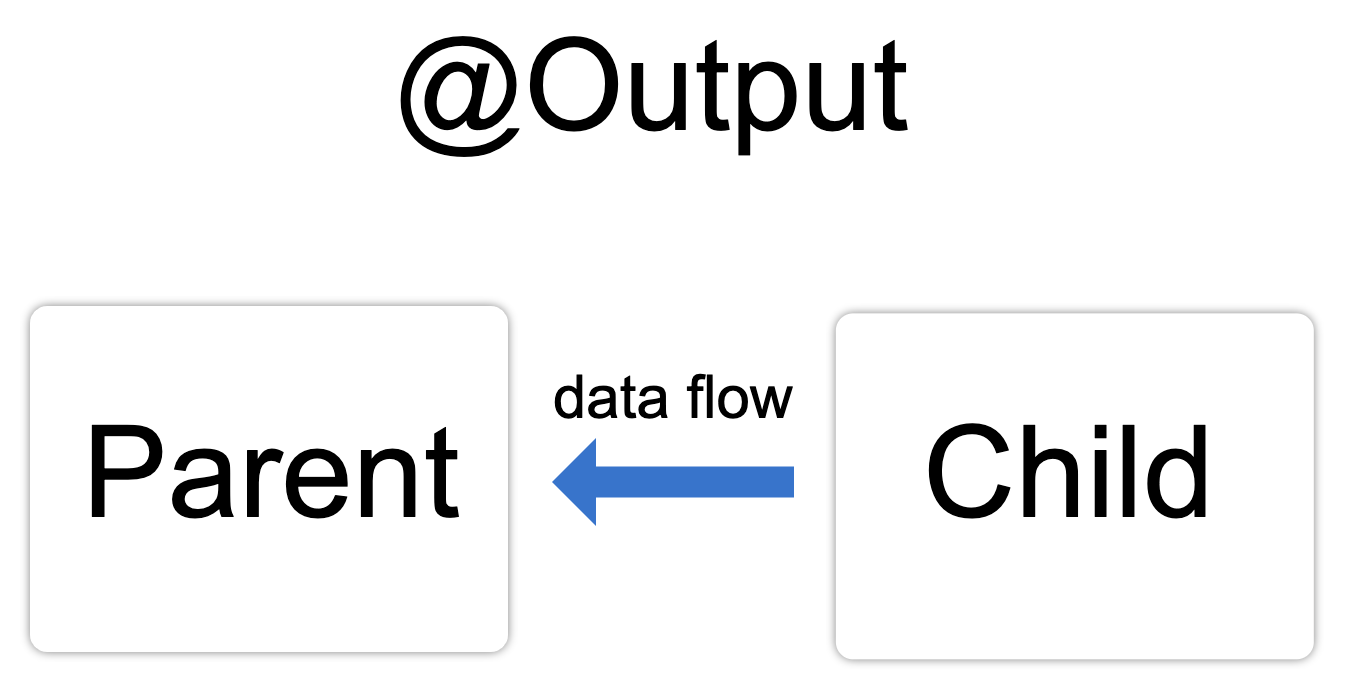
하위 컴포넌트
import {Component, EventEmitter, Output} from '@angular/core';

@Component({
  selector: 'app-item-output',
  // templateUrl: './item-output.component.html',
  template : `
    <label for="item-input">Add an item:</label>
    <input type="text" id="item-input" #newItem>
    <button type="button" (click)="addNewItem(newItem.value)">Add to parent's list</button>
  `,
  styleUrls: ['./item-output.component.css']
})
export class ItemOutputComponent {
  @Output() newItemEvent = new EventEmitter<string>();

  addNewItem(value : string){
    this.newItemEvent.emit(value);
  }
}
상위 컴포넌트
import { Component } from '@angular/core';
import { DynamicRoutingService } from './dynamic-routing.service';

@Component({
  selector: 'app-root',
  template: `
    <p>main</p>
<!--    <router-outlet></router-outlet>-->
    <app-item-output (newItemEvent)="addItem($event)"></app-item-output>
    <ul>
      <li *ngFor="let item of items">{{item}}</li>
    </ul>
  `,
  styleUrls: ['./app.component.css']
})
export class AppComponent {
  constructor() { }
  items = ['item1', 'item2', 'item3', 'item4'];

  addItem(newItem: string) {
    this.items.push(newItem);
  }
}
4) @Input, @Output에서 기본값, 참조값 공유 및 수정(set) - 기본값과 참조값에서의 데이터 변화
추가적으로 컴포넌트 라이프사이클
1. ngOnChanges()
2. ngOnInit()✨
3. ngAfterViewInit()✨
Angular가 컴포넌트나 디렉티브 화면과 자식 컴포넌트 화면을 초기화한 후에 실행됩니다.
4. ngOnDestroy()
3. 템플릿
HTML 뭉치이다.
3.1)템플릿 실행문
템플릿 실행문은 HTML 템플릿 안에서 메서드를 실행하거나 프로퍼티를 조작하는 로직을 의미
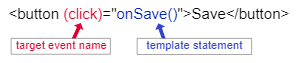
<button type="button" (click)="deleteHero()">Delete hero</button>3.2) 바인딩
바인딩
<!-- app.component.html -->
<div>
  <h1>{{ title }}</h1>
  <p>{{ message }}</p>
</div>
템플릿은 HTML과 Angular의 템플릿 문법을 사용하여 구성된다. 중괄호 {{ }}를 사용하여 컴포넌트의 속성을 템플릿에 바인딩 할 수 있다.
3.3) 프로퍼티 바인딩
엘리먼트 프로퍼티를 바인딩하려면 대상 프로퍼티를 대괄호로 감싸는 문법([])
<img alt="item" [src]="itemImageUrl">3.4) 클래스, 스타일 바인딩
@Component({
  selector: 'app-nav-bar',
  template: `
<nav [style]='navStyle'>
  <a [style.text-decoration]="activeLinkStyle">Home Page</a>
  <a [style.text-decoration]="linkStyle">Login</a>
</nav>`
})
export class NavBarComponent {
  navStyle = 'font-size: 1.2rem; color: cornflowerblue;';
  linkStyle = 'underline';
  activeLinkStyle = 'overline';
  /* . . . */
}
3.5) 이벤트 바인딩
3.6) 양방향 바인딩
자식 컴포넌트에서 발생하는 이벤트를 감지하는 바인딩과
양방향 바인딩을 활용하면 컴포넌트끼리 데이터를 공유할 수 있다.
프로퍼티 바인딩 X 이벤트 바인딩 문법
<app-sizer [(size)]="fontSizePx"></app-sizer>위 코드를 풀어쓴 코드
<app-sizer [size]="fontSizePx" (sizeChange)="fontSizePx=$event"></app-sizer>export class SizerComponent{
@Input size!: number | string;
@Output() sizeChange = new EventEmitter<number>();
}❗️자동으로 인식
Change
TypeScript Non-null assertion연산자
size !: number | string해당 변수 또는 속성
null또는 undefined가 아님을 알려주는 역할
4. 디렉티브
4.1) ngClass
✨8) ngClass & ngStyle
[ngClass]="{ 클래스명 : 조건식 }"
[ngStyles]={ CSS속성명 : 함수(조건식) 또는 조건식 }
CSS 클래스를 추가하거나 제거한다.
<!-- app.component.html -->
<div [ngClass]="isSpecial ? 'specail-class' : null">This is a Special</div>
//app.component.ts
export class AppComponent{
isSpecial : true
}//app.component.css
.sepecail-class{
color : red,
font-weight : bold
}템플릿
<div class="container">
  <div class="row">
    <div class="col-xs-12">
      <button
        class="btn btn-primary"
        (click)="onlyOdd = !onlyOdd">Only show odd numbers</button>
      <br><br>
      <ul class="list-group">
        <div *ngIf="onlyOdd">
          <li class="list-group-item" [ngClass]="{odd : odd % 2 !== 0}" [ngStyle]="{backgroundColor : odd % 2 !== 0}"  *ngFor="let odd of oddNumbers">{{odd}}</li>
        </div>
        <div *ngIf="!onlyOdd">
          <li
            class="list-group-item"
            [ngClass]="{ odd :  even % 2 !== 0}"
            *ngFor="let even of evenNumbers"
          >
            {{ even }}
          </li>
        </div>
      </ul>
      <p appBasicHighlight>Style me with basic directive!</p>
    </div>
  </div>
</div>
컴포넌트
import { Component } from '@angular/core';

@Component({
  selector: 'app-root',
  templateUrl: './app.component.html',
  styleUrls: ['./app.component.css']
})
export class AppComponent {
  numbers = [1, 2, 3, 4, 5];
  onlyOdd = false;
  oddNumbers = [1, 3, 5];
  evenNumbers = [2, 4];
}
스타일
.container {
  margin-top: 30px;
}
.odd {
  color : red;
}
ngStyle
<p [ngStyle]="{backgroundColor : getColor()}">Server Start</p>serverStatus : string = 'offline';
getServerStatus(){
return this.serverStatus;
}
getColor(){
return this.server === 'online'?'green':'red';
}HTML 스타일을 추가하거나 제거한다.
<!-- app.component.html -->
<div [ngStyle]="currentStyles">
   내용이 여기에 있습니다.
</div>
<button (click)="setCurrentStyles()">스타일 변경</button>
//app.component.ts
export class AppComponent {
  title = 'angularLearn';
  currentStyles : Record<string, string> = {};

  setCurrentStyles() {
    const canSave = true;  // 실제 속성 값으로 대체하세요
    const isUnchanged = false;  // 실제 속성 값으로 대체하세요
    const isSpecial = true;  // 실제 속성 값으로 대체하세요

    this.currentStyles = {
      'font-style': canSave ? 'italic' : 'normal',
      'font-weight': !isUnchanged ? 'bold' : 'normal',
      'font-size': isSpecial ? '24px' : '12px'
    };
  }
4.3) ngModel
양방향 데이터 바인딩
양방향 데이터 바인딩은 데이터의 변경이 모델과 뷰 간에 양쪽으로 이루어지는 프로그래밍 패턴이다. 이는 사용자가 UI 요소를 통해 값을 입력하면 모델이 업데이트되고, 반대로 모델의 값이 변경되면 이를 UI에 반영하는 것을 의미한다.
Angular에서는 [(ngModel)]을 사용하여 양방향 데이터 바인딩을 구현한다.
다른 언어나 프레임워크에서도 이와 유사한 패턴이 존재한다.
<label>FontSize (px): <input [(ngModel)]="fontSizePx"></label>
4.4) ngIf
// app.component.ts

import { Component } from '@angular/core';

@Component({
  selector: 'app-root',
  template: `
    <p *ngIf="isActive">main</p>
  `,
  styleUrls: ['./app.component.css']
})
export class AppComponent {
  constructor() { }
  isActive = true;
}
✨3) *ngIf 조건식에 undefined, null
*ngIf 조건식에 undefined 또는 null을 넣을 경우 DOM에 추가되지 않는다.
var a = 0;
console.log(Boolean(a)); //false
a = -0;
console.log(Boolean(a)); //false
a = ""; //빈 문자열
console.log(Boolean(a)); //false
a; //undefiend
console.log(Boolean(a)); //false
a = null; //널값
console.log(Boolean(a)); //false
a = false
console.log(Boolean(a)); //false
else
<p *ngIf="serverCreated; else noServer">
	Server was created, server name is
</p>
<ng-template #noServer>
	<p>No Server was created!</p>
</ng-template>
4.5) *ngFor
index 활용
<div *ngFor="let item of items; let i=index">{{i + 1}} - {{item.name}}</div>*ngFor 표현식을 이렇게 작성하면 호스트 엘리먼트 근처에 이 추가되면서 배열에 있는 item 항목마다 반복되면서 item 프로퍼티가 바인딩된다.
## *ngFor trackBy로 항목 추적
배열 항목이 변경되는 것을 추적하면 불필요한 함수 실행 횟수를 줄일 수 있다. 프로퍼티를 사용하면 Angular는 배열에서 변경된 항목만 화면에서 갱신하고 렌더링을 새로한다.
trackByItems(index: number, item: Item): number { return item.id; }<div *ngFor="let item of items; trackBy: trackByItems">
({{item.id}}) {{item.name}}
</div>✨5) ngIf & ngFor 하나의 태그에서 사용가능? 즉, 엘리먼트에는 구조 디렉티브 여러개가 입력 가능?
<li *ngFor = "let number of numbers" *ngIf="number % 2">
{{number}}</li>
동일한 엘리먼트에 대해 둘 이상의 구조적 디렉티브를 가질 수 없기 때문에 오류가 발생한다.
이유 : 구조 디렉티브는 호스트 엘리먼트와 그 자식 엘리먼트에 복잡한 작업을 수행하기 때문이다.
해결방법
      <ul class="list-group">
        <div *ngIf="onlyOdd">
          <li class="list-group-item" *ngFor="let odd of oddNumbers">{{odd}}</li>
        </div>
        <div *ngIf="!onlyOdd">
          <li
            class="list-group-item"
            *ngFor="let number of evenNumbers"
          >
            {{ number }}
          </li>
        </div>
      </ul>
7-1) 어트리뷰트 디렉티브
- 디렉티브 생성
import {Directive, ElementRef, OnInit} from '@angular/core';

@Directive({
  selector: '[appBasicHighlight]'
})
export class BasicHighlightDirective implements OnInit{

  constructor(private elementRef : ElementRef) { }

  ngOnInit() {
    this.elementRef.nativeElement.style.backgroundColor = "green";
  }

}- 속성주입
<p appBasicHighlight>Style me with basic directive!</p>❗️ 위 방법으로 속성을 주입하는 것은 좋은 방법이 아니다.
DOM에 액세스하는 더 나은 접근 방식으로 렌더러를 사용
import {Directive, ElementRef, OnInit, Renderer2} from '@angular/core';

@Directive({
  selector: '[appBetterHighlight]'
})
export class BetterHighlightDirective implements OnInit{
  constructor(private elRef : ElementRef, private renderer : Renderer2) { }
  ngOnInit(){
    this.renderer.setStyle(this.elRef.nativeElement, 'background-color','blue');
  }
}<p appBetterHighlight>Style me with basic directive!</p>왜 이게 더 나은 접근 방식일까?
Angular는 여기 브라우저에서 실행되는 것에 국한되지 않는다. 예를 들어 서비스 작업자와도 작동하며, 이들은 여러분이 DOM에 액세스할 수 없는 환경이다. 하지만, native 엘리먼트와 이 엘리먼트의 스타일에 직접 액세스하여 기본 강조 표시에서 했던 것처럼 DOM을 변경하려고 하면, 일부 상황에서는 오류가 발생할 수 있다. DOM 엑세스를 위해 렌더러를 사용하고 DOM 액세스를 위해 렌더러가 제공하는 방법을 사용하는 것이 요전히 더 나은 방법이다.
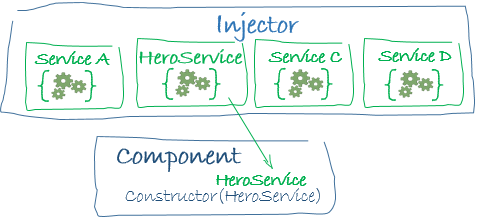
5. 서비스와 의존성 주입
서비스(Service)
컴포넌트의 관심사와 애플리케이션 전역의 관심사를 분리하는 것이 필요한데 이때 사용하는 것이 서비스이다.
장점
애플리케이션 전역의 관심사를 분리하여 외부에서 관리할 수 있다면 컴포넌트는 자신의 관심사에 집중할 수 있어 복잡도가 낮아지고 서비스는 재사용이 가능하게 되어 일관된 애플리케이션 코드를 작성할 수 있다.
import { Injectable } from '@angular/core';
import { TodoItem } from '../interfaces/todo-item';

@Injectable({
  providedIn: 'root'
})
export class TodoListService {

  private todoList: TodoItem[] = [
    {title: 'install NodeJS'},
    {title: 'install Angular CLI'},
    {title: 'create new app'},
    {title: 'serve app'},
    {title: 'develop app'},
    {title: 'deploy app'},
  ];

  constructor() { }

  getTodoList(): TodoItem[] {
    return this.todoList;
  }
}
export class ListManagerComponent {
constructor(private todoListService: TodoListService) { }
}의존성 주입(Dependency Injection)
❗️수동으로 인스턴스화 - 권장하지 않는 방법
서비스 로직
//loging.service.ts
export class LoggingService {
  message(){
    console.log("message submit");
  }ts
import { Injectable } from '@angular/core';
import { TodoItem } from '../interfaces/todo-item';

@Injectable({
  providedIn: 'root'
})
export class TodoListService {

  private todoList: TodoItem[] = [
    {title: 'install NodeJS'},
    {title: 'install Angular CLI'},
    {title: 'create new app'},
    {title: 'serve app'},
    {title: 'develop app'},
    {title: 'deploy app'},
  ];

  constructor() { }

  getTodoList(): TodoItem[] {
    return this.todoList;
  }
}```
}
메인 컴포넌트
```ts
import { Component } from '@angular/core';
import {LoggingService} from "./logging.service";

@Component({
  selector: 'app-root',
  template: `
  `,
})
export class AppComponent {
  ngOnInit(){
    const service = new LoggingService();
    service.message()
  }
}
✨ providers, constructor 이용 - 일반적인 방법
생성자 함수를 통해 서비스(또는 일반적으로 의존성)를 컴포넌트에 주입하는 것이 이러한 주입을 수행하는 가장 일반적인 방법이다.
메인 컴포넌트
import { Component } from '@angular/core';
import {LoggingService} from "./logging.service";

@Component({
  selector: 'app-root',
  template: `
  `,
  providers : [LoggingService]
})
export class AppComponent {
  constructor(private loggingService : LoggingService) {}
  ngOnInit(){
    this.loggingService.message()
  }
}
inject() - 종속성을 주입하는 다른 방법
메인 컴포넌트
import { Component, inject } from '@angular/core';
import {LoggingService} from "./logging.service";

@Component({
  selector: 'app-root',
  template: `
  `,
})
export class AppComponent {
  private loggingService : LoggingService
  constructor() {
  	this.loggingService = inject(LogginService);
  }
  ngOnInit(){
    this.loggingService.message()
  }
}
@Injectable
'root'를 설정하면 루트 인젝터에게 서비스를 제공하도록 지시하여 애플리케이션의 모든 구성요소에 싱글턴 전역 서비스를 주입할 수 있다.
import { Injectable } from '@angular/core';

@Injectable({
  providedIn: 'root' /* @Injectable 프로바이더 */
})
export class GreetingService {
  sayHi() { return 'Hi!'; }
}
import { Component } from '@angular/core';
import { GreetingService } from './greeting.service';
@Component({
selector: 'app-root',
template: `
<button (click)="sayHi()">Say Hi</button>
<p>{{ greeting }}</p>
`
})
export class AppComponent {
greeting: string;
// 의존성 주입
constructor(private greetingService: GreetingService) {}
sayHi() {
// 주입된 서비스의 사용
this.greeting = this.greetingService.sayHi();
}
}6. 라우팅
요청 URL에 따라 분기를 해서 출력을 하는 것
→ 간단하게 생각 하면 사용자가 요청한 URL에 따라 해당 URL에 맞는 페이지를 전송.
6.1) 기본 라우팅 셋팅

import { NgModule } from '@angular/core';
import { RouterModule, Routes } from '@angular/router';
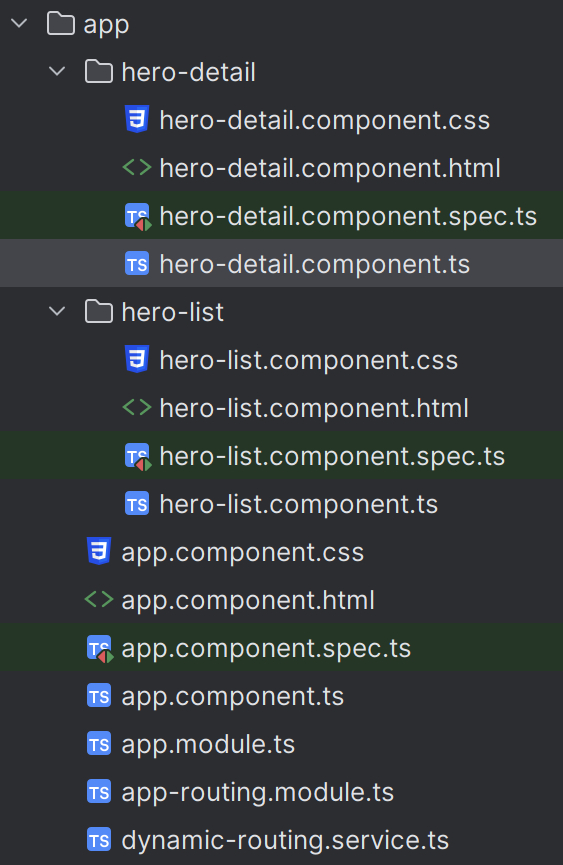
import {HeroListComponent} from "./hero-list/hero-list.component";
const routes: Routes = [
{ path : 'heroes', component : HeroListComponent },
];
@NgModule({
imports: [RouterModule.forRoot(routes)],
exports: [RouterModule
})
export class AppRoutingModule { }6.2) 리다이렉션
설정방법
	const = routes : Routes = [
  		{ path : 'home', component : Home },
  		{ path : '', redirectTo:'/home' }
  ];
6.3) 와일드카드(*)
설정방법
	const = routes : Routes = [
  		{ path : '**', component : PageNotFoundComponent }
  ];
6.4) 중첩 라우팅 규칙
AppRoutingModule에 children 프로퍼티를 추가한다.
const routes: Routes = [
 {
   path: 'first-component',
   component: FirstComponent, // 이 컴포넌트 템플릿에 <router-outlet>이 존재합니다.
   children: [
     {
       path: 'child-a', // 자식 라우팅 규칙과 연결되는 주소
       component: ChildAComponent, // 라우터가 렌더링하는 자식 컴포넌트
     },
     {
       path: 'child-b',
       component: ChildBComponent, // 또다른 자식 컴포넌트
     },
   ],
 },
];
6.5) 동적경로 설정방법
import { NgModule } from '@angular/core';
import { RouterModule, Routes } from '@angular/router';
import {HeroListComponent} from "./hero-list/hero-list.component";
import {HeroDetailComponent} from "./hero-detail/hero-detail.component";

const routes: Routes = [
  { path : 'heroes', component : HeroListComponent },
  { path : 'hero/:id', component : HeroDetailComponent }
];

@NgModule({
  imports: [RouterModule.forRoot(routes)],
  exports: [RouterModule]
})
export class AppRoutingModule { }
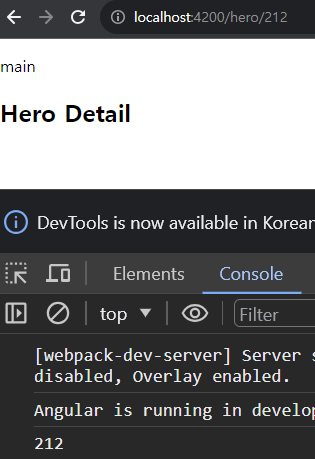
6.6) 동적경로 url경로 가져오기
import { Component } from '@angular/core';
import {ActivatedRoute, ParamMap} from "@angular/router";

@Component({
  selector: 'app-hero-detail',
  template : `
    <h2>Hero Detail</h2>
  `,
  styleUrls: ['./hero-detail.component.css']
})
export class HeroDetailComponent {
  constructor(private route : ActivatedRoute) {
  }
  ngOnInit() {
this.route.paramMap.subscribe((params)=>console.log(params))

    this.route.paramMap.subscribe((params) => {
      console.log(params.get('id'));
    });
  }
}
7. RxJS
자바스크립트에서 반응형 프로그래밍을 지원하기 위한 라이브러리
- 옵저버 패턴을 기반
- 데이터나 이벤트 스트림에 대한 비동기적인 처리를 쉽게 다룰 수 있도록 도와준다.
- 다양한 오퍼레이터(operators)를 제공하여 데이터 스트림을 변형 하고 조작할 수 있다.
즉, 비동기 코드를 더 쉽게 작성하고 관리
옵저버블(Observable)
연속적으로 흐르는 데이터, 즉 데이터 스트림을 생성하고 방출하는 객체
옵저버(Observer)
옵저버블을 구독하여 옵저버블이 방출한 노티피케이션(Notification)을 전파받아 사용하는 객체
 import { Component, OnInit } from '@angular/core';

// RxJS 임포트
import { Observable } from 'rxjs';

@Component({
  selector: 'app-root',
  template: ''
})
export class AppComponent implements OnInit {
  ngOnInit() {

    // 옵저버블이 구독될 때 호출되는 구독 함수
    const subscriber = (observer) => {
      try {
        // next 노티피케이션 방출
        observer.next(1);
        observer.next(2);

        // throw new Error('Something wrong!');

        // complete 노티피케이션 방출
        observer.complete();
      } catch(e) {
        // error 노티피케이션 방출
        observer.error(e);
      } finally {
        // 구독 해지될 때 호출되는 콜백 함수
        return () => console.log('Unsubscribed!')
      }
    }

    // 옵저버블 생성
    const observable$ = new Observable(subscriber);

    // 구독(Subscription)
    observable$.subscribe(
      // 옵저버블이 방출한 next 노티피케이션에 반응하는 next 메소드
      value => console.log(value),
      // 옵저버블이 방출한 error 노티피케이션에 반응하는 error 메소드
      error => console.error(error),
      // 옵저버블이 방출한 complete 노티피케이션에 반응하는 complete 메소드
      () => console.log('Complete')
    );
  }
}
커스텀 옵저버
import { Component, OnInit } from '@angular/core';
import {interval, Observable, Subscription} from "rxjs";

@Component({
  selector: 'app-home',
  templateUrl: './home.component.html',
  styleUrls: ['./home.component.css']
})
export class HomeComponent implements OnInit {

  private firstObsSubscription : Subscription;
  constructor() { }

  ngOnInit() {
    // this.firstObsSubscription = interval(1000).subscribe(count =>{
    //   console.log(count)
    // })
    const customIntervalObservable = Observable.create(observer => { //옵저버블 생성
      let count = 0;
      setInterval(()=>{
        observer.next(count);
        if(count > 3){ //4가 나올 경우 강제로 구독이 취소 된다.
          observer.error(new Error('Count is greater 3!'));
        }
        count++;
      },1000);
    });
    customIntervalObservable.subscribe((a)=>{ //옵저버블 구독
        console.log(a)
    }, error => {
      console.log(error);
      alert(error.message)
    }) //두번쨰 인자로는 에러에 대한 로직이 들어간다.
  }

  // ngOnDestroy():void{ // 구독취소 방법
  //   this.firstObsSubscription.unsubscribe()
  // }
}
import { Component, OnInit } from '@angular/core';
import {interval, Observable, Subscription} from "rxjs";

@Component({
  selector: 'app-home',
  templateUrl: './home.component.html',
  styleUrls: ['./home.component.css']
})
export class HomeComponent implements OnInit {

  private firstObsSubscription : Subscription;
  constructor() { }

  ngOnInit() {
    const customIntervalObservable = Observable.create(observer => { //옵저버블 생성
      let count = 0;
      setInterval(()=>{
        observer.next(count);
        if(count === 2){
          observer.complete(); //구독 완료 방법
        }
        if(count > 3){ //4가 나올 경우 강제로 구독이 취소 된다.
          observer.error(new Error('Count is greater 3!'));
        }
        count++;
      },1000);
    });
    customIntervalObservable.subscribe((a)=>{ //옵저버블 구독
        console.log(a)
    }, (error) => {
      console.log(error);
      alert(error.message)
    }, ()=>{
      console.log("Completed!");
    }) //세번째 인자 구독 완료시 처리될 로직
  }

  // ngOnDestroy():void{ // 구독취소 방법
  //   this.firstObsSubscription.unsubscribe()
  // }
}