개요
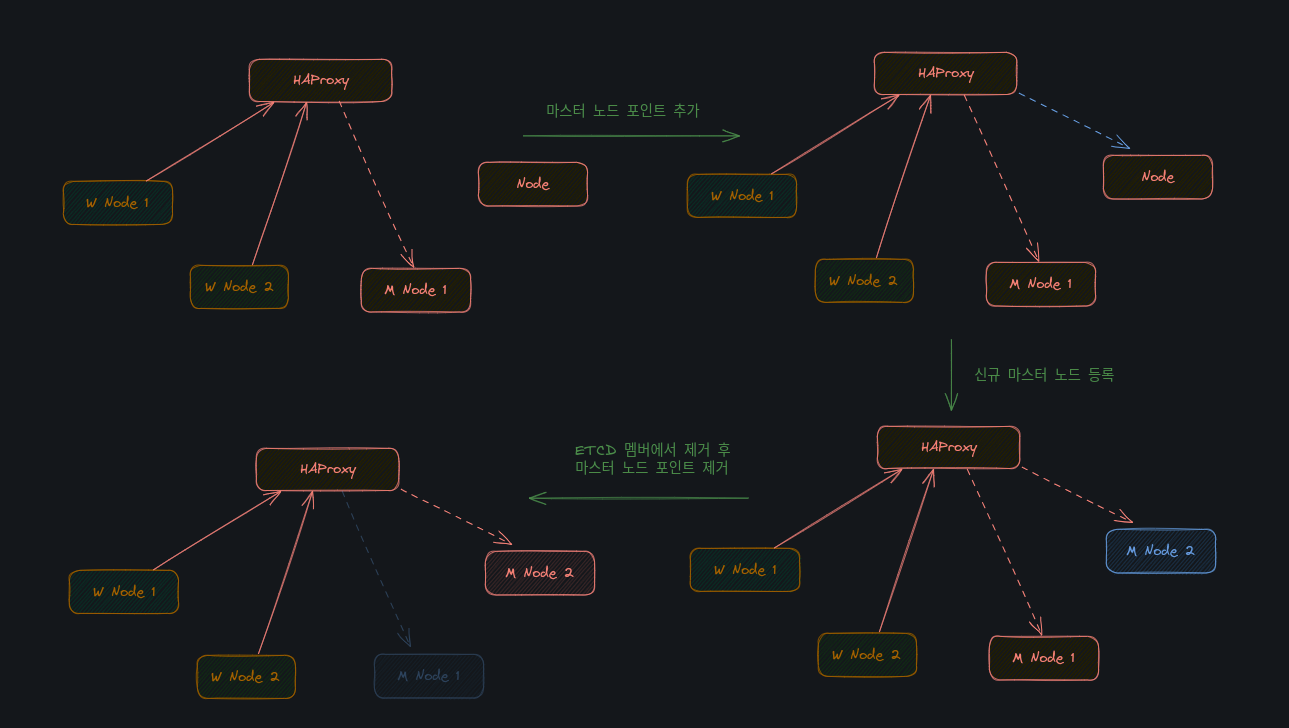
온프레미스하에 마스터노드를 교체하는 것을 염두하고 있다면 HAProxy 를 구성하는 것이 좋아보인다.
나는 현재 온프레미스 K8S 를 운용중에 있고, (마스터노드 1대, 워커노드 2대) 기존의 마스터노드를 새로운 마스터노드로 교체를 하려했다. 이를 하려면 새로운 마스터 노드를 추가하고 기존 마스터노드를 지우면 될텐데, 이는 kubeadm 에서 지원하지 않았다. K8S 클러스터 구성 초기 (kubeadm init) 에 control-plain-endpoint 를 지정하지 않으면 단일 마스터노드로 인식하여 워커노드에서는 기존 마스터노드의 IP 만을 바라보고 있어서 새로운 마스터노드를 추가하더라도 워커노드의 수많은 설정들이 계속 기존 마스터노드 IP를 바라보고 있었을 것이기에 이에 대한 설정 수정 변경은 .

이러한 상황이 발생하지 않으려면 처음부터 HAProxy 를 구성하여 control-plain-endpoint 을 지정해 클러스터를 구성하였어야 되었다.
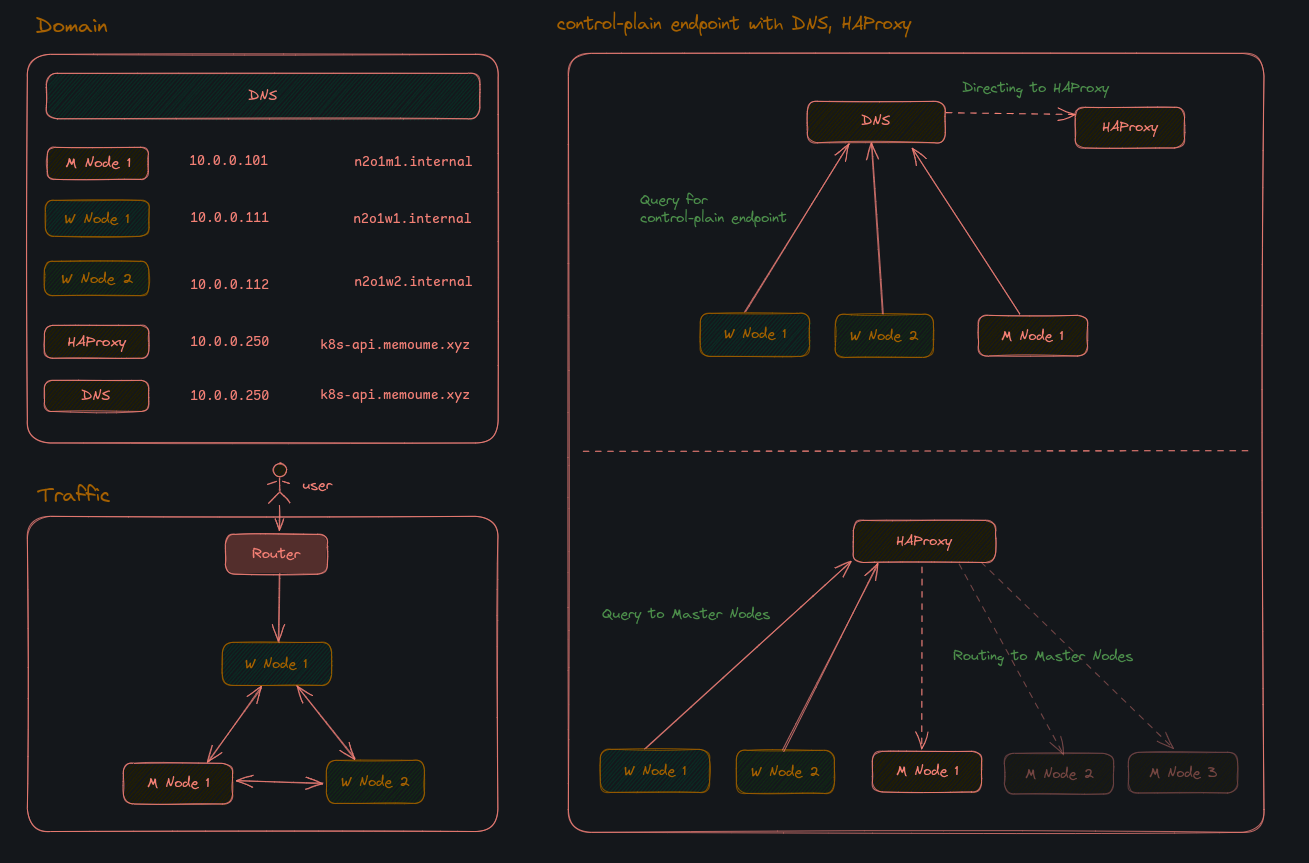
따라서 나는 아예 새롭게 HAProxy 를 통해 아래와 같이 새롭게 클러스터를 구성하려 했다.
최종적인 흐름은 아래와 같다. 따라서 DNS 도 HAProxy 서버에 설치할 예정이다.
이와 관련해 HAProxy 를 설치하고 정상적으로 HAProxy 가 동작하는 지 확인하는 방법을 공유하고자 한다.
설치 방법
DNS 서버 세팅
DNS 서버로 사용할 서버에 접속하여 아래 가이드를 진행한다.
1. DNS 서버 구성
sudo apt update
sudo apt install dnsmasq -y
control-plane endpoint으로 사용할domain : IP작성
# /etc/dnsmasq.d/k8s.conf
address=/k8s-api.memoume.xyz/10.0.0.250

# /etc/dnsmasq.d/upstream.conf
server=8.8.8.8
server=1.1.1.1- 기존의 DNS 서버 종료
sudo systemctl stop systemd-resolved- 신규 DNS 서버 실행
sudo systemctl restart dnsmasq/etc/resolv.conf값 수정
# /etc/resolv.conf
# `127.0.0.53`  -> `127.0.0.1` 으로 변경
sudo rm /etc/resolv.conf
echo "nameserver 127.0.0.1" | sudo tee /etc/resolv.conf- 정상동작 확인
# 아래 결과 모두 IP 를 반환하면 성공
dig @127.0.0.1 k8s-api.memoume.xyz +short
dig @127.0.0.1 www.google.com +short
- 부팅 시에도 기존 변경내역이 반영되도록 변경
sudo systemctl disable systemd-resolved
sudo systemctl enable dnsmasq
-
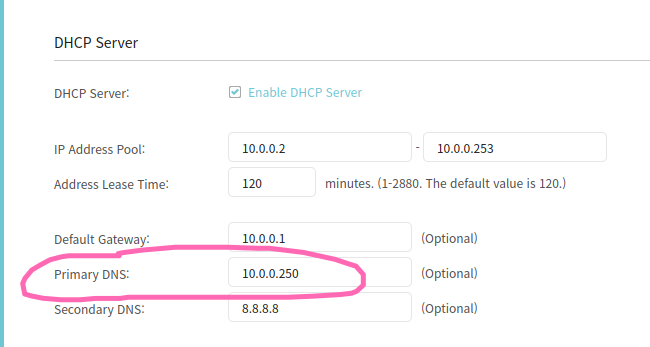
다른 노드들이
DNS서버에DNS쿼리를 하도록 설정한다.
나는 라우터에Primary DNS를DNS 서버의 IP 로 지정하였다.
-
다른 노드에서 DNS 쿼리를 하여 확인한다.
dig k8s-api.memoume.xyz +short
---
result)  10.0.0.250
HAProxy 설치
HAProxy 서버에 접속하여 진행한다. ( 참고로 본인은 하나의 서버에 HAProxy, DNS 를 모두 설치하여 진행한다. )
HAProxy서버에HAProxy설치
sudo apt update
sudo apt install haproxy -y
# 설치 확인
haproxy -vHAProxy설정 파일 생성
마스터 노드로 사용할 서버의 IP 인10.0.0.101로 설정한다.
# /etc/haproxy/haproxy.cfg
global
    log /dev/log local0
    log /dev/log local1 notice
    daemon
    maxconn 2000


defaults
    log     global
    mode    tcp
    option  tcplog
    timeout connect 10s
    timeout client  30s
    timeout server  30s


frontend k8s-api
    bind *:6443
    mode tcp
    default_backend k8s-masters


backend k8s-masters
    mode tcp
    balance roundrobin
    option tcp-check
    default-server inter 3s fall 3 rise 2


server master1 10.0.0.101:6443 check- 설정 파일 적용
sudo haproxy -c -f /etc/haproxy/haproxy.cfg  # 설정 문법 확인
sudo systemctl restart haproxy               # 설정 적용
sudo systemctl enable haproxy                # 부팅 시 자동 시작
마스터노드 설치를 위한 기본 세팅
마스터 노드가 될 서버에 접속하여 진행합니다.
- 스왑 미사용 설정
sudo -i
swapoff --all- 스왑 설정이 있다면 주석처리한다.
vim /etc/fstab
#/swapfile none swap sw 0 0- 이후 재부팅한다.
shutdown -r now- 브릿지 네트워크 설정
bridge 네트워크를 통해 송수신 되는 패킷(컨테이너 패킷)이 iptables 설정에 따라 제어되도록 설정한다.
# 부팅 시에 overlay와 br_netfilter라는 두 가지 모듈을 로드하도록 설정합니다.
cat <<EOF | sudo tee /etc/modules-load.d/k8s.conf
overlay
br_netfilter
EOF
# overlay 커널 모듈을 즉시 로드합니다. 컨테이너 오버레이 파일 시스템에 사용됩니다.
sudo modprobe overlay

# br_netfilter 커널 모듈을 즉시 로드합니다. Linux 브리지 네트워크와 관련된 네트워크 필터링에 사용됩니다.
sudo modprobe br_netfilter

# 여기서는 몇 가지 중요한 파라미터를 설정합니다. 예를 들어, net.bridge.bridge-nf-call-iptables는 iptables가 브리지 트래픽을 처리할 수 있도록 하는 설정입니다.
# sysctl params required by setup, params persist across reboots
cat <<EOF | sudo tee /etc/sysctl.d/k8s.conf
net.bridge.bridge-nf-call-iptables  = 1
net.bridge.bridge-nf-call-ip6tables = 1
net.ipv4.ip_forward                 = 1
EOF

# 설정했던 값을 적용합니다.
sudo sysctl --system- 브릿지 네트워크 설정 확인
$ lsmod | grep br_netfilter
# Module                  Size  Used by
br_netfilter           28672  0

$ lsmod | grep overlay
# Module                  Size  Used by
overlay               151552  54

# 다음의 세가지가 모두 1 로 되어 있는 지 확인
## net.bridge.bridge-nf-call-iptables
## net.bridge.bridge-nf-call-ip6tables
## net.ipv4.ip_forward
$ sysctl net.bridge.bridge-nf-call-iptables net.bridge.bridge-nf-call-ip6tables net.ipv4.ip_forward- 컨테이너 런타임 설치 (containerd 설치)
# Install required packages
sudo apt install -y curl gnupg2 software-properties-common apt-transport-https ca-certificates

# Add Docker repo
curl -fsSL https://download.docker.com/linux/ubuntu/gpg | sudo gpg --dearmor -o /etc/apt/trusted.gpg.d/docker-archive-keyring.gpg
sudo add-apt-repository "deb [arch=amd64] https://download.docker.com/linux/ubuntu $(lsb_release -cs) stable"

# Install containerd
sudo apt update
sudo apt install -y containerd.io

# Configure containerd and start service
sudo mkdir -p /etc/containerd
sudo containerd config default|sudo tee /etc/containerd/config.toml- disabled_plugins 제거
# /etc/containerd/config.toml에서 disabled_plugins 라인을 비활성화하여 CRI 인터페이스를 활성화합니다.
$ sudo vim /etc/containerd/config.toml
# /etc/containerd/config.toml
...
disabled_plugins = ["cri"]
=>
# disabled_plugins = ["cri"]
...- systemd를 cgroup driver로 설정
# systemd를 cgroup driver로 사용하기
> vim /etc/containerd/config.toml
SystemdCgroup = true
===
[plugins."io.containerd.grpc.v1.cri".containerd.runtimes.runc]
  ...
  [plugins."io.containerd.grpc.v1.cri".containerd.runtimes.runc.options]
SystemdCgroup = true- containerd 재시작
sudo systemctl restart containerd
sudo systemctl enable containerd
systemctl status  containerd
마스터 노드 설치
- cni plugin 설치 ( 공식문서 )
CNI_PLUGINS_VERSION="v1.3.0"
ARCH="amd64"
DEST="/opt/cni/bin"
sudo mkdir -p "$DEST"
curl -L "https://github.com/containernetworking/plugins/releases/download/${CNI_PLUGINS_VERSION}/cni-plugins-linux-${ARCH}-${CNI_PLUGINS_VERSION}.tgz" | sudo tar -C "$DEST" -xz- crictl 설치
DOWNLOAD_DIR="/usr/local/bin"
sudo mkdir -p "$DOWNLOAD_DIR"

CRICTL_VERSION="v1.31.0"
ARCH="amd64"
curl -L "https://github.com/kubernetes-sigs/cri-tools/releases/download/${CRICTL_VERSION}/crictl-${CRICTL_VERSION}-linux-${ARCH}.tar.gz" | sudo tar -C $DOWNLOAD_DIR -xz- kubectl 설치
# 다운로드
curl -LO "https://dl.k8s.io/release/$(curl -L -s https://dl.k8s.io/release/stable.txt)/bin/linux/amd64/kubectl"
# 설치
sudo install -o root -g root -m 0755 kubectl /usr/local/bin/kubectl
# 확인
kubectl version- kubelet, kubeadm 설치 및 service.conf 생성
# kubelet, kubeadm 설치
# 직접 버전을 지정하고 싶을 경우 아래 사이트에서 참고하자.
  #  https://kubernetes.io/releases/patch-releases/
VERSION="$(curl -sSL https://dl.k8s.io/release/stable.txt)"
ARCH="amd64"
DOWNLOAD_DIR="/usr/local/bin"
cd $DOWNLOAD_DIR
sudo curl -L --remote-name-all https://cdn.dl.k8s.io/release/${VERSION}/bin/linux/${ARCH}/{kubeadm,kubelet}
sudo chmod +x {kubeadm,kubelet}

# service.conf 생성
RELEASE_VERSION="v0.16.2"
curl -sSL "https://raw.githubusercontent.com/kubernetes/release/${RELEASE_VERSION}/cmd/krel/templates/latest/kubelet/kubelet.service" | sed "s:/usr/bin:${DOWNLOAD_DIR}:g" | sudo tee /usr/lib/systemd/system/kubelet.service
sudo mkdir -p /usr/lib/systemd/system/kubelet.service.d
curl -sSL "https://raw.githubusercontent.com/kubernetes/release/${RELEASE_VERSION}/cmd/krel/templates/latest/kubeadm/10-kubeadm.conf" | sed "s:/usr/bin:${DOWNLOAD_DIR}:g" | sudo tee /usr/lib/systemd/system/kubelet.service.d/10-kubeadm.conf
지금까지의 설치는 워커노드와 마스터노드 모두 동일하게 진행하면 된다.
이제 마스터노드에서만의 설치를 진행한다.
5. 현재의 인증서 상태 확인
kubeadm certs check-expiration
CERTIFICATE                          EXPIRES   RESIDUAL TIME   CERTIFICATE AUTHORITY   EXTERNALLY MANAGED
!MISSING! admin.conf
!MISSING! apiserver
!MISSING! apiserver-etcd-client
!MISSING! apiserver-kubelet-client
!MISSING! controller-manager.conf
!MISSING! etcd-healthcheck-client
!MISSING! etcd-peer
!MISSING! etcd-server
!MISSING! front-proxy-client
!MISSING! scheduler.conf

CERTIFICATE AUTHORITY      EXPIRES   RESIDUAL TIME   EXTERNALLY MANAGED
!MISSING! ca
!MISSING! etcd-ca
!MISSING! front-proxy-ca- 마스터노드 생성에 필요한 이미지를 pull 받는다.
sudo kubeadm config images pull --cri-socket unix:///run/containerd/containerd.sock- 마스터 노드를 생성한다.
kubeadm init \
  --upload-certs \
  --pod-network-cidr "172.24.0.0/16" \
  --cri-socket "/var/run/containerd/containerd.sock" \
  --control-plane-endpoint "k8s-api.memoume.xyz"

=================
출력결과
...
Your Kubernetes control-plane has initialized successfully!

To start using your cluster, you need to run the following as a regular user:
...

Alternatively, if you are the root user, you can run:

  export KUBECONFIG=/etc/kubernetes/admin.conf

You should now deploy a pod network to the cluster.
Run "kubectl apply -f [podnetwork].yaml" with one of the options listed at:
  https://kubernetes.io/docs/concepts/cluster-administration/addons/

You can now join any number of control-plane nodes running the following command on each as root:

  kubeadm join k8s-api.memoume.xyz:6443 --token s101z6.eth3r9u67qf2wtma \
	--discovery-token-ca-cert-hash sha256:76669cb4e6807641c4510f9b87bcfc56554d94b556a0af7c51df5802c312991e \
	--control-plane --certificate-key c36ae4a9ef77554b59525d9b3990372e6e55710d6bf066446244bef2d0e932e5

Please note that the certificate-key gives access to cluster sensitive data, keep it secret!
As a safeguard, uploaded-certs will be deleted in two hours; If necessary, you can use
"kubeadm init phase upload-certs --upload-certs" to reload certs afterward.

Then you can join any number of worker nodes by running the following on each as root:

kubeadm join k8s-api.memoume.xyz:6443 --token s101z6.eth3r9u67qfdf***** \
--discovery-token-ca-cert-hash sha256:76669cb4e6807641c4510f9b87bcdfdafsadfsfsfsdfdsfea*****- 이제 인증서 기한을 다시 확인해보자.
# 정상적으로 결과가 나온 것을 확인할 수 있다.
sudo kubeadm certs check-expiration

CERTIFICATE                EXPIRES                  RESIDUAL TIME   CERTIFICATE AUTHORITY   EXTERNALLY MANAGED
admin.conf                 Mar 30, 2026 18:19 UTC   364d            ca                      no
apiserver                  Mar 30, 2026 18:19 UTC   364d            ca                      no
apiserver-etcd-client      Mar 30, 2026 18:19 UTC   364d            etcd-ca                 no
apiserver-kubelet-client   Mar 30, 2026 18:19 UTC   364d            ca                      no
controller-manager.conf    Mar 30, 2026 18:19 UTC   364d            ca                      no
etcd-healthcheck-client    Mar 30, 2026 18:19 UTC   364d            etcd-ca                 no
etcd-peer                  Mar 30, 2026 18:19 UTC   364d            etcd-ca                 no
etcd-server                Mar 30, 2026 18:19 UTC   364d            etcd-ca                 no
front-proxy-client         Mar 30, 2026 18:19 UTC   364d            front-proxy-ca          no
scheduler.conf             Mar 30, 2026 18:19 UTC   364d            ca                      no
super-admin.conf           Mar 30, 2026 18:19 UTC   364d            ca                      no

CERTIFICATE AUTHORITY   EXPIRES                  RESIDUAL TIME   EXTERNALLY MANAGED
ca                      Mar 28, 2035 18:19 UTC   9y              no
etcd-ca                 Mar 28, 2035 18:19 UTC   9y              no
front-proxy-ca Mar 28, 2035 18:19 UTC 9y no - kubectl 세팅
  # kubectl config 를 가져온다.
  mkdir -p $HOME/.kube
  sudo cp -i /etc/kubernetes/admin.conf $HOME/.kube/config
  sudo chown $(id -u):$(id -g) $HOME/.kube/config

  # kubectl 동작 확인
  kubectl get po
Calico CNI 설치
최신 버전 정보 링크 : releases page
- operator 와 custom resource files 을 다운받는다.
VERSION="v3.29.3"
curl -O "https://raw.githubusercontent.com/projectcalico/calico/${VERSION}/manifests/tigera-operator.yaml"
curl -O "https://raw.githubusercontent.com/projectcalico/calico/${VERSION}/manifests/custom-resources.yaml"- operator 를 클러스터에 설치한다.
kubectl create -f tigera-operator.yaml
===
namespace/tigera-operator created
...
clusterrole.rbac.authorization.k8s.io/tigera-operator created
clusterrolebinding.rbac.authorization.k8s.io/tigera-operator created
deployment.apps/tigera-operator createdcustom-resources.yaml의 CIDR 을 수정한다.
> sed -ie 's/192.168.0.0/172.24.0.0/g' custom-resources.yamlcustom-resources.yaml을 통해 custom-resource 를 설치한다.
$ kubectl create -f custom-resources.yaml
installation.operator.tigera.io/default created
apiserver.operator.tigera.io/default created- 정상적으로 설치되었는 지 확인
$ kubectl get pods --all-namespaces -w
...
kube-system        coredns-668d6bf9bc-r9r7p                   1/1     Running             0          20m
calico-apiserver   calico-apiserver-68fdcdb86-2x424           1/1     Running             0          20s
calico-system      csi-node-driver-g4bzl                      2/2     Running             0          97s
여기까지 되었으면 설치가 완료된 것이다.
우선은 여기까지 진행하고 나중에 또 워커노드 설치까지 추가로 작성하려 한다.
참고 문헌