Creating on my own Virtual Machine!😀
I choose the DebianOS(download link!).
several encrypted partitions are made using LVM when OS was setting up.
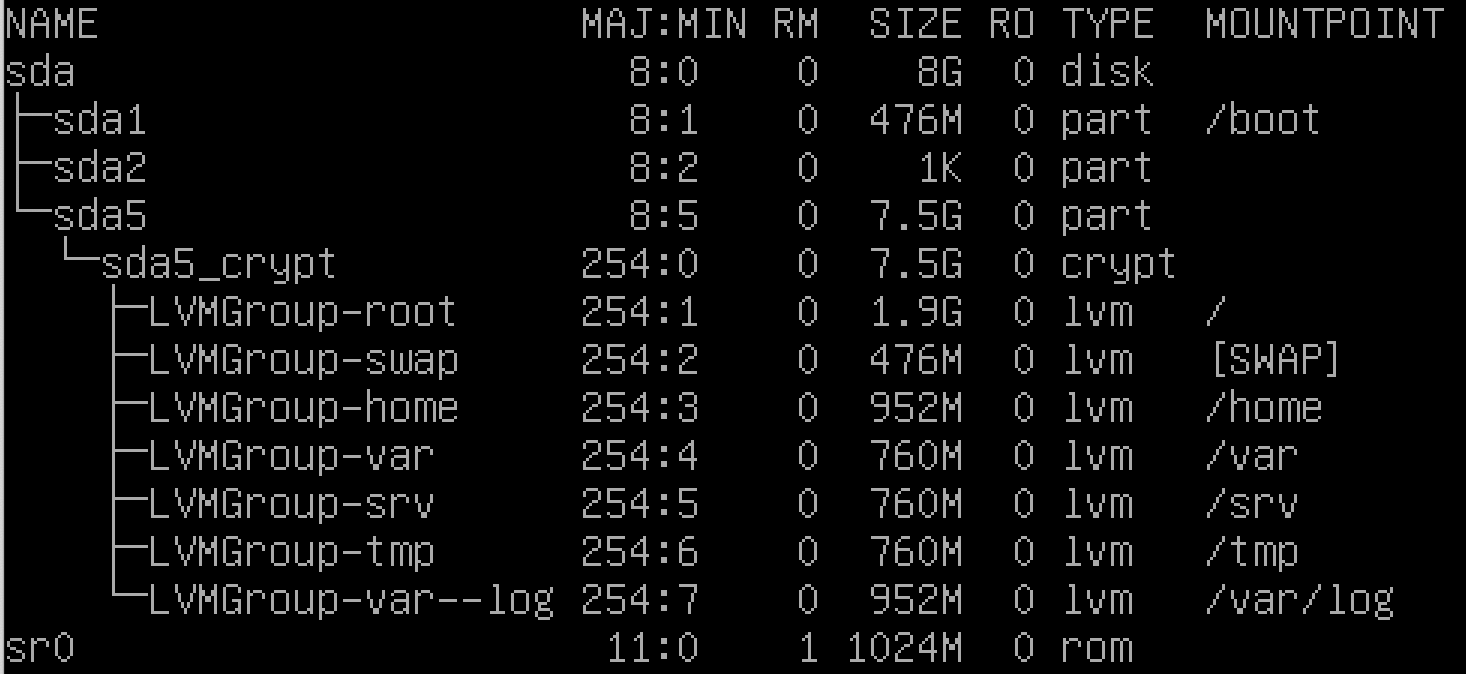
to me, this part was the most complicated.
need to care of the mountpoint, size...
Set up sudo
install sudo
apt-get install sudorequirment
• Authentication using sudo has to be limited to 3 attempts in the event of an incorrect password.
• A custom message of your choice has to be displayed if an error due to a wrong password occurs when using sudo.
• Each action using sudo has to be archived, both inputs and outputs. The log file has to be saved in the /var/log/sudo/ folder.
• The TTY mode has to be enabled for security reasons.
• For security reasons too, the paths that can be used by sudo must be restricted.
Example:
/usr/local/sbin:/usr/local/bin:/usr/sbin:/usr/bin:/sbin:/bin:/snap/bin
visudo- visudo = vi /etc/sudoers
(this command open sudoers file with default editor nano.
you can also use vi, vim etc. after chaning default editor.)
add some required options.
Defaults	authfail_message="A custom message"
Defaults	badpass_message="A custom message"
Defaults	iolog_dir="/var/log/sudo/"
Defaults	log_input
Defaults	log_output
Defaults	requiretty
Defaults	passwd_tries=3
append user to sudo, user42 group.
groupadd user42usermod -aG sudo id- usermod -a = append
- usermod -G = group
cat /etc/group | grep 'id'look up the group and user list.
setting SSH
SSH(Secure Shell) is a network protocol that gives a secure way to access a computer over an unsecured network.
provides strong password authentication and public key authentication, as well as encrypted data communications between two computers connecting over an open network, such as the internet.
requirment
- A SSH service will be running on port 4242 only. For security reasons, it must not be possible to connect using SSH as root.
installing SSH is needed at the first time.
su -
apt install openssh-server
open config file to modify.
vi /etc/ssh/sshd_config

Port 4242
PermitRootLogin no
modified port setting line and Permition for root login setting line.
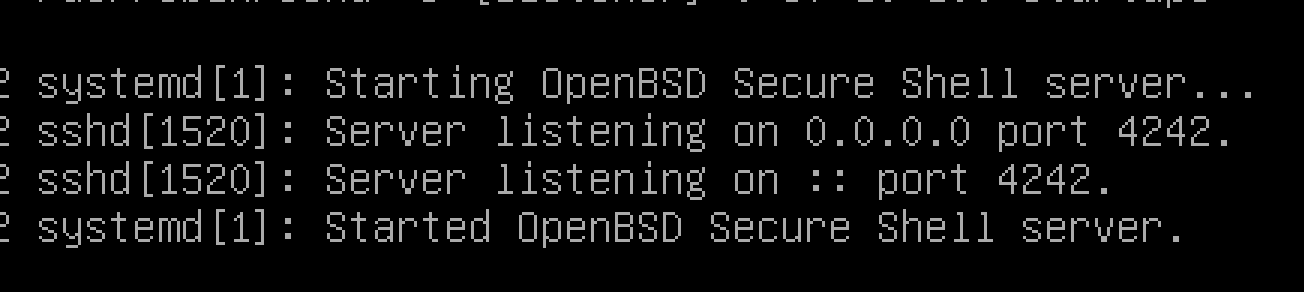
systemctl restart ssh
systemctl status ssh
restart ssh and check status.
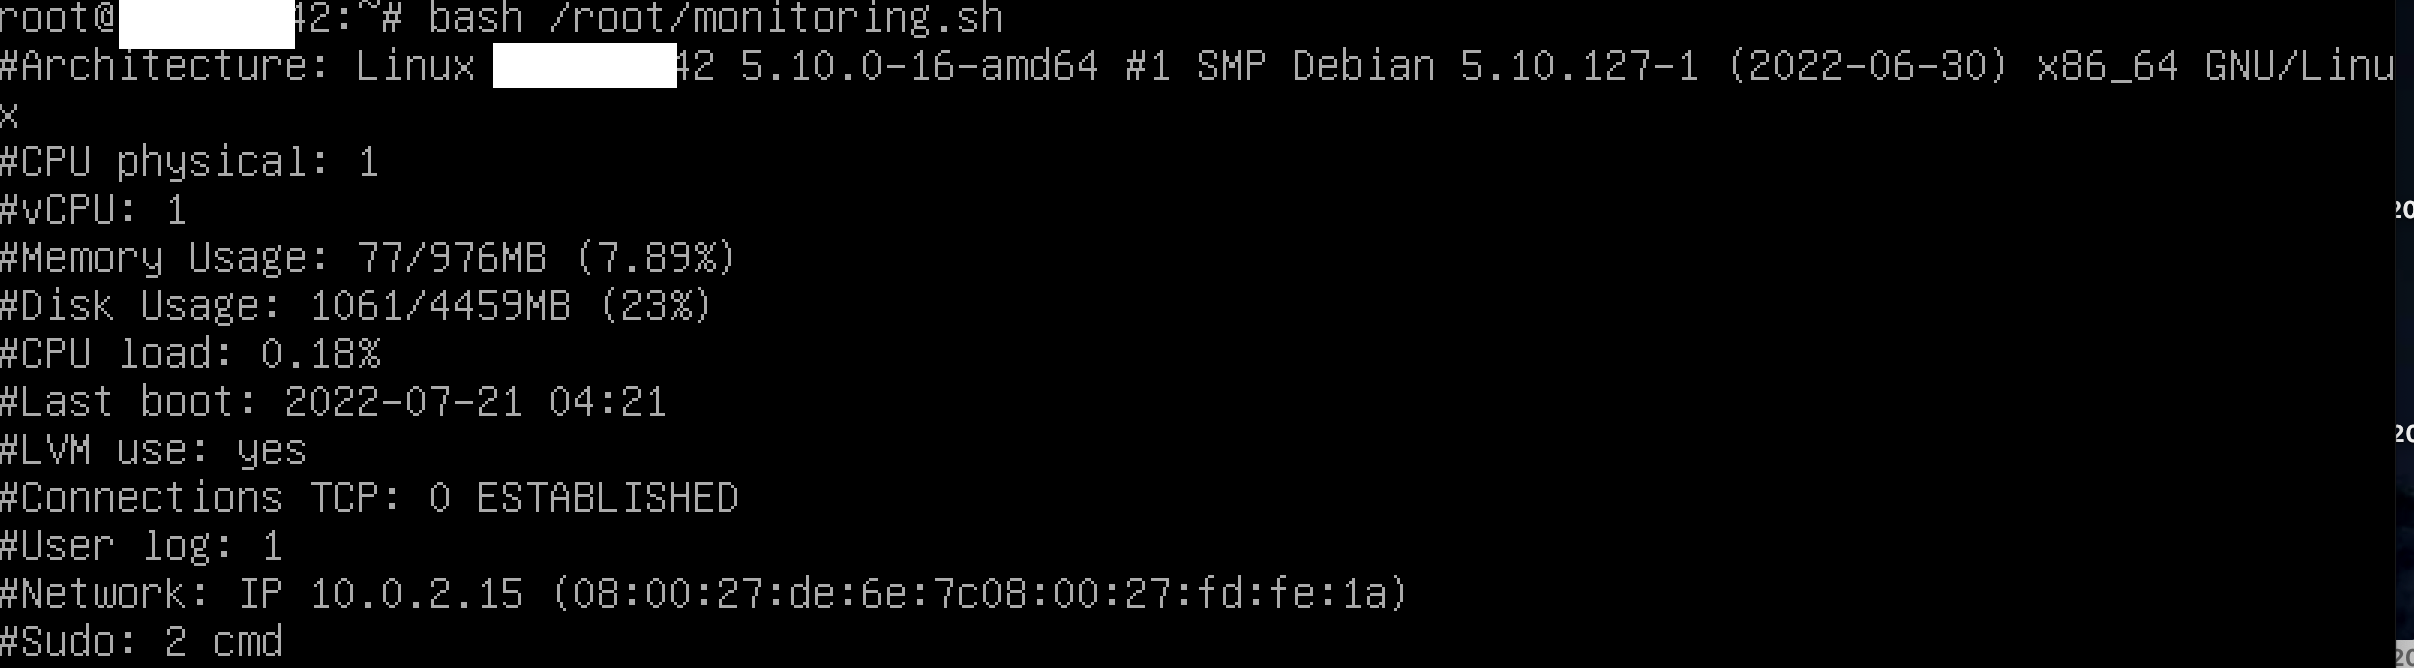
then you can see result like below.
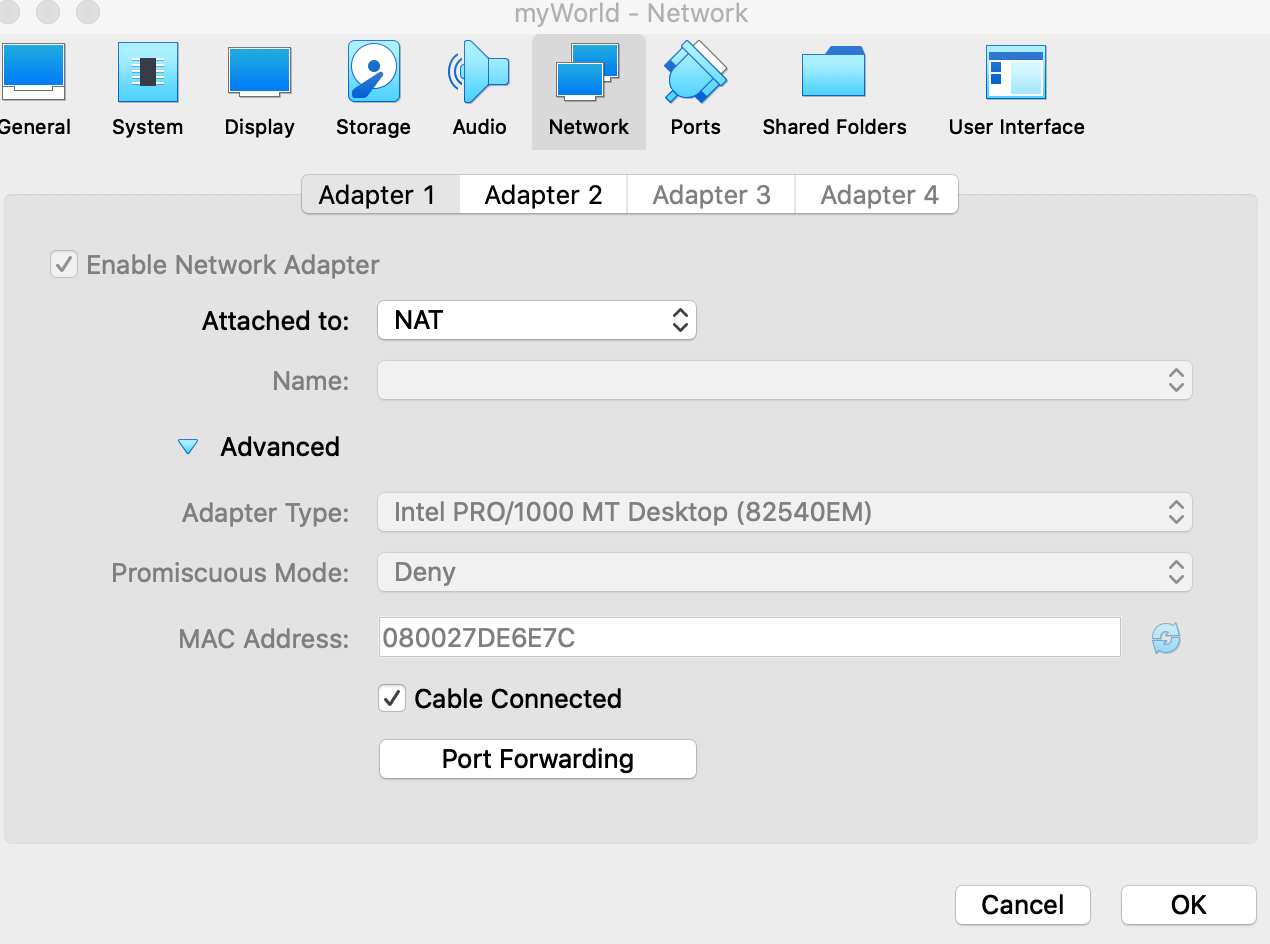
made new Network. to access to myWorld.
in local terminal, you can reach to myWorld using
this command.
ssh id@ip -p 4242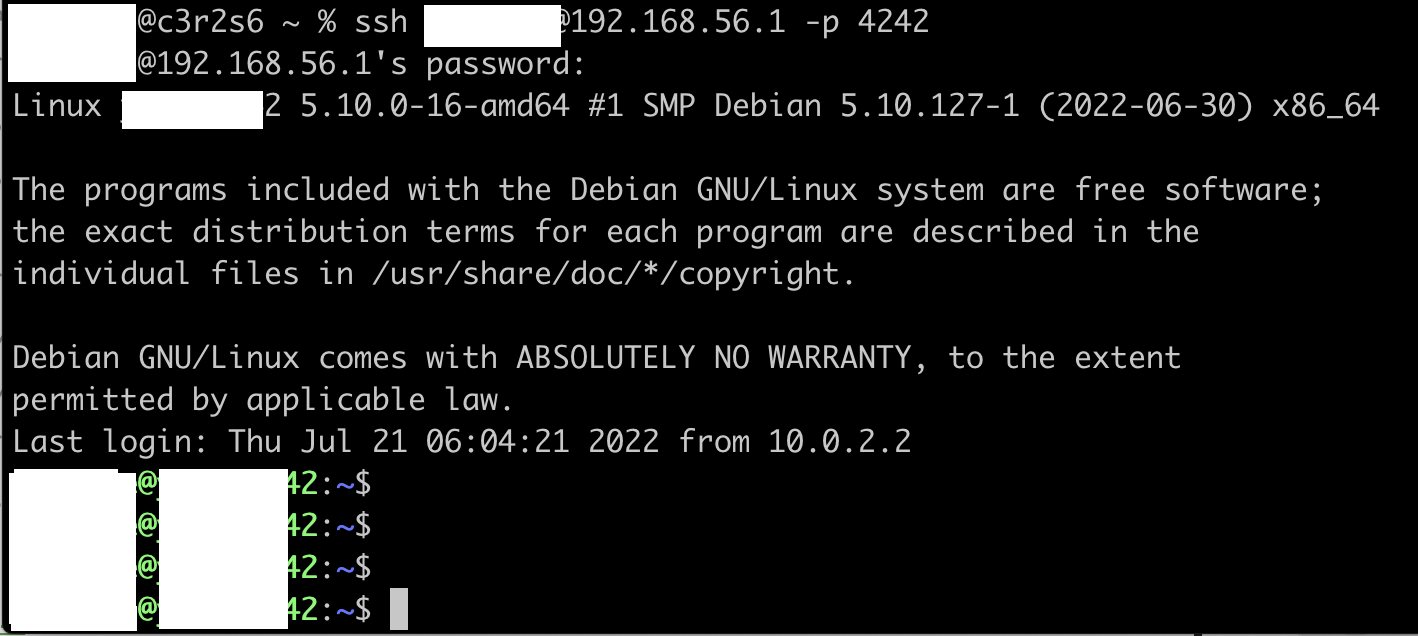
Since I modified the setting, no login root is allowed.
set up a password policy
requirment
• Your password has to expire every 30 days.
• The minimum number of days allowed before the modification of a password will be set to 2.
• The user has to receive a warning message 7 days before their password expires.
• Your password must be at least 10 characters long. It must contain an uppercase letter and a number.
Also, it must not contain more than 3 consecutive identical characters.
• The password must not include the name of the user.
• The following rule does not apply to the root password: The password must have at least 7 characters that are not part of the former password.
• Of course, your root password has to comply with this policy.
su -

vi /etc/login.defs

PASS_MAX_DAYS 30
PASS_MIN_DATS 2
PASS_WARN_AGE 7- PASS_MAX_DAYS - Maximum number of days a password may be used.
- PASS_MIN_DAYS - minimum number of days allowed between password changes.
- PASS_WARN_AGE - Number of days warning given before a password expires.
apt-get -y install libpam-pwquality

vi /etc/pam.d/common-password

retry=3
minlen=10 ucredit=-1 lcredit=-1 dcredit=-1 maxrepeat=3 reject_username enforce_for_root difok=7
- ucredit - maximum number of uppercase characters that will generate a credit.
- lcredit - maximum number of lowercase characters that will generate a credit.
- dcredit - maximum number of digits that will generate a credit. (default = 1)
Create monitoring.sh
requirment
Your script must always be able to display the following information:
• The architecture of your operating system and its kernel version.
• The number of physical processors.
• The number of virtual processors.
• The current available RAM on your server and its utilization rate as a percentage.
• The current available memory on your server and its utilization rate as a percentage.
• The current utilization rate of your processors as a percentage.
• The date and time of the last reboot.
• Whether LVM is active or not.
• The number of active connections.
• The number of users using the server.
• The IPv4 address of your server and its MAC (Media Access Control) address.
• The number of commands executed with the sudo program.
command
- uname - print system information. (-a print all information)
- nproc - print the number of processing units available.
- free - Display amount of free and used memory in the system.(--mega Display the amount of memory in megabytes.)
- df - report file system disk space usage.(-B, --block-size=SIZE scale sizes by SIZE before printing them; e.g., '-BM' prints sizes in units of 1,048,576 bytes)
- mpsat - Report processors related statistics.
- who - show who is logged on.(-b time of last system boot)
- ss - another utility to investigate sockets.
- hostname - show or set the system's host name.(-I = --all-ip-addresses)
- journalctl - Query the systemd journal(log).(a query for matching this option "_COMM=")
requirment
- At server startup, the script will display some information (listed below) on all terminals every 10 minutes (take a look at wall). The banner is optional. No error must be visible.
crontab -e
*/10 * * * * /root/monitoring.sh | wall'/10 * * *' means everydey every 10mins.
set up default firewall
UFW(Uncomplicated FireWall)
: a front-end for iptables and is particularly well-suited for host-based firewalls. UFW was developed specifically for Ubuntu (but is available in other distributions), and is also configured from the terminal.
requirment
- you have to use UFW instead of the default firewall. To install it, you will probably need DNF.
apt-get install ufw -y
ufw enable
ufw default deny
ufw allow 4242
ufw status verbose- ufw default deny - deny the default policy
- ufw allow 4242 - only allow port 4242 (TCP/UDP)
- ufw status verbose - check the status of ufw