
파일 업로드
HTML Form을 통한 파일 업로드를 이해하려면 먼저 폼을 전송하는 다음 두 가지 방식의 차이를 이해해야 한다.
application/x-www-form-urlencodedmultipart/form-data
application/x-www-form-urlencoded
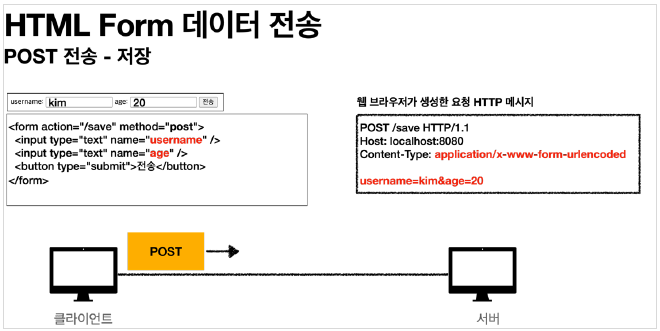
application/x-www-form-urlencoded 방식은 HTML 폼 데이터를 서버로 전송하는 가장 기본적인 방법이다. Form 태그에 별도의 enctype 옵션이 없으면 웹 브라우저는 요청 HTTP 메시지의 헤더에 다음 내용을 추가한다.
Content-Type: application/x-www-form-urlencoded
그리고 폼에 입력한 전송할 항목을 HTTP Body에 문자로 username=kim&age=20와 같이 &로 구분해서 전송한다.
파일을 업로드 하려면 파일은 문자가 아닌 바이너리 데이터를 전송해야 한다. 문자를 전송하는 이 방식으론 파일을 전송하기 어렵다. 게다가 보통 폼을 전송할 때 파일만 전송하는 것이 아니라는 점도 문제가 된다.
- 이름
- 나이
- 첨부 파일
같은 내용을 전송해야 한다면, 이름과 나이는 문자로 전송하고 첨부파일은 바이너리로 전송해야 한다. 문자와 바이너리를 동시에 전송해야 하는 상황이 바로 문제점이다.
multipart/form-data
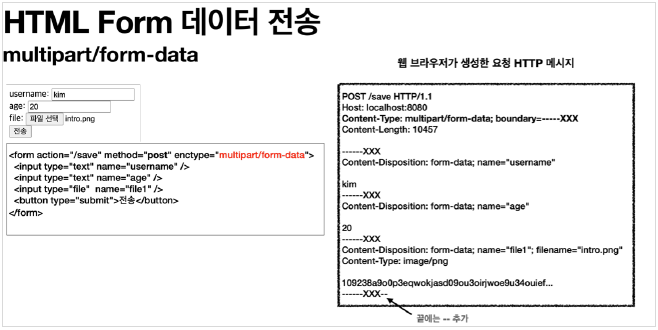
위 문제를 해결할 방법은 multipart/form-data 전송 방식이다.
이 방식을 사용하려면, Form 태그에 별도의 enctype="multipart/form-data"를 지정해야 한다. multipart/form-data 방식은 다른 종류의 여러 파일과 폼의 내용을 함께 전송할 수 있다.
폼의 입력 결과로 생성된 HTTP 메시지를 보면 각각의 전송 항목이 구분되어 있다. Content-Disposition 이라는 항목별 헤더가 추가되어 있고 여기에 부가 정보가 있다. 폼의 일반 데이터는 각 항목별로 문자가 전송되고, 파일의 경우 파일 이름과 Content-Type이 추가되고 바이너리 데이터가 전송된다.
multipart/form-data는 이처럼 각각의 항목을 구분해서, 한번에 전송하는 것이다.
서블릿과 파일 업로드
서블릿을 통한 파일 업로드
- Controller 코드
//...
@Slf4j
@Controller
@RequestMapping("/servlet/v1")
public class ServletUploadControllerV1 {

    @GetMapping("/upload")
    public String newFile() {
        return "upload-form";
    }

    @PostMapping("/upload")
    public String saveFileV1(HttpServletRequest request) throws ServletException, IOException {
        log.info("request={}", request);

        String itemName = request.getParameter("itemName");
        log.info("itemName={}", itemName);

        Collection<Part> parts = request.getParts();
        log.info("parts={}", parts);

        return "upload-form";
    }
}- thymeleaf 파일
<!DOCTYPE HTML>
<html xmlns:th="http://www.thymeleaf.org">
<head>
    <meta charset="UTF-8">
</head>
<body>

<div class="container">

    <div class="py-5 text-center">
        <h2>상품 등록 폼</h2>
    </div>

    <h4 class="mb-3">상품 입력</h4>

    <form th:action method="post" enctype="multipart/form-data">
        <ul>
            <li>상품명 <input type="text" name="itemName"></li>
            <li>파일 <input type="file" name="file"></li>
        </ul>
        <input type="submit">
    </form>

</div> <!-- /container -->
</body>
</html>- HTTP 요청 메시지를 확인하기 위한
application.yml설정
logging:
  level:
    org.apache.coyote.http11: debug
결과는 다음과 같다.
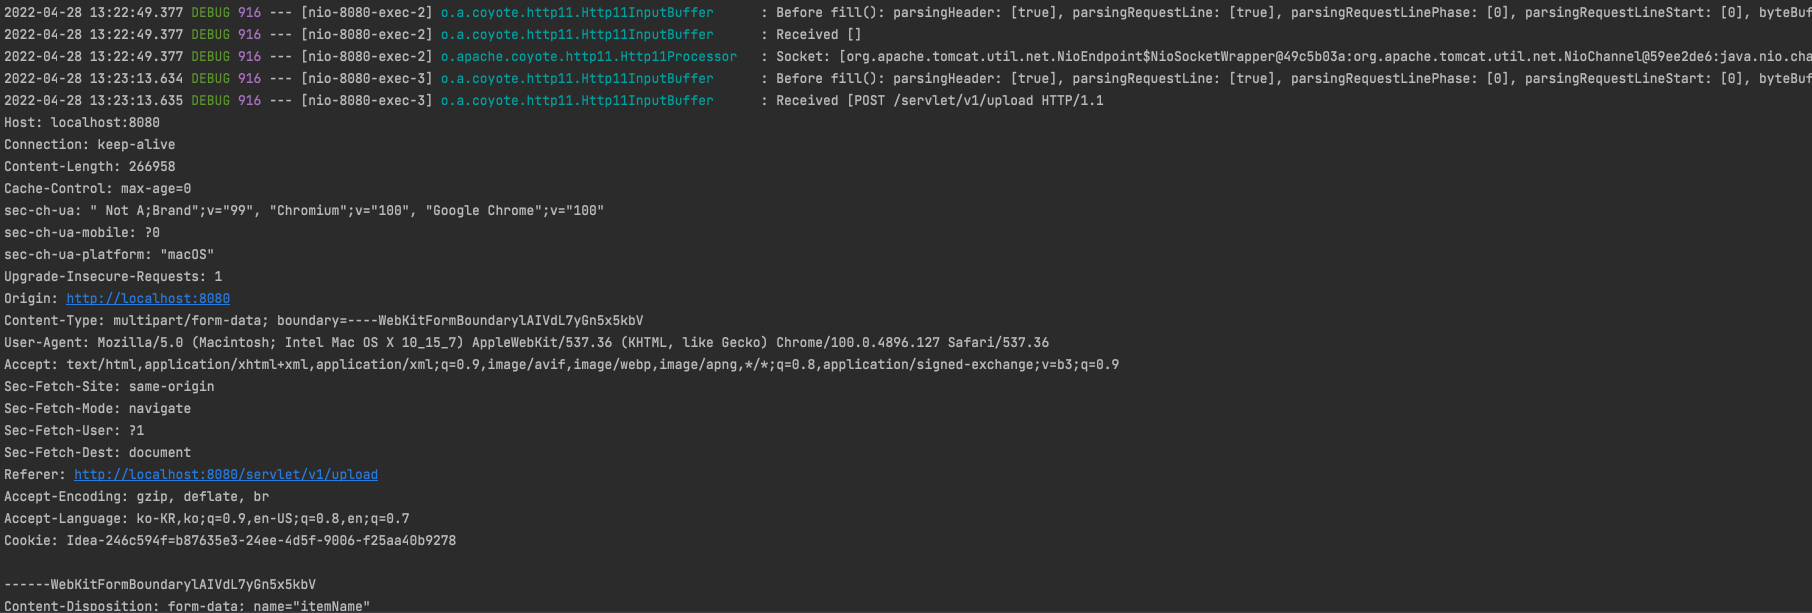
요약하자면 다음과 같은 구조로 log가 출력된다.
Content-Type: multipart/form-data; boundary=----xxxx

------xxxx
Content-Disposition: form-data; name="itemName"

Spring
------xxxx
Content-Disposition: form-data; name="file"; filename="test.data"
Content-Type: application/octet-stream

sdadslfjkf...
실제 파일 업로드
먼저, application.yml에 다음 설정을 추가하자.
# dir 경로 설정을 다음과 같이 추가하고 경로상 가장 마지막엔 반드시 '/'를 넣어줘야 한다.
# 해당 로컬 경로는 반드시 미리 만들어 둬야 한다.
file:
dir: /Users/hakhyeonsong/study/filetest/- Controller 코드
// ...
@Slf4j
@Controller
@RequestMapping("/servlet/v2")
public class ServletUploadControllerV2 {
    @Value("${file.dir}")
    private String fileDir;

    @GetMapping("/upload")
    public String newFile() {
        return "upload-form";
    }

    @PostMapping("/upload")
    public String saveFileV1(HttpServletRequest request) throws ServletException, IOException {
        log.info("request={}", request);

        String itemName = request.getParameter("itemName");
        log.info("itemName={}", itemName);

        Collection<Part> parts = request.getParts();
        log.info("parts={}", parts);

        for (Part part : parts) {
            log.info("==== PART ====");
            log.info("name={}", part.getName());
            Collection<String> headerNames = part.getHeaderNames();
            for (String headerName : headerNames) {
                log.info("header {}: {}", headerName, part.getHeader(headerName));
            }
            //편의 메서드
            //content-disposition; filename
            log.info("submittedFilename={}", part.getSubmittedFileName());
            log.info("size={}", part.getSize()); //part body size

            //데이터 읽기
            InputStream inputStream = part.getInputStream();
            String body = StreamUtils.copyToString(inputStream, StandardCharsets.UTF_8);
            log.info("size={}", part.getSize());

            //파일에 저장하기
            if (StringUtils.hasText(part.getSubmittedFileName())) {
                String fullPath = fileDir + part.getSubmittedFileName();
                log.info("파일 저장 fullPath={}", fullPath);
                part.write(fullPath);
            }
        }

        return "upload-form";
    }
}
해당 결과는 다음과 같다.

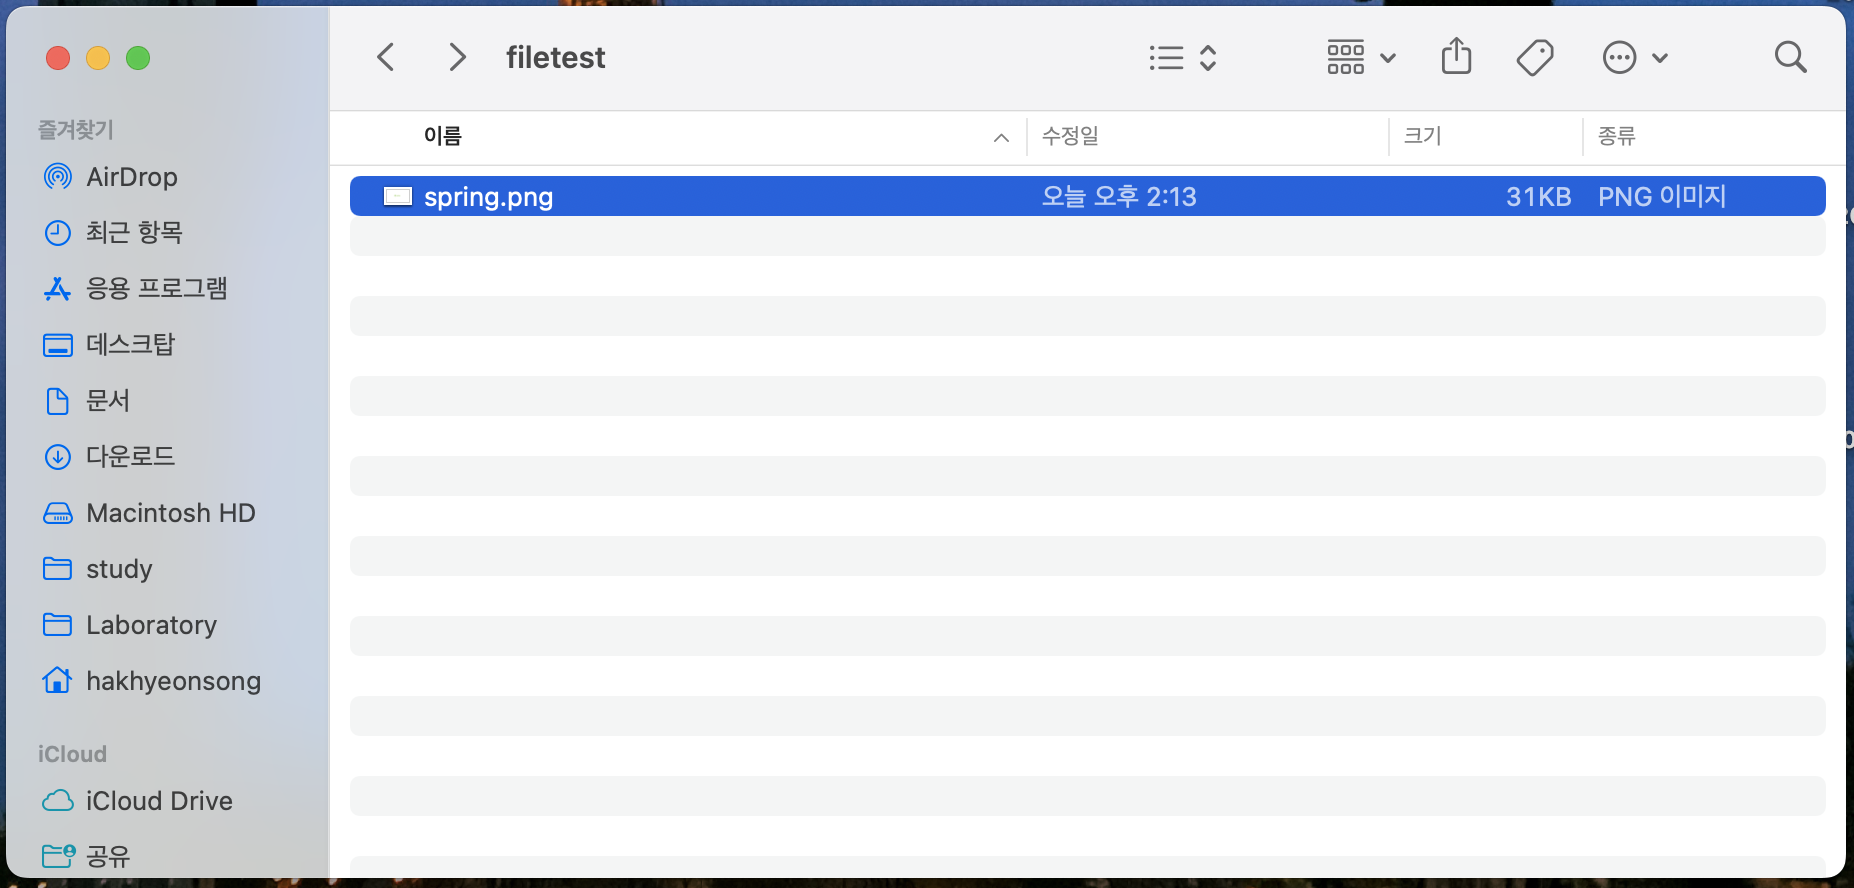
이 후 설정했던 경로에 가보면 파일이 정상적으로 저장됐음을 확인할 수 있다.
Part의 주요 메서드를 살펴보면,
part.getSubmittedFileName(): 클라이언트가 전달한 파일명part.getInputStream(): Part의 전송 데이터를 읽을 수 있다.part.write(...): Part를 통해 전송된 데이터를 저장할 수 있다.
서블릿이 제공하는 Part는 편하긴 하지만, HttpServletRequest를 사용해야 하고, 추가로 파일 부분만 구분하려면 여러가지 코드를 넣어야한다. 스프링은 이 부분을 편리하게 처리하도록 지원한다.
스프링과 파일 업로드
스프링은 MultipartFile이라는 인터페이스로 멀티파트 파일을 매우 편리하게 지원한다.
package ramos.upload.controller;

import lombok.extern.slf4j.Slf4j;
import org.springframework.beans.factory.annotation.Value;
import org.springframework.stereotype.Controller;
import org.springframework.web.bind.annotation.GetMapping;
import org.springframework.web.bind.annotation.PostMapping;
import org.springframework.web.bind.annotation.RequestMapping;
import org.springframework.web.bind.annotation.RequestParam;
import org.springframework.web.multipart.MultipartFile;

import javax.servlet.http.HttpServletRequest;
import java.io.File;
import java.io.IOException;

@Slf4j
@Controller
@RequestMapping("/spring")
public class SpringUploadController {

    @Value("${file.dir}")
    private String fileDir;

    @GetMapping("/upload")
    public String newFile() {
        return "upload-form";
    }

    @PostMapping("/upload")
    public String saveFile(@RequestParam String itemName,
                           @RequestParam MultipartFile file,
                           // HttpServletRequest는 log 찍을 용도로 추가함(없어도 됨)
                           HttpServletRequest request) throws IOException {
        log.info("request={}", request);
        log.info("itemName={}", itemName);
        log.info("multipartFile={}", file);

        if (!file.isEmpty()) {
            String fullPath = fileDir + file.getOriginalFilename();
            log.info("파일 저장 fullPath={}", fullPath);
            file.transferTo(new File(fullPath));
        }

        return "upload-form";
    }
}
실행 결과는 앞서 서블릿의 경우와 동일하지만, 코드가 훨씬 간결해졌다.
@RequestParam MultipartFile file
업로드하는 HTML Form에 name에 맞추어@RequestParam을 적용하면 된다. 추가로@ModelAttribute에서도MultipartFile을 동일하게 사용할 수 있다.
MultipartFile의 주요 메서드를 살펴보면 다음과 같다.
file.getOriginalFileName(): 업로드 파일 명file.transferTo(...): 파일 저장
파일 업로드/다운로드
서버에서 파일을 저장하는 방식은 파일이 보관된 경로만 DB에 저장하고, 실제 파일의 경우 서버 내부 경로나 AWS S3에 저장되는 방식을 사용한다.
강의에서 제시한 예제의 일부를 통해 고려해야 할 점을 정리하도록 하자.
업로드 파일 정보 보관
@Data
public class UploadFile {

    private String uploadFileName; //고객이 업로드한 파일명
    private String storeFileName; //서버 내부에서 관리하는 파일명

    public UploadFile(String uploadFileName, String storeFileName) {
    	this.uploadFileName = uploadFileName;
        this.storeFileName = storeFileName;
    }
}
고객이 업로드한 파일명으로 서버 내부에 파일을 저장하면 안된다. 왜냐하면 서로 다른 고객이 같은 파일이름을 업로드 하는 경우 기존 파일 이름과 충돌이 날 수 있다. 서버에선 저장할 파일명이 겹치지 않도록 내부에서 관리하는 별도의 파일명이 필요하다.
파일 저장 관련 처리
@Component
public class FileStore {

    @Value("${file.dir}")
    private String fileDir;

    public String getFullPath(String filename) {
        return fileDir + filename;
    }

    public List<UploadFile> storeFiles(List<MultipartFile> multipartFiles) throws IOException {
        List<UploadFile> storeFileResult = new ArrayList<>();
        for (MultipartFile multipartFile : multipartFiles) {
            if (!multipartFile.isEmpty()) {
                storeFileResult.add(storeFile(multipartFile));
            }
        }
        return storeFileResult;
    }

    public UploadFile storeFile(MultipartFile multipartFile) throws IOException {
        if (multipartFile.isEmpty()) {
            return null;
        }

		// ex) image.png
        String originalFilename = multipartFile.getOriginalFilename();

        // 서버에 저장하는 파일명
        String storeFileName = createStoreFileName(originalFilename);
        multipartFile.transferTo(new File(getFullPath(storeFileName)));

        return new UploadFile(originalFilename, storeFileName);
    }

    private String createStoreFileName(String originalFilename) {
        String ext = extractExt(originalFilename);
        String uuid = UUID.randomUUID().toString();
        return uuid + "." + ext;
    }

    private String extractExt(String originalFilename) {
        int pos = originalFilename.lastIndexOf(".");
        return originalFilename.substring(pos + 1);
    }
}createStoreFileName(): 서버 내부에서 관리하는 파일명은 유일한 이름을 생성하는UUID를 사용해서 충돌하지 않도록 한다.extractExt(): 확장자를 별도로 추출해 서버 내부에서 관리하는 파일명에도 붙여준다.
Controller
@Slf4j
@Controller
@RequiredArgsConstructor
public class ItemController {

    private final ItemRepository itemRepository;
    private final FileStore fileStore;

    @GetMapping("/items/new")
    public String newItem(@ModelAttribute ItemForm form) {
        return "item-form";
    }

    @PostMapping("/items/new")
    public String saveItem(@ModelAttribute ItemForm form, RedirectAttributes redirectAttributes)
    		throws IOException {
        UploadFile attachFile = fileStore.storeFile(form.getAttachFile());
        List<UploadFile> storeImageFiles = fileStore.storeFiles(form.getImageFiles());

        // 데이터베이스에 저장
        Item item = new Item();
        item.setItemName(form.getItemName());
        item.setAttachFile(attachFile);
        item.setImageFiles(storeImageFiles);
        itemRepository.save(item);

        redirectAttributes.addAttribute("itemId", item.getId());

        return "redirect:/items/{itemId}";
    }

    @GetMapping("/items/{id}")
    public String items(@PathVariable Long id, Model model) {
        Item item = itemRepository.findById(id);
        model.addAttribute("item", item);
        return "item-view";
    }

    @ResponseBody
    @GetMapping("/images/{filename}")
    public Resource downloadImage(@PathVariable String filename) throws MalformedURLException {
        return new UrlResource("file:" + fileStore.getFullPath(filename));
    }

    @GetMapping("/attach/{itemId}")
    public ResponseEntity<Resource> downloadAttach(@PathVariable Long itemId)
    		throws MalformedURLException {
        Item item = itemRepository.findById(itemId);
        String storeFileName = item.getAttachFile().getStoreFileName();
        String uploadFileName = item.getAttachFile().getUploadFileName();

        UrlResource resource = new UrlResource("file:" + fileStore.getFullPath(storeFileName));

        log.info("uploadFileName={}", uploadFileName);
        String encodedUploadFileName = UriUtils.encode(uploadFileName, StandardCharsets.UTF_8);
        String contentDisposition = "attachment; filename=\"" + encodedUploadFileName + "\"";

        return ResponseEntity.ok()
                .header(HttpHeaders.CONTENT_DISPOSITION, contentDisposition)
                .body(resource);
    }
}@GetMapping("/images/{filename}):<img>태그로 이미지를 조회할 때 사용한다.UrlResource로 이미지 파일을 읽어@ResponseBody로 이미지 바이너리를 반환한다.@GetMapping("/attach/{itemId}): 파일을 다운로드할 때 실행.String contentDisposition = "attachment; filename=\"" + encodedUploadFileName + "\"";: 파일 다운로드시 고객이 업로드한 파일 이름으로 다운로드하도록 지정.
References