Spring Final Project
- 당근 마켓의 시스템과 유사한 메커니즘으로 튜터링 매칭 시스템을 구현중.
- Team Notino : https://www.notion.so/d240cccf193f488bb7843c3ebe3ca932?v=d4493d0b5dba4643b0ae30b5a6701499&p=61b63b48a2074ed3904b51664fdcadd0&pm=s
- Team GitHub : https://github.com/20230206/tutormatching
1. KaKao Map API
- 너무 멀지 않은 근처 사용자의 위치를 대략적으로 알고, 튜터링 시스템을 이용하도록 하기 위해서 회원가입시
KaKao API를 사용해서 주소 검색을 실시하고, DB에 좌표값 및 주소를 담는다.- kakao Dev : https://developers.kakao.com/

- 내 어플리케이션을 만들고 , key발급을 받는다.
- 우편번호 검색 API 가이드 : https://postcode.map.daum.net/guide

- 가장 깔끔한 이형식을 선택하고, 친절하게 예제 코드까지 주어진다.
<!DOCTYPE html>
<html lang="en">
<head>
    <meta charset="UTF-8">
    <title>Title</title>

    <script type="text/javascript" src="//dapi.kakao.com/v2/maps/sdk.js?appkey="발급받은 키"&libraries=services"></script>
    <script src="//t1.daumcdn.net/mapjsapi/bundle/postcode/prod/postcode.v2.js"></script>

</head>
    <body>

    <div id="map" style="width:800px;height:800px;"></div>
    <input type="text" id="sample5_address" placeholder="주소">
    <input type="button" onclick="sample5_execDaumPostcode()" value="주소 검색"><br>
    <div id="coordXY"></div>

    <script>
        var container = document.getElementById('map'); //지도를 담을 영역의 DOM 레퍼런스
        var options = { //지도를 생성할 때 필요한 기본 옵션
            center: new kakao.maps.LatLng(33.450701, 126.570667), //지도의 중심좌표.
            level: 3 //지도의 레벨(확대, 축소 정도)
        };
        var map = new kakao.maps.Map(container, options);
        var geocoder = new daum.maps.services.Geocoder();


        var markerPosition  = new kakao.maps.LatLng(33.450701, 126.570667);
        var markerPosition2  = new kakao.maps.LatLng(32.450701, 125.570667);

        var marker = new kakao.maps.Marker({
            position: markerPosition,
            clickable: true
        });

        var marker2 = new kakao.maps.Marker({
            position: markerPosition2,
            clickable: true
        });

        marker.setMap(map);
        marker2.setMap(map);

        var iwContent = '<div style="padding:5px;">정성윤 튜터님</div>',
            iwRemoveable = true;

        var iwContent2 = '<div style="padding:5px;">신희경지 튜터님</div>',
            iwRemoveable = true;

        var infowindow = new kakao.maps.InfoWindow({
            content : iwContent,
            removable : iwRemoveable
        });

        var infowindow2 = new kakao.maps.InfoWindow({
            content : iwContent2,
            removable : iwRemoveable
        });

        kakao.maps.event.addListener(marker, 'click', function() {
            // 마커 위에 인포윈도우를 표시합니다
            infowindow.open(map, marker);
        });

        kakao.maps.event.addListener(marker2, 'click', function() {
            // 마커 위에 인포윈도우를 표시합니다
            infowindow2.open(map, marker2);
        });

        alert("come in");


    function sample5_execDaumPostcode() {
        var coordXY   = document.getElementById("coordXY");
        new daum.Postcode({
    oncomplete: function(data) {
    var addr = data.address; // 최종 주소 변수

    // 주소 정보를 해당 필드에 넣는다.
    document.getElementById("sample5_address").value = addr;
    // 주소로 상세 정보를 검색
    geocoder.addressSearch(data.address, function(results, status) {
    // 정상적으로 검색이 완료됐으면
    if (status === daum.maps.services.Status.OK) {
    var result = results[0]; //첫번째 결과의 값을 활용
         var x = result.y;
         var y = result.x;


        coordXY.innerHTML = "<br>X좌표 : " + x + "<br><br>Y좌표 : " + y;

    }
    });


    }
    }).open();

    }

    </script>


</body>
</html>
- 주소 검색한 것을 바탕으로 x,y,address를 추출해서, Ajax 통신을 활용하여 추출한 데이터를 DB에 담을 수 있도록 처리하였다.
- 처음에는 Service lib를 script딴에 선언해주지 않아서 오류가 떴었다.
- 검색한 주소를 바탕으로 x,y값을 뽑아내는 부분은 Geocoder 객체가 담당한다고 생각하면 편하다.
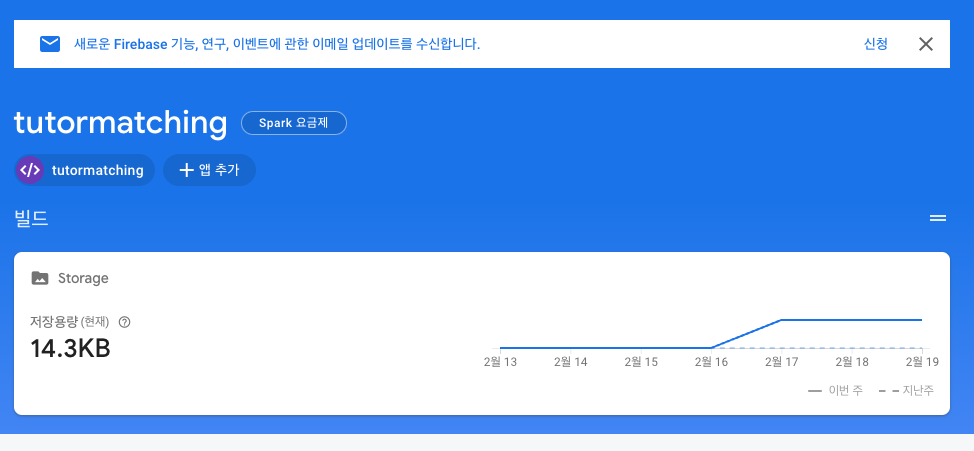
2. 외부 저장소에 이미지 업로드, 가져오기
- 외부 저장소 후보 : Amazon S3(가장 대중적!), FireBase Storage, Naver Object Cloud
- 현재 다른 팀원이 S3를 연구중에 있으나, 초기 기획에서는 S3는 일정 사용량 이상 사용하면 제약을 가하지 않고, 추가 요금이 자연스럽게 부과된다는 것을 알았다.
- 테스트 수준의 지금 프로젝트에서는 그 이상을 넘길 일이 많지 않겠지만, 제한 사용량 이상이 사용되면, 차단을 해주는 FireBaseStorage를 사용 해보기로 결정.
- FireBase Console : https://console.firebase.google.com
- 먼저 해당 기능을 사용할 프로젝트를 콘솔 딴에 만들어준다.
- 그 후 -> Key등 프로젝트의 인증정보를 담고있는 Json파일이 다운되게 되는데, 이 파일은 Firebase를 사용하기 위해서는 꼭 필수적인 파일이다!
초반 진행상황
- 초반에 그렸던 서버의 흐름은, html form에서 MutilPartFIle형식의 파일을 요청받고, 그 파일을 Stream으로 변환하여 FirebaseStorage에 쏴주는게 흐름이였다.
- Firebase Config
 package com.imagetest.config;

import com.google.auth.oauth2.GoogleCredentials;
import com.google.cloud.storage.StorageOptions;
import com.google.firebase.FirebaseApp;
import com.google.firebase.FirebaseOptions;
import lombok.extern.slf4j.Slf4j;
import org.springframework.beans.factory.annotation.Value;
import org.springframework.core.io.ClassPathResource;
import org.springframework.stereotype.Service;

import javax.annotation.PostConstruct;
import java.io.IOException;

@Slf4j
@Service
public class FirebaseConfig {


    @Value("${firebase-configuration-file}")
    private String firebaseConfigPath;

    @PostConstruct
    public void initialize() {
        try{
            FirebaseOptions options = new FirebaseOptions.Builder().setCredentials(
                    GoogleCredentials.fromStream(
                            new ClassPathResource(firebaseConfigPath).getInputStream())).build();
            if (FirebaseApp.getApps().isEmpty()) {
                FirebaseApp.initializeApp(options);
                log.info("Firebase application has been initialized");


            }
        }catch (IOException e){
            log.error(e.getMessage());
        }
    }
}
- Application.properties
firebase-configuration-file: ./serviceAccountKey.json
firebase-bucket: tutormatching-a3e13.appspot.com
spring.cloud.gcp.credentials.location=resources/serviceAccountKey.json

spring.datasource.url=jdbc:h2:mem:db;MODE=MYSQL;
spring.datasource.username=sa
spring.datasource.password=
- Previous Controller
    @PostMapping(value = "/files")
    public String uploadFile(@RequestParam("file") MultipartFile file, String nameFile, Model model)
           throws IOException, FirebaseAuthException {
       if (file.isEmpty()) {
            return "is empty";
        }

        URL url = firebaseService.uploadFiles(file, nameFile);
        System.out.println(url);
        model.addAttribute("imgUrl",url);
        return "image_view";
    }
- Previous Service
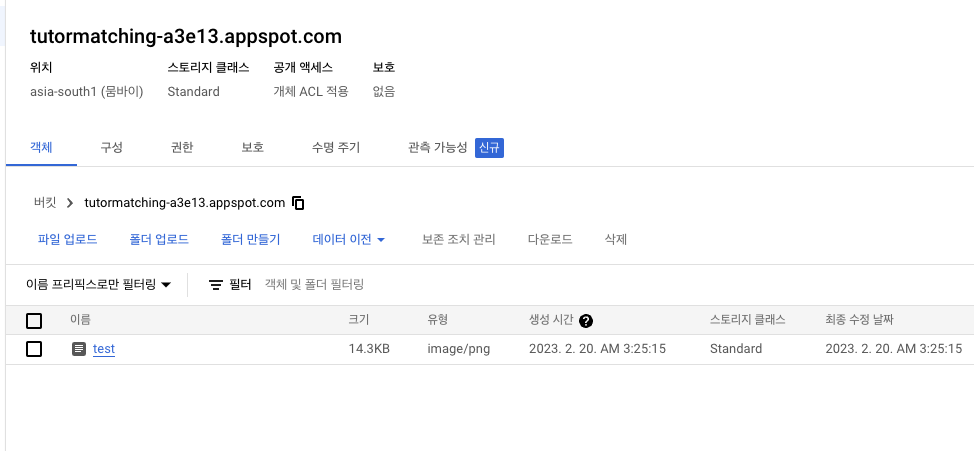
Bucket bucket = StorageClient.getInstance().bucket(firebaseBucket);

InputStream content = new ByteArrayInputStream(file.getBytes());
- 버킷 : 저장할 storage 이름 / MutilpartFile -> InputStream 변환 저장
애로사항
- 저런식으로 저장을 했을 때, 맽어주는 URL로 파일에 접근할 수 없었다.
( Access Denied )
방법 1 : 모든 사용자에게 읽기 권한을 준다.
- Console에서 먼저 프로젝트 Rules 수정
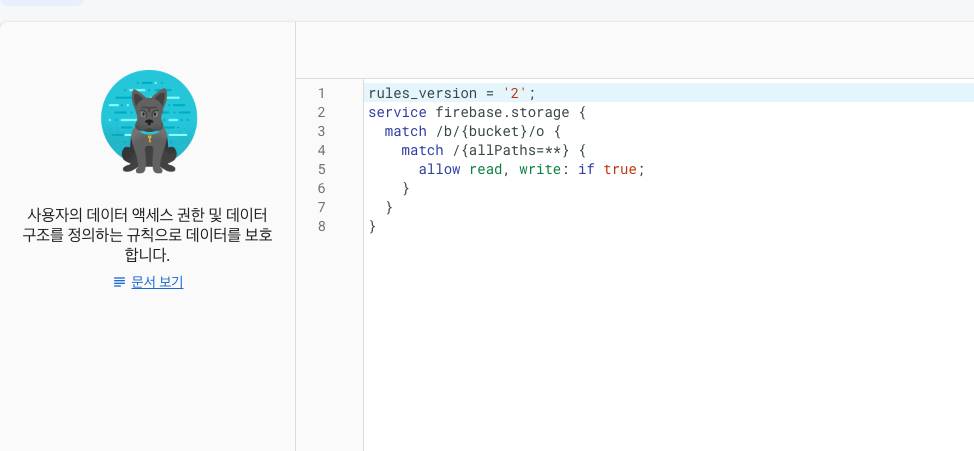
- GCP 쪽에 프로젝트에서 모든 유저에게 권한 부여하는 구성원
AllUsers추가
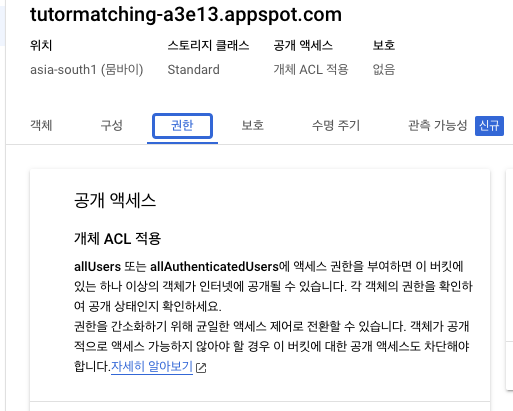
- 이렇게 되면 파일이 저장되고 받은 URL로 해당 사진에 대해 접근을 할 수 있게 되는데,
모든 사용자가 권한이 없어도 접근할 수 있기 때문에민감한 정보를 담을 수 없는 보안성에 문제가 생긴다.
방법 2 : Pre - Signed URL을 업로드/읽기 시 발급해준다.(채택)
- 현재 Amazon S3 및 외장 클라우드 서버에서 모두 사용하고 있는 방식으로, 유효시간을 부여하여 , 그 시간안에만 저장/읽기가 가능한 URL을 부여해주는 방식
- 예제 코드를 살펴보고 구현하는 중 계속해서 SignKey의 오류가 발생했고, 영문 주석을 잘 살펴보니,
Storage 객체를 불러오고 사용할 때 setCredentail()를 통해 인증 설정을 해주는 것을 뒤늦게 깨달았다.
- 파일 불러오는 Pre - Signed URL 메서드 구현
public class UrlUtil {


        /**
         * Signing a URL requires Credentials which implement ServiceAccountSigner. These can be set
         * explicitly using the Storage.SignUrlOption.signWith(ServiceAccountSigner) option. If you don't,
         * you could also pass a service account signer to StorageOptions, i.e.
         * StorageOptions().newBuilder().setCredentials(ServiceAccountSignerCredentials). In this example,
         * neither of these options are used, which means the following code only works when the
         * credentials are defined via the environment variable GOOGLE_APPLICATION_CREDENTIALS, and those
         * credentials are authorized to sign a URL. See the documentation for Storage.signUrl for more
         * details.
         */

        public static URL generateV4GetObjectSignedUrl(
                String projectId, String bucketName, String objectName) throws StorageException, IOException {
            // String projectId = "my-project-id";
            // String bucketName = "my-bucket";
            // String objectName = "my-object";

            Storage storage = StorageOptions.newBuilder().setProjectId(projectId).setCredentials(
                    GoogleCredentials.fromStream(
                            new ClassPathResource("./serviceAccountKey.json").getInputStream())
            ).build().getService();
            // Define resource
            BlobInfo blobInfo = BlobInfo.newBuilder(BlobId.of(bucketName, objectName)).build();

            URL url =
                    storage.signUrl(blobInfo, 15, TimeUnit.MINUTES, Storage.SignUrlOption.withV4Signature());

            System.out.println("Generated GET signed URL:");
            System.out.println(url);
            System.out.println("You can use this URL with any user agent, for example:");
            return url;
        }
- 파일 업로드용 Pre - Signed URl 구현
public static String generateV4PutObjectSignedUrl(
            String projectId, String bucketName, String objectName) throws StorageException,IOException {
        // String projectId = "my-project-id";
        // String bucketName = "my-bucket";
        // String objectName = "my-object";
//
//        Storage storage = StorageOptions.newBuilder().setProjectId(projectId).setCredentials(
//                GoogleCredentials.fromStream(
//                        new ClassPathResource("./serviceAccountKey.json").getInputStream())
//        ).build().getService();
//
//        // Define Resource
//        BlobInfo blobInfo = BlobInfo.newBuilder(BlobId.of(bucketName, objectName)).build();
//
//        // Generate Signed URL
//        Map<String, String> extensionHeaders = new HashMap<>();
//        extensionHeaders.put("Content-Type", "application/octet-stream");
//
//        URL url =
//                storage.signUrl(
//                        blobInfo,
//                        15,
//                        TimeUnit.MINUTES,
//                        Storage.SignUrlOption.httpMethod(HttpMethod.POST),
//                        Storage.SignUrlOption.withExtHeaders(extensionHeaders),
//                        Storage.SignUrlOption.withV4Signature());
//
//        System.out.println("Generated PUT signed URL:");
//        System.out.println(url);
//        System.out.println("You can use this URL with any user agent, for example:");

        Storage storage = StorageOptions.newBuilder().setProjectId(projectId).setCredentials(
                GoogleCredentials.fromStream(
                        new ClassPathResource("./serviceAccountKey.json").getInputStream())).build().getService();

        PostPolicyV4.PostFieldsV4 fields =
                PostPolicyV4.PostFieldsV4.newBuilder().setCustomMetadataField("test", "data").build();

        PostPolicyV4 policy =
                storage.generateSignedPostPolicyV4(
                        BlobInfo.newBuilder(bucketName, objectName).build(), 10, TimeUnit.MINUTES, fields);

        StringBuilder htmlForm =
                new StringBuilder(
                        "<form action='"
                                + policy.getUrl()
                                + "' method='POST' enctype='multipart/form-data'>\n");
        for (Map.Entry<String, String> entry : policy.getFields().entrySet()) {
            htmlForm.append(
                    "  <input name='"
                            + entry.getKey()
                            + "' value='"
                            + entry.getValue()
                            + "' type='hidden' />\n");
        }
        htmlForm.append("  <input type='file' name='file'/><br />\n");
        htmlForm.append("  <input type='submit' value='Upload File'/><br />\n");
        htmlForm.append("</form>\n");

        System.out.println(
                "You can use the following HTML form to upload an object to bucket "
                        + bucketName
                        + " for the next ten minutes:");
        System.out.println(htmlForm.toString());

        return htmlForm.toString();

    }
기록하는 습관