
복습 문제
복습문제 1

package chapter09;
class TV{
	private int size;
	public TV(int size) {
		this.size=size;
	}
	protected int getSize() {
		return size;
	}
}
public class ColorTV extends TV{

	private int color;

	public ColorTV(int size, int color) {
		super(size);
		this.color=color;
	}

	public void printProperty() {
		System.out.println(getSize()+"인치 "+color+"컬러");

	}

	public static void main(String[] args) {
		ColorTV myTV = new ColorTV(32,1024);
		myTV.printProperty();

	}

}

//강사님 방법- 내가 한 방법도 클래스 명이 다를 뿐 동일함.
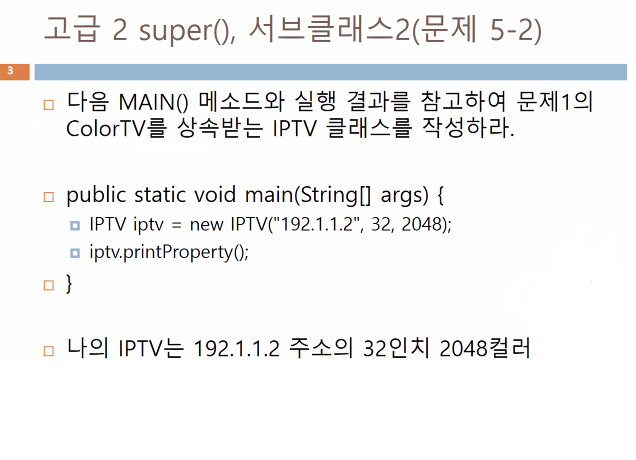
복습문제 2
package chapter09;

class Tv2{
	private int size;
	public Tv2(int size) {
		this.size=size;
	}
	protected int getSize() {
		return size;
	}
}
class ColorTv3 extends Tv2{

	private int color;

	public ColorTv3(int size, int color) {
		super(size);
		this.color=color;
	}

	public void printProperty() {
		System.out.println(getSize()+"인치 "+color+"컬러");
	}

}

public class IPTV extends ColorTv3{
	private String Ip;


	public IPTV(String Ip, int size, int color) {
		super(size, color);
		this.Ip = Ip;
	}

	public void printProperty() {
		System.out.print("나의 IPTV는 "+Ip+" 주소의 ");
		super.printProperty();

	}

	public static void main(String[] args) {
		IPTV iptv = new IPTV("192.1.1.2",32,2048);
		iptv.printProperty();
	}

}- 주의해야하는 부분
super(size, color);
이렇게도 사용 할 수있다.
복습문제 3
출력결과가
//원 a : Point (2,3) 반지름5
//원 b : Point (2,3) 반지름30
//서로 다른 원
인 Circle 메소드 작성
(메인 메소드는 제공함)
package chapter09;

class Circle{
	private int x,y;
	private int radius;
	public Circle(int x, int y, int radius) {
		super();
		this.x = x;
		this.y = y;
		this.radius = radius;
	}

	@Override
	public String toString() {//오버라이딩
		return "Point ("+x+","+y+") 반지름"+radius;
	}

	@Override
	public boolean equals(Object obj) {
		Circle b = (Circle) obj;
		if (x==b.x || y== b.y) {
			return true;
		} else {
			return false;
		}
	}

}


public class CircleApp {
	public static void main(String[] args) {
		Circle a = new Circle (2,3,5);
		Circle b = new Circle(2,3,30);

		System.out.println("원 a : "+a);
		System.out.println("원 b : "+b);

		if (a.equals(b)) {
			System.out.println("같은 원");
		}else {
			System.out.println("서로 다른 원");

		}
	}
}

//원 a : Point (2,3) 반지름5
//원 b : Point (2,3) 반지름30
//같은 원
@Override
public boolean equals(Object obj) {
Circle b = (Circle) obj;
if (x==b.x || y== b.y) {
return true;
} else {
return false;
}
}중요한 부분은 별도로 다시 한번더 빼놓음
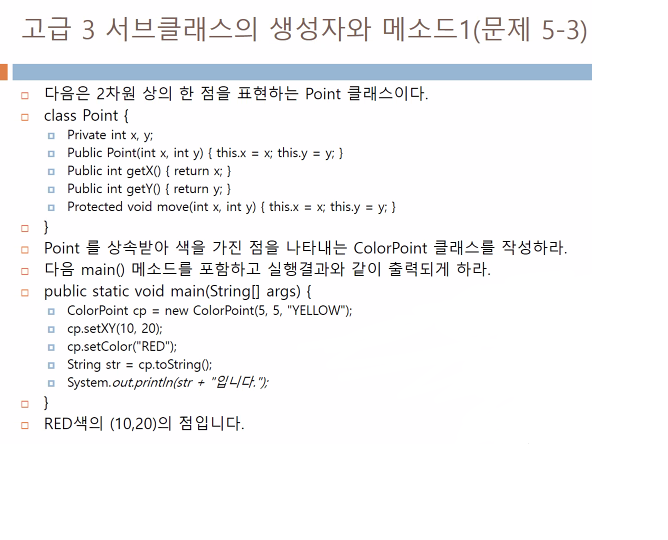
복습문제 4
package chapter10;

class Point {
	protected int x;
	protected int y;
	public Point(int x, int y) {
		super();
		this.x = x;
		this.y = y;
	}

	protected void move(int x, int y) {
		this.x = x;
		this.y = y;
	}

	public int getX() {
		return x;
	}

	public int getY() {
		return y;
	}
}


public class ColorPoint extends Point{
	private String Color;


	public ColorPoint(int x, int y, String Color) {
		super(x,y);
		this.Color= Color;
	}

	public String getColor() {
		return Color;
	}

	private void setColor(String Color) {
		this.Color=Color;
	}


	private void setXY(int x, int y) {
		move(x,y);
	}

	@Override
	public String toString() {//오버라이딩
		return Color+"색의 ("+x+","+y+")의 점";
	}


	public static void main(String[] args) {
		ColorPoint cp = new ColorPoint(5,5,"YELLOW");
		cp.setXY(10,20);
		cp.setColor("RED");
		String str = cp.toString();
		System.out.println(str+"입니다.");

	}

}
입출력 (PPT Chapter 09-01)
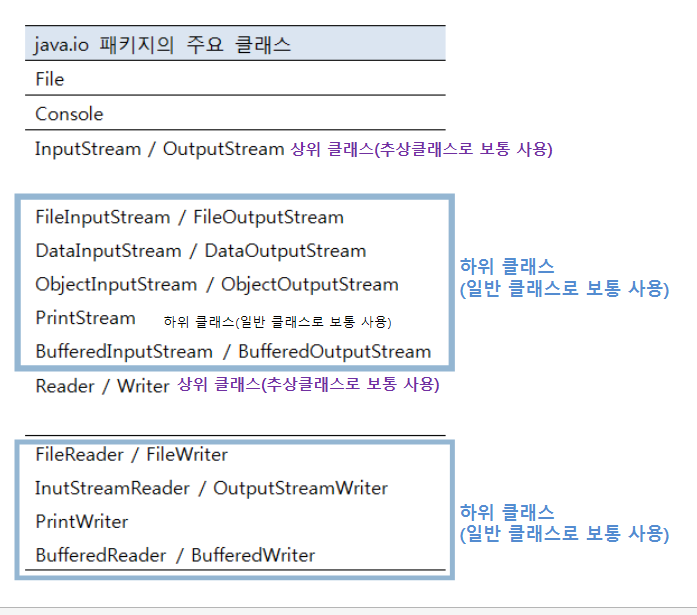
IO 패키지
:자바의 기본적인 데이터 입출력(IO: Input/Output) API 제공
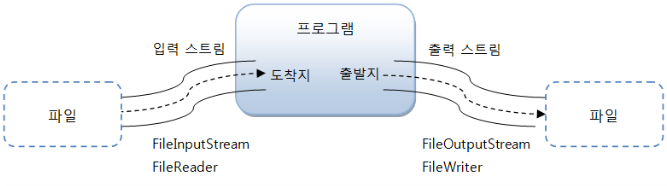
입력 스트림과 출력 스트림
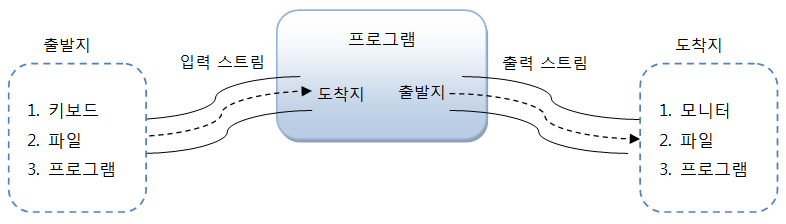
입출력 구조
Stream
자바데이터를 운반하는데 사용되는 연결 통로
스트림은 단방향 통신만 가능하기 때문에 하나의 스트림으로 입력과 출력을 동시에 처리 불가능
그래서 입력과 출력을 동시에 수행하려면 입력스트림과 출력스티림 2개의 스트림 필요
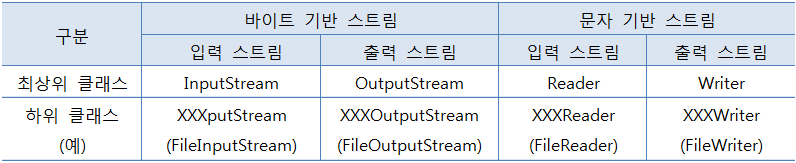
바이트 기반 스트림과 문자 기반 스트림
스트림은 바이트 단위로 데이터를 전송하며, 입출력 대상에 따라서 입출력 스트림이 다르다.
- 바이트 기반 스트림의 경우, 파일, 메모리, 프로세스, 오디오 장치, 그림, 멀티미디어, 문자 등 가능함
- 문자 기반 스트림은 문자 전용 스트림으로 이해한다.
(why? 문자 기반 스트림을 사용하는가?
바이트기반은 1byte단위인데, 자바는 ㄴ한문자를 의미하는 char형이 1byte가 아닌 2byte이기때문에 바이트기반으로 처리하기 문제가 있음)
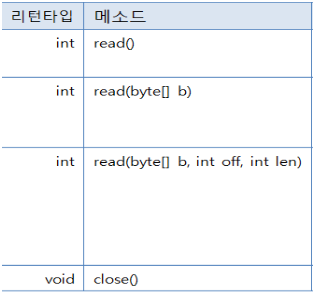
InputStream
- 추상클래스 형식
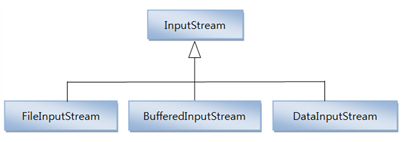
- 주요메소드
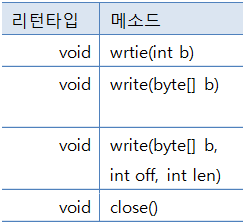
OutputStream
- 추상클래스 형식
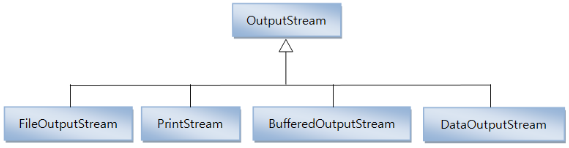
- 주요메소드
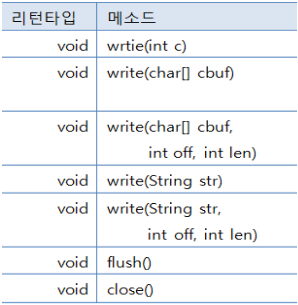
Writer
-
추상클래스 형식
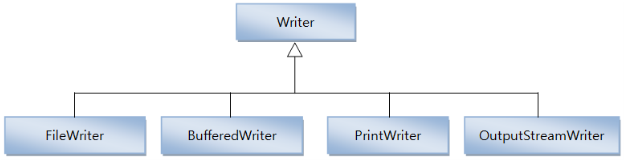
-
주요 메소드
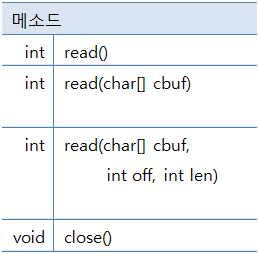
Reader
-
추상클래스 형식
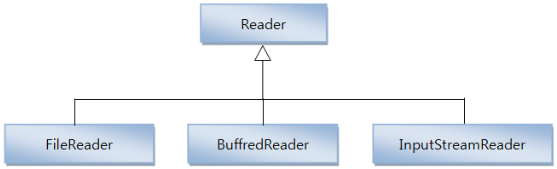
-
주요 메소드
예제
예제 1
package chapter09;

import java.io.FileInputStream;
import java.io.InputStream;

public class ReadExample1 {
	public static void main(String[] args) throws Exception {
		//throws Exception예외처리
		InputStream is =new FileInputStream("d:/test.txt");
		// 업캐스팅 //InputStream는 슈퍼클래스 FileInputStream는 하위 클래스에 해당
		int readByte;
		//두번째 방법

		while ((readByte = is.read()) != -1) {
			System.out.print((char)readByte);
		}


		// 첫번째 방법
		//EOF(end of file : -1) : 이게 나오면 끝남
//		while (true) {//무한 반복
//			readByte = is.read();
//
//			if (readByte == -1) {
//				break;
//			}
//			System.out.print((char)readByte);
//			//readByte 출력시 test.txt 파일내 줄 바꿈될때 10,13 개행문자? 발생
//			// (char)readByte로 하면 숫자가 문자가됨
//		}

		is.close();
	}

}
예제 2
package chapter08;

import java.io.FileInputStream;
import java.io.InputStream;

public class ReadExample2 {
	public static void main(String[] args) throws Exception {
		//throws Exception예외처리
		InputStream is =new FileInputStream("d:/test.txt");
		// 업캐스팅 //InputStream는 슈퍼클래스 FileInputStream는 하위 클래스에 해당
		String data="";
		int readByteNo;
		byte[] readBytes = new byte [3];


		//두번째 방법
		while ((readByteNo = is.read(readBytes)) != -1) {
			data += new String(readBytes,0,readByteNo);
		}
		System.out.println(data);


		// 1번째 방법
//		while (true) {
//			readByteNo = is.read(readBytes);
////			System.out.println((char)readByteNo);
//			//글자 깨져서 나옴.
//
//			if (readByteNo == -1) {
//				break;
//			}
//
//			data += new String(readBytes,0,readByteNo);
//			//String(byte bytes[], int offset, int length) 형식
//		}
//		System.out.println(data);
		is.close();
	}

}
예제 3
package chapter08;

import java.io.FileOutputStream;

import java.io.OutputStream;


public class WriteExample {
	public static void main(String[] args) throws Exception{//예외처리
		OutputStream os = new FileOutputStream("d:/output.txt");//업캐스팅
		byte[] data = "ABC".getBytes();

		for (int i = 0; i < data.length; i++) {
			os.write(data[i]);
		}
		os.flush();//쓰나 안쓰나 동일함(지금은 상관없음.
		os.close();
		//실행하면 d드라이브에output.txt 생성됨(안에 내용은 ABC가 적혀있음)
	}

}
예제 4
package chapter09;

import java.io.FileNotFoundException;
import java.io.FileReader;
import java.io.Reader;

public class ReadExample12 {
	public static void main(String[] args) throws Exception {
		Reader reader = new FileReader("d:/test.txt");
		//객체 생성//업캐스팅

		int readData;
		char[] cduf = new char[2];
		String data="";

		while (true) {
			readData = reader.read(cduf);
			if (readData == -1) {
				break;
			}
			data += new String(cduf, 0, readData);
			//String(bytes, offset, length)꼴
		}
		System.out.print(data);

		reader.close();

	}

}
//
//aaa
//bb
//c
예제 5
package chapter09;

import java.io.FileWriter;
import java.io.IOException;
import java.io.Writer;

public class WriteExample11 {
	public static void main(String[] args) throws Exception {
		Writer writer = new FileWriter("d:/output11.txt");
		//업캐스팅

	    char [] data ="홍길동".toCharArray();
	    //"홍길동"을 데이터 타입으로 읽어서 char 형식의 data 배열에 넣음

	    for (int i = 0; i < data.length; i++) {
			writer.write(data[i]);
		}

	    writer.close();

	}

}
//d 드라이브에 홍길동 이라는 내용이 적힌 output11.txt 파일 생성됨
예제 6
package chapter09;

import java.io.FileWriter;
import java.io.IOException;
import java.io.Writer;

public class WriteExample12 {
	public static void main(String[] args) throws Exception {
		Writer writer = new FileWriter("d:/output12.txt");
		//업캐스팅

	    char [] data ="임영웅".toCharArray();
	    //"임영웅"을 데이터 타입으로 읽어서 char 형식의 data 배열에 넣음

	    writer.write(data);
//	    for (int i = 0; i < data.length; i++) {
//			writer.write(data[i]);
//		}

	    writer.close();

	}

}
//d 드라이브에 임영웅 이라는 내용이 적힌 output12.txt 파일 생성됨
예제 7
package chapter09;

import java.io.FileWriter;
import java.io.IOException;
import java.io.Writer;

public class WriteExample13 {
	public static void main(String[] args) throws Exception {
		Writer writer = new FileWriter("d:/output13.txt");
		//업캐스팅

	    char [] data ="임영웅".toCharArray();
	    //"임영웅"을 데이터 타입으로 읽어서 char 형식의 data 배열에 넣음

	    writer.write(data,1,2);
//	    for (int i = 0; i < data.length; i++) {
//			writer.write(data[i]);
//		}
//
	    writer.close();

	}

}
//d 드라이브에 영웅 이라는 내용이 적힌 output13.txt 파일 생성됨
예제 8
package chapter09;

import java.io.FileWriter;
import java.io.IOException;
import java.io.Writer;

public class WriteExample14 {
	public static void main(String[] args) throws Exception {
		Writer writer = new FileWriter("d:/output14.txt");
		//업캐스팅

		String data = "안녕 자바 프로그램";
		writer.write(data,3,2);

//	    char [] data ="임영웅".toCharArray();
	    //"임영웅"을 데이터 타입으로 읽어서 char 형식의 data 배열에 넣음

//	    writer.write(data,1,2);
//	    for (int i = 0; i < data.length; i++) {
//			writer.write(data[i]);
//		}
//
	    writer.close();

	}

}
//d 드라이브에 자바 이라는 내용이 적힌 output14.txt 파일 생성됨
입출력 (PPT Chapter 09-02)
파일 입출력
File 클래스
- 파일을 표현
- 크기, 속성, 이름 등의 정보 제공
- 생성 및 삭제 기능
- 디렉토리 생성, 파일리스트를 얻어내는 기능 - 객체 생성

- 파일 데렉토리 존재 유무 확인

- 생성 및 삭제
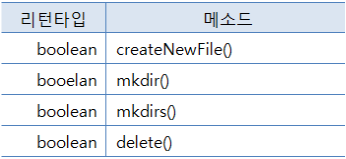
한번에 디렉토리 안에 디렉토리를 만들때, 뒤에 s를 붙여 작성해야함.
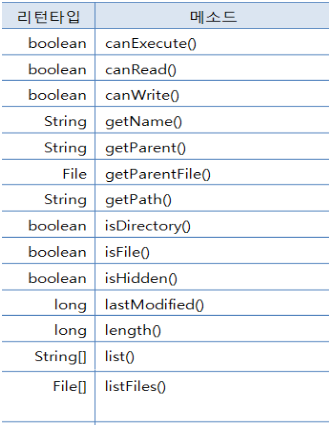
- 파일 및 디렉토리 정보를 리턴하는 메소드
예제
예제 9
import java.io.File;
import java.io.IOException;
import java.text.SimpleDateFormat;
import java.util.Date;

public class FileExample {
	public static void main(String[] args) throws Exception {
//		File dir = new File("d:/test");
		File dir = new File("d:/test/dir");
		File file1 = new File("d:/test/file1.txt");
		File file2 = new File("d:/test/file2.txt");
		File file3 = new File("d:/test/file3.txt");
//		dir.mkdir();//d드라이브에 test 파일 생성(안에 아무내용 없음)
		dir.mkdirs();//d드라이브에 test 파일과 그 안의 파일 dir 생성(안에 아무내용 없음)
		file1.createNewFile();// 예외 처리 해야지 오류 발생 x
		//d드라이브에 test 파일과 그 안의 파일 dir, file1.txt 생성(안에 아무내용 없음)
		file2.createNewFile();
		file3.createNewFile();

		File test = new File("d:/test");
		test.listFiles();// 파일 목록을 들고옴
		File[] contents = test.listFiles();
		System.out.println("날짜               시간               형태          크기           이름");
		System.out.println("-------------------------------------------------");

		SimpleDateFormat sdf = new SimpleDateFormat("yyyy-MM-dd a hh:mm");
		for (int i = 0; i < contents.length; i++) {
			System.out.print(sdf.format(new Date(contents[i].lastModified())));
			if (contents[i].isDirectory()) {
				System.out.println("\t<DIR>\t\t"+contents[i].getName());
			} else {
				System.out.println("\t\t"+contents[i].length()+"\t"+contents[i].getName());
			}
		}

	}
}

//날짜               시간               형태          크기           이름
//-------------------------------------------------
//2022-08-05 오후 02:20	<DIR>		dir
//2022-08-05 오후 02:20		0	file1.txt
//2022-08-05 오후 02:20		0	file2.txt
//2022-08-05 오후 02:20		0	file3.txt
스레드 (PPT Chapter 10-01)
스레드와 멀티스레딩
-
스레드 : JVM에 의해 스케쥴 되는 실행 단위의 코드 불럭(=경량 프로세스)
- JVM은 스레드를 자동으로 실행 시켜줌
- 스레드의 생명주기는 JVM
- 하나의 JVM은 하나의 자바 응용 프로그램을 실행 및 종료함. 그러므로 응용프로그램의 생명 주기를 함께함.
- 하나의 응용프로그램은 여러개의 스레드로 구성됨
-
멀티스레드 : 스레드가 2개 이상
-
멀티쓰레딩의 장단점
- CPU 사용률 향상
- 효율적으로 사용가능
- 사용자에 대한 응답성 향상
- 작업 분리되어 코드가 간결해짐.
- 동기화, 교착상태 등의 문제들을 고려하여 프로그래밍해야함
- 동기식/ 비동기식
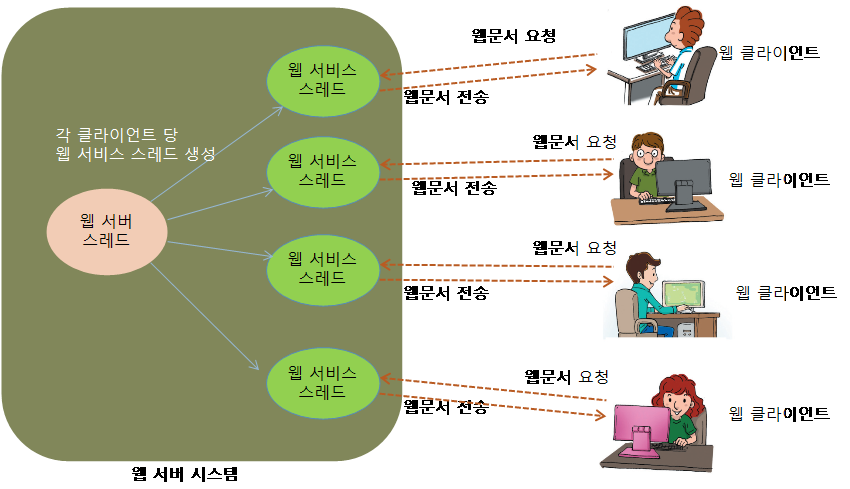
웹 서버의 멀티스레딩 예시
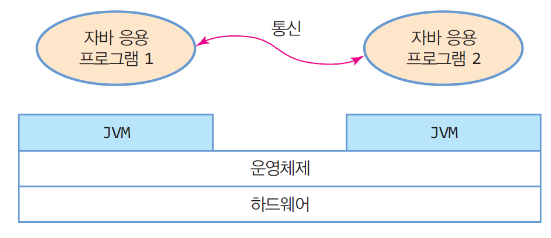
JVM과 자바 응용프로그램, 스레드의 관계
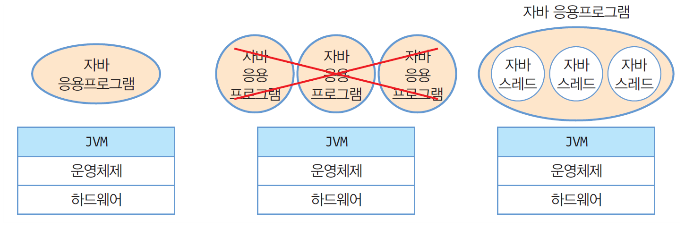
하나의 JVM이 하나의 응용프로그램의 시작과 종료 담당.(여러 프로그램 아님)
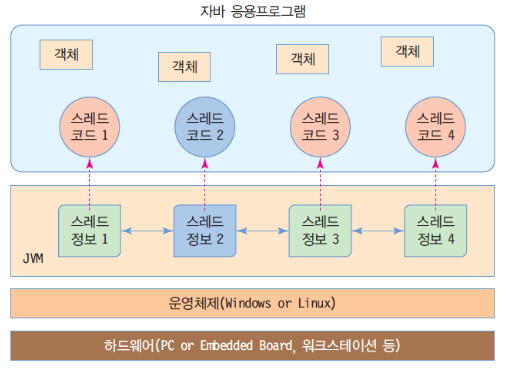
자바 스레드와 JVM
스레드 생성 방법 (2가지)
- java.lang.Thread 클래스
- java.lang.Runnable 인터페이스
java.lang.Thread 클래스를 이용한 스레드 생성
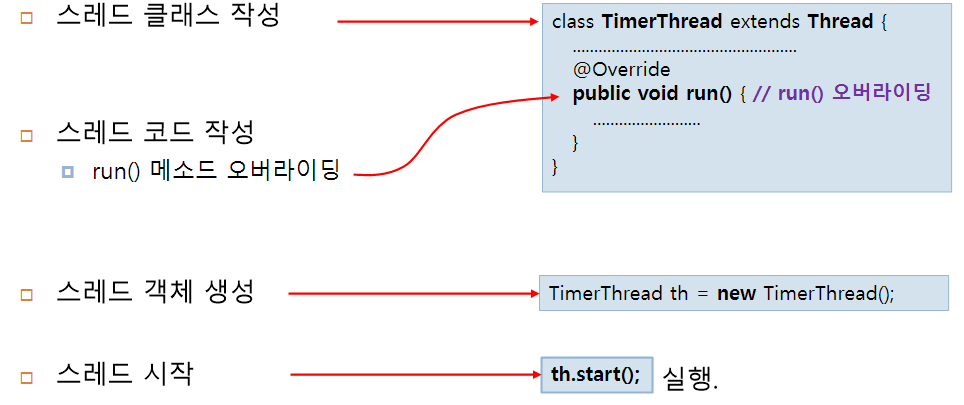
package chapter10;
public class TestThread {
	public static void main(String[] args) {
		TimerThread th = new TimerThread();//객체생성
		th.start();//start();메소드로 시작
	}

}- 주의 사항
- run( )메소드 종료시, 스레드 종료
- 한번 종료된 스레드는 다시 시작 불가능
(할거면 다시 호출하고 get 메소드를 호출하는 등 해야함)
java.lang.Runnable 인터페이스를 이용한 스레드 생성
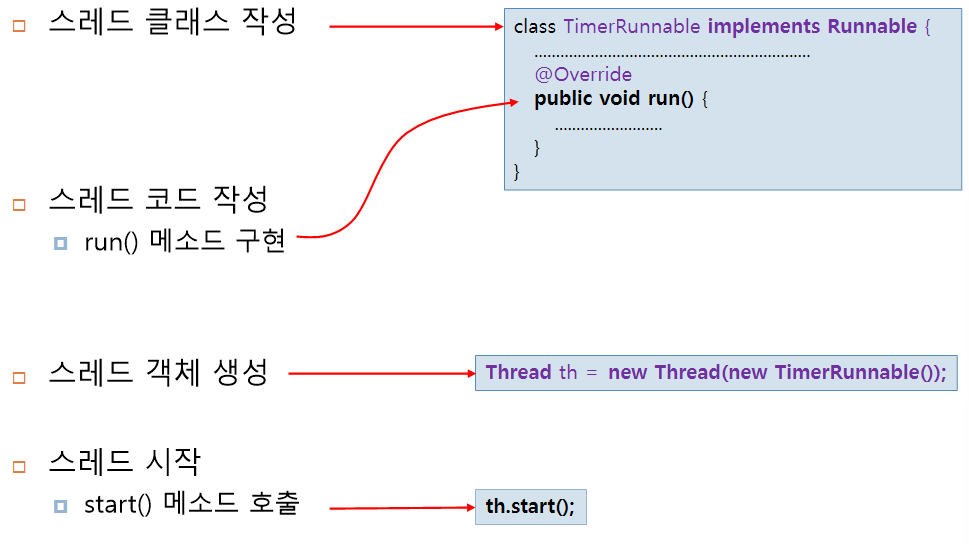
package chapter10;

public class TestRunnable {
	public static void main(String[] args) {
	    Thread th =	new Thread(new TimerRunnable());
	    th.start();
	}
}
예제
예제 10
package chapter10;


public class ThreadEx {
	public static void main(String[] args) {
		ThreadEx1 t1 = new ThreadEx1();
		Runnable r = new ThreadEx2();
		Thread t2 = new Thread(r);

		t1.start();
		t2.start();
		//비동기식이라서 원래 순서대로 출력되지 않음


	}
}

class ThreadEx1 extends Thread{

	@Override
	public void run() {
		for (int i = 0; i < 5; i++) {
			System.out.println("i: "+i);
		}
	}
}

class ThreadEx2 implements Runnable{

	@Override
	public void run() {
		for (int j = 10; j < 15; j++) {
			System.out.println("j: "+j);
		}
	}
}
예제 11
package chapter10;

public class TimerRunnable implements Runnable {
	int n =0;

	@Override
	public void run() {
		while (true) {
			System.out.println(n);
			n++;

			try {
				Thread.sleep(1000);
			} catch (InterruptedException e) {
				// TODO Auto-generated catch block
				e.printStackTrace();
			}//try catch로 Thread.sleep(1000); 예외 처리
		}
	}

}
스레드 (PPT Chapter 10-02
스레드의 주요 정보
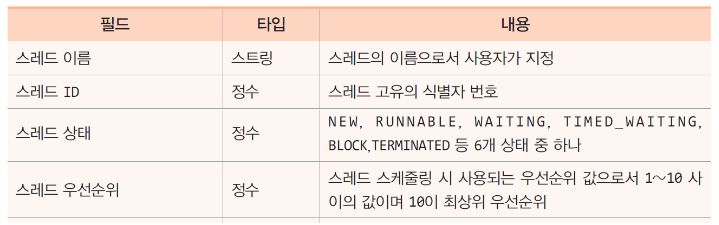
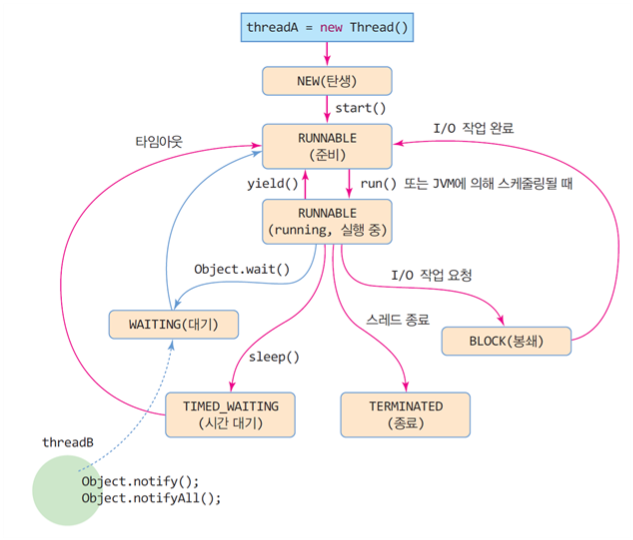
스레드 상태
6가지
-
NEW
스레드가 생성(실행준비는 아님) -
RUNNABLE
스레드가 현재 실행 or 스케쥴링(실행준비) -
WAITING
wait()를 호출한 상태, 기다림 -
TIMED_WAITING
sleep(n)을 호출 (sleep (n) : 지연시간을 주는 메소드) -
BLOCK
I/O 작업을 요청하면 JVM이 자동으로 BLOCK 상태로 만듦
(+ 파일을 읽고쓸때는 다른거 하지 못하게 멈춤) -
TERMINATED
종료
스레드 상태와 생명주기
우선수위와 스케쥴링
- 스레드의 우선순위 10(max)/ 5(기본값)/ 1(min)
(10부터 시작) - main 스레드의 우선순위 초기값 : 5
- 스레드 우선 순위는 응용 프로그램
void setPriority(int priority) : 우선순위 바꾸기
int getPriority() : 우선순위 가지고 오기 - JVM의 스케쥴링 정책 - 철저한 우선순위 기반
main()을 실행하는 main 스레드
- main 스레드와 main() 메소드
- JVM은 응용프로그램이 실행될때 main() 메소드가 실행됨과 동시에 main 스레드실행
- JVM은 main 스레드에게 main() 메소드와 같은 존재
예제
예제 12
package chapter10;

public class ThreadMainEx {

	public static void main(String[] args) {
		long id = Thread.currentThread().getId();
		String name = Thread.currentThread().getName();
		int priority = Thread.currentThread().getPriority();
		Thread.State s = Thread.currentThread().getState();


		System.out.println("현재  쓰레드 ID = "+id);
		System.out.println("현재  쓰레드 이름 = "+name);
		System.out.println("현재  쓰레드 우선 순위 값 = "+priority);
		System.out.println("현재  쓰레드 상태 = "+s);

	}

}