전에 올렸던 내용을 기반으로 다이얼로그를 구성해 보고자 한다.
전에 다이얼로그는 앱을 이용하고 있을 때 다양한 상황을 알리기 위해 사용한다고 했는데, 토스트, 알림 창, 목록, 날짜 선택, 시간 선택, 커스텀 다이얼로그 모두 구현해 보고자 한다.
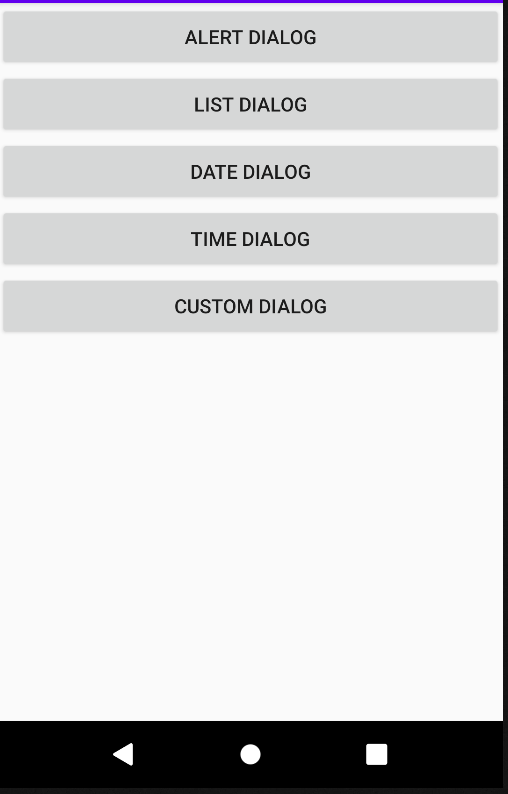
우선 기본 화면이며 각 버튼을 누르면 그에 맞는 화면이 제공된다.
자바 코드
public class dialoglayout extends AppCompatActivity implements View.OnClickListener {

    Button alertBtn;
    Button listBtn;
    Button dateBtn;
    Button timeBtn;
    Button customDialogBtn;

//    이벤트 처리를 위해 dialog 객체를 멤버변수로 선언
    AlertDialog customDialog;
    AlertDialog listDialog;
    AlertDialog alertDialog;

    @Override
    protected void onCreate(Bundle savedInstanceState) {
        super.onCreate(savedInstanceState);
        setContentView(R.layout.activity_dialoglayout);

//        View 객체 획득
        alertBtn  = findViewById(R.id.btn_alert);
        listBtn = findViewById(R.id.btn_list);
        dateBtn = findViewById(R.id.btn_date);
        timeBtn = findViewById(R.id.btn_time);
        customDialogBtn = findViewById(R.id.btn_custom);

//        버튼 이벤트 등록
        alertBtn.setOnClickListener(this);
        listBtn.setOnClickListener(this);
        dateBtn.setOnClickListener(this);
        timeBtn.setOnClickListener(this);
        customDialogBtn.setOnClickListener(this);
    }
//     매개변수의 문자열을 Toast로 띄우는 개발자 함수
        private void showToast(String message){
            Toast toast = Toast.makeText(this, message, Toast.LENGTH_SHORT);
            toast.show();
        }

//        Dialog Button 이벤트 처리
        DialogInterface.OnClickListener dialogListener = new DialogInterface.OnClickListener() {
    @Override
    public void onClick(DialogInterface dialog, int which) {
        if (dialog == customDialog && which == Dialog.BUTTON_POSITIVE){
            showToast("custom dialog 확인 click.....");
        }else if (dialog == listDialog){
//            목록 dialog의 항목이 선택되었을 때 항목 문자열 획득
            String[] datas =  getResources().getStringArray(R.array.dialog_arrays);
            showToast(datas[which]+ "선택 하셨습니다.");
        }else if (dialog == alertDialog && which == DialogInterface.BUTTON_POSITIVE){
            showToast("alert dialog ok click....");
        }

    }
};

    @Override
    public void onClick(View v) {
        if ( v == alertBtn){
//            알림창을 만들어 주는 Builder 클레스의 객체 생성
            AlertDialog.Builder builder = new AlertDialog.Builder(this);
            builder.setIcon(android.R.drawable.ic_dialog_alert);
            builder.setTitle("알림");
            builder.setMessage("정말 종료 하시겠습니다.");
            builder.setPositiveButton("OK", dialogListener);
            builder.setNegativeButton("NO", null);
//          알림창 생성, 생성된 다이얼로그 화면에 출력
            alertDialog = builder.create();
            alertDialog.show();
        }else if (v == listBtn){
            AlertDialog.Builder builder = new AlertDialog.Builder(this);
            builder.setTitle("알람 벨소리");
            builder.setSingleChoiceItems(R.array.dialog_arrays, 0, dialogListener);
            builder.setPositiveButton("확인", null);
            builder.setNegativeButton("취소", null);
            listDialog = builder.create();
            listDialog.show();
        }
        else if (v == dateBtn){
//            현재 날짜로 dialog를 띄우기 위해 날짜를 구함성

            Calendar c = Calendar.getInstance();
            int year = c.get(Calendar.YEAR);
            int month = c.get(Calendar.MONTH);
            int day = c.get(Calendar.DAY_OF_MONTH);

            DatePickerDialog dateDialog = new DatePickerDialog(this,
                    new DatePickerDialog.OnDateSetListener(){
                @Override //onDateSet() 함수가 호출되어 매개변수로 선택한 연, 월, 일을 받을 수 있다.
                        public void onDateSet(DatePicker view, int year, int monthOfYear,
                                              int datOfMonth){
                    showToast(year + ":" + (monthOfYear + 1) + ":" + datOfMonth);
                }
                    }, year, month, day);
            dateDialog.show();
        }else if (v == timeBtn){
//            현재 시간으로 Dialog를 띄우기 위해 시간을 구함
            Calendar c = Calendar.getInstance();
            int hour = c.get(Calendar.HOUR_OF_DAY);
            int minute = c.get(Calendar.MINUTE);

            TimePickerDialog timeDialog = new TimePickerDialog(this, new TimePickerDialog.OnTimeSetListener() {

                @Override
                public void onTimeSet(TimePicker view, int hourOfDay, int minute) {
                 showToast(hourOfDay + ":" + minute);
                }
            }, hour, minute, false);
            timeDialog.show();
        }else if (v == customDialogBtn){
            AlertDialog.Builder builder = new AlertDialog.Builder(this);
            LayoutInflater inflater = (LayoutInflater) getSystemService(LAYOUT_INFLATER_SERVICE);
            View view = inflater.inflate(R.layout.dialog_layout, null);
            builder.setView(view);
            builder.setPositiveButton("확인", dialogListener);
            builder.setNegativeButton("취소", null);

            customDialog = builder.create();
            customDialog.show();
        }
    }
}
📂res>values>arrays
목록을 구성하기 위한 문자열을 배열 리소스로 만들기.
<resources>
    <string-array name="dialog_arrays">
        <item> 기본 알람 소리</item>
        <item>Argon</item>
        <item>Awaken</item>
        <item>Bounce</item>
        <item>Carbon</item>
    </string-array>
</resources>
레이아웃 XML
<LinearLayout xmlns:android="http://schemas.android.com/apk/res/android"
xmlns:tools="http://schemas.android.com/tools"
android:layout_width="match_parent"
android:layout_height="match_parent"
tools:context=".dialoglayout"
android:orientation="vertical">
<Button
android:layout_width="match_parent"
android:layout_height="wrap_content"
android:id="@+id/btn_alert"
android:text="alert dialog"/>
<Button
android:layout_width="match_parent"
android:layout_height="wrap_content"
android:id="@+id/btn_list"
android:text="list dialog"/>
<Button
android:layout_width="match_parent"
android:layout_height="wrap_content"
android:id="@+id/btn_date"
android:text="date dialog"/>
<Button
android:layout_width="match_parent"
android:layout_height="wrap_content"
android:id="@+id/btn_time"
android:text="time dialog"/>
<Button
android:layout_width="match_parent"
android:layout_height="wrap_content"
android:id="@+id/btn_custom"
android:text="custom dialog"/>
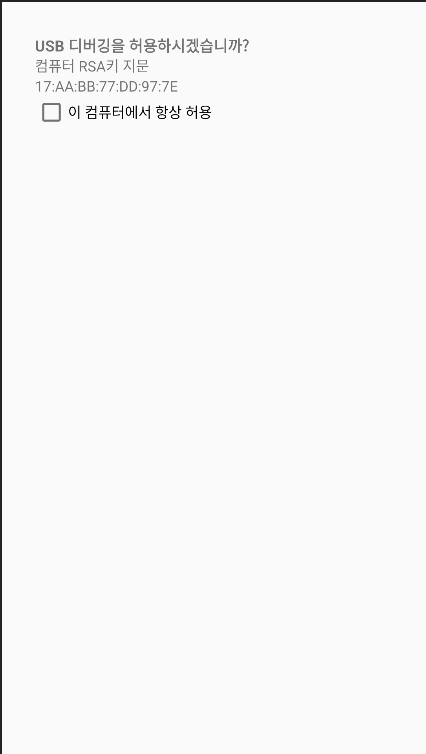
</LinearLayout>커스텀 다이얼로그의 화면을 구성하는 새 레이아웃 XML 파일을 res/layout 폴더를 오른쪽 마우스로 선택하여 NEW→Layout Resource file 메뉴를 이용하여 생성하고 화면 구성을 한다.
<RelativeLayout xmlns:android="http://schemas.android.com/apk/res/android"
    android:layout_width="match_parent"
    android:layout_height="match_parent">

    <TextView
        android:layout_width="wrap_content"
        android:layout_height="wrap_content"
        android:id="@+id/text1"
        android:text="USB 디버깅을 허용하시겠습니까?"
        android:textStyle="bold"
        android:textSize="15dp"
        android:layout_marginLeft="32dp"
        android:layout_marginTop="32dp"/>

    <TextView
        android:layout_width="wrap_content"
        android:layout_height="wrap_content"
        android:id="@+id/text2"
        android:text="컴퓨터 RSA키 지문"
        android:layout_below="@+id/text1"
        android:layout_alignLeft="@+id/text1"/>

    <TextView
        android:layout_width="wrap_content"
        android:layout_height="wrap_content"
        android:id="@+id/text3"
        android:text="17:AA:BB:77:DD:97:7E"
        android:layout_below="@+id/text2"
        android:layout_alignLeft="@id/text2"/>

    <CheckBox
        android:layout_width="wrap_content"
        android:layout_height="wrap_content"
        android:text="이 컴퓨터에서 항상 허용"
        android:layout_below="@id/text3"
        android:layout_alignLeft="@+id/text3"/>

</RelativeLayout>
위의 코드를 입력하면 밑의 화면이 구성된다.
이렇게 구현된 화면은
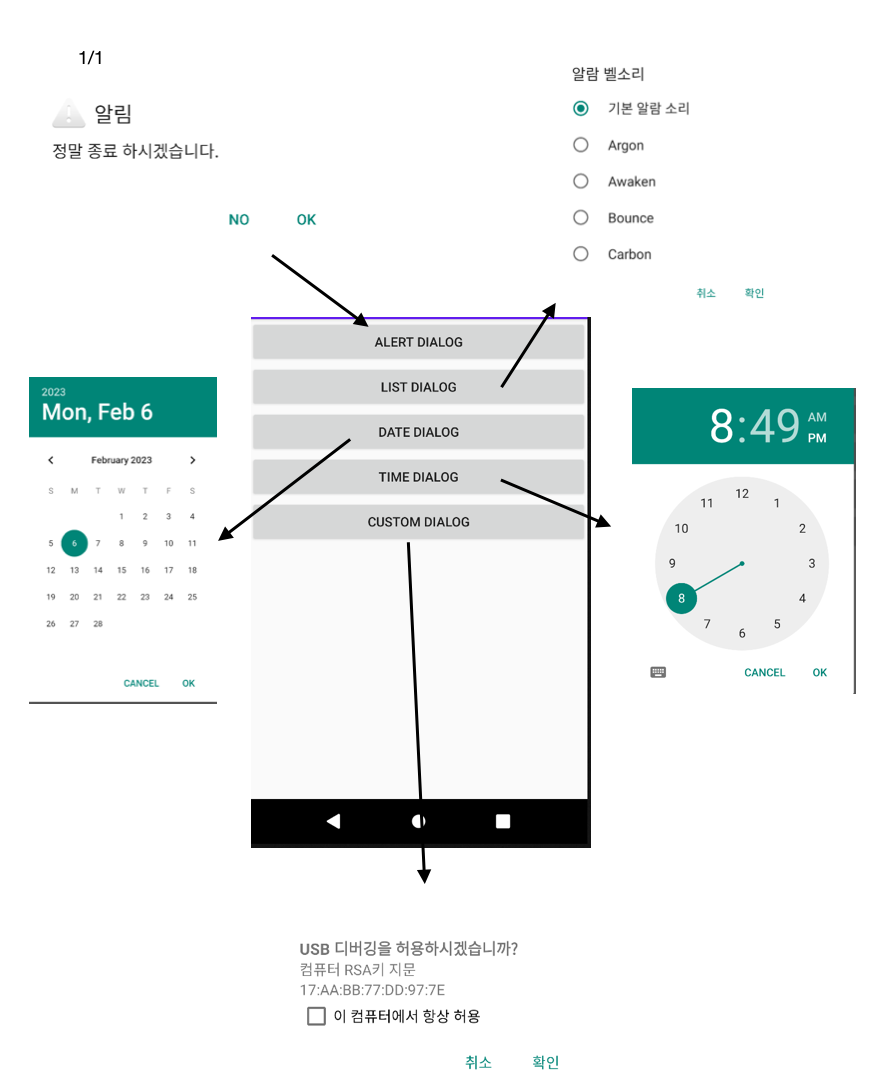
이러한 결과물이 나온다.
✏️ 오늘의 두 번쨰 벨로그도 끝.. 이제 캐나다 어학원을 알아봐야 한다.
캐나다 까지 이 무거운 노트북을 들고 갈 생각하니 좀 막막..하다..
막상 코드로 짜보면 그렇게 어려운 부분도 아닌데 처음에는 왜 그렇게 오류가 났는지.. 그럼에도 구구절절한 설명을 적어내는 건 그냥 독서하는 느낌으로 한번 훑고 적어 내리는 식으로 해서 나름 재미도 있고 도중에 궁금한걸 찾을 수 있어서 계속 올리게 되는거 같다. 오늘도 벨로그 끝 내일은 또 일..
근데 만들고 있는 앱하고 동행해서 올리는 건 역시 조금 어렵다..

찌끄레기 코딩