vue spring boot 웹소켓 채팅 만들기
vue와 spring boot를 stomp로 연결해서 간단한 채팅 서비스를 만들어봅시다.
2022.03.30 수정
글을 작성할 당시 2020년에는 스프링부트 2.5.2 버전을 사용했습니다.
다만, 스프링 공식 문서 에 따르면 스프링 5.3, 스프링부트 2.4 버전 부터 allowCredentials이 true인 경우 setAllowedOrigins 메서드에서 와일드 카드 '*'을 사용할 수 없게 되었습니다.
전역 해제를 하는 것은 좋은 방법은 아니어서 상용 애플리케이션을 배포할 때는 사용하지 않지만
테스트 및 데모를 위해 출처를 전역 해제하신다면, setAllowedOriginPatterns 을 통해 '*' 와일드카드를 사용하실 수 있습니다.
@Override
// connection을 맺을때 CORS 허용합니다.
public void registerStompEndpoints(StompEndpointRegistry registry) {
	registry.addEndpoint("/")
// 스프링 5.3, 스프링부트 2.4 버전 부터 allowCredentials이 true인 경우 setAllowedOrigins 메서드에서
// 와일드 카드 `'*'`을 사용하실 수 없습니다.
//  	.setAllowedOrigins("*")
		.setAllowedOriginPatterns("*")
		.withSockJS();
}
코드
프론트 코드: https://github.com/skyepodium/stomp_front
백엔드 코드: https://github.com/skyepodium/stomp_back
참고 링크: Using WebSocket to build an interactive web application
stomp는 메시지 브로커로 일반 웹소켓과 조금 다릅니다. 나중에 채워놓을께요 일단 구현먼저
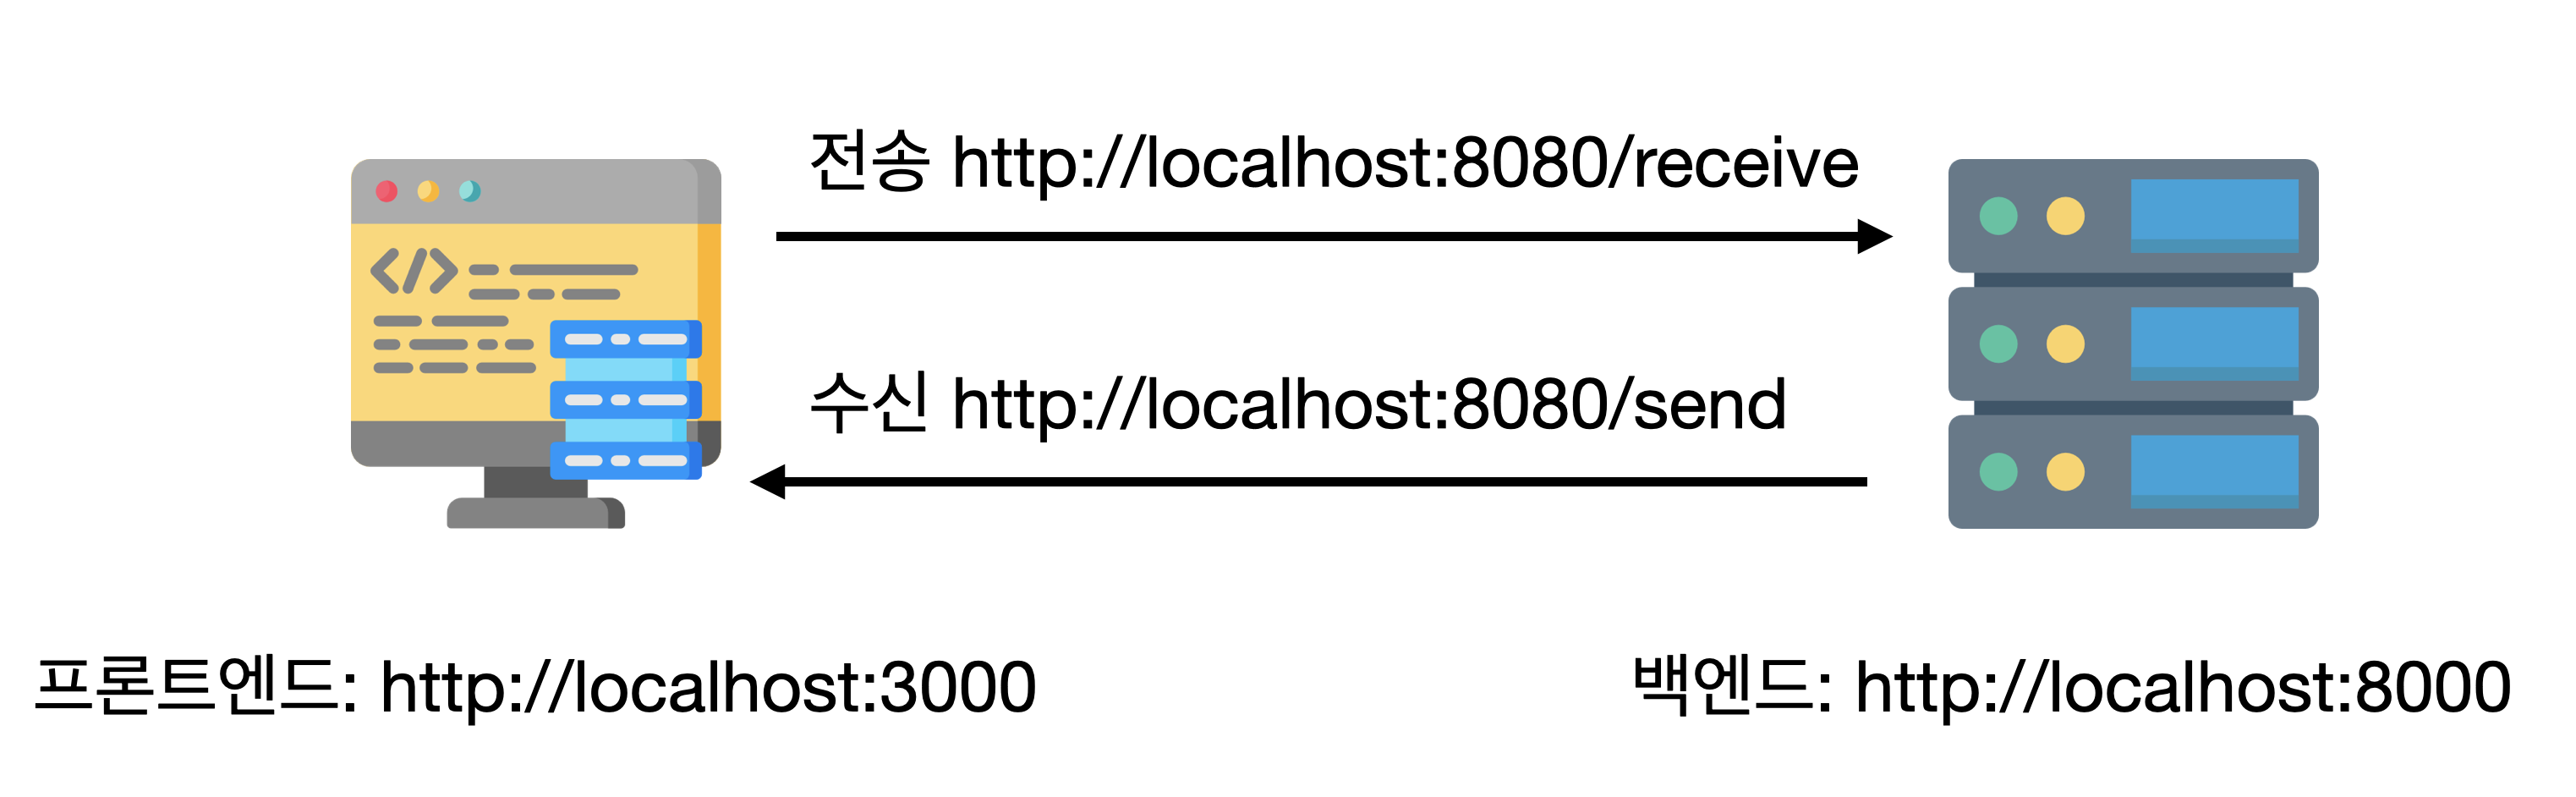
0. 전체 구조
1. 서버
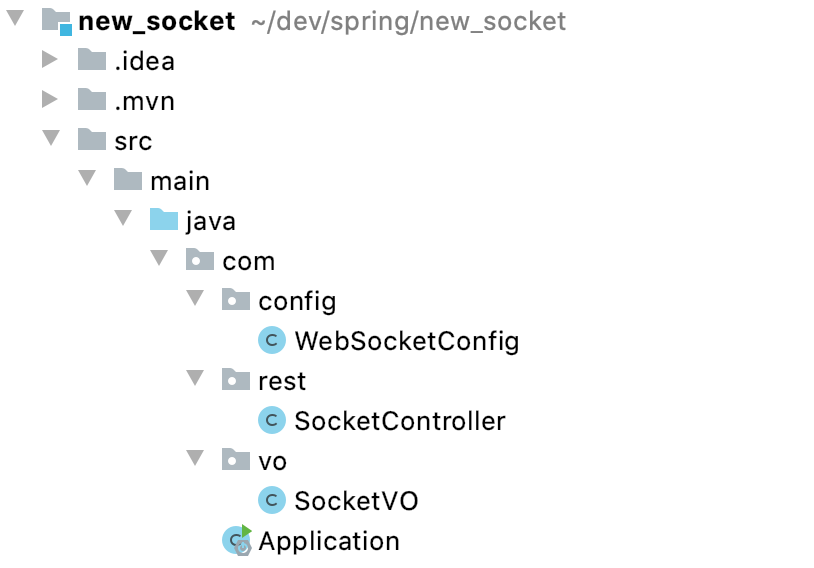
1) 구조
3개의 파일만 작성하겠습니다.
- vo - 메시지의 형식(userName, content)
- controller (메시지를 받는 endpoint 설정)
- config (구독 endpoint 설정, cross origin 해제)
2) dependencies
다음 3개만 사용합니다.
- web - 스프링 부트의 MVC 패턴을 사용
- websocket - 웹 소켓 사용, stomp가 들어있습니다.
- lombok - 클래스의 getter, setter, constructor를 자동 생성
maven
<!--스프링 부트의 MVC 패턴 사용-->
<dependency>
    <groupId>org.springframework.boot</groupId>
    <artifactId>spring-boot-starter-web</artifactId>
</dependency>

<!--웹 소켓 사용, stomp가 들어있습니다.-->
<dependency>
    <groupId>org.springframework.boot</groupId>
    <artifactId>spring-boot-starter-websocket</artifactId>
</dependency>

<!--클래스의 getter, setter, constructor를 자동 생성-->
<dependency>
    <groupId>org.projectlombok</groupId>
    <artifactId>lombok</artifactId>
    <optional>true</optional>
</dependency>
gradle
dependencies {
    implementation 'org.springframework.boot:spring-boot-starter-web'
    implementation 'org.springframework.boot:spring-boot-starter-websocket'
    compileOnly 'org.projectlombok:lombok'
    annotationProcessor 'org.projectlombok:lombok'
    testImplementation('org.springframework.boot:spring-boot-starter-test') {
        exclude group: 'org.junit.vintage', module: 'junit-vintage-engine'
    }
}
3) VO
VO에 어떤 형태로 메시지를 받을지를 정의합니다.
- userName: 유저의 이름 저장
- content: 메시지의 내용 저장
또한, lombok을 사용해서 조금 더 간단하게 만들었습니다.
- Data 어노테이션은 getter, setter를 자동 생성합니다.
- AllArgsConstructor 어노테이션은 생성자를 자동 생성합니다.
package com.vo;

import lombok.AllArgsConstructor;
import lombok.Data;

// Data 어노테이션은 getter, setter를 자동 생성합니다.
@Data

// AllArgsConstructor 어노테이션은 생성자를 자동 생성합니다.
@AllArgsConstructor
public class SocketVO {
    // 유저의 이름을 저장하기 위한 변수
    private String userName;

    // 메시지의 내용을 저장하기 위한 변수
    private String content;
}
4) controller
SocketHandler는 1) /receive에서 메시지를 받고, /send로 메시지를 보내줍니다.
package com.rest;

import com.vo.SocketVO;
import org.springframework.messaging.handler.annotation.MessageMapping;
import org.springframework.messaging.handler.annotation.SendTo;
import org.springframework.stereotype.Controller;

@Controller
public class SocketController {

    // /receive를 메시지를 받을 endpoint로 설정합니다.
    @MessageMapping("/receive")

    // /send로 메시지를 반환합니다.
    @SendTo("/send")

    // SocketHandler는 1) /receive에서 메시지를 받고, /send로 메시지를 보내줍니다.
    // 정의한 SocketVO를 1) 인자값, 2) 반환값으로 사용합니다.
    public SocketVO SocketHandler(SocketVO socketVO) {
        // vo에서 getter로 userName을 가져옵니다.
        String userName = socketVO.getUserName();
        // vo에서 setter로 content를 가져옵니다.
        String content = socketVO.getContent();

        // 생성자로 반환값을 생성합니다.
        SocketVO result = new SocketVO(userName, content);
        // 반환
        return result;
    }
}
5) configuration
설정 파일에서 다음 2개를 정의합니다.
- 클라이언트가 메시지를 구독할 endpoint
- 핸드쉐이크 때 CORS 해제
(해제를 하지 않으면 다음과 같이 브라우저에서 CORS 에러가 발생합니다.)

package com.config;

import org.springframework.context.annotation.Configuration;
import org.springframework.messaging.simp.config.MessageBrokerRegistry;
import org.springframework.web.socket.config.annotation.EnableWebSocketMessageBroker;
import org.springframework.web.socket.config.annotation.StompEndpointRegistry;
import org.springframework.web.socket.config.annotation.WebSocketMessageBrokerConfigurer;

@Configuration
@EnableWebSocketMessageBroker
public class WebSocketConfig implements WebSocketMessageBrokerConfigurer {

    @Override
    // 클라이언트가 메시지를 구독할 endpoint를 정의합니다.
    public void configureMessageBroker(MessageBrokerRegistry config) {
        config.enableSimpleBroker("/send");
    }

    @Override
    // connection을 맺을때 CORS 허용합니다.
    public void registerStompEndpoints(StompEndpointRegistry registry) {
        registry.addEndpoint("/")
    // 스프링 5.3, 스프링부트 2.4 버전 부터 allowCredentials이 true인 경우 setAllowedOrigins 메서드에서
    // 와일드 카드 `'*'`을 사용하실 수 없습니다.
    //  	.setAllowedOrigins("*")
            .setAllowedOriginPatterns("*")
            .withSockJS();
    }
클라이언트
1) 뷰 프로젝트 생성
vue cli로 프로젝트를 생성합니다.
vue cli 4.x 버전 이상을 사용했습니다.
// vue cli 버전 확인
vue --version

// vue cli로 프로젝트를 생성합니다. vue create 생성할 프로젝트 이름
vue create websocket_client
2) 라이브러리
- sockjs-client - 웹소켓 객체를 생성하기 위해 사용합니다.
- webstomp-client - stomp를 사용하기 위해 사용합니다.
// npm을 사용해서 라이브러리 설치
npm i webstomp-client sockjs-client

// yarn을 사용해서 라이브러리 설치
yarn add webstomp-client sockjs-client
3) 포트 변경
뷰와 스프링부트의 기본 포트는 8080입니다. 서로 겹치기 때문에 뷰의 포트를 3000으로 변경합니다.
루트 디렉토리(package.json이 있는곳) 에서 vue.config.js 파일을 생성하고 다음과 같이 작성합니다.
module.exports = {
    devServer: {
        // 3000 포트에서 vue 개발 서버를 실행합니다.
        port:3000
    }
}
4) 실행 및 확인
// npm을 사용해서 뷰 개발서버 실행
npm run serve

// yarn을 사용해서 뷰 개발서버 실행
yarn run serve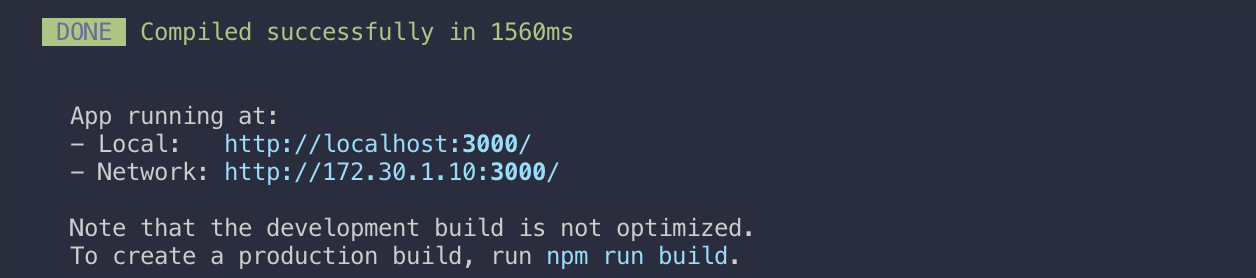
5) App.vue 수정
App.vue에 다음 3개를 작성합니다.
- 소켓 연결
- 메시지 전송
- 메시지 수신
// 파일 경로: root/src/app.vue
<template>
  <div id="app">
    유저이름:
    <input
      v-model="userName"
      type="text"
    >
    내용: <input
      v-model="message"
      type="text"
      @keyup="sendMessage"
    >
    <div
      v-for="(item, idx) in recvList"
      :key="idx"
    >
      <h3>유저이름: {{ item.userName }}</h3>
      <h3>내용: {{ item.content }}</h3>
    </div>
  </div>
</template>

<script>
import Stomp from 'webstomp-client'
import SockJS from 'sockjs-client'

export default {
  name: 'App',
  data() {
    return {
      userName: "",
      message: "",
      recvList: []
    }
  },
  created() {
    // App.vue가 생성되면 소켓 연결을 시도합니다.
    this.connect()
  },
  methods: {
    sendMessage (e) {
      if(e.keyCode === 13 && this.userName !== '' && this.message !== ''){
        this.send()
        this.message = ''
      }
    },
    send() {
      console.log("Send message:" + this.message);
      if (this.stompClient && this.stompClient.connected) {
        const msg = {
          userName: this.userName,
          content: this.message
        };
        this.stompClient.send("/receive", JSON.stringify(msg), {});
      }
    },
    connect() {
      const serverURL = "http://localhost:8080"
      let socket = new SockJS(serverURL);
      this.stompClient = Stomp.over(socket);
      console.log(`소켓 연결을 시도합니다. 서버 주소: ${serverURL}`)
      this.stompClient.connect(
        {},
        frame => {
          // 소켓 연결 성공
          this.connected = true;
          console.log('소켓 연결 성공', frame);
          // 서버의 메시지 전송 endpoint를 구독합니다.
          // 이런형태를 pub sub 구조라고 합니다.
          this.stompClient.subscribe("/send", res => {
            console.log('구독으로 받은 메시지 입니다.', res.body);

            // 받은 데이터를 json으로 파싱하고 리스트에 넣어줍니다.
            this.recvList.push(JSON.parse(res.body))
          });
        },
        error => {
          // 소켓 연결 실패
          console.log('소켓 연결 실패', error);
          this.connected = false;
        }
      );
    }
  }
}
</script>
6) 확인
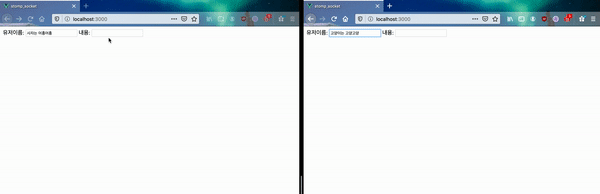
브라우저 2개 띄어놓고 확인하실 수 있습니다.


웹소켓에대해 공부하던 중 좋은 자료 발견해 공부하고갑니다!
감사합니다!
다름이아니라 설정파일을 똑같이 해 주었는데도 cors에러가 발생하는데 그럴 경우 어떻게 해결해야 좋을까요?