[ReactJS] Framer Motion
framer motion: Framer에서 제공하는 ReactJS 애니메이션을 위한 라이브러리
animate 하기 위해서는 기본적으로 <motion.div></motion.div>의 형태를 사용한다.
기본 구조
const Box = styled(motion.div)` //motion.div 설정
  width: 200px;
  height: 200px;
  background-color: white;
  border-radius: 15px;
  box-shadow: 0 2px 3px rgba(0, 0, 0, 0.1), 0 10px 20px rgba(0, 0, 0, 0.06);
`;

function App() {
  return (
    <Wrapper>
      <Box
        transition={{ type: "spring", delay: 0.5 }}
        initial={{ scale: 0 }}
        animate={{ scale: 1, rotateZ: 360 }}
      />
    </Wrapper>
  );
}
위와 같이 props를 사용해 간단하게 설정할 수 있다.
animate는 animation의 종류를,
transition은 애니메이션 진행에 관련된 사항을(예. 지연시간, 진행시간, 효과),
initial은 애니메이션 시작 시 element의 초기 상태를 설정한다.
즉, 위의 애니메이션은 상자가 갑자기 나타나며 한 바퀴 도는 애니메이션이다.
Variants
Variants는 애니메이션 코드를 정리하고, 여러 애니메이션을 하나로 묶어준다.
코드를 정리하기 위해서 stage를 사용한다.
stage: Variant에서 애니메이션이 생성되는 무대.
예를 들어 위의 박스 애니메이션은 애니메이션의 시작과 끝 두 개의 무대가 필요하다.
그러므로 이렇게 작성될 수 있다.
const myVars = {
  start: { scale: 0 },
  end: { scale: 1, rotateZ: 360, transition: { type: "spring", delay: 0.5 } },
};

function App() {
  return (
    <Wrapper>
      <Box variants={myVars} initial="start" animate="end" />
    </Wrapper>
  );
}
stage를 사용하면 여러 애니메이션을 묶어줄 수도 있다.
const boxVariants = {
  start: {
    opacity: 0,
    scale: 0.5,
  },
  end: {
    scale: 1,
    opacity: 1,
    transition: {
      type: "spring",
      duration: 0.5,
      bounce: 0.5,
      delayChildren: 0.5, //하위 요소에 delay 주기
      staggerChildren: 0.2, //하위 요소 간 간격 조정하기
    },
  },
};

const circleVariants = {
  start: {
    opacity: 0,
    y: 10,
  },
  end: {
    opacity: 1,
    y: 0,
  },
};

function App() {
  return (
    <Wrapper>
      <Box variants={boxVariants} initial="start" animate="end">
        <Circle variants={circleVariants} />
        <Circle variants={circleVariants} />
        <Circle variants={circleVariants} />
        <Circle variants={circleVariants} />
      </Box>
    </Wrapper>
  );
}
framer motion에서 자식 요소는 부모 요소의 stage값을 상속 받는다.
상세화면 만들기
위의 Framer Motion을 활용해 두 화면이 이런 식으로 자연스럽게 이어지도록 하려고 한다.
- 4가지 중 원하는 개체 클릭
- 개체가 앞으로 나오며 형태 변화
- 개체가 중앙에 나온 상태로 고정
우선 전체 코드는 아래와 같다.
import styled from "styled-components";
import { motion, AnimatePresence } from "framer-motion";
import {useState}  from 'react';

const Wrapper = styled.div`
  height: 100vh;
  width: 100vw;
  display: flex;
  justify-content: space-around;
  align-items: center;
`;

const Grid = styled.div`
  display: grid;
  grid-template-columns: repeat(3, 1fr);
  width: 50vw;
  gap: 10px;
  div:first-child,
  div:last-child {
    grid-column: span 2;
  }
`;

const Box = styled(motion.div)`
  background-color: rgba(255, 255, 255, 1);
  border-radius: 40px;
  height: 200px;
  box-shadow: 0 2px 3px rgba(0, 0, 0, 0.1), 0 10px 20px rgba(0, 0, 0, 0.06);
`;

const Overlay = styled(motion.div)`
  width: 100%;
  height: 100%;
  position: absolute;
  display: flex;
  justify-content: center;
  align-items: center;
`;

const overlay = {
  hidden: { backgroundColor: "rgba(0, 0, 0, 0)" },
  visible: { backgroundColor: "rgba(0, 0, 0, 0.5)" },
  exit: { backgroundColor: "rgba(0, 0, 0, 0)" },
};

function App() {
  const [id, setId] = useState<null | string>(null);
  return (
    <Wrapper>
      <Grid>
        {["1", "2", "3", "4"].map((n) => (
          <Box onClick={() => setId(n)} key={n} layoutId={n} />
        ))}
      </Grid>
      <AnimatePresence>
        {id ? (
          <Overlay
            variants={overlay}
            onClick={() => setId(null)}
            //클릭하면 setId 비워주기
            initial="hidden"
            animate="visible"
            exit="exit"
          >
            <Box layoutId={id} style={{ width: 400, height: 200 }} />
          </Overlay>
        ) : null}
      </AnimatePresence>
    </Wrapper>
  );
}

export default App;
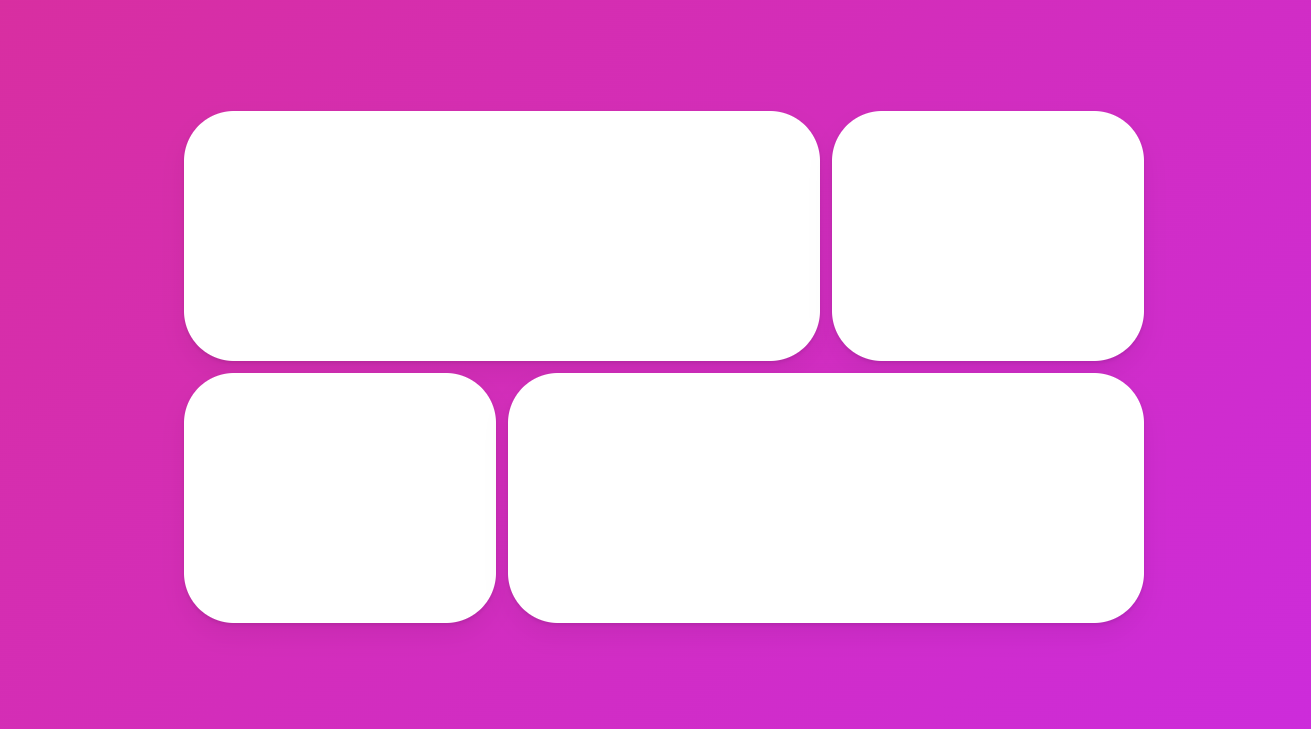
Box
우선 Grid를 활용해 네 개의 상자를 만들어 주었다.
const Grid = styled.div`
display: grid;
grid-template-columns: repeat(3, 1fr);
width: 50vw;
gap: 10px;
div:first-child,
div:last-child {
grid-column: span 2;
}
`;
const Box = styled(motion.div)`
background-color: rgba(255, 255, 255, 1);
border-radius: 40px;
height: 200px;
box-shadow: 0 2px 3px rgba(0, 0, 0, 0.1), 0 10px 20px rgba(0, 0, 0, 0.06);
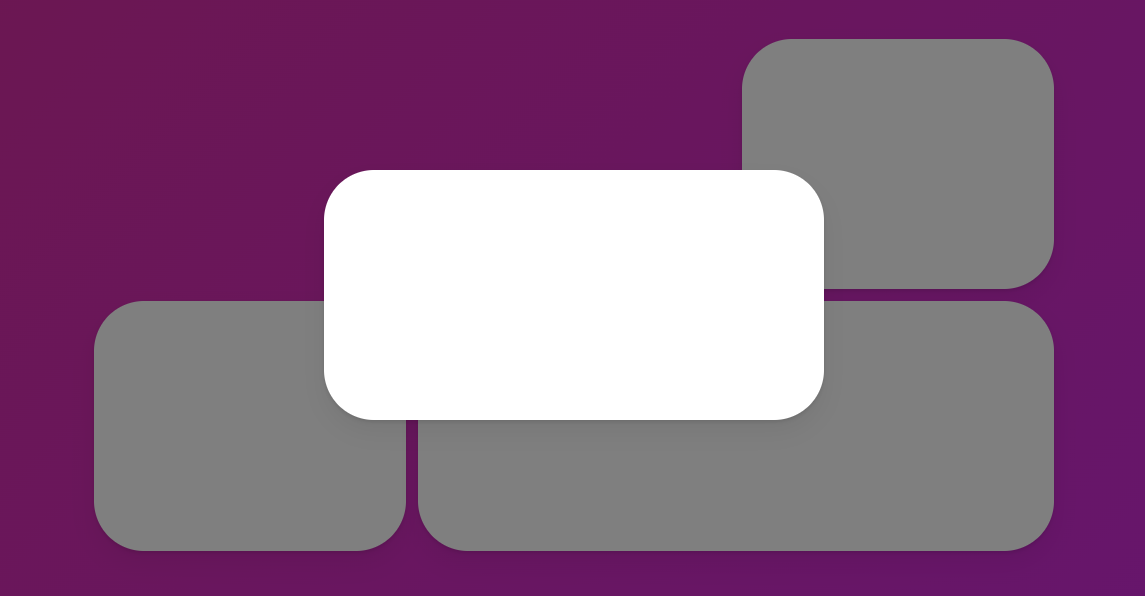
`;이제 클릭 시 형태변화가 일어나도록 해야한다. 이때 Animate Presence가 쓰인다.
Animate Presence
<AnimatePresence>
        {id ? (
          <Overlay
            variants={overlay}
            onClick={() => setId(null)}
            //클릭하면 setId 비워주기
            initial="hidden"
            animate="visible"
            exit="exit"
          >
            <Box layoutId={id} style={{ width: 400, height: 200 }} />
          </Overlay>
        ) : null}
Overlay는 박스 생성 시 배경에 깔리는 투명도 50%짜리 검은 박스이다.
Animate Presence의 자식 요소인 Overlay는 세 개의 props를 가지는데, 각각 initial, animate, exit이다.
Animate Presence는 하위 트리가 나타나고 사라짐에 따라 변화를 주는 것이다. 현재 Overlay에 onClick이 설정되어있기 때문에, 각각의 props는 기본 값, 클릭 후(나타날 때), 클릭 후(사라질 때)를 나타낸다.
현재 variants로 overlay를 가져왔는데 overlay는 아래와 같다.
const overlay = {
  hidden: { backgroundColor: "rgba(0, 0, 0, 0)" },
  visible: { backgroundColor: "rgba(0, 0, 0, 0.5)" },
  exit: { backgroundColor: "rgba(0, 0, 0, 0)" },
};
그러므로 투명도 50%의 검은 박스가 나타나는 것이다.
위에서 말했듯이 FramerMotion의 stage값은 자식에게 상속되므로, Box 또한 같이 나타나고 사라진다.
id
const [id, setId] = useState<null | string>(null);
  //클릭된 개체를 받음
  return (
    <Wrapper>
      <Grid>
        {["1", "2", "3", "4"].map((n) => (
          <Box onClick={() => setId(n)} key={n} layoutId={n} />
        ))}
        {/* layoutId로 박스 연결 */}
      </Grid>
위의 코드만으로는 하나의 박스 밖에 조정할 수 없다.
다만, Animate Presence는 개체의 key를 받아 사용하는데, 이를 이용해 네 박스에 1,2,3,4라는 키를 부여하여 사용할 수 있다.
layoutId
여기까지 구현하면 박스 네 개가 잘 뜨게 된다. 다만 유연하게 이어지는 애니메이션을 위해 layoutId를 설정해줄 수 있다.
<AnimatePresence>
        {id ? (
          <Overlay
            variants={overlay}
            onClick={() => setId(null)}
            //클릭하면 setId 비워주기
            initial="hidden"
            animate="visible"
            exit="exit"
          >
            <Box layoutId={id} style={{ width: 400, height: 200 }} />
          </Overlay>
        ) : null}