useForm
Register
const {register} = useForm();문자열 "todo"를 인수로 두고, register 함수를 호출하면 다음과 같은 객체가 출력된다.
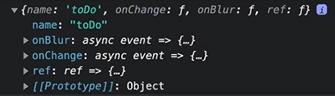
onBlur: Focus 해제 상태.
이것들은 Form에 필요한 요소들을 모아놓은 객체이다.
Watch
form 입력값의 변화를 확인할 수 있다.
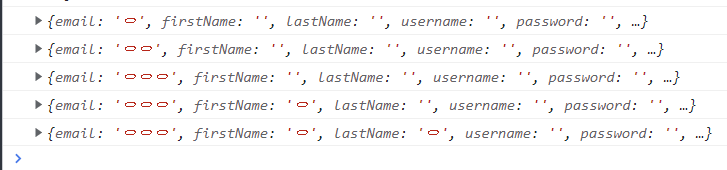
이런 식으로 실시간 입력되는 값들을 알려준다.
따라서 위의 두 함수를 이용해 다음과 같이 작성할 수 있다.
이것이 기본 구조이다.
function ToDoList() {
  const { register, watch } = useForm();
  console.log(watch());
  return (
    <div>
      <form>
        <input {...register("email")} placeholder="Email" />
        <input {...register("firstName")} placeholder="First Name" />
        <input {...register("lastName")} placeholder="Last Name" />
        <input {...register("username")} placeholder="Username" />
        <input {...register("password")} placeholder="Password" />
        <input {...register("password1")} placeholder="Password1" />
        <button>Add</button>
      </form>
    </div>
  );
요소마다 useState(), onChange() 사용할 때보다 훨씬 간결한 코드를 짤 수 있다.
Validation: handleSubmit
기존의 validation은 onSubmit() 함수를 가져와서 하나씩 조건을 설정했다. 이것을 handleSubmit이 대신한다.
<form onSubmit={handleSubmit(onValid,유효x)}>
handleSubmit을 호출한 후 두 개의 합수를 인자로 넣는다. 각각 유효할 때(필수)와 유효하지 않을 때이다.
const onValid = (data: any) => {유효힐 때 실행};
조건은 다음과 같이 설정한다.
        <input
          {...register("password1", {
            required: "Password is required",
            //필수값. true 대신 텍스트를 보낸다.
            minLength: {
              value: 5,
              message: "Your password is too short.",
            },
            //최소 길이 설정. 객체를 만들어 메시지를 전송한다.
          })}
			placeholder="Password1"
        />
Errors & Regular Expression
formState는 에러에 해당하는 사항을 객체로 출력한다.
console.log(formState.errors);의 결과는 다음과 같다.

에러의 개수가 form을 채움에 따라 줄어들고 있다. type를 보면 어떤 에러인지 알 수 있다.
정규 표현식
input이 어떻게 작성되어야 하는지를 알린다.
아래 참고.
다음과 같이 작성된다.
<input
  {...register("email", {
      required: "Email is required",
      pattern: {
      value: /^[A-Za-z0-9._%+-]+@naver.com$/,
      message: "Only naver.com emails allowed",
    },
  })}
  placeholder="Email"
/>
<span>{errors?.email?.message}</span>
//위에서 콘솔에만 출력했던 메시지를 화면에 띄운다.
Custom
setError
회원가입을 하기 위해 비밀번호와 비밀번호 확인 란이 같은지 확인을 할 필요가 있다. 이렇게 고의로 만들어내는 에러는 setError를 통해 이루어진다. 위에서 나온 onValid를 이렇게 바꾸면 된다.
const onValid = (data: IForm) => {
    if (data.password !== data.password1) {
      setError(
        "password1",
        //항목
        { message: "Password are not the same" },
        //메시지
        { shouldFocus: true }
        //커서가 문제가 생긴 곳(비밀번호 확인란)에 옮겨진다.
      );
    }
extraError를 추가하여 서버 등에 문제가 생겼을 때 추가적으로 에러를 설정할 수도 있다.
Validation
또 다른 Custom Validation을 만드는 법은 아래와 같다.
아래는 validation을 사용하여 제한 조건 두 개를 건 것이다.
<input
          {...register("firstName", {
            required: "write here",
            validate: {
              noNico: (value) =>
                value.includes("nico") ? "no nicos allowed" : true,
                //조건1. nico가 포함되는 경우 가입할 수 없다.
              noNick: (value) =>
                value.includes("nick") ? "no nick allowed" : true,
                //조건2. nick이 포함되는 경우 가입할 수 없다.
            },
          })}
          placeholder="First Name"
        />