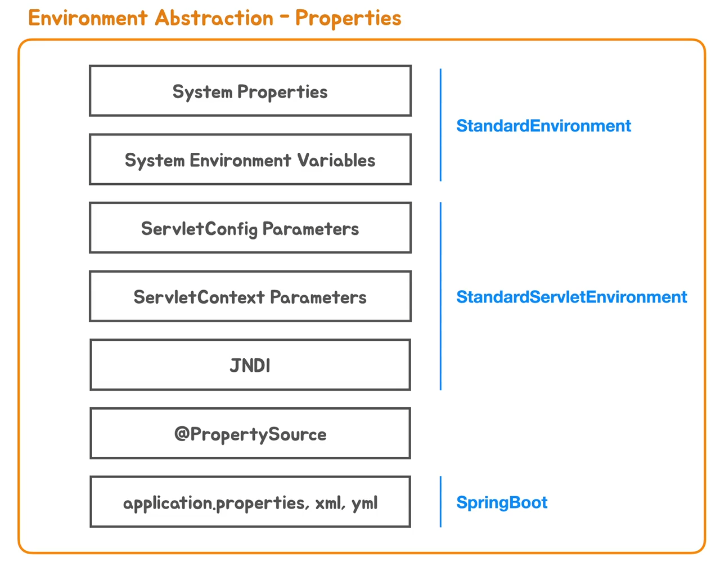
Spring boot를 만들어 사용하다보면 application.properties에서 변수를 지정해서 사용한 적이 한번은 있을겁니다. Web Application이 실행되면서 Bean에 설정된 Property를 변경할 수 있게 제공하는 기능을 Environment Abstraction이라고 합니다. 여기서는 boot에서 제공하는 application.properties와 같이 사용자가 직접 만들어 사용하는 방법을 설명합니다.
인프런 토비선생님의 스프링부트 강의내용을 옮긴 글입니다.
1. Load 우선순위
property를 선언하는 방법은 다양합니다. 그리고 각설정에는 우선순위가 존재합니다.
따라서 같은 값을 제공해도 우선순위가 높은 설정에 값을 불러옵니다.
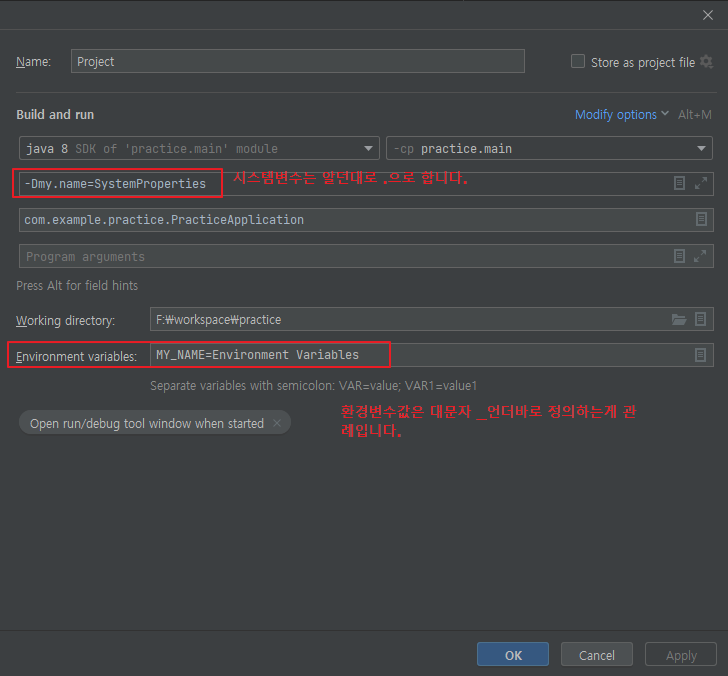
System valiables : 1 순위
Environment valiables : 2 순위
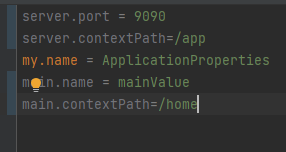
application.properties : 3 순위
인텔리 제이에선 다음의 사진에서 테스트 가능합니다.
2. @Value로 Property 값 읽어오기
@value Annotation을 이용한 방법입니다. "${}"와 같은 Expression은 읽어오기 위한 기능을 추가해야합니다. 다행이 Spring에서 지원하는 Source가 있으므로 Bean으로 등록해 사용해주면 됩니다.
@Configuration
public class PropertyPlaceholder {
    @Bean
    PropertySourcesPlaceholderConfigurer propertySourcesPlaceholderConfigurer(){
        return new PropertySourcesPlaceholderConfigurer();
    }
}
그 다음 아래와 같이 선언하고 application.properties에도 작성하면 됩니다.
이때 : 뒤에는 default값을 작성할 수 있습니다. application.properties에 값이 없으면 해당 값으로 설정 됩니다.
    @Value("${contextPath:}") //:뒤에 없으므로 "" 다
    String contextPath;
    @Value("${port:8080}")// 디폴트 8080 port
    int port;

    @Bean("tomcatServer")
    public ServletWebServerFactory servletWebServerFactory(Environment env){
        TomcatServletWebServerFactory factory = new TomcatServletWebServerFactory();
        //factory.setContextPath(env.getProperty("contextPath")); // @Value 없이 Environment값을 그대로 불러와서 사용해도 됩니다.
        factory.setContextPath(contextPath);
        factory.setPort(port);
        return factory;
    }
이러한 방식은 변수가 많아지면 관리하기 힘듭니다. 객체로 담아서 관리하는법을 알아봅시다.
3. Obejct로 Property 값 Binding 및 읽어오기
getter setter로 담을 객체를 생성합니다.
public class ServerProperties {
    private String ContextPath;
    private int port;

    public String getContextPath() {
        return ContextPath;
    }

    public void setContextPath(String contextPath) {
        ContextPath = contextPath;
    }

    public int getPort() {
        return port;
    }

    public void setPort(int port) {
        this.port = port;
    }
}
해당 객체를 주입해줄 Bean을 하나 생성하고 값을 setting해주면 됩니다.
@Configuration
public class ServerPropertiesConfig {
    @Bean
    public ServerProperties serverProperties (Environment env){
    	// env.get...을 해서 각각 set해줘도 되지만, Binder를 쓰면 한번에 불러와집니다.
        return Binder.get(env).bind("",ServerProperties.class).get();
    }
}
마지막으로 Context가 받을 대상을 수정해주면 됩니다.
    @Bean("tomcatServer")
    public ServletWebServerFactory servletWebServerFactory(ServerProperties properties){
        TomcatServletWebServerFactory factory = new TomcatServletWebServerFactory();
        factory.setContextPath(properties.getContextPath());
        factory.setPort(properties.getPort());
        return factory;
    }
3. PostProcess를 이용한 Binding 및 읽어오기
앞에 기술도 쓸만하지만, ServerProperties파일을 사용하는 횟수가 많아지면 코드에 매번 입력하기 귀찮아집니다. 그래서 전체 Annotation을 한번씩 검사하여 class타입이 일치하는게 있으면 binding하는 방식으로 바꿀려고 합니다.
- 우선, ServierProperties를 사용하기 위해 명시할 Annotation을 만듭니다.
@Retention(RetentionPolicy.RUNTIME)
@Target(ElementType.TYPE)
@Component
public @interface MyConfigProperties {
}- 위에 작성했던 Object에 선언합니다.
@MyConfigProperties
public class ServerProperties {
    private String ContextPath;
    private int port;
//이하생략...
- 해당 기능에서는 ServerPropertiesConfig 파일을 사용안하므로 이 파일은 삭제하거나 주석처리하고, ServerProperties를 사용할 파일에 import해줍니다.
@Import(ServerProperties.class)
public class TomcatWebServerConfig {- 그럼 마지막으로 postProcessAfterInitialization을 사용하여 모든 Bean을 검색하며 일치하는게 있을때만 Propoerty를 setting해주면 됩니다.
@Configuration
public class PropertyPostProcessorConfig {
    @Bean
    BeanPostProcessor postProcessor(Environment env){
        return new BeanPostProcessor() {
            @Override
            public Object postProcessAfterInitialization(Object bean, String beanName) throws BeansException {
                MyConfigProperties anno = AnnotationUtils.findAnnotation(bean.getClass(), MyConfigProperties.class);
                if(anno == null) return bean;

                return Binder.get(env).bindOrCreate("",bean.getClass());
            }
        };
    }
}
빈 후처리기(Bean Post Processor)란?
- 빈(Bean)의 설정을 후처리(postprocessing)함으로써 빈의 생명 주기와 빈 팩토리의 생명주기에 관여.
- 빈의 초기화 되기 전, 초기화 된 후 2개의 기회를 제공.
- 빈 프로퍼티의 유효성 검사 등에 사용.
Object postProcessBeforeInitialization(Object bean, String name) throws BeansException {} //빈 초기화 전
Object postProcessAfterInitialization(Object bean, String name) throws BeansException; {} //빈 초기화 후```
4. prefix설정하기
위에서 내용을 끝내도 되지만 추가로 property값이 중복되어 사용되는 경우 명시를 정확히 할 필요성이 있다.
이럴때 콤마(.)로 구분해서 값을 불러오게 할 수 있다.
위에 소스에서 해당부분을 추가해주면 됩니다.
@Configuration
public class PropertyPostProcessorConfig {
    @Bean
    BeanPostProcessor postProcessor(Environment env){
        return new BeanPostProcessor() {
            @Override
            public Object postProcessAfterInitialization(Object bean, String beanName) throws BeansException {
                MyConfigProperties anno = AnnotationUtils.findAnnotation(bean.getClass(), MyConfigProperties.class);
                if(anno == null) return bean;
				//추가
                Map<String,Object> attrs = AnnotationUtils.getAnnotationAttributes(anno);
                String prefix = (String) attrs.get("prefix");
                return Binder.get(env).bindOrCreate(prefix,bean.getClass());
            }
        };
    }
}@MyConfigProperties(prefix="server") // 추가
public class ServerProperties {
private String ContextPath;
private int port;
//이하생략...
참고자료들___
(참고) 빈 후처리기(Bean Post Processor)