이전 포스트에서는 기본적으로 제공하는 Spring Security기능만을 이용한 로그인을 만들었습니다.
이번에는 Provider를 이용하여 자체적인 인증 프로세스를 구현하고, Handler러로 에러도 구현해봅니다.

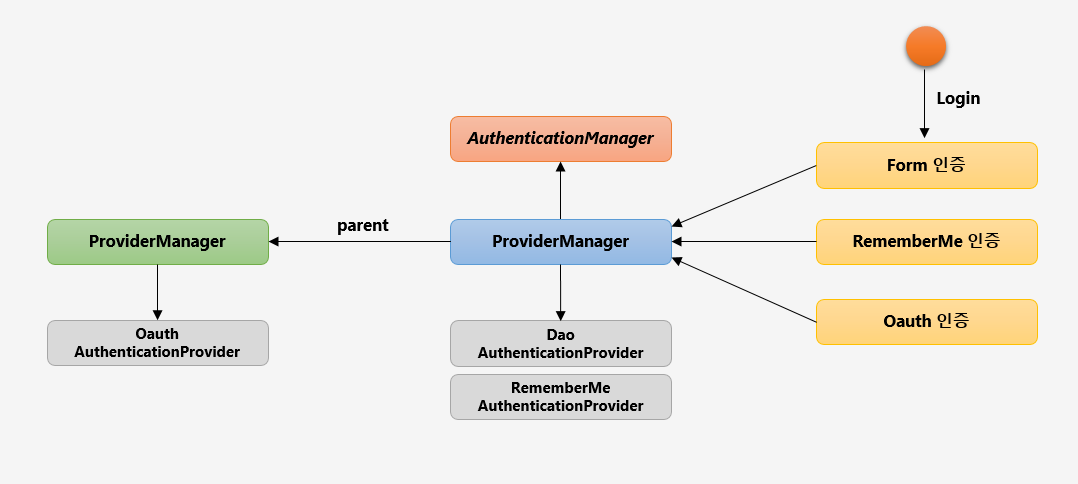
AuthenticationProvider
Provider는 requestFilter를 통해 전송받은 user parameter를 Manager로 부터 받아, 인증처리를 하고, 다시 Manager로 전달하는 역할을 하고있습니다. 여러개의 인증수단이 있을시에는 AuthenticationManager는 적절한 Provider를 찾아 진행을하게 됩니다.
CustomProvider를 만들기 위해서는 AuthenticationProvider 를 상속받는 클래스를 만들고
몇가지 필요한 객체를 주입받고 authenticate 매서드를 override 하여 사용 할 수 있습니다.
public class CustomAuthenticationProvider implements AuthenticationProvider {

    @Autowired
    private CustomUserDetailsService CustomUserDetailsService;
    @Autowired
    private PasswordEncoder passwordEncoder;

    @Override
    @Transactional
    public Authentication authenticate(Authentication authentication) throws AuthenticationException {
        String username = authentication.getName();
        String password = (String) authentication.getCredentials();

        AccountContext accountContext = (AccountContext) userDetailsService.loadUserByUsername(username);
        if (!passwordEncoder.matches(password,accountContext.getAccount().getPassword())){
            throw new BadCredentialsException("BadCredentialsException");
        }

        FormWebAuthenticationDetails details = (FormWebAuthenticationDetails) authentication.getDetails();
        String secretKey = details.getSecretKey();

        if(secretKey == null || !"secret".equals(secretKey)){
            throw new InsufficientAuthenticationException("InsufficientAuthenticationException");
        }

        UsernamePasswordAuthenticationToken authenticationToken = new UsernamePasswordAuthenticationToken(
                accountContext.getAccount(),
                null,
                accountContext.getAuthorities()
        );


        return authenticationToken;
    }

    @Override
    public boolean supports(Class<?> authenticate) {
        return UsernamePasswordAuthenticationToken.class.isAssignableFrom(authenticate);
    }
}
CustomUserDetailsService
CustomUserDetailsService는 db에서 불러와야하므로UserDetailsService를 상속받아 구현해야합니다.
@Service
public class CustomUserDetailsService implements UserDetailsService {

    @Autowired
    private UserRepository userRepository;
    @Override
    public UserDetails loadUserByUsername(String username) throws UsernameNotFoundException {
        Account account = userRepository.findByUsername(username);
        if (account == null) throw new UsernameNotFoundException("userNotFound");

        List<GrantedAuthority> roles = new ArrayList<>();
        roles.add(new SimpleGrantedAuthority(account.getRole())); // db에 role도 구현해줍니다.
        AccountContext accountContext = new AccountContext(account, roles);
        return accountContext;
    }

}- 이걸
CustomAuthenticationProvider.java에 주입해서 사용하면 됩니다.
	@Autowired
private CustomUserDetailsService CustomUserDetailsService;Token을 생성하기 위해서는AccountContext로 된 객체가 필요합니다. 다행이AccountContext가UserDetails상속받으므로Casting하여 사용할 수 있습니다.
AccountContext accountContext = (AccountContext) userDetailsService.loadUserByUsername(username);Username,password및 여러 인증수단들(details)을 이용해서 인증에 들어갑니다.
	String username = authentication.getName(); //authentication에서 받아온 parameter를 불러올 수 있습니다.
    String password = (String) authentication.getCredentials(); // 암호도 불러옵니다.

    AccountContext accountContext = (AccountContext) userDetailsService.loadUserByUsername(username);
    if (!passwordEncoder.matches(password,accountContext.getAccount().getPassword())){
        throw new BadCredentialsException("BadCredentialsException");
    } // 암호가 db에 저장될때는 BCrypt 암호화 패턴으로 저장이 됩니다.
      // 따라서 parameter로 가져온값에 Encoding값이 db에 저장되어있는 암호화 값하고 같은지를 비교합니다.

    FormWebAuthenticationDetails details = (FormWebAuthenticationDetails) authentication.getDetails();
    // getDetails를 통해 form안에 다른 값들도 가져오는게 가능합니다.
    String secretKey = details.getSecretKey();
    // 저는 secretKey라고 테스트로 만들어 사용했습니다.

    if(secretKey == null || !"secret".equals(secretKey)){
        throw new InsufficientAuthenticationException("InsufficientAuthenticationException");
    } // 이런식으로 추가로 커스터마이징한 인증 수단을 추가하는것이 가능합니다.

    UsernamePasswordAuthenticationToken authenticationToken = new UsernamePasswordAuthenticationToken(
            accountContext.getAccount(),
            null,
            accountContext.getAuthorities()
    ); // 리턴값에 맞춰서 값을 세팅해줍니다. 두번째인자는 password, null로 처리합니다.


    return authenticationToken;
이렇게 secretKey라는 값을 넣어 추가 인증수단으로 사용이 가능합니다.
인증수단을 추가하면 authentication.getDetails()로 불러와지며, 별도의 AuthenticationDetailsSource클래스를 만들어 커스터마이징을 하셔야합니다. 일단 마저 만들고 아래에서 설명하겠습니다.
- 마지막으로
supports에 provider가 지원하는 클래스를 작성하시면 됩니다.
    @Override
    public boolean supports(Class<?> authenticate) {
        return UsernamePasswordAuthenticationToken.class.isAssignableFrom(authenticate);
    }
CustomAuthenticationDetailsSource
AuthenticationDetailsSource를 상속받는 파일을 만들고FormWebAuthenticationDetails객체를 override 하여 요청값을 넘깁니다.
@Component
public class FormAuthenticationDetailsSource implements AuthenticationDetailsSource<HttpServletRequest, WebAuthenticationDetails> {
    @Override
    public WebAuthenticationDetails buildDetails(HttpServletRequest request) {
        return new FormWebAuthenticationDetails(request);
    }
}- 요청값에서 원하는 인자값을 빼오고 이를 지역변수로 담아 설정하는게 가능합니다.
이렇게 만든DetailsSource는 위에서 설명하는FormWebAuthenticationDetails에서 불러오는게 가능합니다.
public class FormWebAuthenticationDetails extends WebAuthenticationDetails {
    private String secretKey;

    public FormWebAuthenticationDetails(HttpServletRequest request) {
        super(request);
        secretKey = request.getParameter("secret_key");
    }

    public String getSecretKey() {
        return secretKey;
    }
}
아래는 form에서 secretKey가 어떻게 쓰였는지에 대한 예시입니다.
	<!--thymeleaf 형식입니다. 그래도 secret_key만 보시면 됩니다.-->
    <form th:action="@{/login_proc}" class="form-signin" method="post">
        <input type="hidden" th:value="secret" name="secret_key" />
        <div class="form-group">
            <input type="text" class="form-control" name="username" placeholder="아이디" required="required" autofocus="autofocus">
        </div>
        <div class="form-group">
            <input type="password" class="form-control" name="password" placeholder="비밀번호" required="required">
        </div>
        <button type="submit" class="btn btn-lg btn-primary btn-block">로그인</button>
    </form>
Configuration에 적용하기
이렇게 만들어놓은 CustomProvider를 등록만 해주시면 됩니다. override 대상은 매개변수가 AuthenticationManagerBuilder인 Method가 대상입니다.
    @Autowired
    private AuthenticationDetailsSource <HttpServletRequest, WebAuthenticationDetails>
    	authenticationDetailsSource;

    @Bean
    public AuthenticationProvider authenticationProvider() {
        return new CustomAuthenticationProvider();
    }

    @Override
    protected void configure(AuthenticationManagerBuilder auth) throws Exception {
        auth.authenticationProvider(authenticationProvider());
    }

    @Override
    protected void configure(final HttpSecurity http) throws Exception {
        	http
                .authorizeRequests()
                .antMatchers("/","/users","/user/login/**").permitAll()
                .antMatchers("/mypage").hasRole("USER")
                .antMatchers("/messages").hasRole("MANAGER")
                .antMatchers("/config").hasRole("ADMIN")
                .anyRequest().authenticated()

                .and()
                .formLogin()
                .authenticationDetailsSource(authenticationDetailsSource)
                ;
    }
하이