
2010년 처음 iPad가 등장하고 난 뒤, 사람들은 iPhone 보다 큰 화면으로 맥북과 달리 간편하게 휴대하며 컨텐츠를 즐길 수 있게 되었다.
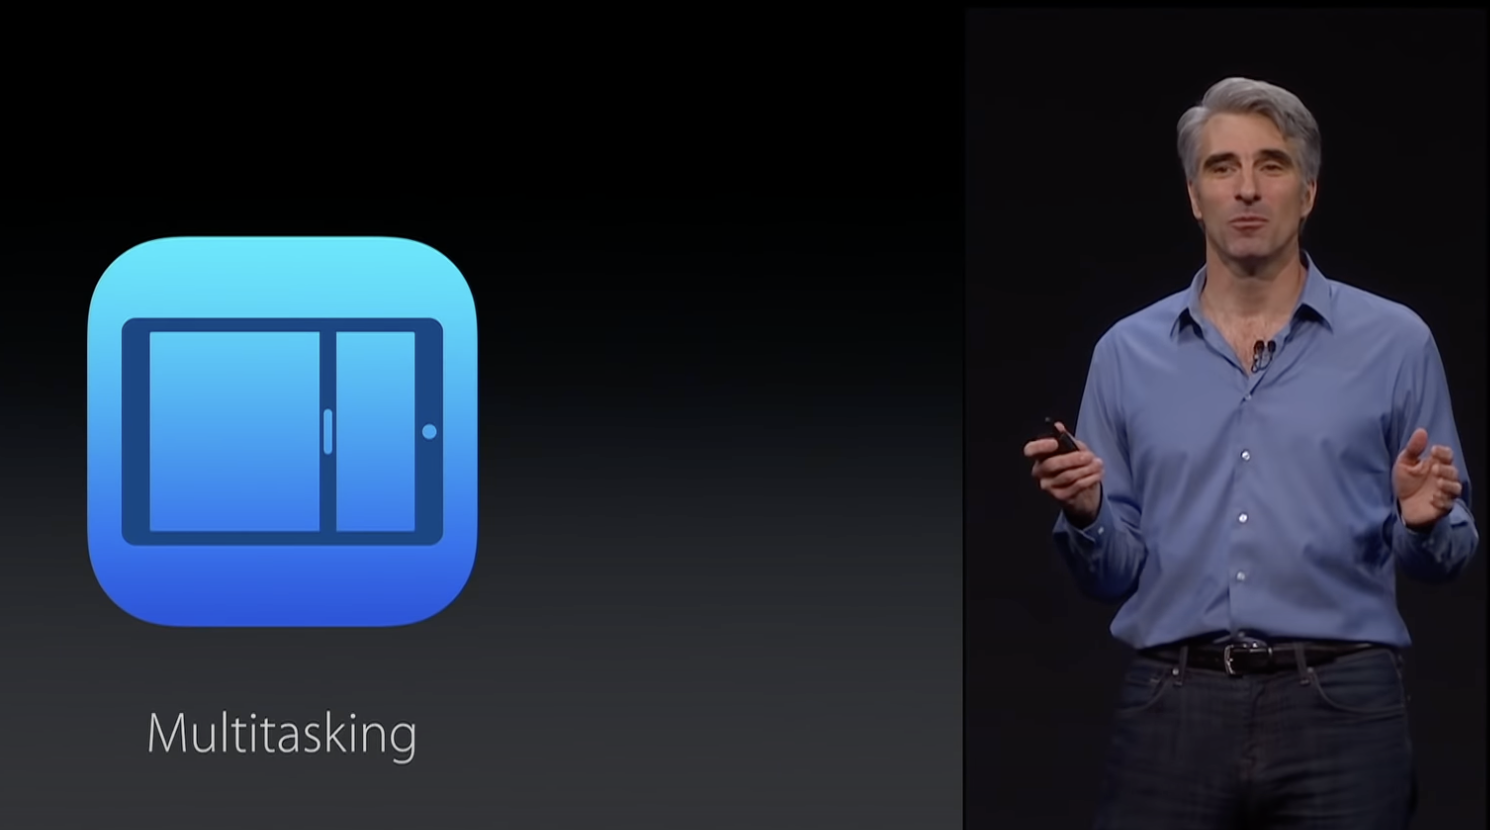
사람들은 iPad를 사용하면서 큰 화면에 한 개의 앱만 활용하는 것에 불만을 표했다. 이에 WWDC 2015에서 iOS 9를 발표하며 iPad 기능으로 slide over와 split view를 통한 멀티태스킹 기능을 도입했다.
이제 사람들은 동시에 두 앱 (slide over를 활용하면 3개까지) 한 스크린에 띄울 수 있게 되었다. 하지만 앱은 하나의 UI instance만 매칭될 수 있었기에 동시에 같은 앱을 실행해서 서로 다른 화면을 보고 싶은 경우는 대응을 못한다. (app has only one process, just one UI instance to match)
iPadOS 등장
WWDC 2019에서 iOS 13 발표와 더불어 iPad는 iOS 13이 아닌 iPadOS 13을 탑재하게 되었다.
iPadOS는 완전히 새로 개발된 운영체제는 아니고, iOS의 대부분을 이어 만든 것이기에 iOS 13의 기능과 대부분 겹친다.
(현재 베타버전인 iPad 17도 건강 앱을 비롯해 iOS 17의 기능을 iPad에 맞게 가져오는 과정을 아직도 진행중이다.)
다만 큰 화면 디바이스이기에 iPhone에선 불가능한 멀티태스킹 기능이 강화되면서 이에 따라 기존의 AppDelegate로 관리하던 앱과 UI의 lifecycle 관리 방식이 변경되었다.
Before iOS 13
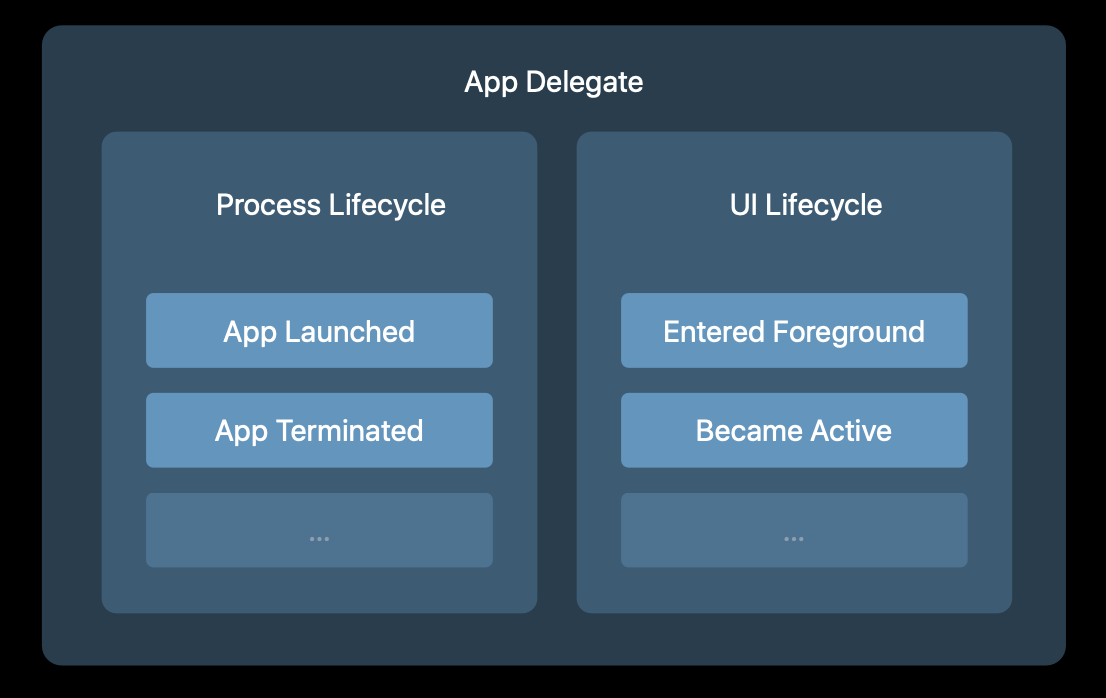
멀티태스킹을 지원하던 이전에도 AppDelegate가 앱의 모든 것을 관리했다. 즉 시스템과의 커뮤니케이션을 통한 process 관리와 앱 상태(state)에 따른 어떤 UI를 보여줄 지를 관리하는 역할을 담당했다.
이런 관리 방식의 문제점은 같은 앱에서 서로 다른 화면을 동시에 보여줄 수 없다는 점이다. 예를 들어 노트 앱에서 동시에 서로 다른 노트를 남기고 싶다면 분할된 화면에서 서로 다른 입력칸과 입력값을 보여줘야 하지만 AppDelegate 만으로는 대응할 수 없다. 하나의 앱에는 하나의 화면만 띄울 수 있었기에.
따라서 하나의 앱이 동시에 여러 화면을 띄워주는 작업을 서로 다른 Session이라고 이해하고 시작해야 한다. 이를 "scene sessions"라고 한다.
그리고 이런 scene들을 관리하도록 SceneDelegate가 등장했다.
SceneDelegate과 버전 대응
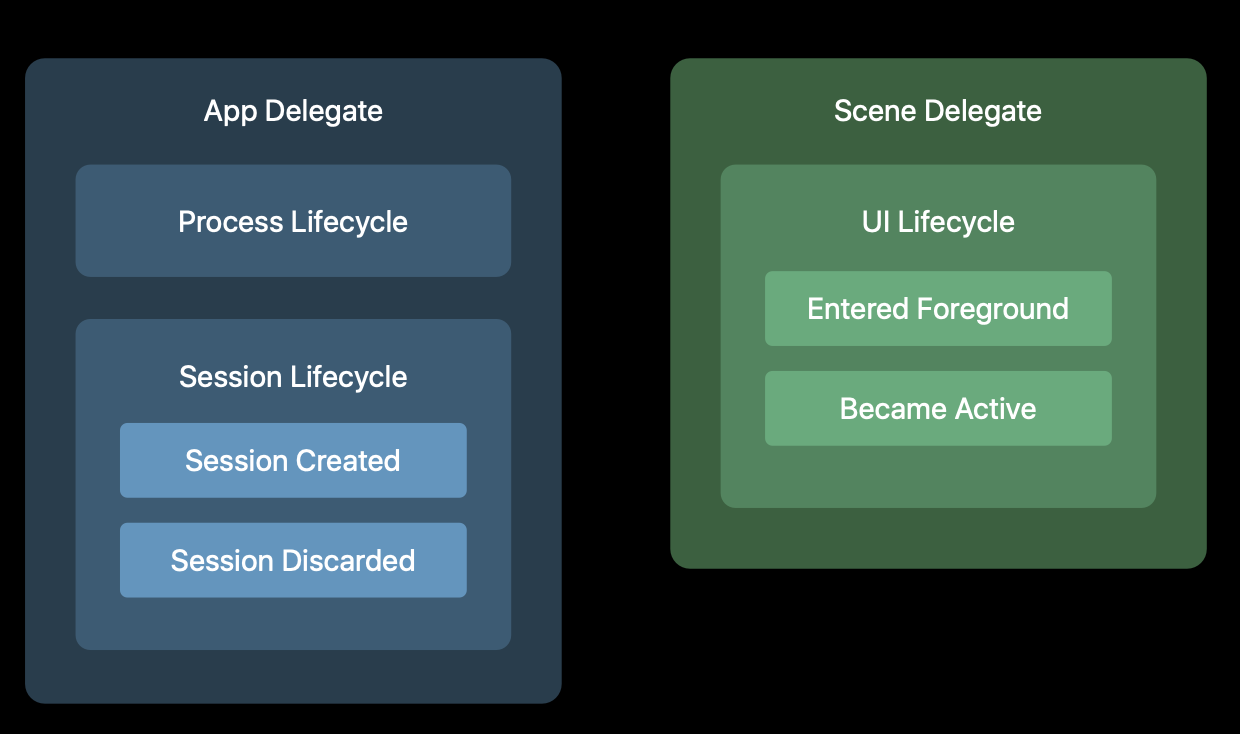
AppDelegate의 기능 중 UI의 Lifecycle을 SceneDelegate가 담당한다. AppDelegate는 같은 앱의 서로 다른 화면과 연관된 Session과 App의 lifecycle과 연관된 Process를 관리하는 역할을 맡게 되었다.
최소 지원 버전이 낮은 앱들은?
SceneDelegate로 migrate된 상황에서 최소 버전이 iOS 12인 경우 다음과 같은 에러가 발생한다.
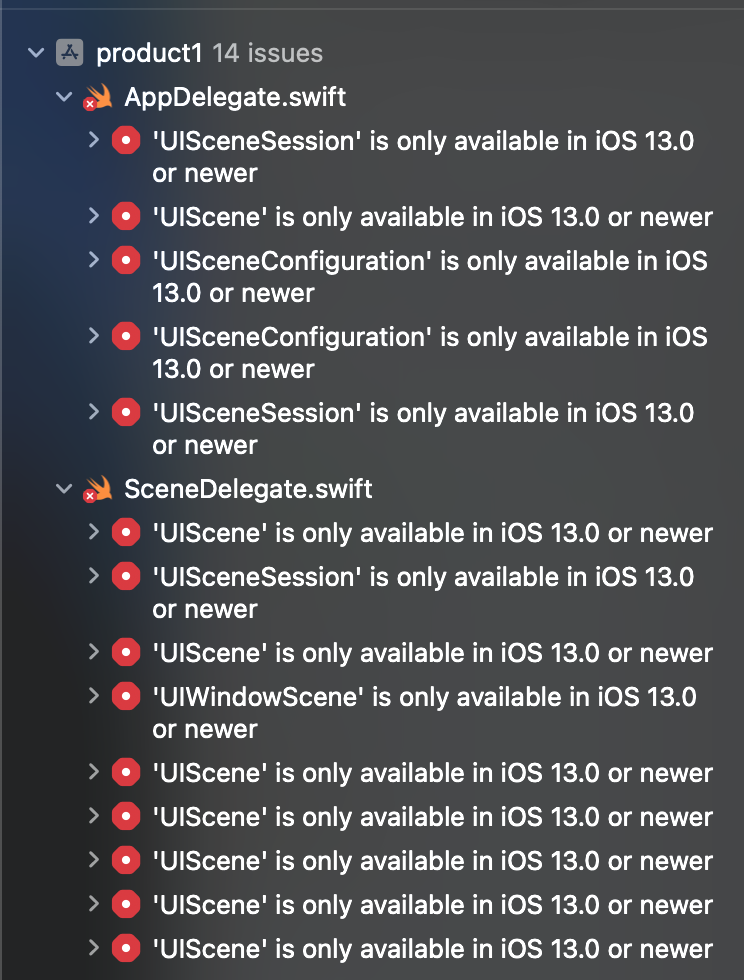
SceneDelegate 도입을 할 수 없다고 iOS 13 이후 업데이트를 끊는 것도 말이 안되지만 12 이전 버전 지원을 종료하는 것 역시 말이 안된다.
따라서 버전 분기 코드가 필요하다. UIScene과 관련된 코드들에 다음과 같이 작성한다.
@main
class AppDelegate: UIResponder, UIApplicationDelegate {
	//...중략...

    // MARK: UISceneSession Lifecycle

	@available(iOS 13.0, *)
    func application(_ application: UIApplication, configurationForConnecting connectingSceneSession: UISceneSession, options: UIScene.ConnectionOptions) -> UISceneConfiguration {
        // Called when a new scene session is being created.
        // Use this method to select a configuration to create the new scene with.
        return UISceneConfiguration(name: "Default Configuration", sessionRole: connectingSceneSession.role)
    }

	@available(iOS 13.0, *)
    func application(_ application: UIApplication, didDiscardSceneSessions sceneSessions: Set<UISceneSession>) {
        // Called when the user discards a scene session.
        // If any sessions were discarded while the application was not running, this will be called shortly after application:didFinishLaunchingWithOptions.
        // Use this method to release any resources that were specific to the discarded scenes, as they will not return.
    }
}

@available(iOS 13.0, *)
class SceneDelegate: UIResponder, UIWindowSceneDelegate {
	//...중략...
}
해당 디바이스가 iOS 13 이상일 때만 UIScene 관련 코드들이 동작한다.
참고) @available와 #available 차이
둘 다 모두 해당 플랫폼에서 사용할 수 있는지 여부를 판단하는데 활용된다.
@는 swift 언어에서 속성(attributes)을 나타낸다.
Attributes
Add information to declarations and types.
@available은 선언 속성으로 클래스, 함수/메서드, 프로토콜을 플랫폼 별로 제한할때 사용한다.
available
Apply this attribute to indicate a declaration’s life cycle relative to certain Swift language versions or certain platforms and operating system versions.
You can also use an asterisk (*) to indicate the availability of the declaration on all of the platform names. An available attribute that specifies availability using a Swift version number can’t use the asterisk.
#available은 런타임때 해당 플랫폼에서의 코드 실행 기준을 따질 때 조건으로 활용된다.
Checking API Availability
Swift has built-in support for checking API availability, which ensures that you don’t accidentally use APIs that are unavailable on a given deployment target.
The compiler uses availability information in the SDK to verify that all of the APIs used in your code are available on the deployment target specified by your project. Swift reports an error at compile time if you try to use an API that isn’t available.
You use an availability condition in an if or guard statement to conditionally execute a block of code, depending on whether the APIs you want to use are available at runtime. The compiler uses the information from the availability condition when it verifies that the APIs in that block of code are available.
if #available(iOS 13.0, *) {
	// iOS 13 이후 버전
} else {
	// iOS 13 이전 버전
}
참고
Swift Language: Control Flows - Availability
App's Lifecycle
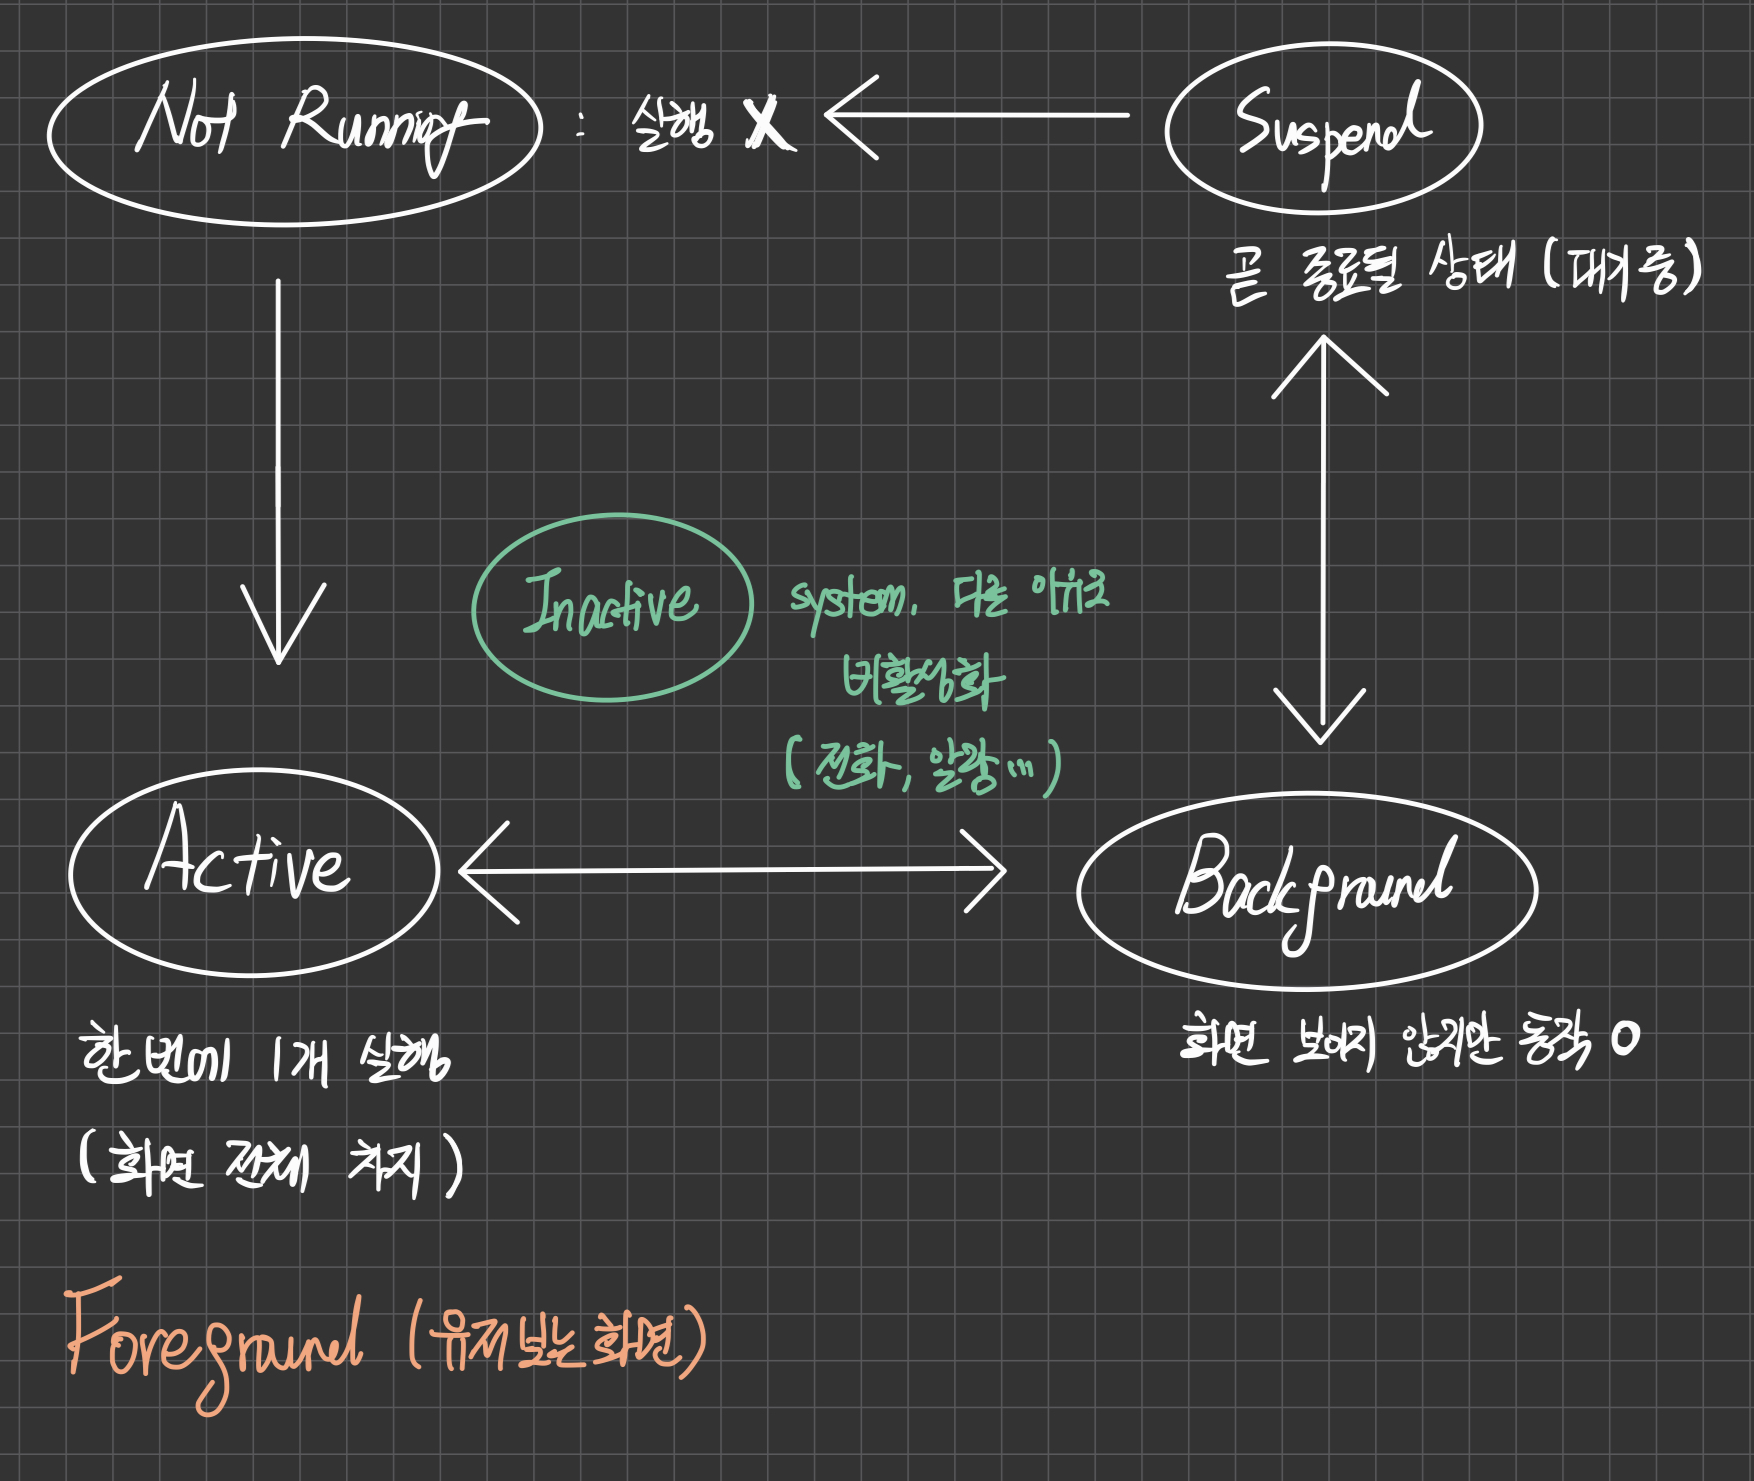
before iOS 13
iOS 13 이전에는 다음과 같은 과정과 구조를 가지고 있었다.
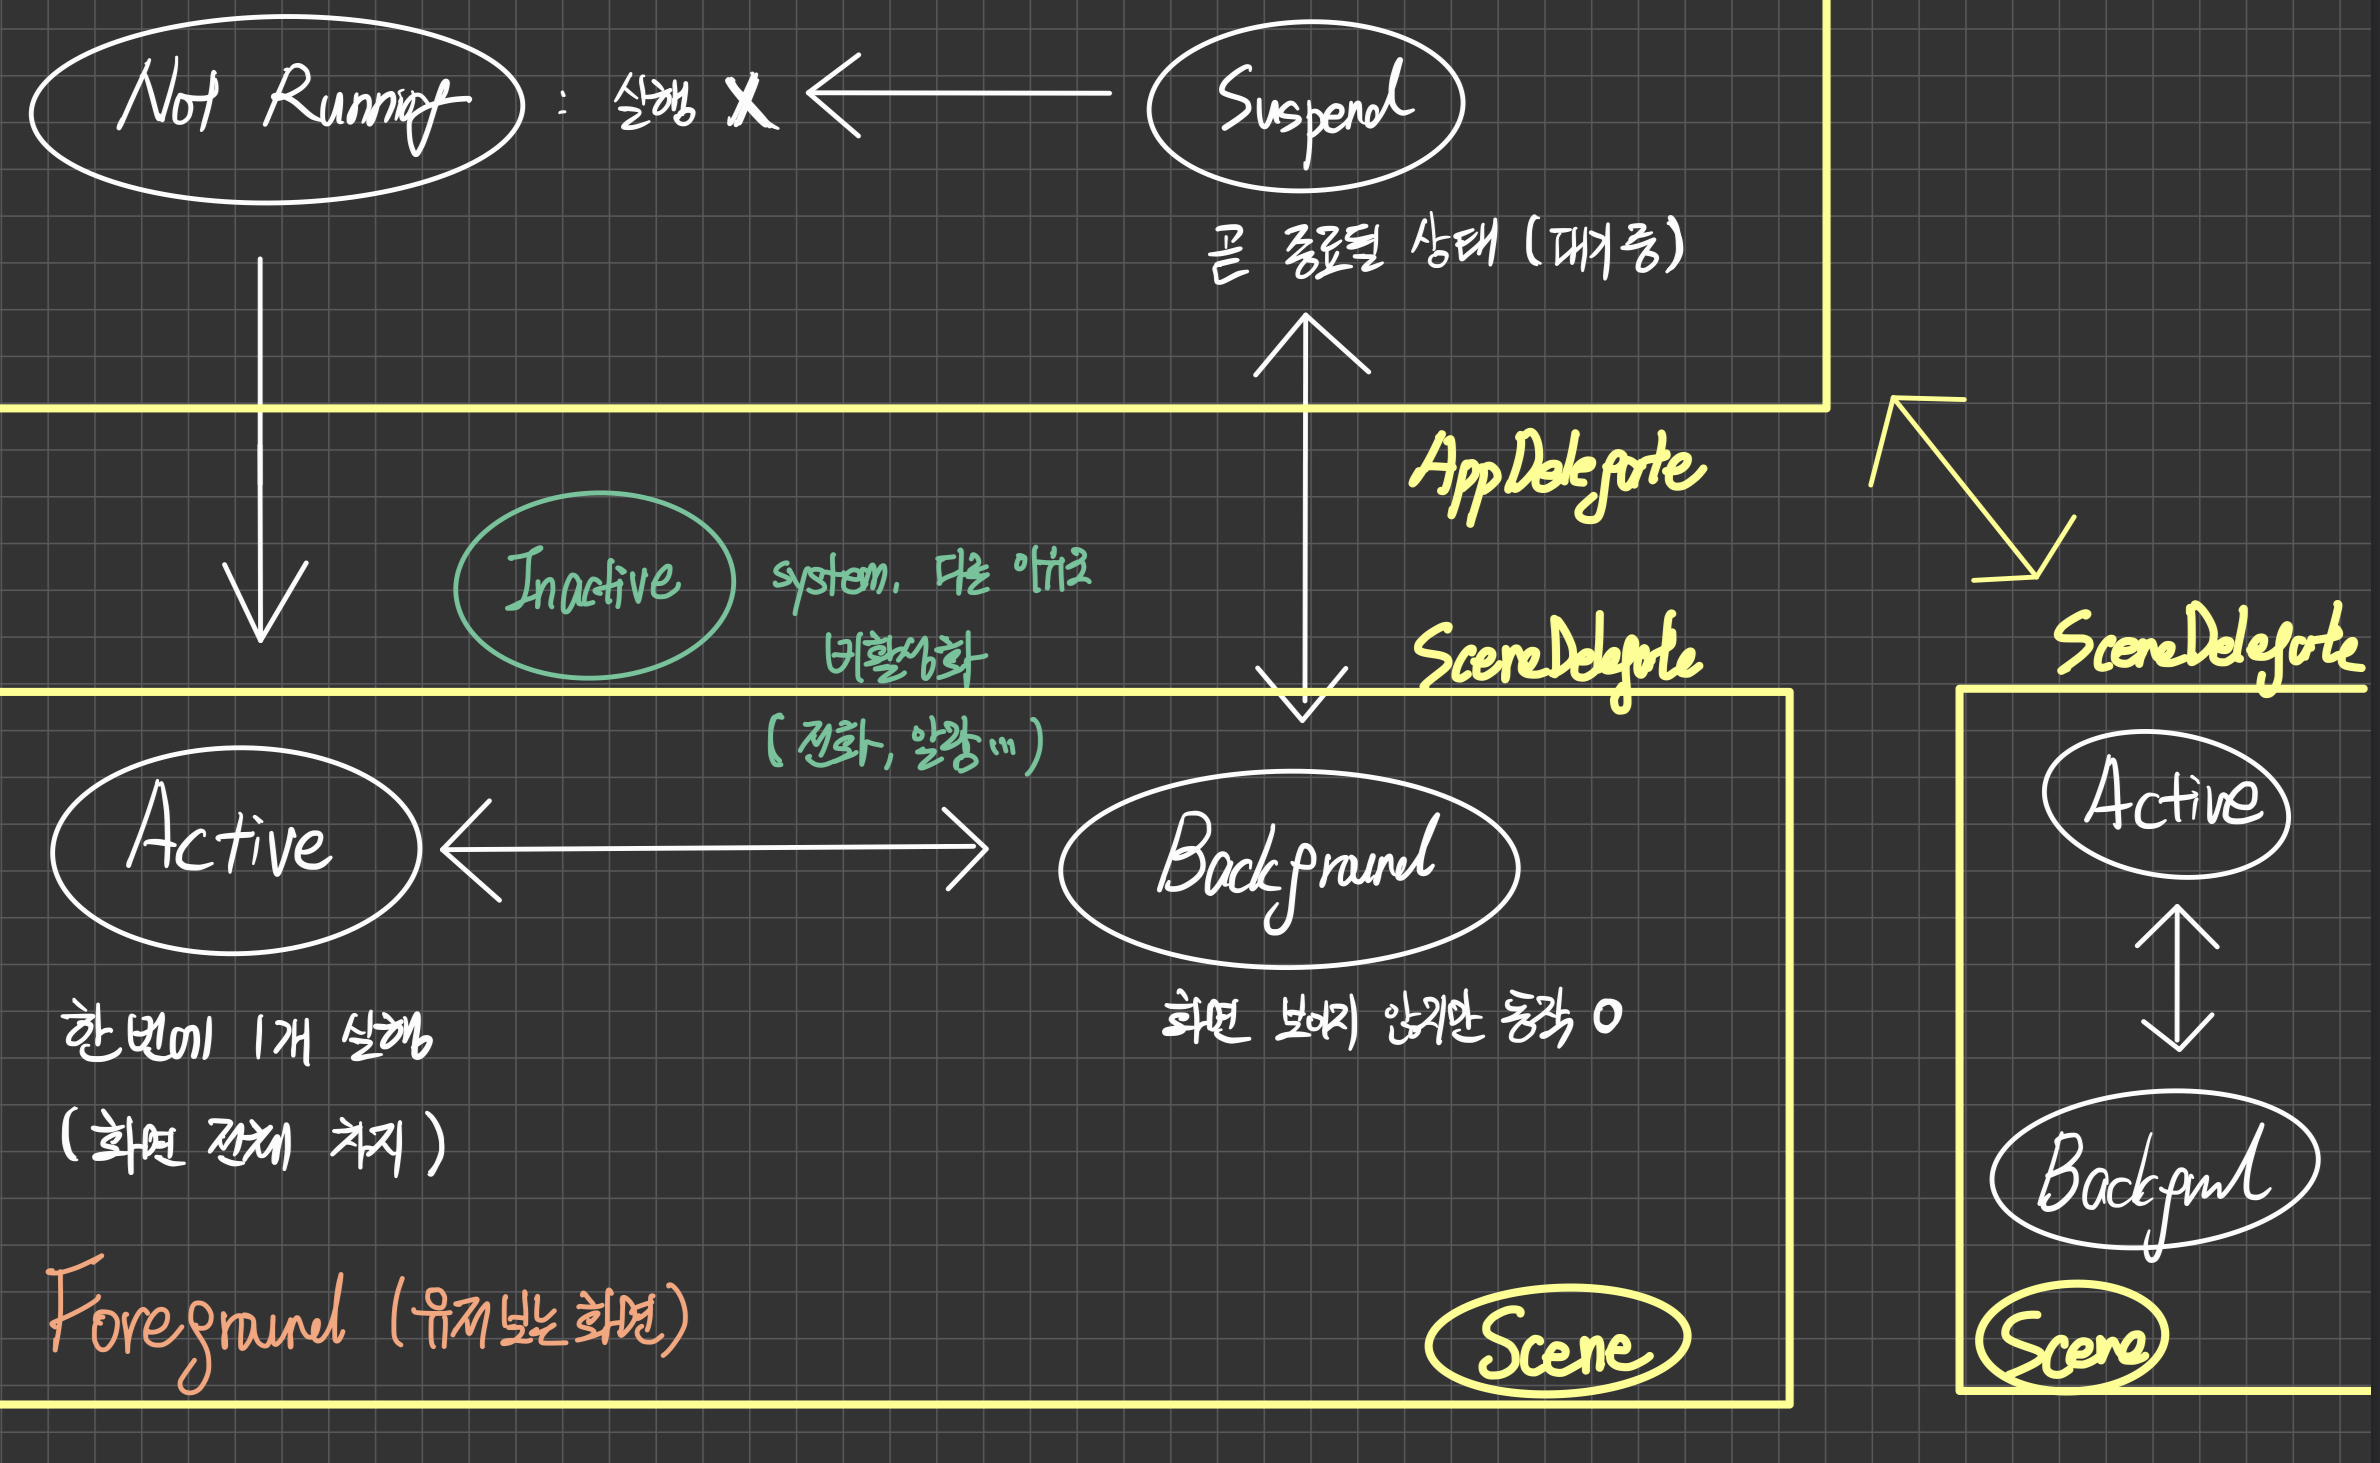
after iOS 13
동시에 여려 화면을 보여줄 수 있게 되자 다음과 같은 과정과 구조를 가지게 된다. 앱의 실행 상태에 따라 UI가 변하게 된다.
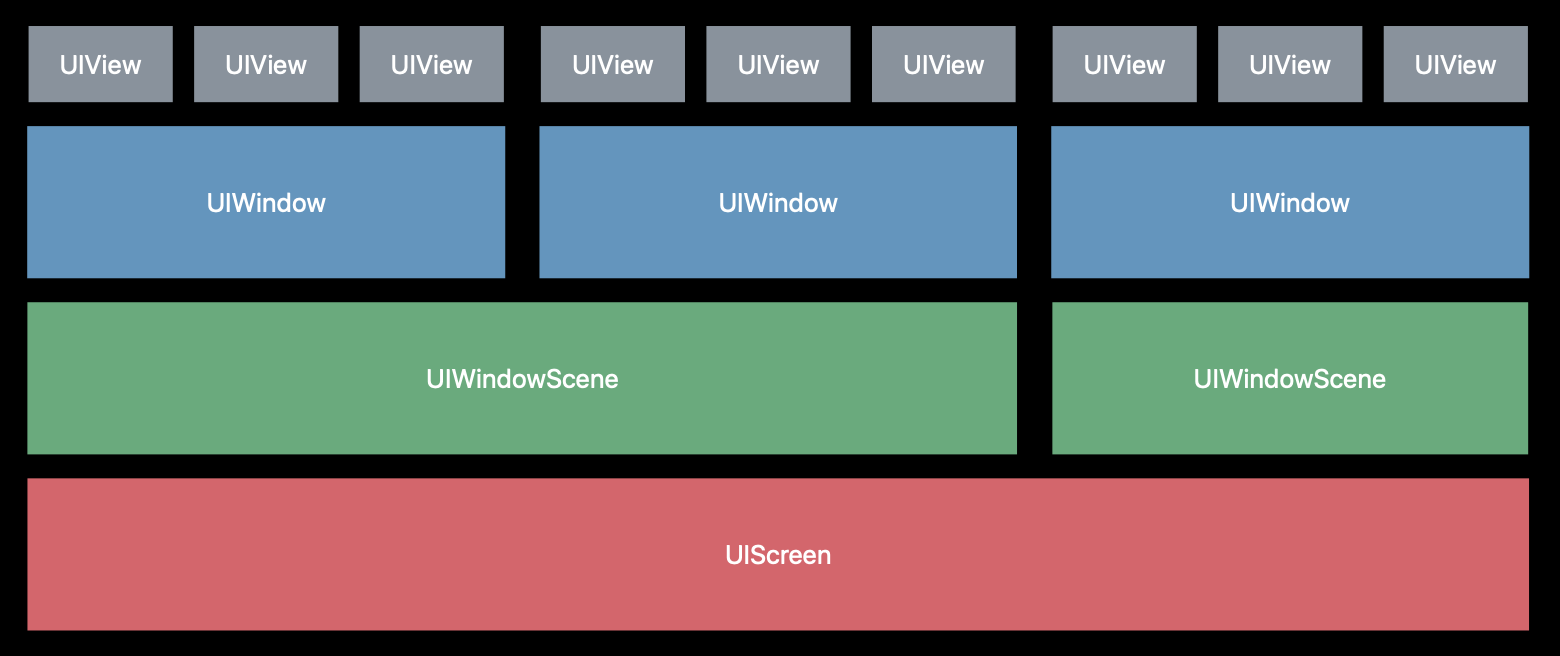
UIScene
UIScene
An object that represents one instance of your app’s user interface.
UIKit creates a scene object for each instance of your app’s UI that the user or your app requests. Every scene object has an associated delegate object, an object that adopts the UISceneDelegate protocol. When the state of the scene changes, the scene object notifies its delegate object and posts appropriate notifications to registered observer objects. Use the delegate object and notifications to respond to changes in the state of the scene.
앱을 실행해서 나타나는 각각의 화면을 그리고 있는 instance 이라고 봐도 무방할 듯 하다. 모든 UIScene은 SceneDelegate protocol을 만족하는 delegate를 통해 state에 update를 준다. UIScene은 앱의 생명주기 동안 session으로부터 연결되고 해제된다.
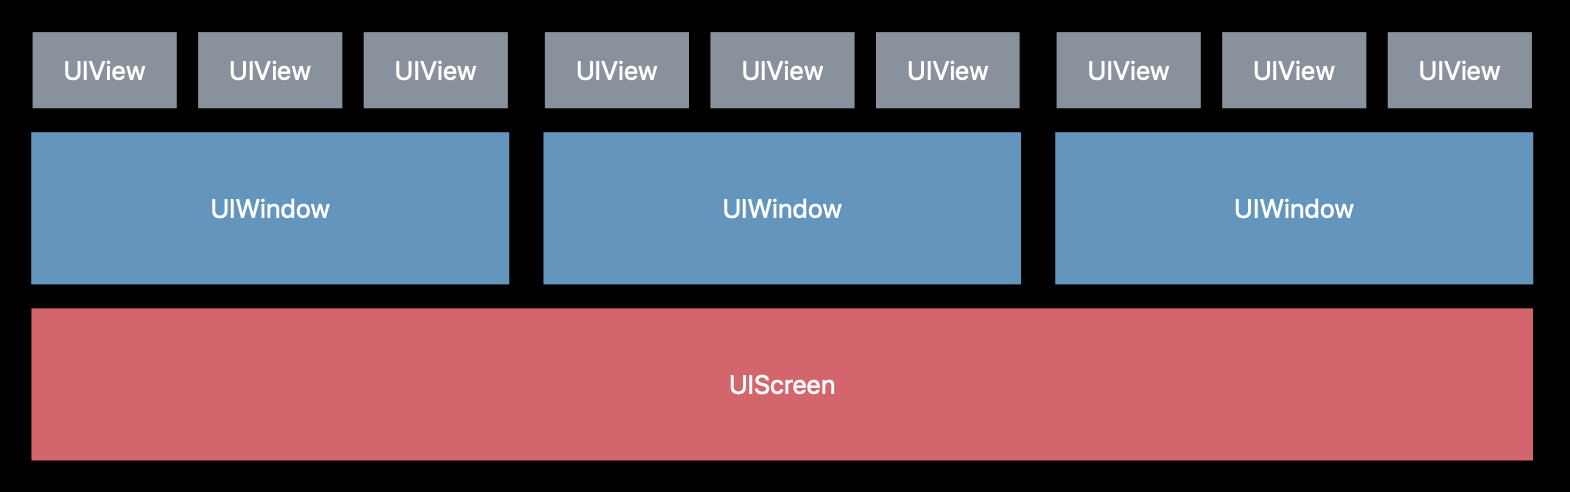
UIWindowScene
UIWindowScene
A scene that manages one or more windows for your app.
A UIWindowScene object manages one instance of your app’s UI, including one or more windows that you display from that scene. The scene object manages the display of your windows on the user’s device, and the life cycle of that scene as the user interacts with it. When the state of the scene changes, the scene object notifies its delegate object, which adopts the UIWindowSceneDelegate protocol. The scene also posts appropriate notifications to registered observers. Use the delegate object or notification observers to respond to any changes.
UIScene의 subclass로 윈도우 관리 역할을 한다.
UISceneSession
UISceneSession
An object that contains information about one of your app’s scenes.
A UISceneSession object manages a unique runtime instance of your scene. When the user adds a new scene to your app, or when you request one programmatically, the system creates a session object to track that scene. The session contains a unique identifier and the configuration details of the scene. UIKit maintains the session information for the lifetime of the scene itself, destroying the session in response to the user closing the scene in the app switcher.
앱의 scene에 대한 정보를 포함하고 있다. 저장된 인터페이스 state를 통해 유저가 마지막으로 보고 있던 화면을 기억해서 다시 띄우는 등의 작업을 할 때 활용된다. 매번 새로운 윈도우가 생성될 때, 혹은 종료될 때 AppDelegate가 app에게 새로운 session이 생성 혹은 제거되었다고 알린다.
이렇게 새로운 개념이 등장하고 새롭게 역할이 분화되면서 다음과 같은 분업화를 보여준다.
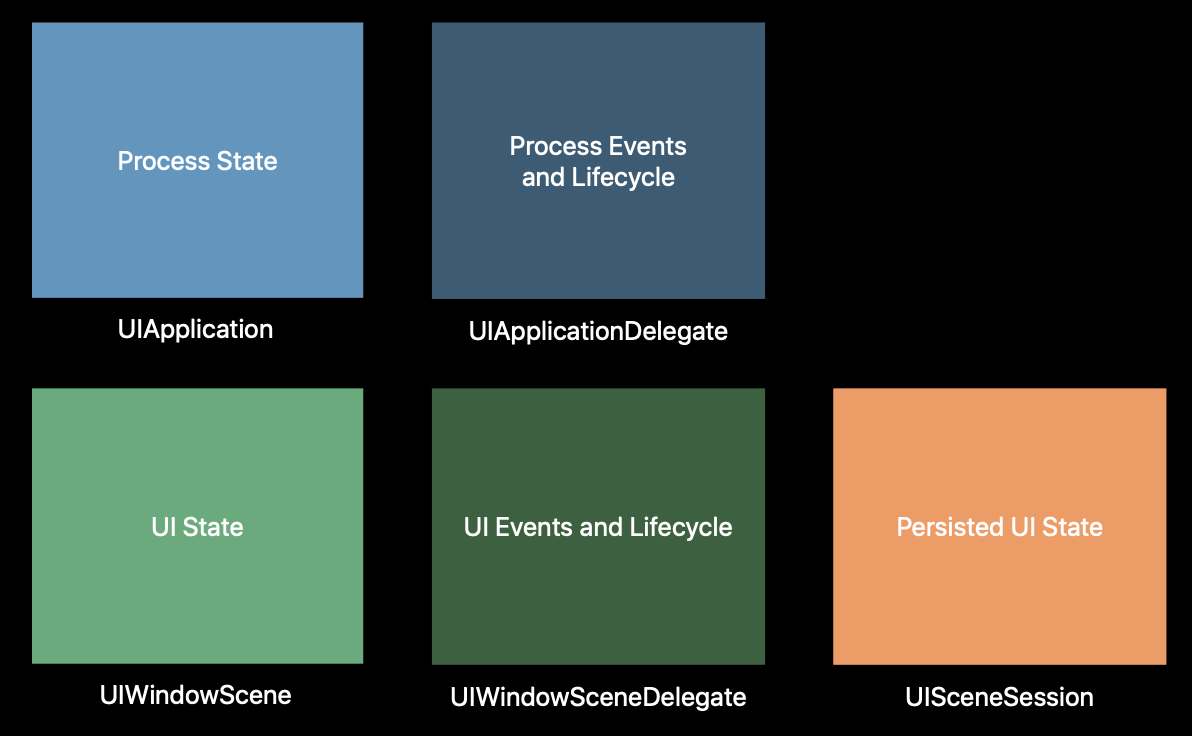
- Application: 시스템의 state
- AppDelegate: 앱의 lifecycle 중 이벤트와 delegate notification
- Scene: UIScene 포함
- SceneDelegate: Scene의 lifecycle (foreground, background state)
- SceneSession: 지속적인 UI state
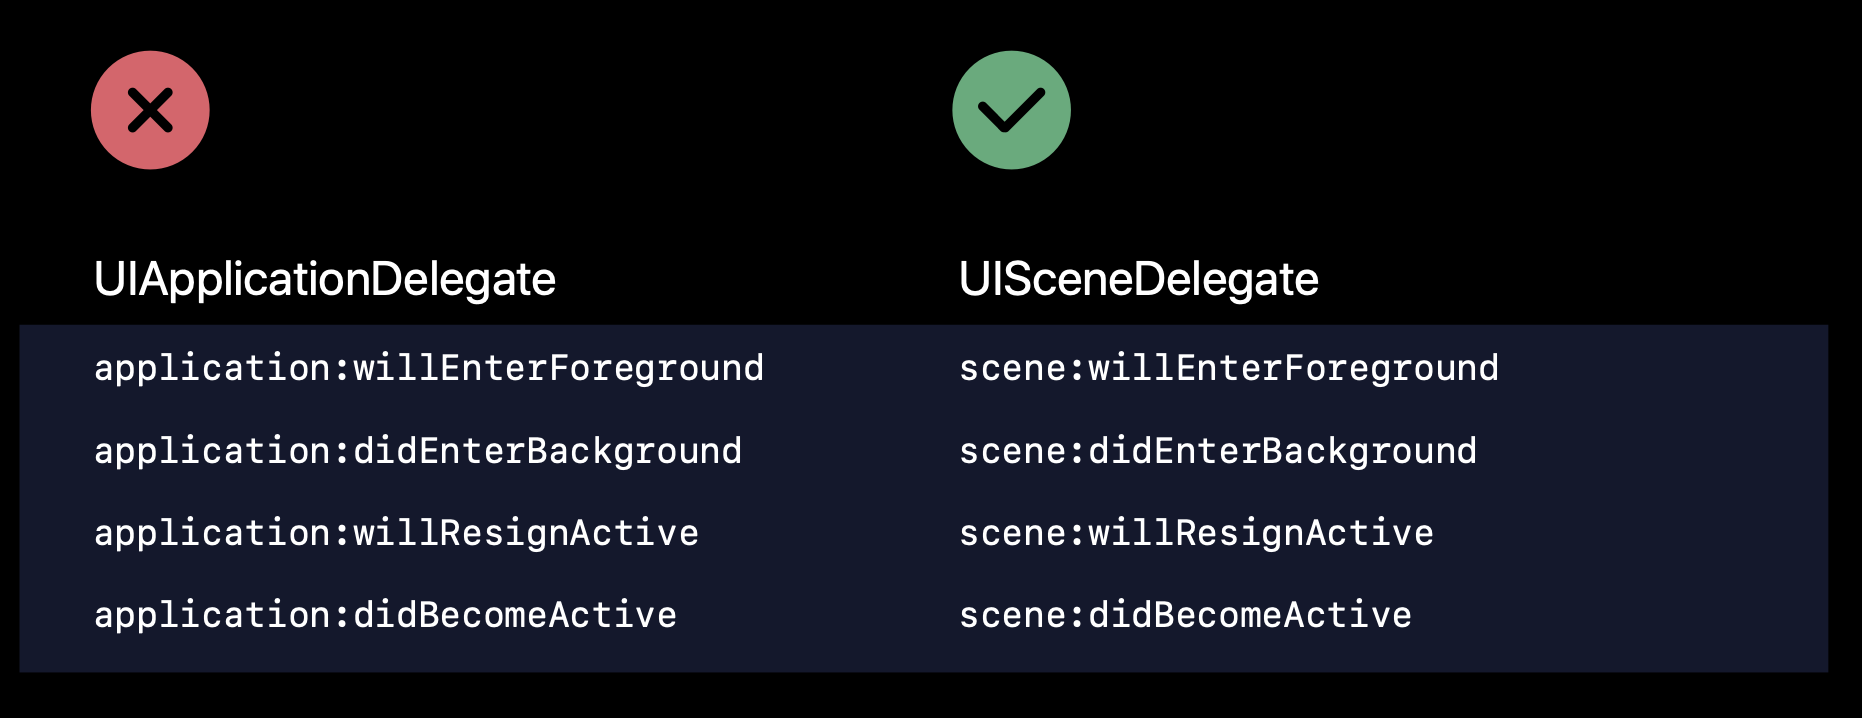
또한 기존의 AppDelegate에서 사용하던 method도 업데이트되었다.
과정
앱을 처음 실행하면 AppDelegate에서 didFinishLaunching 메서드 호출
func application(_ application: UIApplication, didFinishLaunchingWithOptions launchOptions: [UIApplication.LaunchOptionsKey: Any]?) -> Bool {
    // Override point for customization after application launch.
	return true
}
scene session을 생성할 때, UIScene에게 어떤 SceneDelegate와 storyboard, scene의 subclass를 이용해서 scene을 생성할 지configuration을 물어본다.
func application(_ application: UIApplication, configurationForConnecting connectingSceneSession: UISceneSession, options: UIScene.ConnectionOptions) -> UISceneConfiguration {
	// Called when a new scene session is being created.
    // Use this method to select a configuration to create the new scene with.
    return UISceneConfiguration(name: "Default Configuration", sessionRole: connectingSceneSession.role)
}
e.g.) main and accessory scene
상황에 맞는 scene을 선택하기 위해 name과 sessionRole로 선택
앱이 실행되면 SceneDelegate의 willConnectToSession이 실행됨
func scene(_ scene: UIScene, willConnectTo session: UISceneSession, options connectionOptions: UIScene.ConnectionOptions) {
    // Use this method to optionally configure and attach the UIWindow `window` to the provided UIWindowScene `scene`.
    // If using a storyboard, the `window` property will automatically be initialized and attached to the scene.
    // This delegate does not imply the connecting scene or session are new (see `application:configurationForConnectingSceneSession` instead).

    //for code works
    window = UIWindow(windowScene: scene as! UIWindowScene)

    if let activity = options.userActivities.first ?? session.stateRestorationActivity {
    	configure(window: window, with: acitivity)
    }

    //using storyboard
    guard let _ = (scene as? UIWindowScene) else { return }
}
initializer로 UIWindow를 생성한 뒤, activity를 확인해서 configuration을 진행.
예시의 경우 코드로 작업할 때이고, storyboard로 작업을 했다면 자동으로 연결이 된다고 한다.
앱을 사용하다 유저가 홈으로 돌아가기 위해 swipe up할 경우, willResignActive와 didEnterBackground가 호출된다.
func sceneWillResignActive(_ scene: UIScene) {
    // Called when the scene will move from an active state to an inactive state.
    // This may occur due to temporary interruptions (ex. an incoming phone call).
}

func sceneDidEnterBackground(_ scene: UIScene) {
    // Called as the scene transitions from the foreground to the background.
    // Use this method to save data, release shared resources, and store enough scene-specific state information
    // to restore the scene back to its current state.
}
실제로 앱이 메모리에서 해제될 때는 didDisconnect가 호출된다.
func sceneDidDisconnect(_ scene: UIScene) {
    // Called as the scene is being released by the system.
    // This occurs shortly after the scene enters the background, or when its session is discarded.
    // Release any resources associated with this scene that can be re-created the next time the scene connects.
    // The scene may re-connect later, as its session was not necessarily discarded (see `application:didDiscardSceneSessions` instead).
}
이 경우, scene과 연결된 SceneDelegate와 window 혹은 view hierarchies 모두 해제된다. scene이 다시 메모리로 올라올 때, 유저의 정보와 state는 동일하게 유지되어야 한다.
앱이 완전히 백그라운드에서 제거될 때는 AppDelegate의 didDiscardSceneSession이 호출된다.
func application(_ application: UIApplication, didDiscardSceneSessions sceneSessions: Set<UISceneSession>) {
    // Called when the user discards a scene session.
    // If any sessions were discarded while the application was not running, this will be called shortly after application:didFinishLaunchingWithOptions.
    // Use this method to release any resources that were specific to the discarded scenes, as they will not return.
}
앱을 완전히 종료하면 아직 저장하지 못한 입력값 등의 scene과 연관된 유저 데이터나 state들도 삭제될 수 있다.
만약 앱이 실행되지 않을 때 종료되는 경우, 다시 앱을 실행하고 나서 호출된다. 유저에겐 앱 리프레시처럼 보여질 수 있다.
앱이 종료되거나 백그라운드에서 메모리 해제되는 경우, 유저가 다시 foreground로 가져오면 마지막으로 사용했던 위치/상태로 돌아가면 사용자 경험에 도움을 줄 수 있다.
restoration이 구현되어 있지 않다면 새로 시작하면서 새로운 window를 생성한다. 이전에서 작업하던 내용들, 환경 세팅들이 모두 초기화될 것이다.
scene이 도입된 이후에는 scene을 기반으로 restoration을 구현해야 한다.
class SceneDelegate: UIResponder, UIWindowSceneDelegate {
	func stateRestorationActivity(for scene: UIScene) -> NSUserActivity? {
    	let currentActicit = fetchCurrentUserAcitivty(for: self.window)
        return currentActivity
    }

    func scene(_ scene: UIScene, willConnectTo session: UISceneSession, options: .ConnectionOptions) {
    	if let restorationActivity = session.stateRestorationActivity {
        	self.configure(window: window, with: restorationActivity)
    }
}
scene이 다시 foreground로 올라오면, session이 restorationActivity를 가지고 있는지 확인을 한다. 존재하면 해당 restoration을 불러오고, 존재하지 않다면 state가 없는 새로운 window를 생성한다.
그 외
동기화
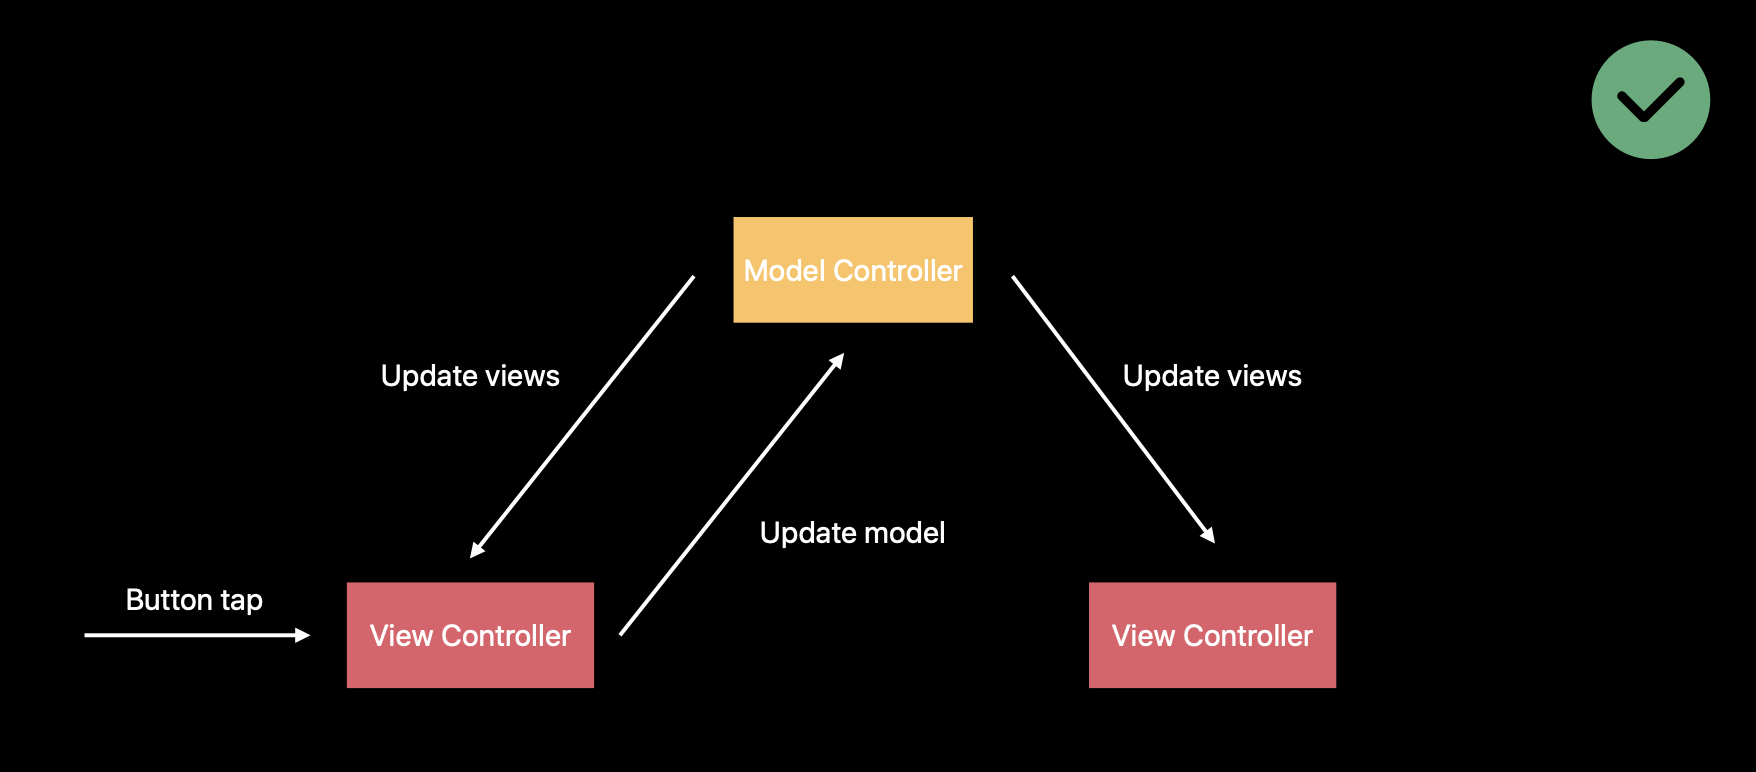
ViewController는 자기 자신 스스로 event를 받아서 UI update를 한 뒤, ModelController에 notification을 보낸다. ModelController가 연관된 다른 ViewController에게 notification을 보내기 전까지 다른 ViewController는 그 ViewController가 update를 했는지 여부를 알 수 없다.
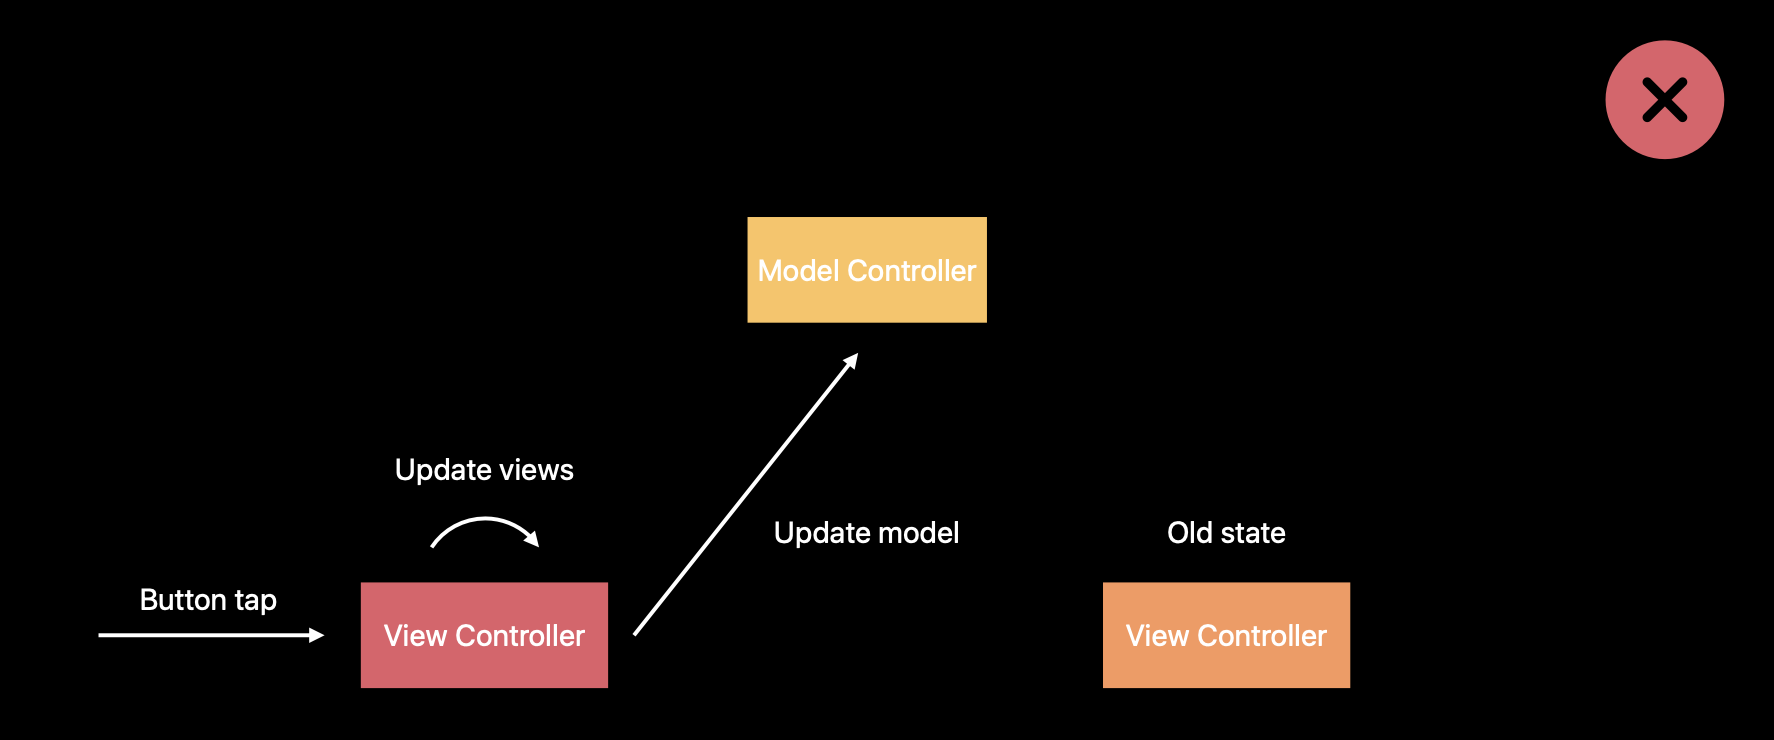
ModelController는 연관된 scene에게 update를 알려야 한다.
이를 위해 새로운 enum type을 활용한다.
enum UpdateEvent {
	case NewMessage(message: Message)

    //NSNotificationCenter for backing store
    static let NewMessageNotificationName = Notification.Name(rawValues: "NewMessage")

    func post() {
    	//Notify subscribers
        switch self {
       	case .NewMessage(message: _): NotificationCenter.default.post(name: UpdateEvent.NewMessageNotificationName, object: self)
        }
	}

}
update된 event를 object 자기 자신으로 전달하며 notification을 전달한다.
그러면 VC는 새로운 event를 인지하고 handler를 활용해서 update를 한다.
class ViewController: UIViewController {
	override func viewDidLoad() {
    	NotificationCenter.default.addObserver(selector: ..., name: .NewMessageNotificationName)
    }

    @objc func handleEvent(notification: Notification) {
    	let event = notification.object as! UpdateEvent

        switch event {
        case .NewMessage(message: newMessage):
        	//update UI
            self.animateNewRow(for: newMessage)
            self.updateUI()
        }
    }

}
참고