
Entry Point
프로그램이 시작하는 지점
- main:
OS가 메모리에 load되고 난 뒤, 응용프로그램을 실행할 때 진입할 주소
C언어를 비롯 많은 프로그래밍 언어에서 main 함수가 entry point 역할을 한다.
Mac용 프로그램에는 main.swift 파일이 포함되어 있지만 iOS용 프로그램에는 @UIApplication 혹은 @main을 활용하여 entry point 역할, 즉 main 함수 역할을 할 파일 위치를 알려준다.

@main을 지우면 다음과 같은 에러가 나타난다.

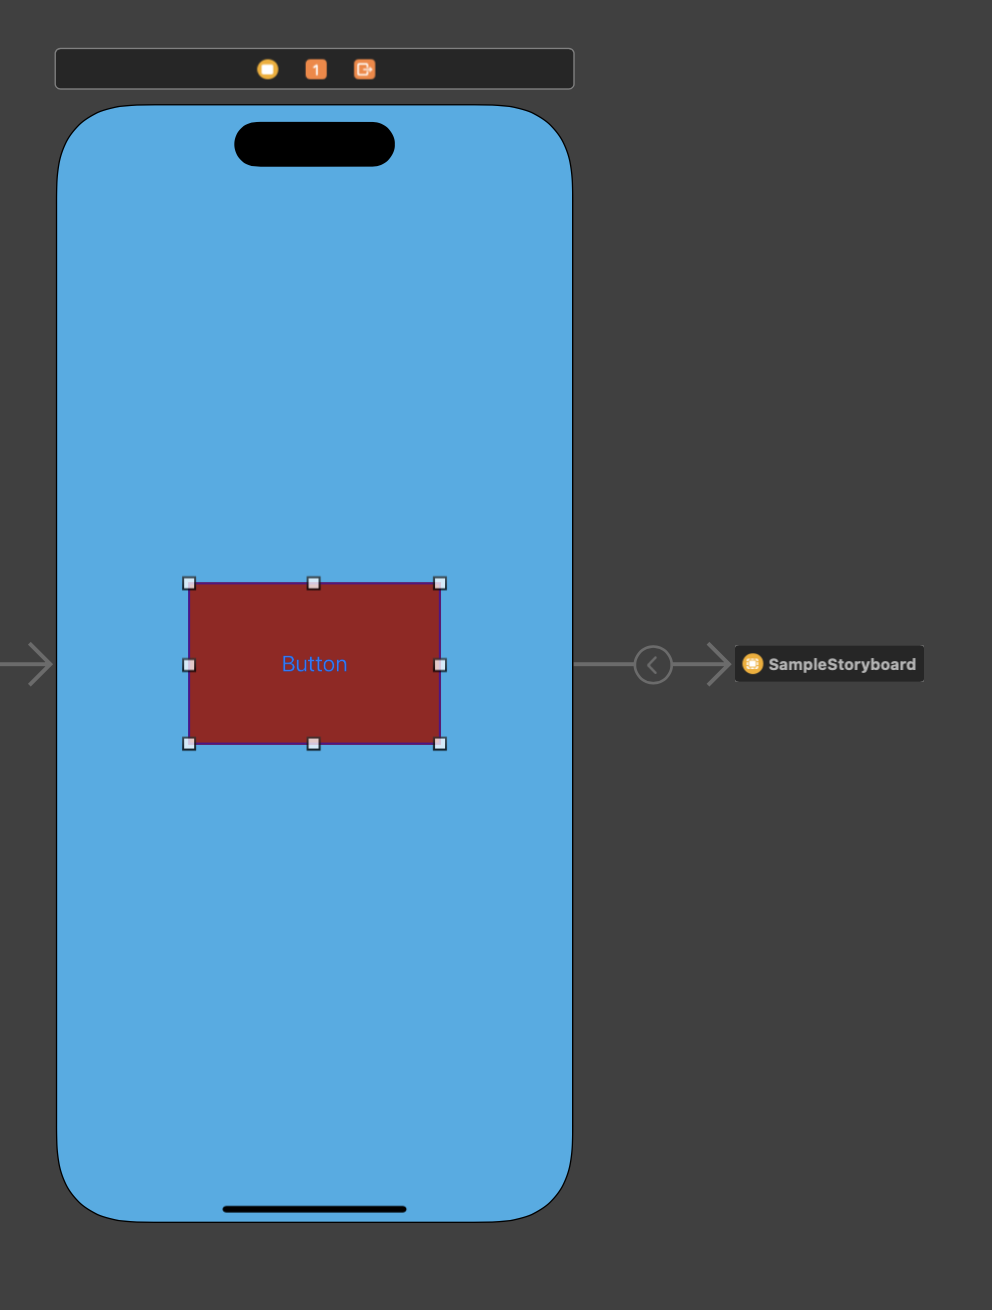
- Interface Builder:
LaunchScreen 이후 storyboard에서 가장 먼저 그려야할 화면(scene)을 가리키는 포인트
따라서 각 storyboard마다 entry point가 존재해야 한다.
존재하지 않으면 처음으로 그릴 화면의 주소를 알 수 없어 다음과 같은 에러가 나타난다.

참고
Entry Point란? Assembly Level까지 보기
Swift: Files and Initialization
User Defined Runtime Attributes
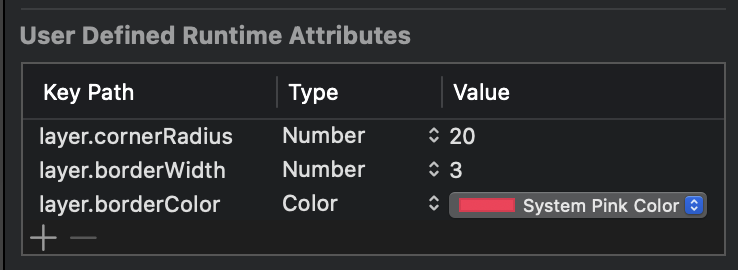
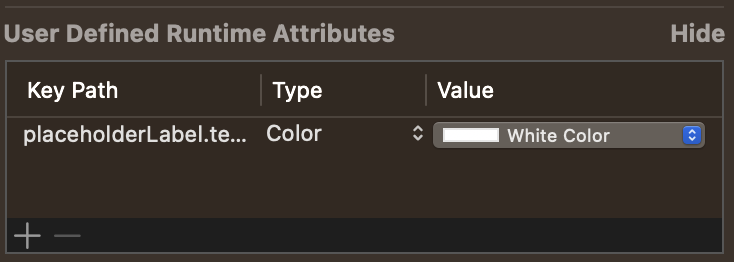
Identity Inspector 내 위치
컴파일 타임때는 적용되지 않지만 런타임때 작성한 내용들이 적용된다.
자주 있지는 않겠지만 코드 없이 순수 storyboard로 구성한 UI component들의 property 설정 때 활용한다.
현업에서 사용하는 경우가 있다고 한다.
UINavigationController
drill-down interface (embed)
계층적 화면 구성 구조를 나타낸다.
상위 root viewController에서 하위 child viewController로 이동하는 것을 push, 반대로 나오는 것을 pop으로 부른다. 따라서 NavigationStack을 이용하여 현재 보여지는 ViewController가 스택의 가장 상단에 위치한다.
(화면상 오른쪽 이동하며 push, 왼쪽 이동하며 pop)
따라서 child viewController로 이동하는 것은 root viewController를 discard하고 child viewController를 그리는 것이 아니라 root viewController 위에 child viewController가 올라오는 것이다.
반대로 pop하는 경우 child viewController를 스택에서 제거하는 방식이다.
UINavigationBarAppearance
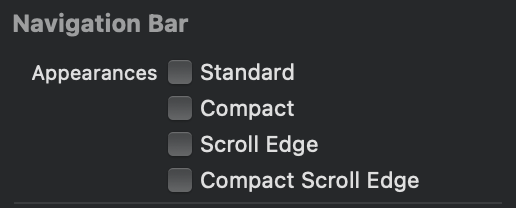
이전에는 bar tint와 같은 property를 적용하면 모든 상황에 동일하게 navigationbar에 적용이 되었다.
iOS 13 이후로는 각 상황에 맞는 navigationbar를 설정할 수 있다.
상황마다 각각 bar tint를 다르게 하는 등 property 설정을 다르게 할 수 있다.
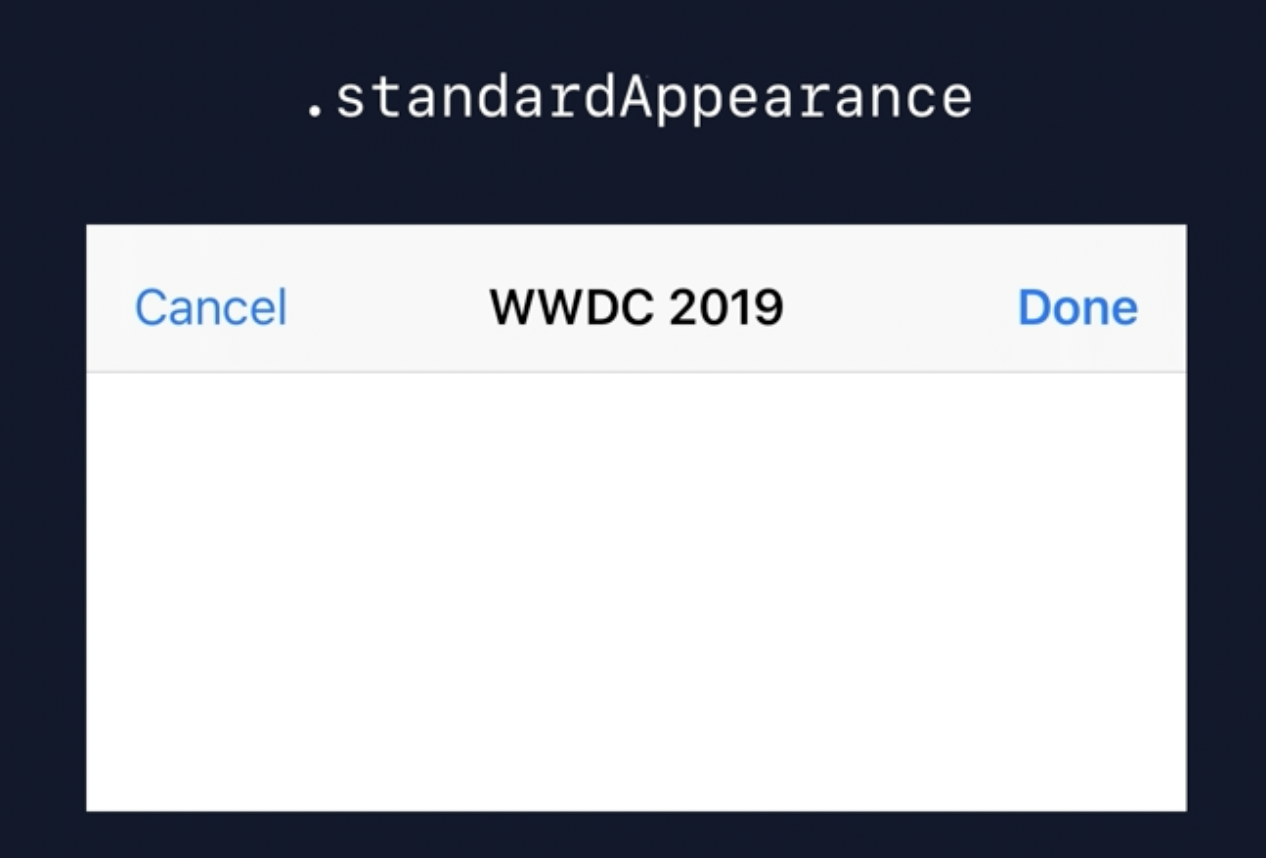
- standard
- portrait 모드 높이의 navigationbar
- large title을 활용하지 않는 경우
- navigationbar 밑의 contents를 보기 위한 스크롤 중 적용
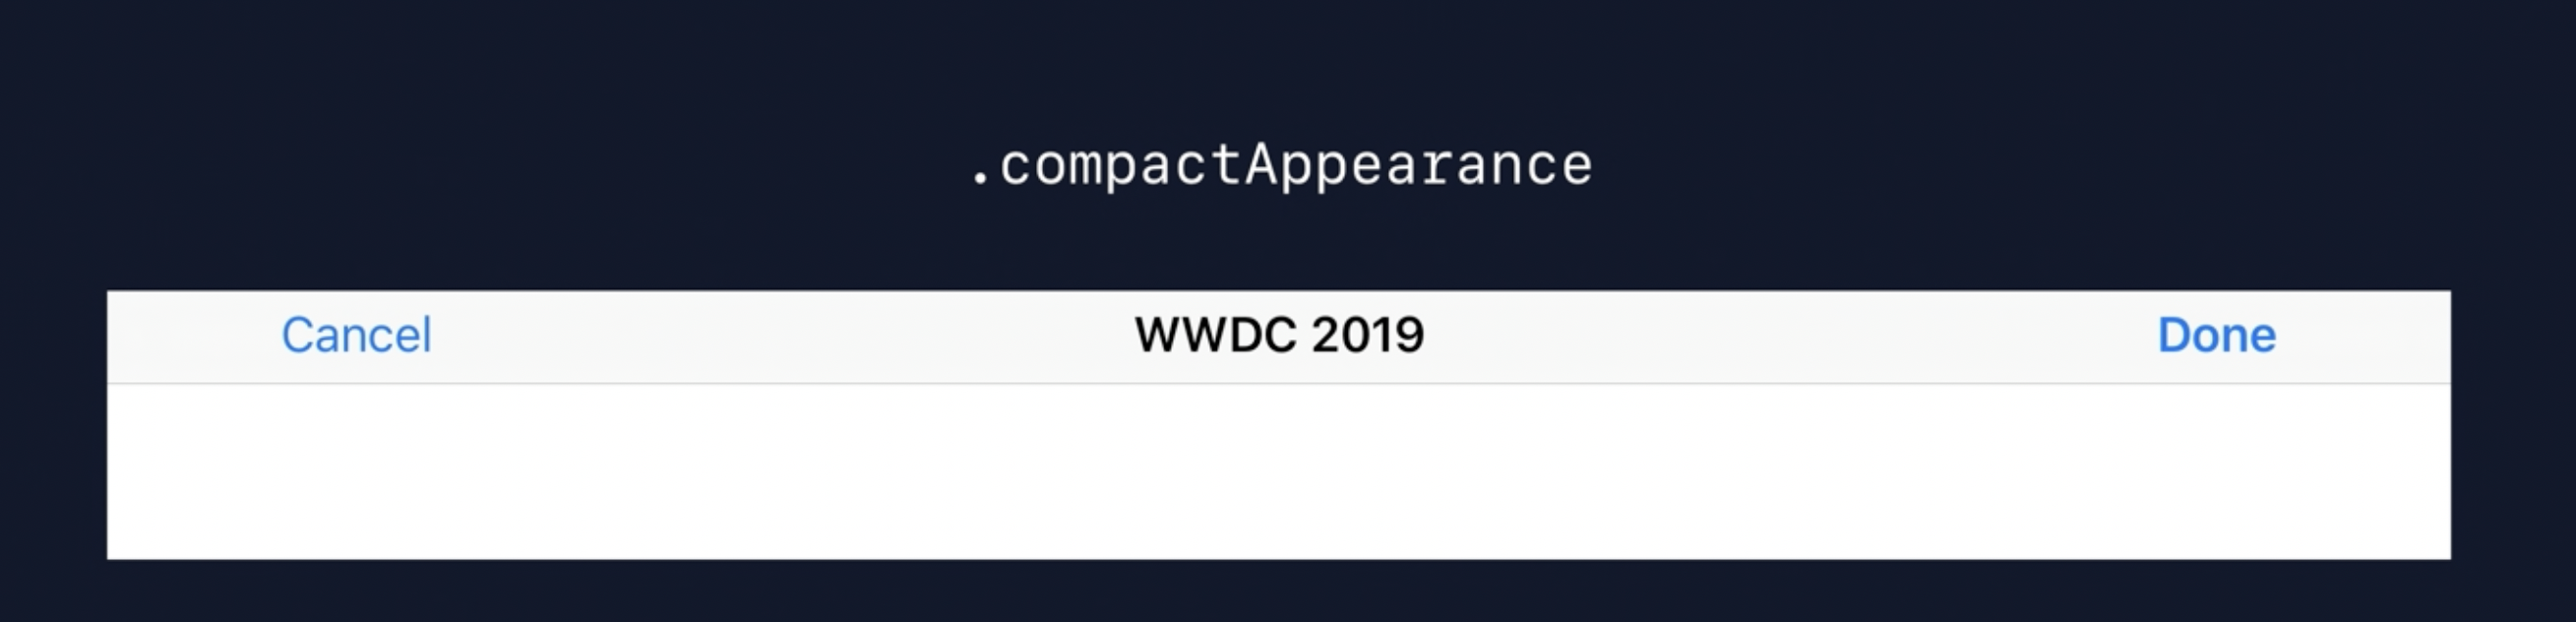
- compact
- landscape 모드 (가로모드) 높이의 navigationbar
- navigationbar 밑의 contents를 보기 위한 스크롤 중 적용
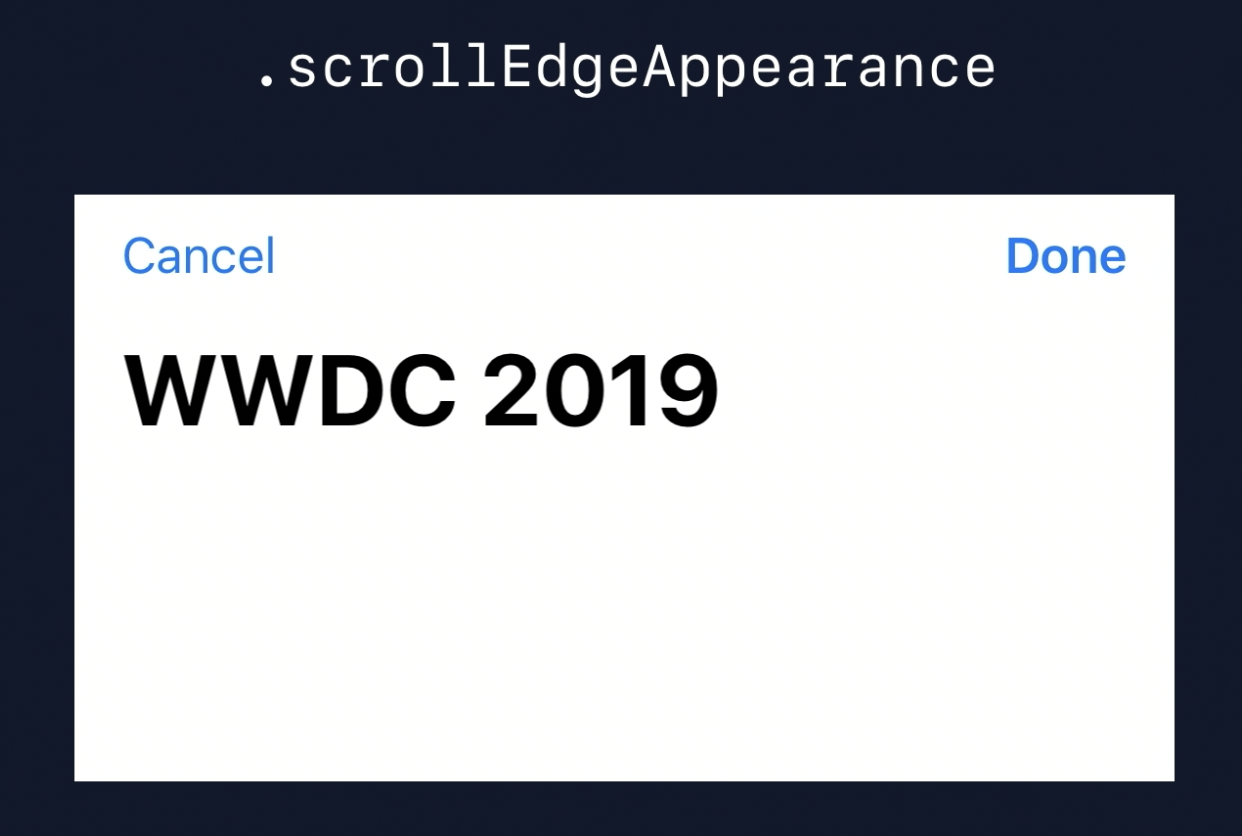
- scrollEdge
- portrait 모드에서 scrollView (혹은 이를 상속한 view)의 edge가 해당 bar에 도달하는 상황 (리스트의 상단 적용)
- large title이 설정되어야 함
compactAppearance와 scrollEdgeAppearance는 따로 설정이 되어 있지 않다면 standardAppearance의 설정을 가져다 활용한다.
- compactScrollEdge
- iOS 15부터 도입, scrollEdge의 활용도를 높임
- compactAppearance에서 scollView의 edge가 해당 bar에 도달하는 상황 (리스트의 상단 적용)
- large title을 활용하지 않는 경우
compactScrollEdge가 nil인 경우, scrollEdgeAppearance의 설정을 활용
아무 설정도 없는 경우, compactAppearance의 설정을 활용
참고
WWDC2019: Modernizing UI for iOS 13
UITabbarController
동일 레벨 view들
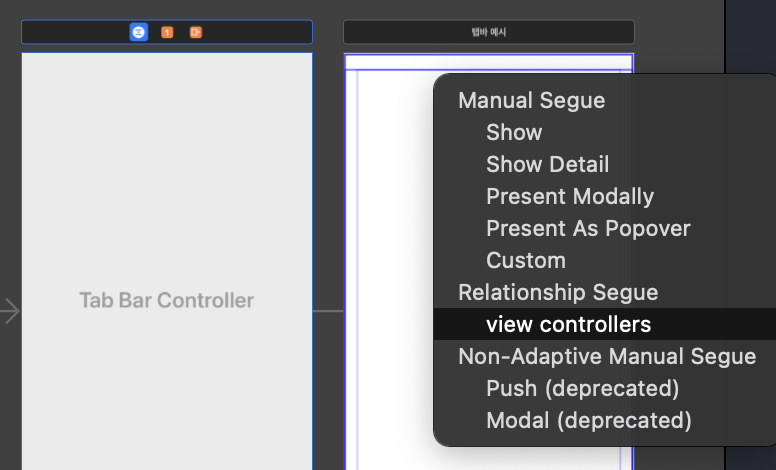
TabbarController를 각 ViewController와 연결할 때 다음과 같이 나타난다.
NavigationController와 다르게 tabbar 구성은 각 tab이 연결된 ViewController들의 hierarchy가 동일하다.
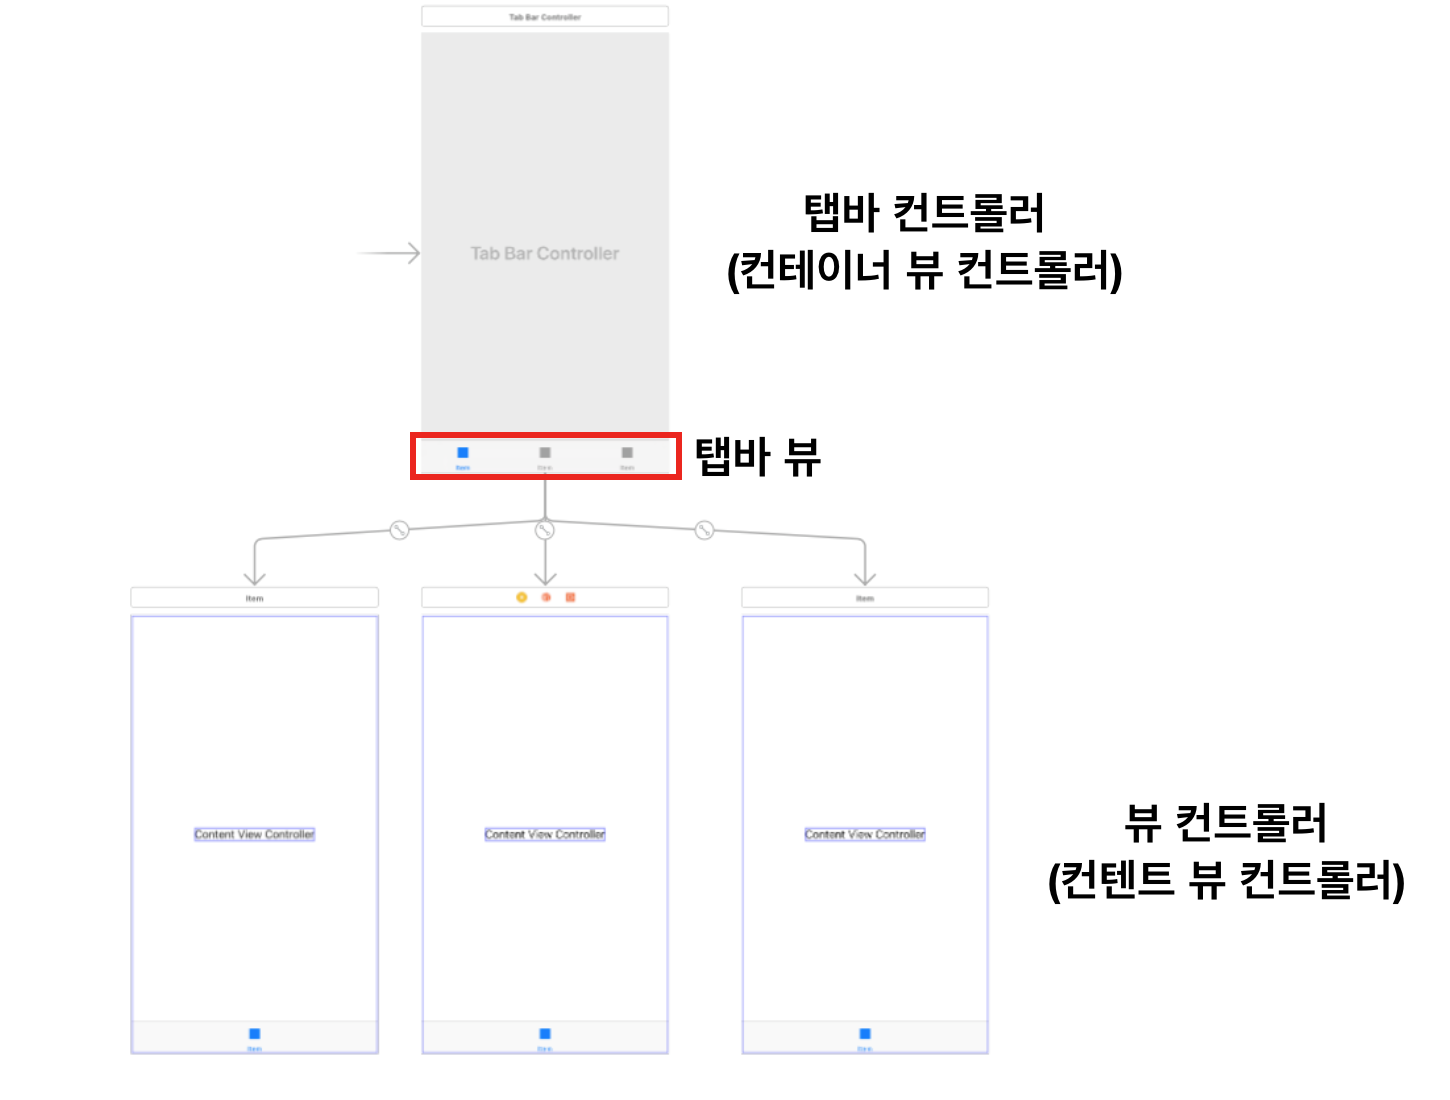
따라서 각 tab과 연결된 ViewController들이 해당 tab을 누를 때 load되는 것이 아니라 TabbarController가 load될 때 동시에 같이된다.
(수정: 2023.07.27)
개념을 다시 찾아보고 실제 view 생명주기 관련 함수 Print도 찍어보면 실제로는 첫번째 tab과 연결된 화면만 load된다.
나머지 tab과 연결된 화면들은 해당 tab이 눌릴 때 load된다.
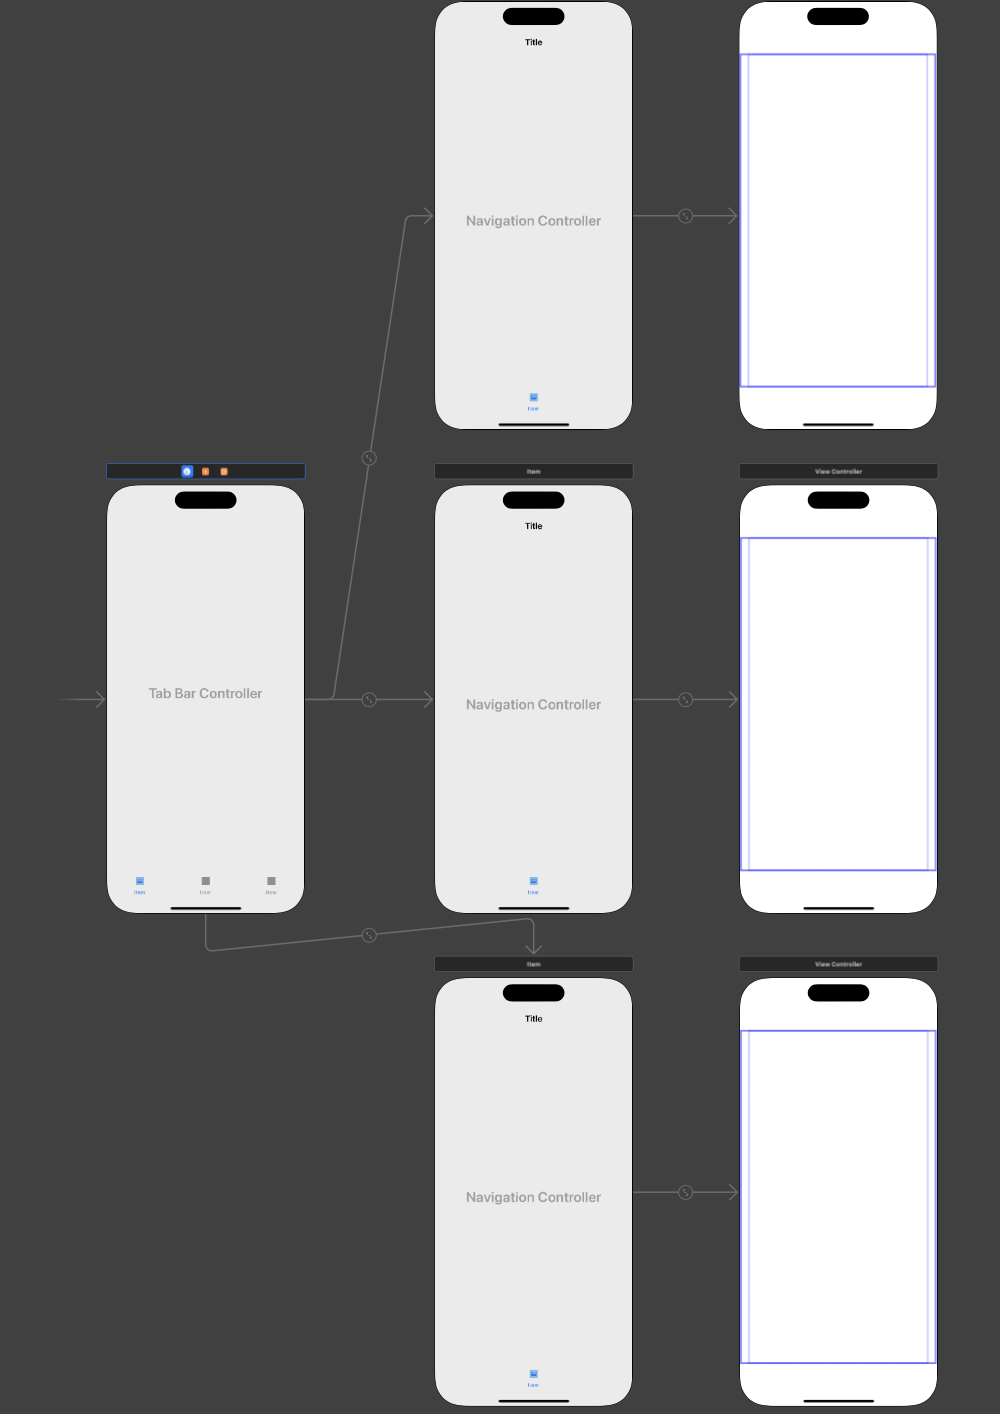
NavigationController와 같이 활용
이런 경우, NavigationController를 각 tab에서 활용하고 싶다면 다음과 같이 구성을 해야 한다.
tabbar의 개수 제한?
tabbar의 tab은 단일로는 5개까지 나타나며, 그 이상으로는 다음과 같이 tabbar가 재구성된다.
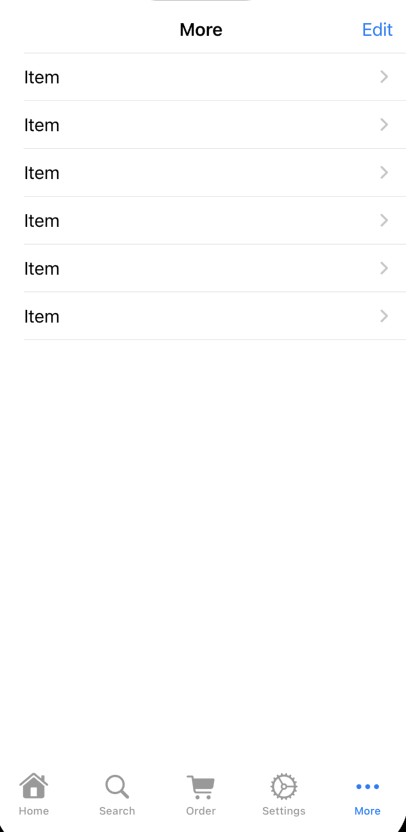
5번째 tab이 more로 나타나고, 거기서 연결된 각 ViewController로 이동하는 리스트가 나타난다.
UIButton의 Style
iOS 15부터 도입 (기존 legacy: defualt)
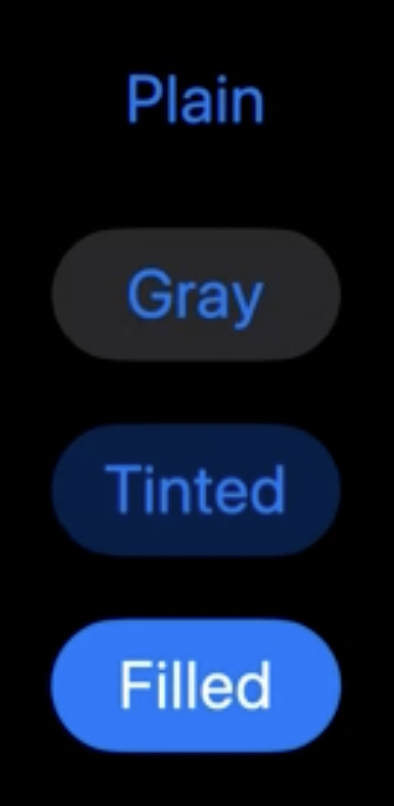
default: title 1줄 처리, image 크기 설정 가능
title의 위치 조정이 불가하므로 이미지 버튼 아래에 따로 label 설정해야 함
plain, gray, tinted, filled: title 여러줄 설정 가능, subTitle도 설정 가능, title padding으로 간격 및 placement로 위치 조정도 가능, but image 크기 설정 불가
UIButtonConfiguration
style을 설정한다면 property 설정은 configuration을 통해 진행할 수 있다.
let button = UIButton(type: .system)
var config = UIButton.Configuration.tinted()
config.title = "This is the button"
config.image = UIImage(named: "exampleButon")
config.imagePlacement = .trailing
button.configuration = config
//더 많은 설정도 가능
//default: backgroundColor
//config: baseForeground, baseBackgroun버튼이 눌릴 때 config 설정을 다르게 하고 싶은 경우 configurationUpdateHandler를 활용한다.
Button의 title을 얻으려는 경우
plain을 비롯한 style을 활용할 경우, currentTitle이 작동하지 않는 것을 알 수 있다.
(default: currentTitle, titleLabel.text 둘 다 얻을 수 있음)
currentTitle
The current title that is displayed on the button.
The value for this property is set automatically whenever the button state changes. For states that do not have a custom title string associated with them, this method returns the title that is currently displayed, which is typically the one associated with the normal state. The value may be nil.
currentTitle은 버튼의 현재 state에서의 title만 보여준다. 다른 state에서의 title 설정이 없다면 .normal의 title을 보여주지만 nil을 return할 수 있다.
titleLabel
A view that displays the value of the currentTitle property for a button.
titleLabel은 .normal state에서의 title을 보여주지만, button의 현재 state와 상관없이 .normal에서의 title을 보여준다. currentTitle property가 없으니 plain 스타일에선 titleLabel.text가 UI component로 올릴 때 기본 주어지는 Button이 될 것이다.
//button: reference to UIButton
//default vs. plain
override func viewDidLoad() {
super.viewDidLoad()
defaultButton.setTitle("Normal State", for: .normal)
defaultButton.setTitle("Selected State", for: .highlighted)
plainButton.setTitle("Normal State", for: .normal)
plainButton.setTitle("Selected State", for: .highlighted)
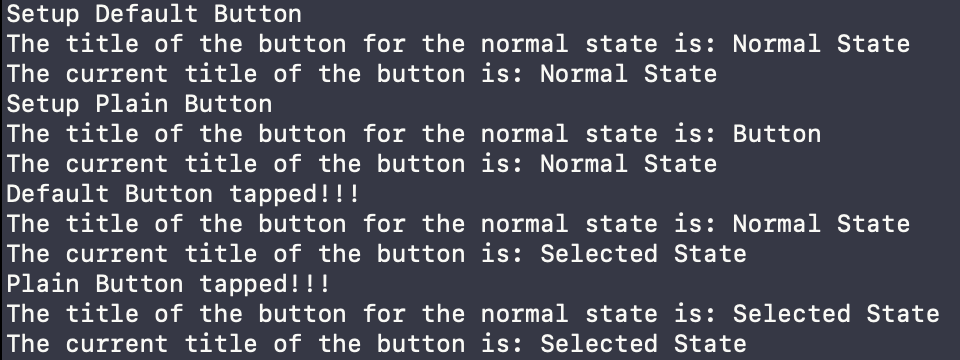
print("Setup Default Button")
if let normalTitle = defaultButton.titleLabel?.text {
print("The title of the button for the normal state is: \(normalTitle)")
} else {
print("The button does not have a title for the normal state.")
}
if let currentTitle = defaultButton.currentTitle {
print("The current title of the button is: \(currentTitle)")
} else {
print("The button does not have a title.")
}
print("Setup Plain Button")
if let normalTitle = plainButton.titleLabel?.text {
print("The title of the button for the normal state is: \(normalTitle)")
} else {
print("The button does not have a title for the normal state.")
}
if let currentTitle = plainButton.currentTitle {
print("The current title of the button is: \(currentTitle)")
} else {
print("The button does not have a title.")
}
}
@IBAction func defaultButtonTapped(_ sender: UIButton) {
print("Default Button tapped!!!")
if let normalTitle = sender.titleLabel?.text {
print("The title of the button for the normal state is: \(normalTitle)")
} else {
print("The button does not have a title for the normal state.")
}
if let currentTitle = sender.currentTitle {
print("The current title of the button is: \(currentTitle)")
} else {
print("The button does not have a title.")
}
}
@IBAction func plainButtonTapped(_ sender: UIButton) {
print("Plain Button tapped!!!")
if let normalTitle = sender.titleLabel?.text {
print("The title of the button for the normal state is: \(normalTitle)")
} else {
print("The button does not have a title for the normal state.")
}
if let currentTitle = sender.currentTitle {
print("The current title of the button is: \(currentTitle)")
} else {
print("The button does not have a title.")
}
}
titleLabel.text로 얻거나 button.configuration.title, 혹은 title(for:) 메서드로 얻을 수 있다.
(config로 버튼의 각 state에 따라 다른 text를 얻거나 설정할 수 있음)
참고
UI vs. CG
같은 color라도 UIColor와 CGColor
같은 image라도 UIImage와 CGImage
이렇게 UI와 CG로 시작하는 비슷하게 보이는 component들이 꽤 많아서 개념과 차이점 정도만 짚고 CG 쪽은 따로 다뤄보기로 하자.
"UIㅁㅁㅁ"는 말 그대로 유저 인터페이스, 유저가 상호작용하는 요소들을 담은 UIKit과 관련된 객체들을 나타낸다.
반면 "CGㅁㅁㅁ"는 CG, Core Graphics와 관련된 데이터들로, 화면을 실제로 그리는 Core Graphics Framework와 연관이 있다.
UIColor vs. CGColor
class UIColor : NSObject
class CGColor
UIColor
An object that stores color data and sometimes opacity.
CGColor
A set of components that define a color, with a color space specifying how to interpret them.
색상 정보를 다룬다는 점은 동일
UIColor는 객체, CGColor는 색상 정의하는 구성요소 집합
UIColor는 NSObject를 상속, CGColor는 CFTypeRef에서 비롯
(CFTypeRef: Core Foundation의 기본 타입)
(Core Foundation: iOS 계층 중 Core Services에 속하는 라이브러리)
일반적인 UI component의 색상을 구성할 때는 UIColor를 활용
CALayer를 비롯해 borderColor, cornerRadius와 같은 layer 요소들
즉 화면을 그리는 내용과 관련되면 CGColor를 활용해야 함
UIImage vs. CGImage
class UIImage : NSObject
class CGImage
UIImage
An object that manages image data in your app.
Because image objects are immutable, you can’t change their properties after creation.
Most image properties are set automatically using metadata in the accompanying image file or image data.
The immutable nature of image objects also means they’re safe to create and use from any thread.
You can retrieve the image data in other formats for use in your app.
Specifically, you can use the cgImage and ciImage properties to retrieve versions of the image that are compatible with Core Graphics and Core Image, respectively.
CGImage
A bitmap image or image mask.
color와 마찬가지로 image 데이터를 다룬다는 것은 동일
UIImage는 UIKit의 객체, CGImage는 비트맵 2D 이미지를 나타낸다.
UIImage는 데이터 안정을 위해 한번 생성되면 불변하는 특징을 지닌다. 이로 인해 이미지 변경을 위해선 CGImage 혹은 CIImage로 타입 변환해서 데이터를 변환한다.
그 후 다시 UIImage 객체를 생성하여 변경된 이미지를 화면에 그릴 수 있다.
CGImage는 Core Graphics에서 활용하는 Quartz 2D를 기반으로 비트맵 데이터를 가지고 있다. CPU 기반으로 연산되기에 크기가 클 수록 처리 속도가 느려진다.
참고: CIImage
CIImage
A representation of an image to be processed or produced by Core Image filters.
Although a CIImage object has image data associated with it, it is not an image. You can think of a CIImage object as an image “recipe.” A CIImage object has all the information necessary to produce an image, but Core Image doesn’t actually render an image until it is told to do so. This lazy evaluation allows Core Image to operate as efficiently as possible.
CIImage는 이미지가 아니다. CGImage가 비록 비트맵 이미지 데이터로 구성되어있지만 결국 이미지를 보여줘야 한다. CIImage는 객체이지만 이미지를 구성하는 온갖 데이터의 집합체라고 할 수 있다. 또한 실제 이미지를 생성하기 전까지 rendering 작업을 하지 않는다. CGImage보다 시간이 훨씬 적게 소요된다.
CIContext and CIImage objects are immutable, which means each can be shared safely among threads. Multiple threads can use the same GPU or CPU CIContext object to render CIImage objects.
UIImage와 마찬가지로 CIImage도 기본적으로 변경 불가하다. 하지만 변경 가능한 CIFilter를 활용하여 각 스레드마다 다른 필터를 먹일 수 있다. CPU와 GPU 동시 활용이 가능하다.
포폴로 만든 필터앱에서도 그렇고 CIImage는 CIFilter를 활용해서 이미지 데이터값에 필터링을 먹여 새로운 이미지로 활용할 수 있다. 굳이 말하자면 CIFilter용 이미지 데이터라고 할 수 있다.
CGSize, CGRect, CGPoint, CGFloat
CGSize
A structure that contains width and height values.
- var width: Double
A width value.- var height: Double
A height value.- static var zero: CGSize
The size whose width and height are both zero.- init()
Creates a size with zero width and height.
used to represent a distance vector, rather than a physical size. As a vector, its values can be negative.
width(너비)와 height(높이)만 설정하면 되는 구조체
CGRect와 다르게 사각형이라고 정해진 적은 없다.
CGRect
A structure that contains the location and dimensions of a rectangle.
- init(origin: CGPoint, size: CGSize)
Creates a rectangle with the specified origin and size.- init(x: Double, y: Double, width: Double, height: Double)
Creates a rectangle with coordinates and dimensions specified as floating-point values.- init(x: Int, y: Int, width: Int, height: Int)
Creates a rectangle with coordinates and dimensions specified as integer values.- init(x: CGFloat, y: CGFloat, width: CGFloat, height: CGFloat)
Creates a rectangle with coordinates and dimensions specified as CGFloat values.
In the default Core Graphics coordinate space, the origin is located in the lower-left corner of the rectangle and the rectangle extends towards the upper-right corner. If the context has a flipped-coordinate space—often the case on iOS—the origin is in the upper-left corner and the rectangle extends towards the lower-right corner.
사각형의 시작점 위치도 정해지지 않아서 (변수로 정해주지 않으면 (0,0)에서 시작하는 것으로 간주) 위치와 너비, 높이를 모두 정해줘야 함
CGPoint
A structure that contains a point in a two-dimensional coordinate system.
2차원 좌표계 점
x축, y축을 표현할 때 활용
CGFloat
The basic type for floating-point scalar values in Core Graphics and related frameworks.
The size and precision of this type depend on the CPU architecture. When you build for a 64-bit CPU, the CGFloat type is a 64-bit, IEEE double-precision floating point type, equivalent to the Double type. When you build for a 32-bit CPU, the CGFloat type is a 32-bit, IEEE single-precision floating point type, equivalent to the Float type.
CGFloat는 CPU의 비트 수에 따라 타입을 다르게 활용한다.
Float가 32bit, Double이 64bit이므로 CPU가 32bit면 Float로, 64bit면 Double로 처리를 한다.
현재는 모든 Apple 기기에서 32bit 지원이 종료되었으므로 64bit라고 생각해도 무방할 듯 하다.
단락 평가 (Short-Circuit Evaluation)
semantics of some Boolean operators in some programming languages in which the second argument is executed or evaluated only if the first argument does not suffice to determine the value of the expression
이항논리연산에서 첫번째 인수로 이미 논리연산 결과가 나오면 두번째 인수까지 계산하지 않는다. CPU의 효율적인 코드 처리를 위한 방식이다.
AND
첫번째 인수 결과가 False라면 두번째 인수 결과에 상관없이 논리연산 결과는 False이다.
OR
첫번째 인수 결과가 True라면 두번째 인수 결과에 상관없이 논리연산 결과는 True이다.
Nil-Coalescing Operator (병합 연산자)
var userName = userNameInput.text ?? "defaultUser"Optional String type의 userNameInput.text를 unwrap하여 할당하려는 값이 nil이 아니면 연산자 뒤의 "defaultUser" 값은 읽지 않는다.
Code Snippet
코드 자동완성 기능
Xcode에서 기본으로 주어지지만 사용자가 직접 만들 수도 있다.
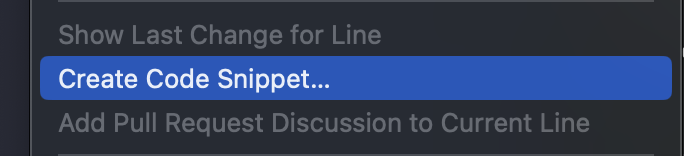
Snippet 이름과 설명을 작성하고 나면 실제 자동완성될 code를 작성한다.
회색 부분의 사용자가 직접 입력할 부분은 <#작성할내용#>으로 하면 자동으로 변환된다.
Completion은 실제 코드 에디터에서 입력하면 자동완성이 뜨도록 할 키워드들을 입력한다.
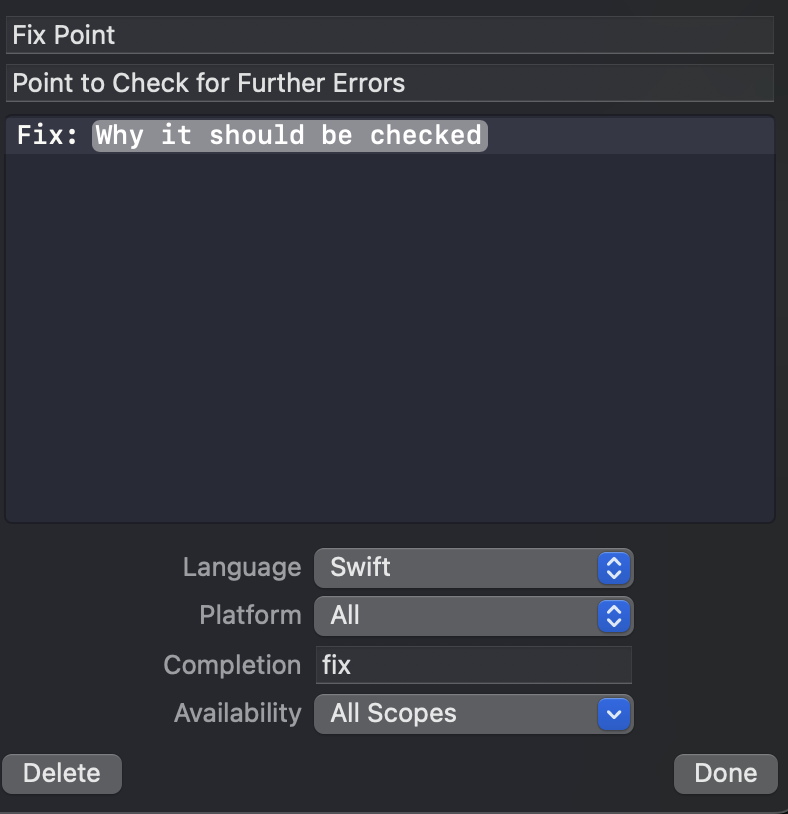
코드 자체를 따로 쓰기 싫어서 자동 입력되도록 코드만 붙일 수도 있다.
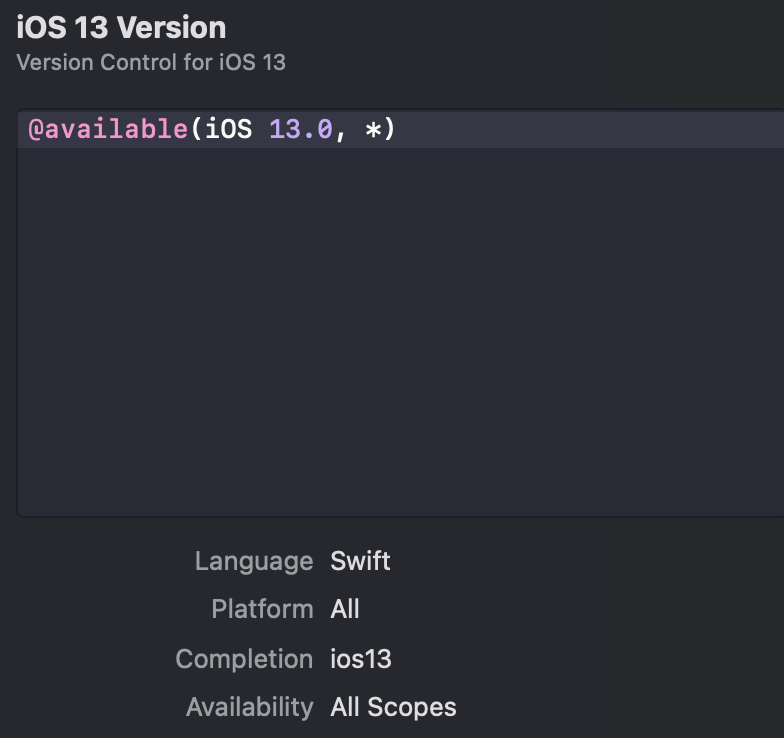
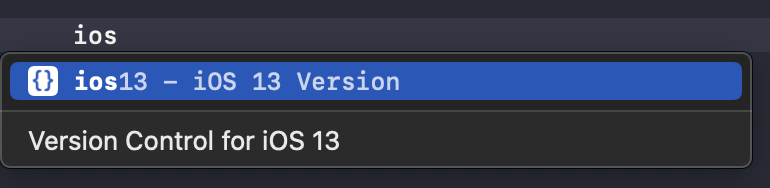
실제 코드 에디터에서는 다음과 같이 나타난다.
Alert
alert의 타입으로는 .alert와 .actionSheet가 존재한다.
let alert = UIAlertController(title: "This is Alert", message: "Alert type view", preferredStyle: .alert)
let actionSheet = UIAlertController(title: "This is ActionSheet", message: "ActionSheet type view", preferredStyle: .actionSheet)
관련 행동들은 AlertAction으로 생성해서 alert UIAlertController에 addAction을 해준다.
alert는 뒷 배경 누르는 행동을 허용하지 않기에 유저가 주의해야할 내용에서 활용
actionsheet는 허용
ActionSheet
ActionSheet는 주로 타이틀과 메시지를 활용하지 않고 액션 버튼들만 나타나도록 한다.
이 경우, title과 message에 nil값을 할당하면 된다.
한편 iPhone에서 설정한 actionsheet가 iPad에서 동작하지 않고 에러를 나타낼 수 있다.
Terminating app due to uncaught exception ‘NSGenericException’, reason: ‘Your application has presented a UIAlertController (<UIAlertController: 0x7f9d0ad52ca0>) of style UIAlertControllerStyleActionSheet. The modalPresentationStyle of a UIAlertController with this style is UIModalPresentationPopover. You must provide location information for this popover through the alert controller’s popoverPresentationController. You must provide either a sourceView and sourceRect or a barButtonItem. If this information is not known when you present the alert controller, you may provide it in the UIPopoverPresentationControllerDelegate method -prepareForPopoverPresentation.’
ActionSheet는 PopOver 스타일로, iPad에서 가로/세로 길이 모두를 활용할 수 없으므로 위치 조정 코드가 필요하다. 여기선 sourceView를 활용하기로 한다.
//화면 가운데에 ActionSheet 띄우기
if let popoverController = alertController.popoverPresentationController {
  popoverController.sourceView = self.view
  popoverController.sourceRect = CGRect(x: self.view.bounds.midX, y: self.view.bounds.midY, width: 0, height: 0)
  popoverController.permittedArrowDirections = []
}
AlertActionType
AlertAction은 addAction 순서대로 붙음
.destructive, .default, .cancel 3가지 타입이 존재한다.
하지만 cancle type만은 ActionSheet의 경우 아래쪽에 고정되며 text가 bold type으로 강조하는 효과를 줄 수 있다.
따라서 type만 cancel로 설정하고 실제 내용은 다르게 설정할 수 있다.
let confirm = UIAlertAction(title: "확인", style: .cancel)cancel type은 1개만 가질 수 있다. 여럿을 추가하면 에러가 발생한다.

참고
ActionSheet Popover on iPad in Swift
함수
메서드, 클로저 등의 확장하는 개념은 차후 정리하기로 하고 오늘은 함수 자체의 정의나 구성, 활용도에 대해 정리해보자.
모듈화
구조나 효율성을 고려하지 않고 모든 코드를 ViewController 하나에 다 작성해도 앱은 작동한다.
동일한 작업을 여러번 반복하거나, 활용할 재료들이 매번 달라지지만 적용할 요소들이 동일한 경우, 일반화/추상화를 통해 따로 분리해놓으면 그 기능을 사용할 때마다 분리해놓은 작업 모음을 가져다가 활용만 하면 된다.
"따로 분리해놓는 것"을 "모듈화"라고 하며 독립적으로 처리하는 부분으로 구조화해서 재사용하는 것이 목적이기에 코드/데이터 관리에 유용하다.
예를 들어 앱 화면에 검은색 바탕선의 이미지 200개를 그려야 한다고 하자.
만약 한바닥에 모든 코드를 작성했다면 각 imageView의 image 설정 및 borderWith와 borderColor 설정으로 코드 600줄이 나올 것이다.
하지만 함수로 imageView 처리를 한다면 다음과 같을 것이다.
func setupImageView(imageView: UIImageView, image: UIImage) {
	imageView.image = image
    imageView.layer.cornerBorder = UIColor.black.cgColor
    imageView.layer.cornerWidth = 1
}

class ViewController: UIViewController {

//중략

    override func viewDidLoad() {
    	super.viewDidLoad()
        configImageView()
	}

    func configImageView() {
    	//imageView가 Outlet Collection으로 연결 가정
        //이미지 데이터는 array로 저장 가정
        var i = 0
        for imageView in imageViews {
        	setupImageView(imageView: imageView, image: imageArray[i])
            i += 1
		}
    }
}
향후 바탕선 색을 변경해야 하는 경우, 전자처럼 한번에 다 적은 경우, borderColor 코드 200줄을 직접 수정해야 하지만 함수로 모듈화한 경우, 함수의 borderColor 코드 1줄만 수정하면 200개의 borderColor가 모두 변경된다.
parameter & argument
혼용해서 사용하는 경우도 다반사이지만, 구분하면 다음과 같다.
- parameter: 함수 정의 시, 전달받는 것
- argument: 함수 호출 시, 전달하는 것(실질적인 값)
매개변수
함수에서 변수를 활용할 때 매개변수를 나눠서 활용할 수 있다.
func example(argumentLabel parameterName: Any) {
	parameterName.layer.clipsToBounds = true
}

example(argumentLabel: argumentExample)- 외부 매개변수 (argument label): 외부에서 함수 호출 시 사용, 전달인자 보충설명
- 내부 매개변수 (parameter name): 함수 내부에서 실행 시 사용, 외부에서 알 수 없음
외부 매개변수를 활용하지 않을 거면 외부 매개변수를 "_" (wildcard 식별자)로 작성하면 된다.
func example(_ onlyParameterName: Any) {
	onlyParameterName.layer.clipsToBounds = true
}

example(noArgumentLabelExample)
매개변수 기본값 활용
매개변수를 전달할 때, 항상 전달된다는 보장이 없다면 두가지로 설정할 수 있다.
- 매개변수를 Optional type으로 설정
이 경우, nil값도 전달할 수 있으며 매개변수는 force unwrapping을 무조건 하지 않는 한 안전하게 함수 실행을 할 수 있다.
func example(_ parameter: Int?) {
	print(parameter)
}

example(nil)			//Optional(nil)
example(2)				//Optional(2)
- 매개변수에 기본값 설정
nil-coalescing처럼 값이 없는 경우 자체를 허용하지 않겠다는 맥락과 유사하다.
함수 호출 시, 변수를 따로 전달하지 않으면 설정한 기본값을 활용하겠다는 의미이다. 변수와 기본값은 Optional일 수도, 아닐 수도 있다.
func example(_ parameter: String? = "guest") {
	print("Hello world and you, \(parameter)!")
}

example()			//Hello world and you, guest!
example("sesac")	//Hello world and you, sesac!
print 함수를 살펴보자
func print(
    _ items: Any...,
    separator: String = " ",
    terminator: String = "\n"
)
print 함수를 호출할 때, items에는 Any type을 전달해야 하지만, separator와 terminator는 따로 할당하지 않으면 separator에 " "을, terminator에 "\n"을 할당해서 실행하겠다는 의미이다.
호출
함수 정의가 완료되었다면 실제 수행 과정에서 필요한 상황에 함수의 이름으로 호출하면 된다.
@IBAction 함수들의 경우도 동일하다. 이 때 argument로는 해당 Action과 IBOutlet으로 연결된 UI component를 넣으면 된다.
e.g.) DatePicker로 사용자가 날짜를 직접 tap해야 action 함수를 호출한다.
하지만 앱을 실행하자마자 사용하는 그 날짜부터 action 함수가 적용되길 희망한다.
이 경우, viewDidLoad에서 해당 IBAction 함수를 호출하면 된다.
@IBOutlet weak var datePicker: UIDatePIcker!

override func viewDidLoad() {
	super.viewDidLoad()
    datePickerTapped(datePicker)
}

@IBAction func datePickerTapped(_ sender: UIDatePicker) {
	//날짜 계산
}
다른 함수에서도 마찬가지로 IBAction 함수 호출이 가능하다.
e.g.) 추천 버튼을 누르면 textField에서 키보드 엔터를 누른 것과 같은 효과를 주고 싶음
@IBOutlet weak var textField: UITextField!
@IBOutlet weak var adButton: UIButton!
//중략
@IBAction func textFieldEnterKey(_ sender: UITextField) { }
@IBAction func adButtonTapped(_ sender: UIButton) {
textField.text = sender.currentTitle
textFieldEnterKey(textField)
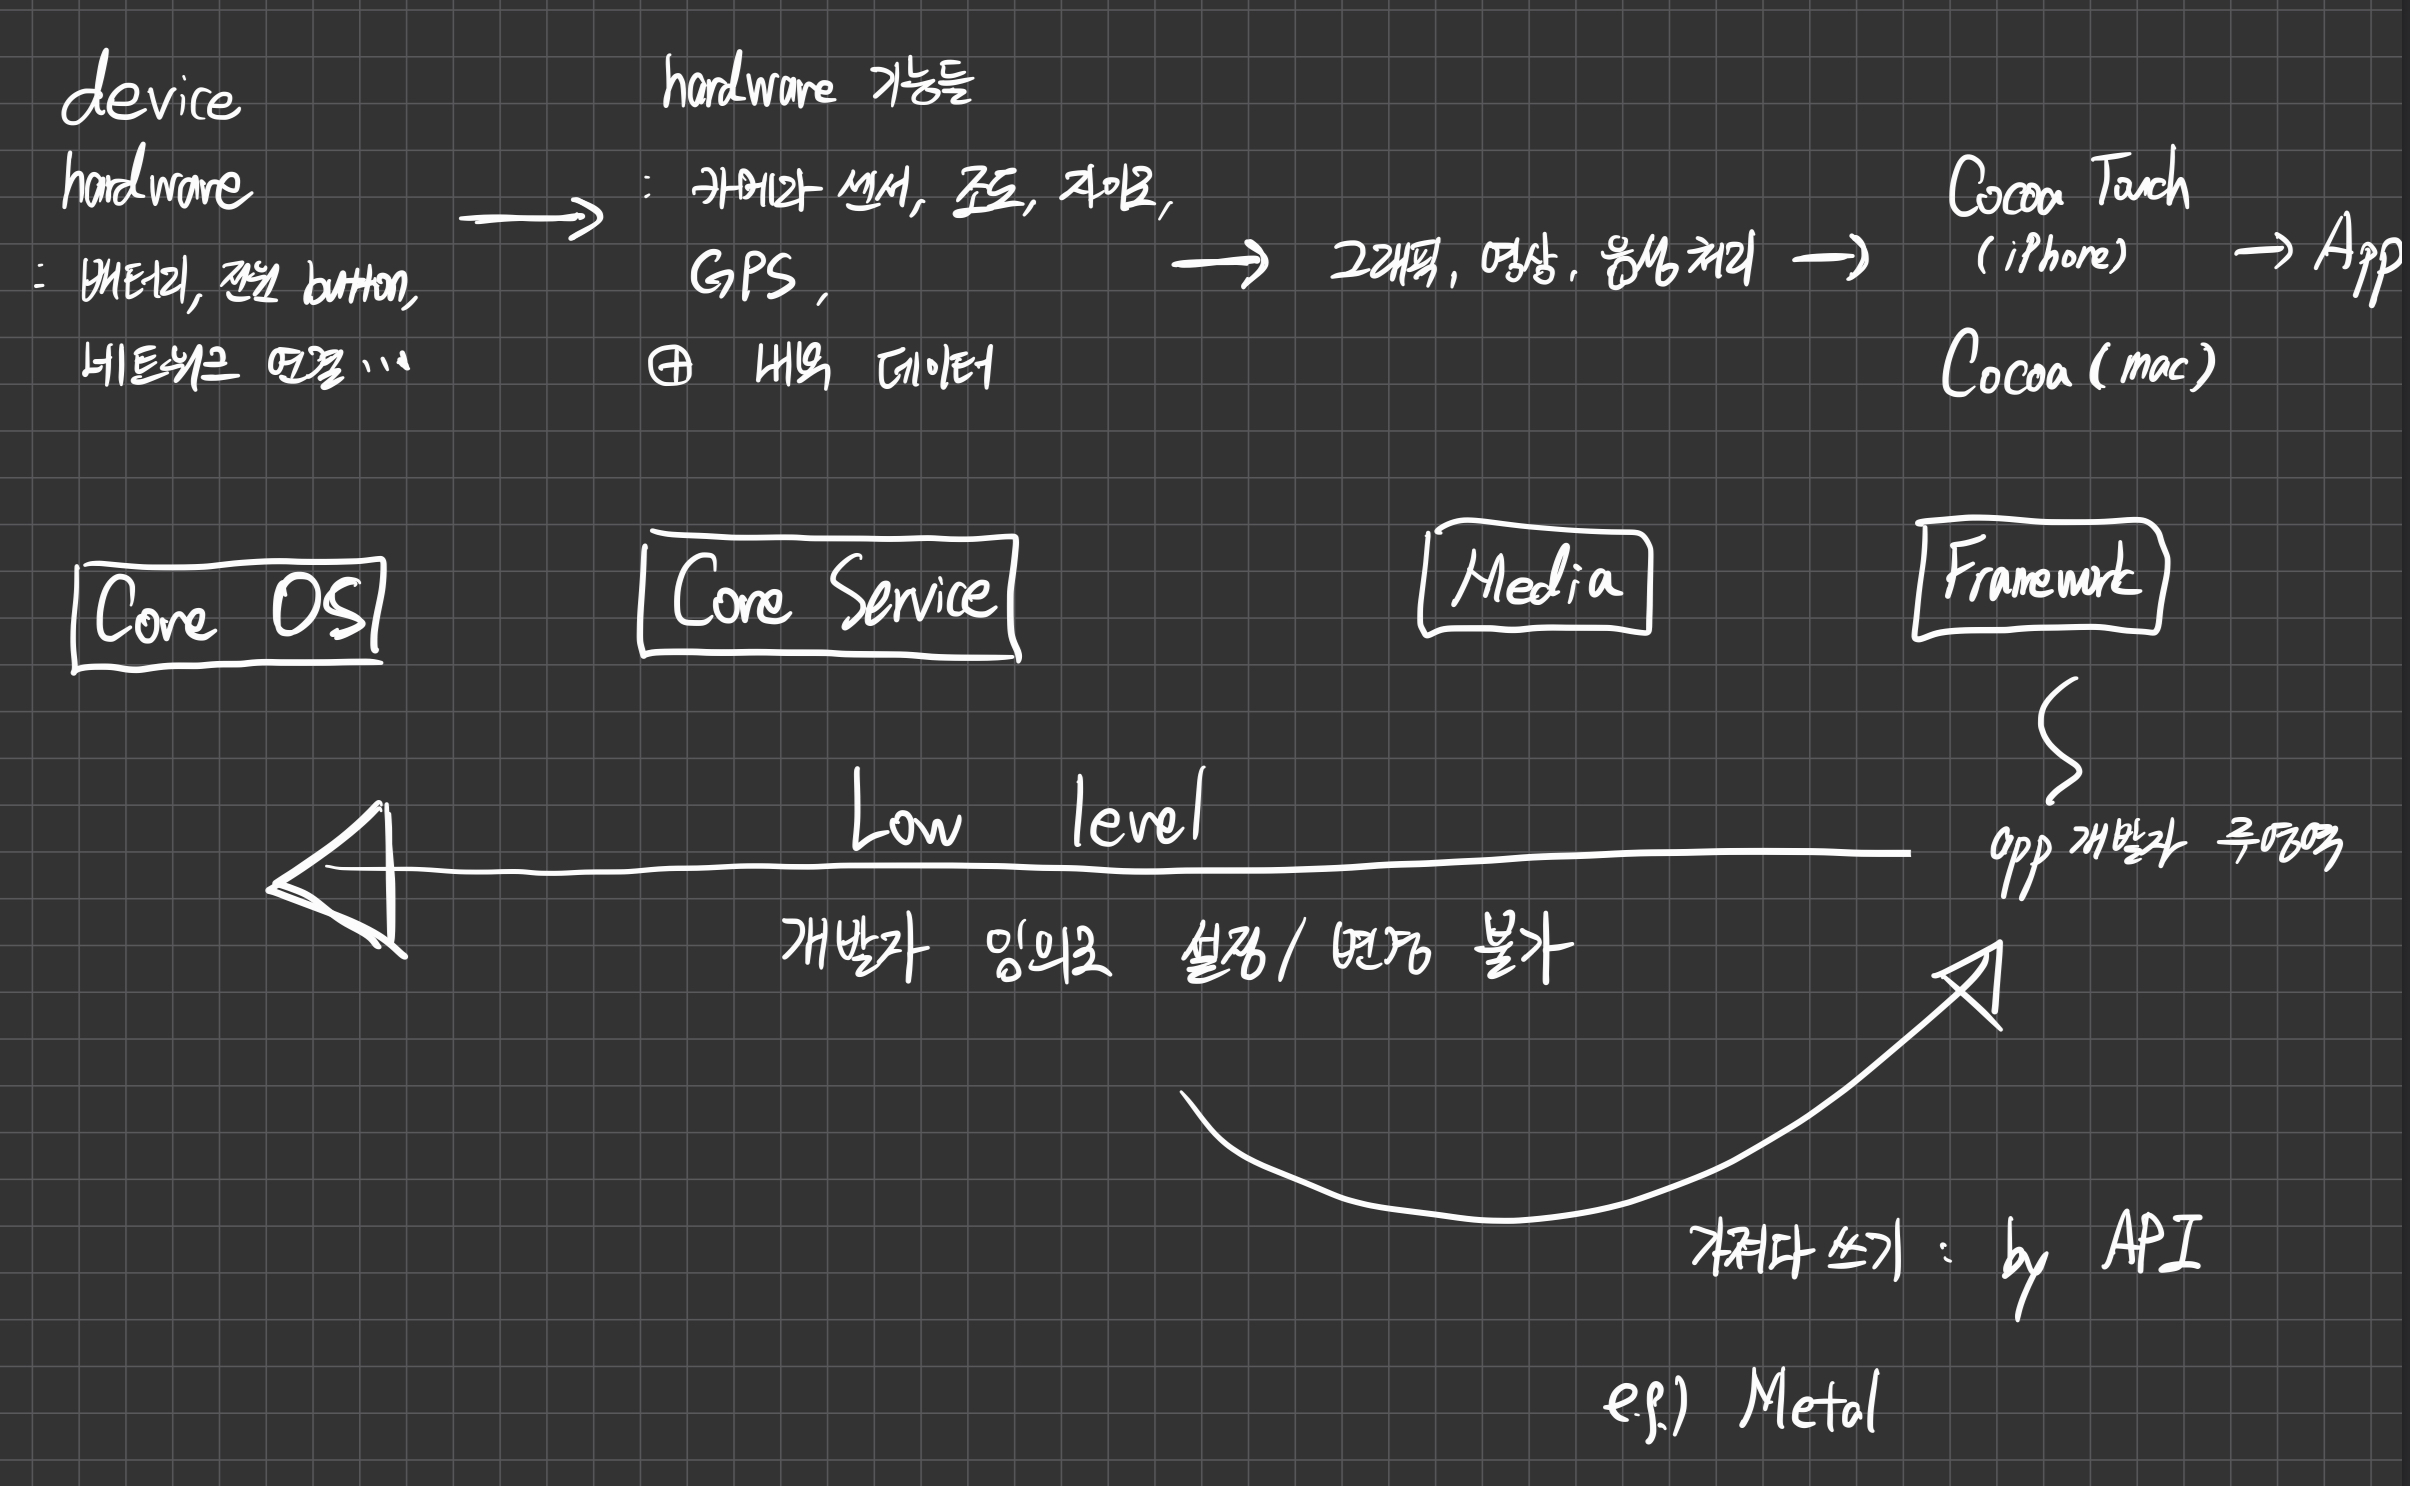
}iOS 계층 구조
Outlet Collection
단일 UI component를 IBOutlet으로 연결할 수도 있지만, 여러 UI component를 하나의 객체에 연결하기 위해 Outlet Collection을 활용할 수 있다.
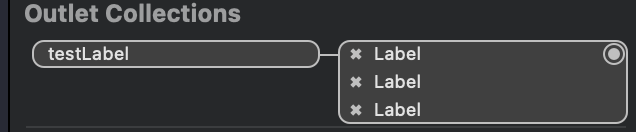
@IBOutlet weak var button: UIButton!
@IBOutlet var imageViews: [UIImageView]!
실제 코드에서는 UI component들의 배열로 객체를 구성한다.
Q) Outlet Collection으로 view 객체들을 연결할 때, weak을 사용하지 않는 이유?
일반적인 IBOutlet UI component는 강한 순환 참조 상황(strong reference cycle)을 피하기 위해 weak으로 선언
e.g.)
class ViewControlelr: UIViewController {
	//button이 view의 subview인 상황
    @IBOutlet var view: UIView!
    @IBOutlet var button: UIButton!
}
Reference Count:
- InterfaceBuilder load: view가 button을 subview로 가짐
button: 1, view: 0- ViewController load: strong하게 두 객체 보유
button: 2, view: 1
만약 ViewController가 해제되는 경우, button과 view의 count가 1씩 사라지게 된다
button: 1, view: 0
view는 count가 0이므로 ViewController와 같이 메모리에서 해제됨
반면 button은 해제되지 않음.
당장은 문제가 되지 않을 수도 있지만 향후 메모리 누수를 비롯한 문제가 발생할 수도 있음.
반면 Outlet Collection은 weak으로 선언하지 않는다.
You resolve strong reference cycles by defining some of the relationships between classes as weak or unowned references instead of as strong references.
Outlet Collection은 배열로 선언된다.
배열은 Class가 아닌 Struct이다.
Reference Count가 없으므로 weak으로 선언할 수가 없다. ViewController가 해제되면 같이 해제된다.
- view hierarchy에서 동일 level의 view들이 모두 weak으로 선언되어 있다면, 어느 한 view가 메모리에서 해제될 시 그 아래에 존재하는 view들은 모두 해제된다.
참고
Any와 Type Casting
Swift provides two special types for working with nonspecific types:
- Any can represent an instance of any type at all, including function types.
- AnyObject can represent an instance of any class type.
Use Any and AnyObject only when you explicitly need the behavior and capabilities they provide. It’s always better to be specific about the types you expect to work with in your code.
Any을 활용하면 어떠한 데이터 타입이라든지 그 자체는 얻을 수 있거나 활용할 수 있다.
하지만 그 자체의 특수한 attribute나 관련 method를 활용하기 위해선 특정 타입으로 지정이 되어야 한다. 이를 type casting이라고 한다.
타입 캐스팅은 상속 개념이 포함되므로 class만 가능하다.
| 부모 class | 방향 | 자식 class |
|---|---|---|
| --> | down-casting | |
| up-casting | <-- |
SubView 찾아가기
subview를 구하는 코드는 다음처럼 작성할 수 있다.
let subViews = view.subviewssubViews는 UIView 배열 타입이다. UIView 자체의 attribute만 접근할 수 있다. 만약 subview 중 UIImageView의 image를 변경하려고 한다면 해당 subview에 접근해야 한다. 이를 위해 UIView를 상속하는 UIImageView로 타입 캐스팅이 필요하다.
//view의 하위 view들 중 가장 가까운 곳에 위치한다고 가정
let imageView = subViews[0] as! UIImageView
imageView.image = UIImage(image: "some other image")
@IBAction 함수
동일한 기능을 하는 여러 타입의 객체들을 하나의 함수에 연결해서 활용할 수 있다.
이 경우, 여러 타입을 변수로 받기 위해 Any type으로 정의가 되야 한다.
@IBAction func sendNotice(_ sender: Any) { }하지만 특정 타입의 attribute 또는 method 활용을 위해선 타입캐스팅으로 scope를 좁혀야 한다.
@IBAction func sendNotice(_ sender: UIButton) { }참고
UIView.layer.cornerRadius
clipsToBounds가 true가 되어야 비로소 layer 모서리 부분 깎여나감
이름에서 알 수 있듯, cornerRaidus 설정은 모든 모서리에서 할당한 raidus값의 원을 masking해서 귀퉁이를 잘라내는 것을 의미한다.
그림자와의 활용 (shadow & clipsToBounds)
view의 shadow attribute들은 view의 외부에서 발생하는 shadow 설정값들이다.
문제는 모서리를 자르기 위해 clipsToBounds를 true로 설정하면 그림자 영역도 같이 잘려 나간다.
하나의 view로는 원형과 그림자 효과를 동시에 원하는 바대로 만들기 어렵다.
따라서 실제 원형으로 나타낼 컨텐츠를 보여줄 view 아래에 background로 그림자 역할을 할 view를 하나 더 만든다.
- shadow 역할의 view에서는 shadow attribute 설정
- 그 위의 컨텐츠 view에서는 cornerRaidus와 clipsToBounds 설정
func configShadowAndContent() {
configShadow()
configContent()
}
func configShadow() {
//contentView에서 자를 만큼처럼 똑같이 자르고 시작
shadowView.layer.cornerRadius = 15
//그림자 효과
shadowView.layer.shadowColor = UIColor.black.cgColor
//빛이 오는 방향
//.zero: 원형으로 퍼짐
shadowView.layer.shadowOffset = .zero
//CGSize(width: , height: ): (0,0)에서 이동한 위치에서의 그림자
//shadowView.layer.shadowOffset = CGSize(width: 10, height: 10)
//그림자 퍼짐의 정도
shadowView.layer.shadowRadius = 15
//그림자 불투명도
shadowView.layer.shadowOpacity = 0.5
}
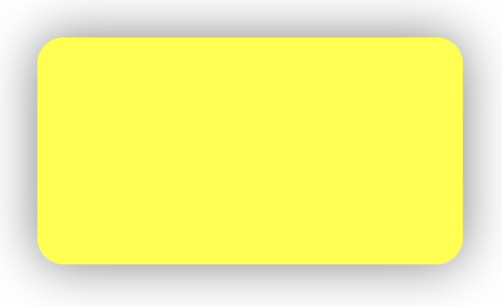
func configContent() {
contentView.backgroundColor = .yellow
contentView.layer.cornerRadius = 15
contentView.clipsToBounds = true
}이 때, 두 view는 동일 hierarchy로 존재해야 한다.
subview 관계인 경우, 특히 shadowView가 하위 view인 경우 아무것도 나타나지 않는다.
contentView의 clipsToBounds 설정이 하위 view까지 영향을 주어 그림자가 잘려 나간다. 그러면서 shadowView가 위치 상 상위에 들어가게 되므로 contentView를 가린다.
특정 모서리만 둥글게 하기
특정 모서리만 작업하고 싶다면 masking할 모서리 부분을 설정해주면 된다.
각 모서리부분의 명칭은 다음과 같다.
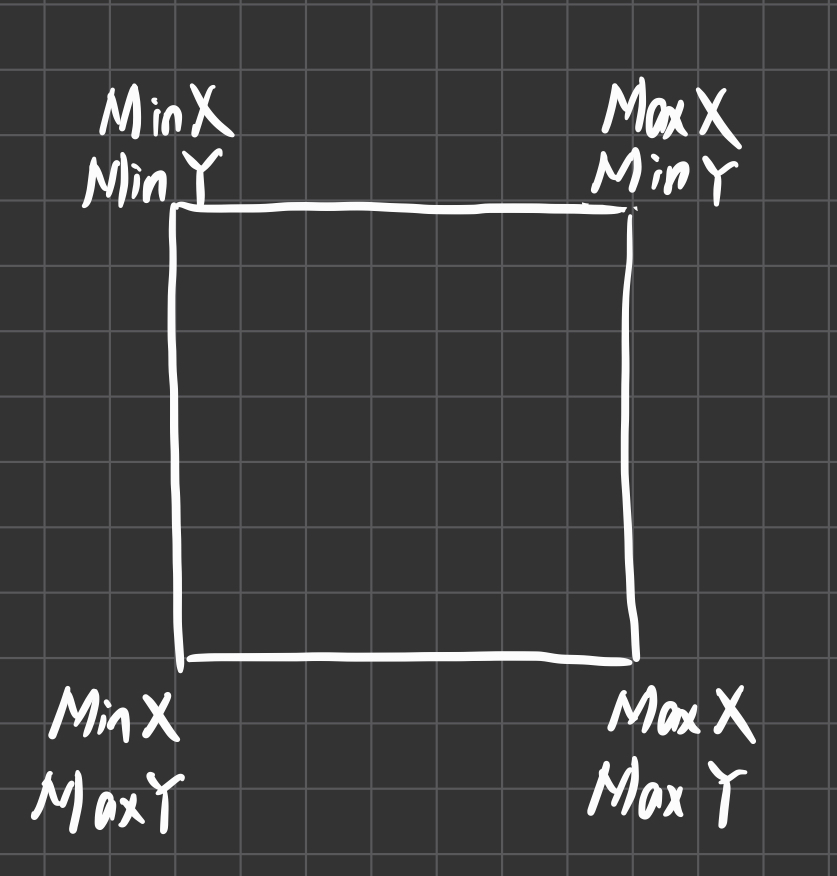
아래 두 곳만 자르고 싶다면 다음과 같이 작성할 수 있다.
view.layer.cornerRadius = 5
view.layer.maskedCorners = [.layerMinXMaxY, .layerMaxXMaxY]
view.layer.maskedToBounds = true
참고
maskedCorners with CACornerMask
이번주 property
isHidden
A hidden view disappears from its window and does not receive input events. It remains in its superview’s list of subviews, however, and participates in autoresizing as usual. Hiding a view with subviews has the effect of hiding those subviews and any view descendants they might have. This effect is implicit and does not alter the hidden state of the receiver’s descendants.
Hiding the view that is the window’s current first responder causes the view’s next valid key view to become the new first responder.
The value of this property reflects the state of the receiver only and does not account for the state of the receiver’s ancestors in the view hierarchy. Thus this property can be false but the receiver may still be hidden if an ancestor is hidden.
화면에 보이지 않을 뿐 View는 자리를 잡고 영역을 차지한다. 또한 상위 view가 isHidden이 true라면 하위 view는 자신과 그 자식 view들의 설정에 상관없이 모두 보이지 않게 된다.
stackView의 경우, 실제 영역이 사라지는 것처럼 보이는데 영역이 사라진 것이 아니다. stackView의 distribution 설정과 spacing에 따라 hidden된 view는 영역 차지를 하지 않을뿐 stackView 안에 그대로 존재한다.
투명도 적용
- alpha: 하위 view까지 영향을 미친다.
alpha
The view’s alpha value.
The value of this property is a floating-point number in the range 0.0 to 1.0, where 0.0 represents totally transparent and 1.0 represents totally opaque. Changing the value of this property updates the alpha value of the current view only. However, the transparency imparted by that alpha value affects all of the view's contents, including its subviews. For example, a subview with an alpha value of 1.0 that is embedded in a parent view with an alpha value of 0.5, appears onscreen as if its alpha value is also 0.5.
Changes to this property can be animated.
- opacity: 해당 view의 투명도만 관여한다.
opacity
The opacity of the receiver. Animatable.
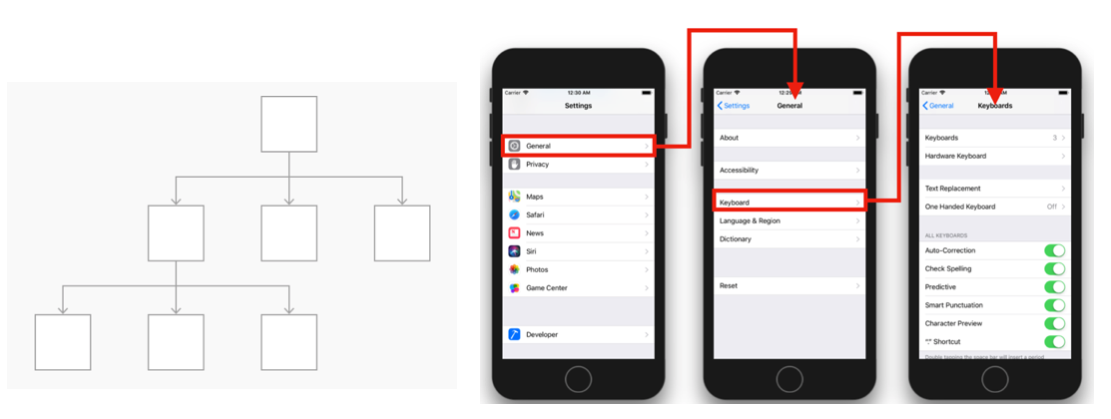
storyboard reference
storyboard에 여러 scene을 가질 수 있지만, 매번 storyboard를 load할 때마다 scene들도 동시에 load해야 한다.
따라서 기능별 혹은 프로젝트별로 storyboard를 나눠 효율성을 높이는 작업을 할 수 있다.
이 경우, A.storyboard에서 B.storyboard로 화면 전환이 이뤄지기 위해선 reference pointer를 두어 연결이 되어야 한다. 이를 Storyboard Reference라고 한다.
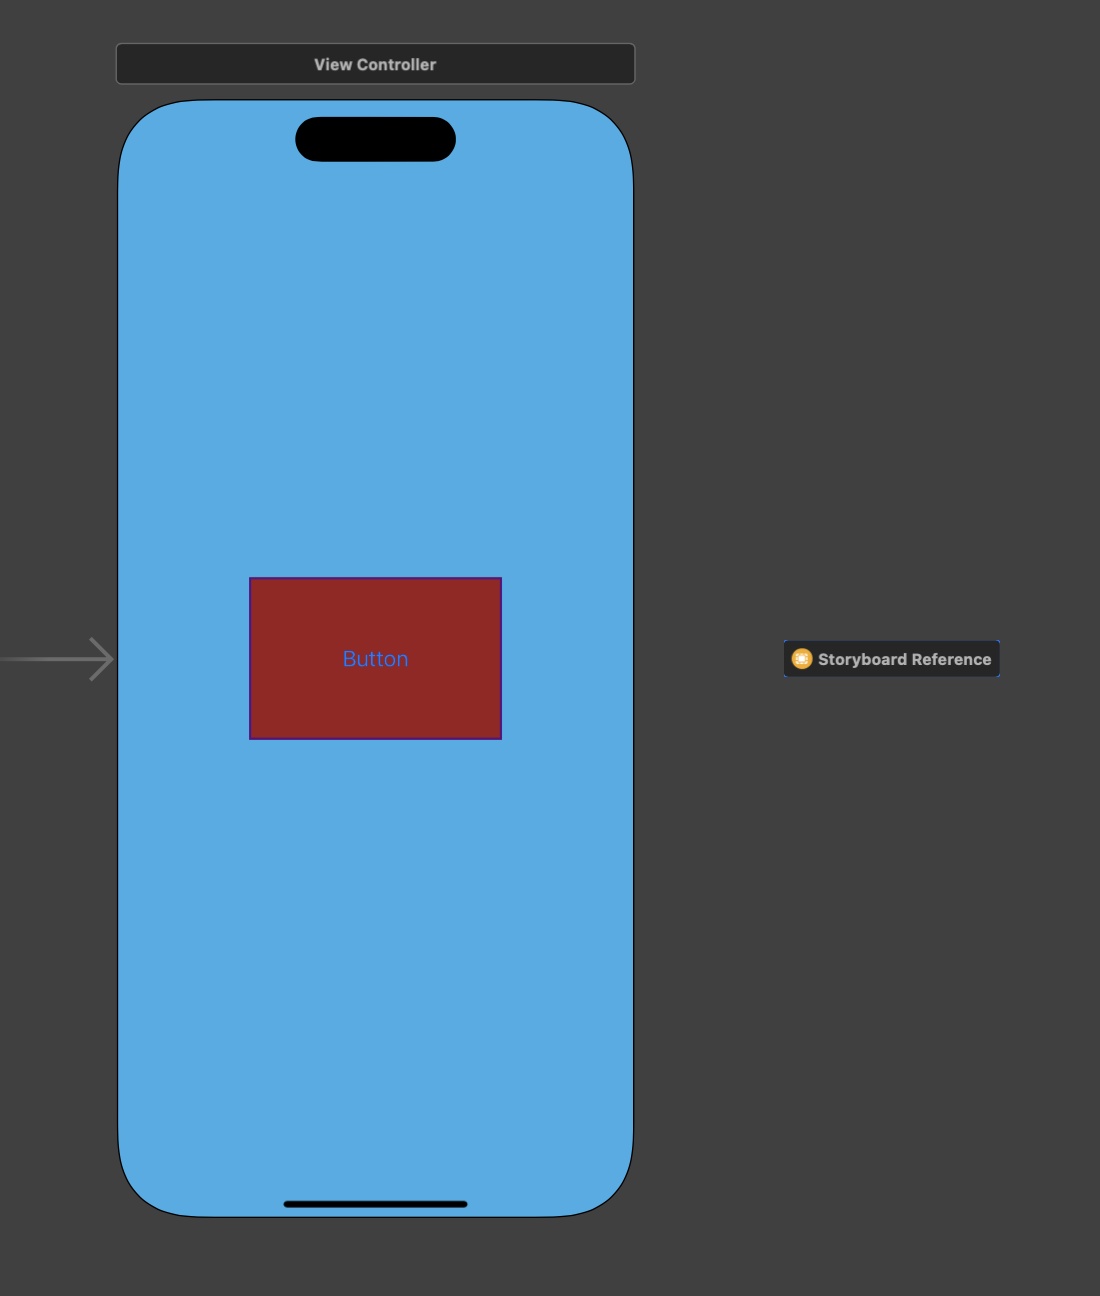
버튼을 눌러 다른 storyboard로 이동한다고 할 때, segue를 설정하면 다음처럼 나타난다.
이 때, Storyboard Reference Inspector에서는 연결할 Storyboard를 설정해야 한다.
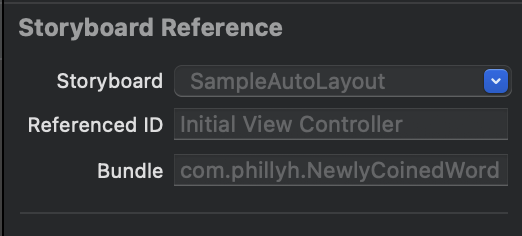
중요한 점은 각 storyboard에 entry point가 설정되어야 해당 storyboard로 이동할 수 있다는 것이다. 없다면 에러가 발생한다.
NavigationController 활용
2가지 방법으로 활용할 수 있다.
- reference에 embed
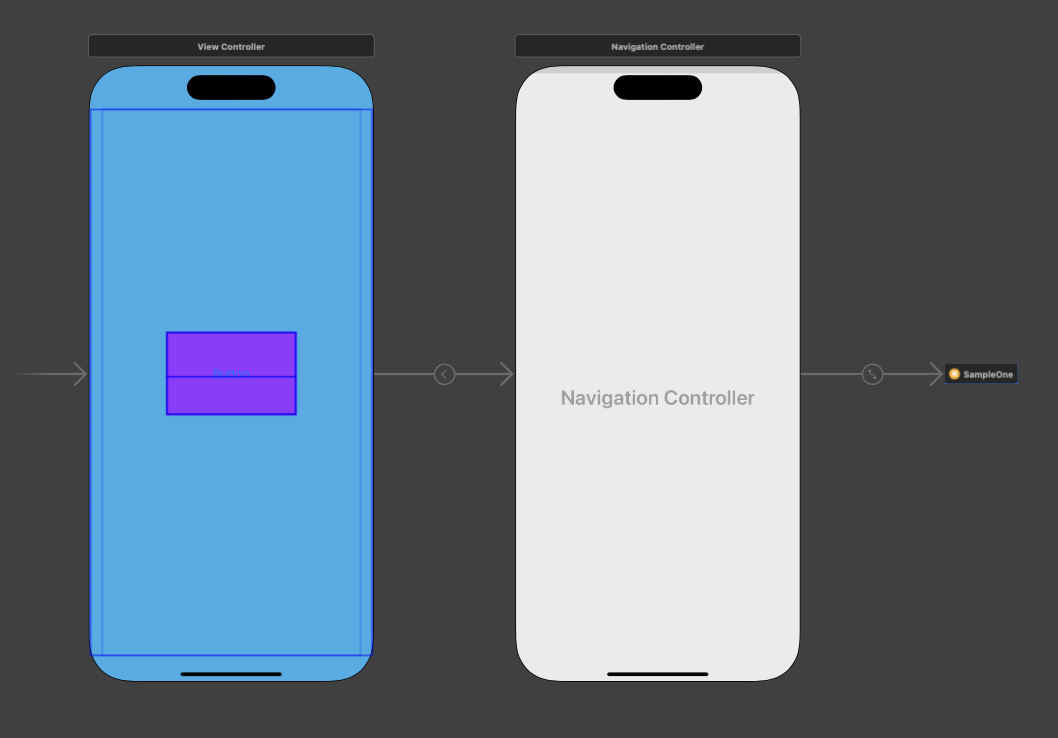
이 경우, NavigationController가 reference 앞에 존재한다.
title과 같은 navBar 설정은 code로 해야한다.
- 연결된 새로운 storyboard의 entry point에 embed
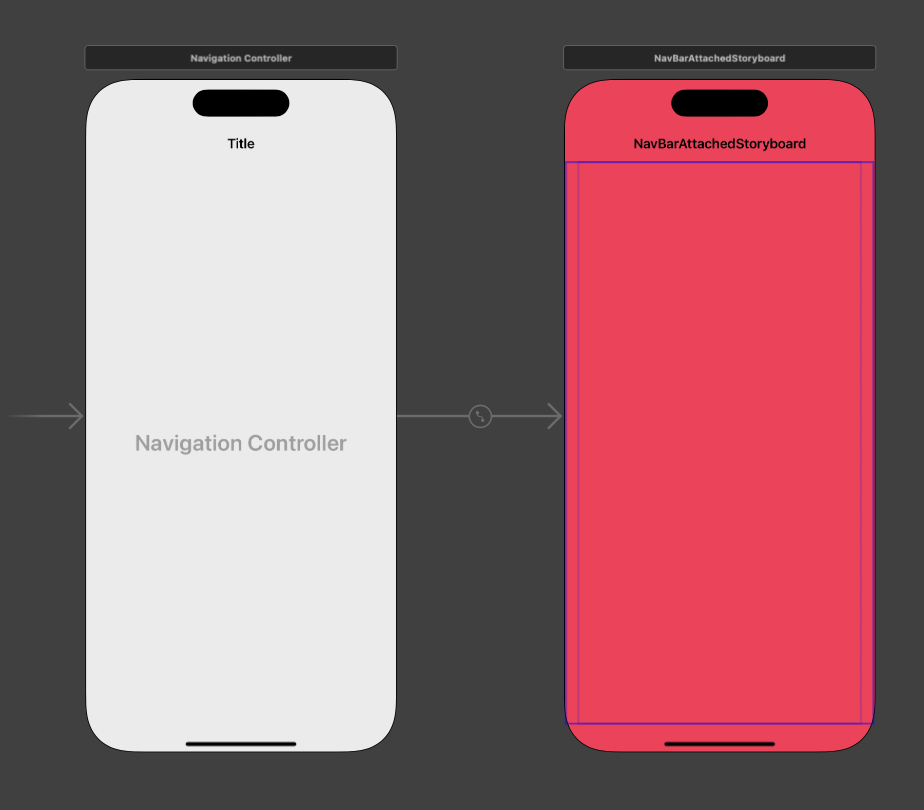
이 경우, 이전처럼 NavigationController를 활용하면 된다.
AutoLayout
Frame Based Layout
과거의 아이폰은 device 크기가 1개였기에 x,y축으로 시작점 위치를 정한 뒤 size를 설정했다.
현재 아이폰은 device 크기만도 여럿이며 iPad를 고려하면 더 많아진다.
따라서 여백 확보를 우선으로, 왼쪽 위부터 그리기 시작하니 이를 AutoLayout이라고 부르기 시작했다. (AutoResizing도 활용했음)
기본 목적
화면 호환성을 고려해서, 문제가 생기지 않도록 배치하는 것이 autolayout의 우선 목표이다.
- device 기준 여백 정하기 (화면 넘어가지 않도록)
- UI component들 사이의 간격 (겹치지 않도록)
- 높이 or 너비 설정 (e.g. 2개 중 1개만 설정 okay)
무엇이 우선 순위인지 선택해야 한다. (e.g. 아이콘 크기 or 여백 고정)
따라서 어느 부분을 우선적으로 고정시킬 지 디자이너와 수 많은 협의가 필요하다.
설정 특징들
view 객체 중 높이 지정되지 않은 것들은 다음처럼 설정할 수 있다.
1. 높이 설정: device 상관없이 동일하게 설정
2. 간격 고정, 높이 자동 설정: device 크기에 따라 높이도 줄어들 수 있음
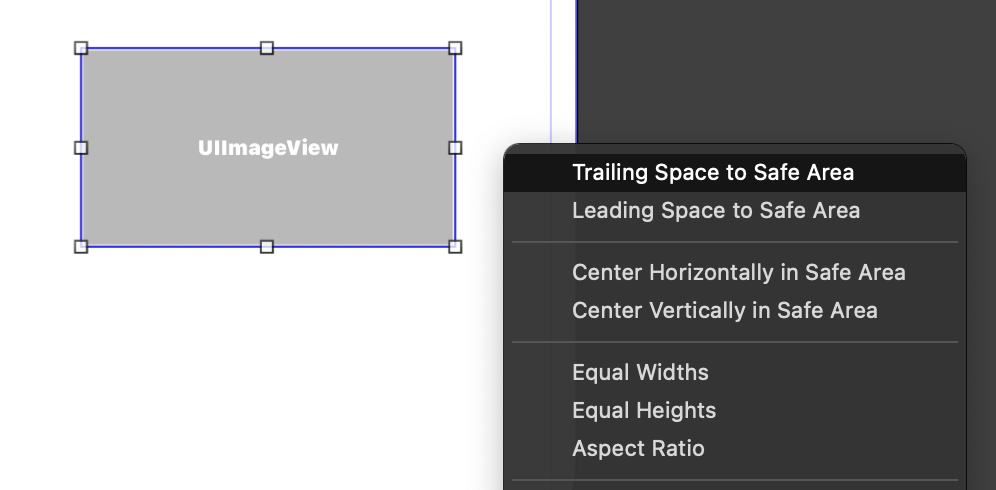
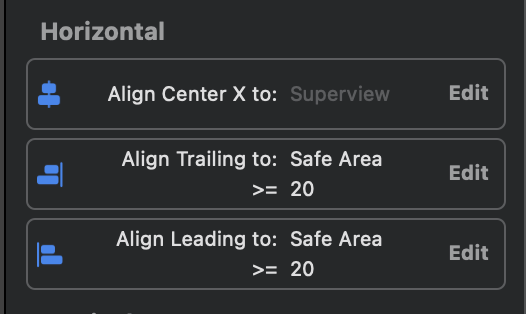
UI component 끼리의 constraint 설정: 대각선 방향으로 with CTRL 누른 채로 당겨오기
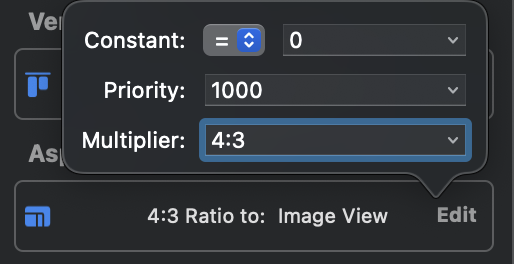
aspect ratio: 비율로 잡기 (multiplier로 비율 구성, 가로:세로)
equal 외의
- less than: 최대 크기 설정, 그보다 공간이 부족해지면 사이즈 작아짐
- more than: 최소 크기 설정: 그보다 공간이 더 남으면 사이즈 커짐
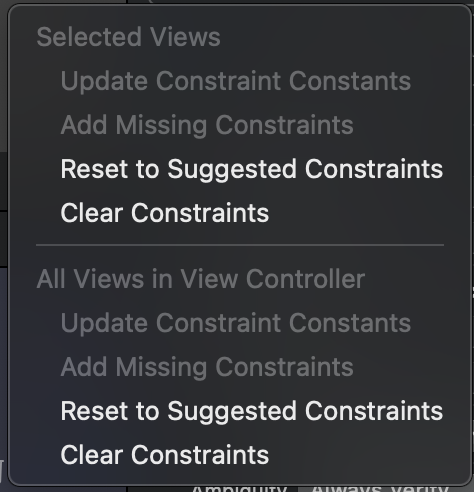
constraint reset: Resolve AutoLayout Issues
- selected views: 선택한 view들만
- all views: 전체 view
UI component간 동일한 크기/비율 만들기: 동시에 선택해서 constraint 주기
--> 너비 동일, 동일 비율 설정 with 동일 간격 constraint
App Thinning
본격적인 정리는 따로 하기로 하고 여기서는 slicing 개념만 살펴보자.
App Thinning은 앱 설치 때의 디바이스 특성에 맞게 설치되도록 하는 설치 최적화 기술이다. 디바이스마다 다운로드한 앱의 용량이 다른 이유이다. 그 중 slicing에 대해 알아보자.
slicing
각 디바이스에 맞는 조각, 앱 번들을 만든다. 유저가 앱스토어에서 앱을 다운받으면 해당 디바이스에게 최적의 조각을 전달한다.
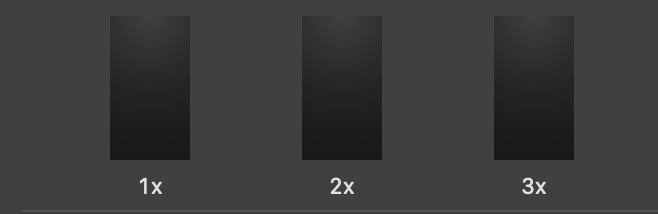
조각의 예로는 image 해상도가 있다. image의 경우, x1, x2, x3를 구분해서 다 갖지 않고 해상도에 맞는 이미지만 가진다.
만약 대응하는 이미지가 없는 경우, 다른 배수의 이미지를 가져다가 확대 혹은 축소해서 나타낸다. 이 경우, 화질이 깨질 수 있다.
Swift의 메모리 주소 접근
함수의 매개변수로 전달되는 data들은 constant이므로 변경이 불가능하다. 따라서
array나 dictionary와 같은 data collection type들이 전달될 경우, 내부에서 동일한 데이터를 지닌 변수를 설정한 뒤, 데이터 변경을 시도한다. 이들은 기본형 타입이므로 Copy-On-Write 방식이므로 원본 데이터의 주소값이 그대로 전달되지 않는다.
대신 동일한 value들을 가지고 있는 새로운 data collection을 만들어 새로운 주소값을 가진다.
다만 주소값은 실제 값이 변경되기 전까지는 동일하도록 해서 효율성을 높인다.
주소값을 실제로 확인하기 위해선 다음을 활용해야 한다.
UnsafeRawPointer
A raw pointer for accessing untyped data.
C언어의 포인터처럼 사용자가 모든 data 공간 할당 및 해제를 컨트롤해야하므로 애플은 사용자의 메모리 접근을 꺼린다.
The UnsafeRawPointer type provides no automated memory management, no type safety, and no alignment guarantees. You are responsible for handling the life cycle of any memory you work with through unsafe pointers, to avoid leaks or undefined behavior.
The memory referenced by an UnsafeRawPointer instance can be in one of several states. Many pointer operations must only be applied to pointers with memory in a specific state—you must keep track of the state of the memory you are working with and understand the changes to that state that different operations perform. Memory can be untyped and uninitialized, bound to a type and uninitialized, or bound to a type and initialized to a value. Finally, memory that was allocated previously may have been deallocated, leaving existing pointers referencing unallocated memory.
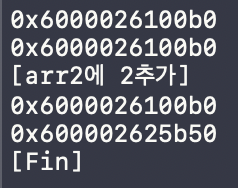
func printMemoryAddress(address o: UnsafeRawPointer) {
    print(String(format: "%p", Int(bitPattern: o)))
}

func arrayMemoryTest() {
	var arr1 = [1]
    var arr2 = arr1

    printMemoryAddress(address: arr1)
    printMemoryAddress(address: arr2)

    print("[arr2에 2추가]")
    arr2.append(2)

    printMemoryAddress(address: arr1)
    printMemoryAddress(address: arr2)

    print("[Fin]")
}
다시 돌아와서 Copy-On-Write를 활용하면 데이터 안정성은 높지만 데이터 변경에 더 많은 시간복잡도가 걸릴 수 있다.
e.g.) 매개변수로 배열을 전달하고, 함수 내부에서 배열의 element 변경, 변경된 배열을 return하는 함수
매개변수로 전달되는 배열은 constant이므로 함수 내부에서 constant와 동일한 data를 가지는 배열을 생성, 그 element를 변경해서 return, 그 결과값을 기존 배열에 update를 한다.
내부에서 배열의 element 변경은 Copy-On-Write 방식이므로 이 소요된다. return으로 받은 변경된 배열로 기존 배열을 update하는 것도 이 소요된다. 최종적으로 가 소요된다.
이 경우, 다른 제한 사항이 없다면 함수에서 배열에 직접 접근해 update하여 만 소요되도록 하는 것이 나아보인다.
다른 방법으로는 마치 reference처럼 작동하도록 in-out 키워드를 활용할 수 있다.
If you want a function to modify a parameter’s value, and you want those changes to persist after the function call has ended, define that parameter as an in-out parameter instead. An in-out parameter has a value that’s passed in to the function, is modified by the function, and is passed back out of the function to replace the original value. You place an ampersand (&) directly before a variable’s name when you pass it as an argument to an in-out parameter, to indicate that it can be modified by the function.
중요한 점은 in-out 방식도 copy 방식이라는 것이다. 원본이 매개변수로 전달되면 함수 내에서 변형 과정을 거친 후, 원본에 전달되어서 update한다. Copy-In, Copy-Out으로 봐야 할 것이다.
반면 class나 함수, 클로저와 같은 reference type들은 매개변수로 활용 시, 원본의 주소값을 그대로 전달한다 (Call-by-Reference). 따라서 IBAction으로 연결된 대부분의 UI component들은 class의 객체이므로 원본 주소값이 전달되었으므로, 함수 내부에서 내부 매개변수 sender로 설정해도 해당 UI component의 설정이 바뀌는 것이다.
참고