
활용도보단 아는 내용 정리 목적이 더 큼
Variable과 Property
Programming Language 수업에서 배운 variable의 정의는 다음과 같다
an abstraction of a computer memory cell, or a collection of cells
can be characterized as a tuple of attributes
(name, address, value, type, lifetime, scope)
메모리 cell의 추상화
메모리에 저장되는 실제 data의 값, data가 저장되는 메모리 주소와 생명주기 및 범주 (어느 범위, a.k.a. 함수, class, 전역, etc... & 어떨 때까지 살아남는지), 그리고 이를 가리킬 대표 이름의 집합체이다.
property는 이 variable이 class, struct, 혹은 enum처럼 custom type으로 직접 데이터 모음체를 만들어 활용될 때를 나타낸다.
Property의 종류
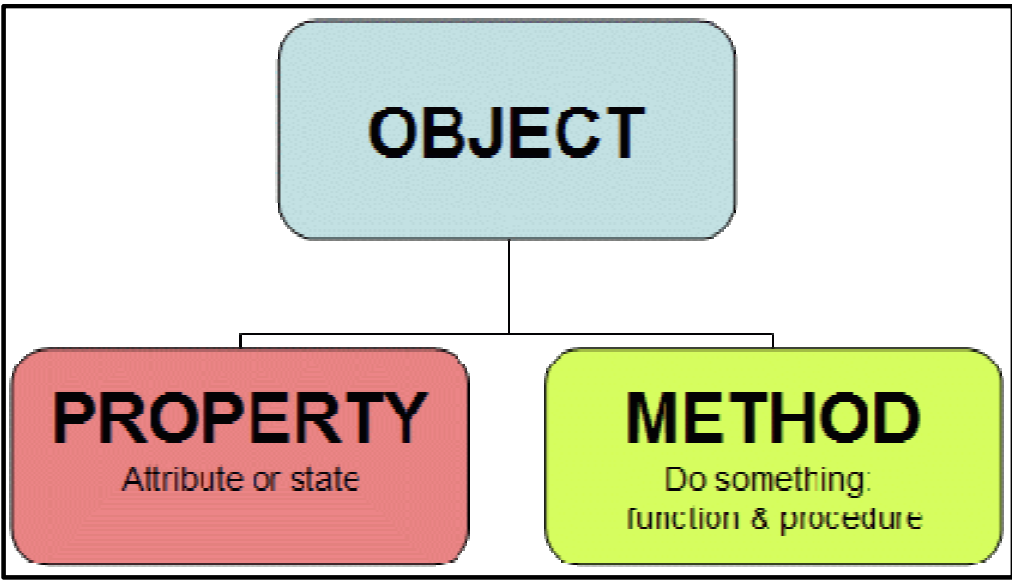
실제 데이터와 관련된 역할을 포함하는 instance (class의 instance는 object라고 부르기에)를 생성하면 다음과 같이 property와 method를 가진다.
이 중 실제 data를 담당하는 곳이 property이다.
저장 방식 관점: stored vs. computed
값을 초기화하고 저장하려는 목적에서 stored, 저장 속성이라 한다. instance를 생성 혹은 타입 그 자체에 공통적으로 중요한 값을 활용할 때 stored property를 활용한다.
lazy: 지연
stored property의 초기화가 지연되도록 해준다. 선언되는 시점이 아닌 실제 호출되는 시점에 초기화되어 메모리에 올라온다.
예를 들어 앱에서 다수의 고화질 이미지를 보여주는 경우, 앱이 실행되자마자 이 많은 이미지를 한번에 메모리에 다 올릴 필요는 없다. 저화질 미리보기를 작게 보여주고, 사용자가 해당 미리보기를 누르는 그 때 지연 저장 속성에 고화질 사진으로 초기화하여 메모리 위에 올라오도록 할 수 있다. 이러면 유저 입장에서도 처음 앱이 실행되었을 때 실제 사진들이 메모리에 올라올 때까지 기다릴 필요가 없다.
특히 버튼을 코드로 생성하는 경우, 실제 눌리기 전까지 활용될 일이 없으므로 지연 저장 속성으로 정의하는 경우가 많다.
lazy var button: UIButton = {
	let button = UIButton()
    //...설정...
    return button
}()
값을 저장하려는 목적보다 이미 저장된 값을 활용해서 간접적으로 값을 제공할 때, computed, 연산 속성이라 한다. 따라서 연산 속성은 값을 저장할 메모리 공간을 따로 잡지 않는다.
computed property vs. method?
사실상 computed property는 property 성격을 띄는 method라고 봐도 무방하다. 다만 활용 목적에 따라 구분을 짓는 것으로 보인다.
method는 custom type에서 함수 역할을 맡고 있다. 따라서 외부에서 parameter로 들어올 수 있는 새로운 data를 비롯해 여러 연산 작업을 통해 결과를 도출한다.
computed property는 저장 속성을 가지고 활용하려는 목적이 크다. 따라서 보편적인 method보다 작은 범위에서 활용된다고 할 수 있다.
get & set
computed property는 연산한 결과를 주는 get과 새로운 값을 받아 저장 속성에 새롭게 할당하는 set으로 구성된다.
get만 설정하는 경우가 default이며, 이 경우 get을 생략해 Return만 표현할 수 있다.
class Computer {
	var name: String = "컴퓨터"

    var sellingPoint: String {
    	return "\(name), 타이어보다 싸다!!!"
    }
}
set을 설정하는 경우, newValue라고 Apple이 기본 parameter로 제공해주는 값을 활용해 기존 저장 속성에 새롭게 값을 할당할 수 있다.
class Computer {
	var name: String = "컴퓨터"

    var sellingPoint: String {
    	get {
        	return "\(name), 타이어보다 싸다!!!"
        }
        set {
        	name = newValue
        }
    }
}

let exampleComputer = Computer()
exampleComputer.sellingPoint = "양자컴퓨터"

exampleComputer.sellingPoint
//양자컴퓨터, 타이어보다 싸다!!!
동작 방식 관점: instance vs. type
instance property는 instance를 생성할 때 초기화해야 접근할 수 있는 property이다. 따라서 동일한 class/struct에서 생성된 각 instance가 동일한 이름의 property는 가지지만 초기화된 실제 data는 각자 다를 수 있다.
class의 instance는 초기화 시 해당 property가 optional로 정의되지 않는 한, 무조건 초기화 과정을 거쳐야 한다. 따라서 선언과 동시에 초기화되거나 init으로 표현되는 초기화 구문을 활용해야 한다.
class Computer {
	var cpu: String
    var memory: Int
    var storage: Int

    init(cpu: String, memory: Int, storage: Int) {
    	self.cpu = cpu
        self.memory = memory
        self.storage = storage
    }
}

let macbookPro14 = Computer(cpu: "M2 Pro", memory: 16, storage: 512)
let galaxyBook3Ultra = Computer(cpu: "i9-13900H", memory: 32, storage: 1024)

print("CPU of each computer: \(macbookPro14.cpu) vs. \(galaxyBook3Ultra.cpu)")

//CPU of each computer: M2 Pro vs. i9-13900H
struct의 instance는 class와 다르게 memberwise initializer라 해서 struct에 init이 없어도 자동으로 instance stored property에 값을 할당해서 instance property에 접근할 수 있다.
반면 type property는 해당 타입 그 자체의 property를 의미한다. 각자 생성되는 instance와 관계없이 접근이 가능하다. 따라서 각 type property에는 하나씩만 값을 가질 수 있다.
type property는 lazy stored property처럼 호출할 때가 되어야 메모리에 올라온다. 다만 app이 종료될 때까지 메모리의 data 영역에 존재한다.
class Computer {
	static var isVonNeumannArchitecture = true

    var cpu: String
    var memory: Int
    var storage: Int

    init(cpu: String, memory: Int, storage: Int) {
    	self.cpu = cpu
        self.memory = memory
        self.storage = storage
    }
}

let macbookPro14 = Computer(cpu: "M2 Pro", memory: 16, storage: 512)
let galaxyBook3Ultra = Computer(cpu: "i9-13900H", memory: 32, storage: 1024)

if Computer.isVonNeumannArchitecture {
	print("\(macbookPro14.cpu) and \(galaxyBook3Ultra.cpu) needs memory hierarchy")
}

//M2 Pro and i9-13900H needs memory hierarchy
참고)
보통 static 키워드를 많이 사용하고 재정의가 불가능하지만, type computed property의 경우, class 키워드로 재정의가 가능하게 만들 수도 있다. 마치 static method가 상속되어 재정의되면 class func가 되는 것처럼.
같은 property를 다른 관점으로 바라보는 것
type property라고 무조건 stored인 것은 아니며, instance property라고 computed를 안 쓰는 것도 아니다. 상황과 목적에 맞게 여러 방면으로 활용할 수 있다.
property observer
감시자 역할로 property의 값 변화의 타이밍에 맞게 추가 작업을 설정할 수 있다. 값이 저장되어 있어야 변화를 인지할 수 있으므로 computed property에서는 활용할 수 없다.
willSet과 didSet
willSet은 값 변화가 실행되기 직전, didSet은 값 변화가 완료되고 나서 호출된다.
- willSet: 값 저장 직전 호출 (변수 —> newValue)
- didSet: 값 저장 직후 호출 (oldValue —> 변수)
호출 시 관련 저장 속성 변경 및 연산 프로퍼티 연계와 같이 다른 코드 활용도 가능하다.
특히 cell에 필요한 data instance를 넘겨줄 때 didSet을 활용하면 쉽게 UI component에 각각 필요한 data를 할당할 수 있다.
Enum ImageData: String {
	case big = "HighResolution"
    case middle = "DefaultResolution"
    case small = "LowResolution"

    var imageString: String {
    	switch self {
        	return self.rawValue
        }
    }
}

class exampleCell: UITableViewCell {

    var data: ExampleData? {
    	didSet {
        	setupData()
        }
    }

    //...UI component 및 UI 설정 method들...


    func setUpData() {
    	//...data 할당 코드들...
    	coverImageView.image = UIImage(named:  ImageData(rawValue: data.imageResolution)!.imageString)
    }
}
재사용 고려 case들
UI와 data는 별개이므로 항상 sync를 해줘야 한다.
data가 update될 때마다 tableView/collectionView의 reloadData method 호출
문제는 cell의 data가 변경될 요소가 많을 수록 ViewController 혹은 cell 파일에서 reloadData() 중복 코드가 발생한다.
이 경우에는 차라리 property observer로 data 자체가 변경될 때마다 reloadData 호출하도록 하는 코드 한줄이 더 관리에 용이할 수도 있다.
class CustomCellTableViewController: UITableViewController {

    var data = DataListStruct() {
        didSet {    //변화 감지
            tableView.reloadData()
        }
    }

	//...중략...

	//SearchBar 활용하는 경우
    @objc func searchBarReturnKeyTapped() {
        //tableView에 내용 추가: data 추가하기
        //변경된 data를 tableView에 갱신
        let newData = DataListStruct(main: searchBar.text!, like: false, done: false)
        data.list.insert(newData, at: 0)
        //searchBar에 작성된 내용 지우기
        searchBar.text = ""

        //data에 didSet 활용: 생략해도 됨
//        tableView.reloadData()
    }

	//좋아요 버튼 누른 경우
	@objc func likeButtonTapped(_ sender: UIButton) {
        //매개변수로 tag 정보 얻기
        //data를 true --> false만 바꾸기
        //image는 보여지는 것: 바뀐 data로 갱신하기

        //data 변경
        //tag에 indexPath.row를 할당해놓음
		data.list[sender.tag].like.toggle()

        //바뀐 data: tableView에 갱신
        //cell 그릴 때, 새로운 image로 나타냄

        //data에 didSet 활용: 생략해도 됨
//        tableView.reloadData()
    }

}
모델 관리: UI와 data 분리
위의 reloadData와 관련된 문제로, cell에서 backgroundColor를 랜덤하게 설정하는 코드를 활용한다고 하자.
reloadData가 호출될 때마다 backgroundColor를 설정하는 코드도 매번 재호출된다. 이렇게 되면 하나의 cell만 변경되어도 나머지 cell도 매번 새로운 backgroundColor가 재할당되어 폭죽마냥 휘황찬란하게 변화한다.
이를 막기 위해선 처음 cell을 생성할 때 color값도 data instance 요소로 저장해야 reloadData가 호출되어도 재설정이 되지 않을 것이다.
data로 UIColor 자체를 저장하기엔 model의 목적과 부합하지 않는다는 것이다.
모델은 property로 data만 관리하기 위해 Foundation framework를 비롯해 기본 타입만 활용하려 하는 목적이 강하다.
따라서 data와 UI를 구분하기 위해 UIColor를 비롯해 다른 UI component 요소는 분리하는 것이 목적에 더 부합한다.
이런 경우에는 Red, Green, Blue 데이터를 CGFloat으로 갖고 있다 UIColor 생성 시 할당하는 것이 더 나을 수 있다.
struct ExampleDataStruct {

    //...다른 property들...

    var cgRed: CGFloat
    var cgGreen: CGFloat
    var cgBlue: CGFloat

    var cgColors: [CGFloat] = {
    	return [cgRed, cgGreen, cgBlue]
    }
}
재활용되는 코드 대신 type method로
위의 randomBackgroundColor를 설정하는 method를 다시 살펴보자.
color data는 instance property가 되었기에 더 이상 reloadData와 관련이 없어졌다. 이제 우리는 instance 생성 시에 backgroundColor도 랜덤하게 만들기를 바란다. 문제는 color property가 instance 생성 이후에 접근이 가능하다는 점이다.
따라서 instance method로 randomBackgroundColor method를 활용할 수 없다.
이 경우, color data를 instance property로 보유하기 보다는 type method로 불러서 활용하는 것이 더 나을 수도 있다.
struct ExampleDataStruct {

    //...다른 property들...

    static func setRandomBackgroundColor() -> UIColor {
    	let randomRed = CGFloat().random(0...255)/255
        let randomGreen = CGFloat().random(0...255)/255
        let randomBlue = CGFloat().random(0...255)/255

        return UIColor(cgColor: CGColor(red: randomRed, green: randomGreen, blue: randomBlue, alpha: 1))
    }
}
cell 재활용 시
cell은 재활용되어 생성될 때마다 매번 cellForRowAt method를 호출한다.
만약 data를 전달하면서 didSet으로 configCell() 메서드를 호출한다고 하면, 동일한 UI 설정 code는 호출될 때마다 반복된다.
따라서 변화하지 않을 property 설정들은 awakeFromNib에 코드를 작성한다.
class ExampleCell: UITableViewCell {

	//...UI component들...

	var data: ExampleData? {
    	didSet {
        	setupData()
        }
    }
	override func awakeFromNib() {
        super.awakeFromNib()
        self.backgroundColor = mainBackgroundColor
        self.tintColor = fontBorderColor
        textLabel?.textColor = fontBorderColor
        detailTextLabel?.textColor = lightFontColor
    }
    func setupData() {
    	//...data 설정...
    }
}
code로 재활용 시 awakeFromNib을 활용 못하는 경우?
awakeFromNib의 정의는 다음과 같다.
awakeFromNib()
Prepares the receiver for service after it has been loaded from an Interface Builder archive, or nib file.
Xib (Nib로 변화) 혹은 storyboard에서 연결된 UI component들의 initialization을 담당한다.
따라서 코드로 재활용시에는 awakeFromNib에 작성한 코드를 각자 UI component들 초기화시에 작성하면 된다.
참고