package com.greedy.section02.set.run;
import java.util.Collection;
import java.util.HashSet;
import java.util.Iterator;
import java.util.Set;
public class Application1 {
public static void main(String[] args) {
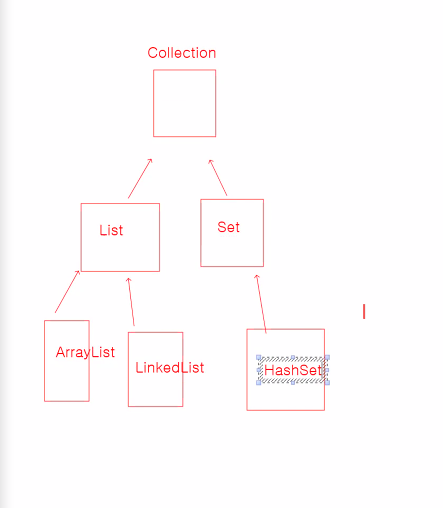
/* Set 인터페이스를 구현한 Set 컬렉션 클래스의 특징
* 1. 요소의 저장 순서를 유지하지 않는다.
* 2. 같은 요소의 중복 저장을 허용하지 않는다.(null값도 중복하지 않게 하나의 null만 저장한다.)
* */
/* HashSet 클래스
* Set 컬렉션 클래스에서 가장 많이 사용되는 클래스 중 하나이다.
* JDK 1.2부터 제공되고 있으며 해쉬 알고리즘을 사용하여 검색 속도가 빠르다는 장점을 가진다.
* */
HashSet<String> hset = new HashSet<>();
/* 다형성 적용하여 상위 인터페이스를 타입으로 사용 가능 */
Set<String> hset2 = new HashSet<>();
Collection<String> hset3 = new HashSet<>();
hset.add(new String("java"));
hset.add(new String("oracle"));
hset.add(new String("jdbc"));
hset.add(new String("html"));
hset.add(new String("css"));
System.out.println("hset : " + hset);
hset.add(new String("java")); // 중복 저장을 허용하지 않는다.
System.out.println("hset : " + hset);
System.out.println("저장된 객체 수 : " + hset.size());
System.out.println("포함확인 : " + hset.contains(new String("oracle")));
/* 저장된 객체를 하나씩 꺼내는 기능이 없다. */
/* 반복문을 이용한 연속처리 하는 방법 */
/* 1. toArray() 배열로 바꾸고 for loop 사용 */
Object[] arr = hset.toArray(); // 하나씩 뽑아다가 배열로 만들어주겠다.
for(int i = 0; i < arr.length; i++) {
System.out.println(i + " : " + arr[i]);
}
/* 2. iterator()로 목록 만들어 연속 처리*/
Iterator<String> iter = hset.iterator(); // hset안에 있는 요소 목록화작업 , 한번꺼내지면 재사용 불가
while(iter.hasNext()) { // 꺼내올 내용이 있는지 확인
System.out.println(iter.next()); // 안에 있는 내용을 반환
}
hset.clear(); // 모두 삭제
System.out.println("empty ? : " + hset.isEmpty());
}}
hset : [css, java, oracle, jdbc, html]
hset : [css, java, oracle, jdbc, html]
저장된 객체 수 : 5
포함확인 : true
0 : css
1 : java
2 : oracle
3 : jdbc
4 : html
css
java
oracle
jdbc
html
empty ? : true
package com.greedy.section02.set.run;
import java.util.LinkedHashSet;
import java.util.TreeSet;
public class Application2 {
public static void main(String[] args) {

	/* LinkedHashSet 클래스 */
	/* HashSet이 가지는 기능을 모두 가지고 있고
	 * 추가적으로 저장 순서를 유지하는 특징을 가지고 있다.
	 *
	 * JDK 1.4 부터 제공
	 * */
	LinkedHashSet<String> lhset = new LinkedHashSet<>();

	lhset.add("java");
	lhset.add("oracle");
	lhset.add("jdbc");
	lhset.add("html");
	lhset.add("css");

	System.out.println("lhset : " + lhset);

	/* 오름차순 정렬을 원하면 클래스 타입일 때에만 가능 */

	TreeSet<String> tset = new TreeSet<>(lhset);
	System.out.println("tset : " + tset);
	/* 만들어진 linkedHashSet을 가지고 TreeSet으로 객체를 생성하면
	 * 같은 타입의 객체를 자동으로 비교하여 오름차순으로 정렬한다.
	 * */

}
}
lhset : [java, oracle, jdbc, html, css]
tset : [css, html, java, jdbc, oracle]
package com.greedy.section02.set.run;
import java.util.Iterator;
import java.util.Set;
import java.util.TreeSet;
public class Application3 {
public static void main(String[] args) {

	/* TreeSet 클래스
	 *
	 * TreeSet 클래스는 데이터가 정렬된 상태로 저장되는 이진 검색 트리 형태로 요소를 저장한다.
	 * 이진 검색 트리는 데이터를 추가하거나 제거하는 등의 기본 동작시간이 매우 빠르다.
	 *
	 * JDK 1.2부터 제공되고 있으며 Set인터페이스가 가지는 특징을 그대로 가지지만
	 * 정렬된 상태를 유지한다는 것이 다른점이다.
	 * */

	TreeSet<String> tset = new TreeSet<>();

	tset.add("java");
	tset.add("oracle");
	tset.add("jdbc");
	tset.add("html");
	tset.add("css");

	System.out.println(tset);

	/* 로또 번호 생성(TreeSet 특징 이용) */
	Set<Integer> lotto = new TreeSet<>();

	while(lotto.size() < 6 ) {

		lotto.add(((int) (Math.random() * 45) ) +1);


	}

	System.out.println("lotto : " + lotto);

	Object[] arr = tset.toArray();

	for(Object obj : arr) {

		System.out.println(((String) obj).toUpperCase()); // 전체를대문자로 바꾸는 메소드
	}
// "2" -> 2 (parsing) => Integer.parseInt("2");
Iterator iter = tset.iterator();
	while(iter.hasNext()) {

		System.out.println(((String) iter.next()).toUpperCase());
	}
}
}
[css, html, java, jdbc, oracle]
lotto : [3, 4, 22, 24, 25, 43]
CSS
HTML
JAVA
JDBC
ORACLE
CSS
HTML
JAVA
JDBC
ORACLE
package com.greedy.section03.map.run;
import java.util.Date;
import java.util.HashMap;
import java.util.Map;
public class Application1 {
public static void main(String[] args) {

	/* Map 인터페이스의 특징
	 *
	 * Collection 인터페이스와는 다른 저장방식을 가진다
	 * 키(key)와 값(value)를 하나의 쌍으로 저장하는 방식을 사용한다.
	 *
	 * 키(key)란?
	 * 값(value)을 찾기 위한 이름 역할을 하는 객체를 의미한다.
	 *
	 * 1. 요소의 저장 순서를 유지하지 않는다.
	 * 2. 키는 중복을 허용하지 않지만, 키가 다르면 중복되는 값은 저장 가능하다.
	 *
	 * HashMap, HashTable, TreeMap 등의 대표적인 클래스가 있다.
	 *
	 * HashMap이 가장 많이 사용되면 HashTable은 JDK 1.0부터 제공되며
	 * HashMap과 동일하게 동작한다. 하위 호환을 위해 남겨놓았기 때문에 가급적이면 HashMap을 사용하는 것이 좋다.
	 * */

	HashMap hmap = new HashMap();
	Map hmp2 = new HashMap();

	/* 키와 값 쌍으로 저장한다. */
	/* List계열, Set계열은 요소를 추가할 때 add()을 주로 사용
	 * Map계열은 요소를 추가할 때 put()을 사용한다.
	 * */

	hmap.put("one", new Date());
	hmap.put(12, "red apple");
	hmap.put(33, 123);

	System.out.println("hmap : " + hmap);

	/* 키는 중복 저장 되지 않는다.(set) : 최근 키로 override됨 (덮어씀)*/
	hmap.put(12, "yello banana");
	System.out.println("hmap : " + hmap);

	/* 값 객체는 중복 저장된다.*/
	hmap.put(11, "yello banana");
	hmap.put(9, "yello banana");

	System.out.println("hmap : " + hmap);

	System.out.println("키 9에 대한 객체 : " + hmap.get(9));

	hmap.remove(9);
	System.out.println("hmap : " + hmap);


	System.out.println("hmap에 저장된 객체 수 : " + hmap.size());
}
}
hmap : {33=123, one=Thu Oct 27 11:18:34 KST 2022, 12=red apple}
hmap : {33=123, one=Thu Oct 27 11:18:34 KST 2022, 12=yello banana}
hmap : {33=123, one=Thu Oct 27 11:18:34 KST 2022, 9=yello banana, 11=yello banana, 12=yello banana}
키 9에 대한 객체 : yello banana
hmap : {33=123, one=Thu Oct 27 11:18:34 KST 2022, 11=yello banana, 12=yello banana}
hmap에 저장된 객체 수 : 4
package com.greedy.section03.map.run;
import java.util.Collection;
import java.util.Date;
import java.util.HashMap;
import java.util.Iterator;
import java.util.Map;
import java.util.Set;
import com.greedy.section01.list.dto.BookDTO;
public class Application1 {
public static void main(String[] args) {

	/* Map 인터페이스의 특징
	 *
	 * Collection 인터페이스와는 다른 저장방식을 가진다
	 * 키(key)와 값(value)를 하나의 쌍으로 저장하는 방식을 사용한다.
	 *
	 * 키(key)란?
	 * 값(value)을 찾기 위한 이름 역할을 하는 객체를 의미한다.
	 *
	 * 1. 요소의 저장 순서를 유지하지 않는다.
	 * 2. 키는 중복을 허용하지 않지만, 키가 다르면 중복되는 값은 저장 가능하다.
	 *
	 * HashMap, HashTable, TreeMap 등의 대표적인 클래스가 있다.
	 *
	 * HashMap이 가장 많이 사용되면 HashTable은 JDK 1.0부터 제공되며
	 * HashMap과 동일하게 동작한다. 하위 호환을 위해 남겨놓았기 때문에 가급적이면 HashMap을 사용하는 것이 좋다.
	 * */

	HashMap hmap = new HashMap();
	Map hmp2 = new HashMap();

	/* 키와 값 쌍으로 저장한다. */
	/* List계열, Set계열은 요소를 추가할 때 add()을 주로 사용
	 * Map계열은 요소를 추가할 때 put()을 사용한다.
	 * */

	hmap.put("one", new Date());
	hmap.put(12, "red apple");
	hmap.put(33, 123);

	System.out.println("hmap : " + hmap);

	/* 키는 중복 저장 되지 않는다.(set) : 최근 키로 override됨 (덮어씀)*/
	hmap.put(12, "yello banana");
	System.out.println("hmap : " + hmap);

	/* 값 객체는 중복 저장된다.*/
	hmap.put(11, "yello banana");
	hmap.put(9, "yello banana");

	System.out.println("hmap : " + hmap);

	System.out.println("키 9에 대한 객체 : " + hmap.get(9));

	hmap.remove(9);
	System.out.println("hmap : " + hmap);


	System.out.println("hmap에 저장된 객체 수 : " + hmap.size());

	Map<String, String> hmap2 = new HashMap<>(); //int는 안됨 (기본자료형은쓸수 없고 Integer사용)

	hmap2.put("one", "java 11");
	hmap2.put("two", "oracle 18c");
	hmap2.put("three", "jdbc");
	hmap2.put("four", "html5");
	hmap2.put("five", "css3");

	/* 1. keySet()을 이용해서 키만 따로 set으로 만들고, iterator()로 키에 대한 목록을 만든다.*/
// Set keys = hmap2.keySet();
// Iterator keyIter = keys.iterator();
	Iterator<String> keyIter = hmap2.keySet().iterator();

	while(keyIter.hasNext()) {

		String key = (String) keyIter.next();
		String value = (String) hmap2.get(key);
		System.out.println(key + "=" + value);
	}

	/* 2. 저장된 value 객체들만 values()로 Collection으로 만든다. */

	Collection<String> values = hmap2.values();

	Iterator<String> valueIter = values.iterator();
	while(valueIter.hasNext()) {

		System.out.println(valueIter.next());
	}

	Object[] valueArr = values.toArray();

	for(int i = 0; i < valueArr.length; i++) {

		System.out.println(i + " : " + valueArr[i]);
	}

	/* 3. Map의 내부클래스인 EntrySet을 이용 : entrySet() */
	Set<Map.Entry<String, String>> set = hmap2.entrySet();
	// Entry : 키 객체와 값 객체를 쌍으로 묶은 것

	Iterator<Map.Entry<String, String>> entryIter = set.iterator();

	while(entryIter.hasNext()) {

		Map.Entry<String, String> entry = entryIter.next();
		System.out.println(entry.getKey() + " : " + entry.getValue());
	}
}
}
hmap : {33=123, one=Thu Oct 27 12:03:53 KST 2022, 12=red apple}
hmap : {33=123, one=Thu Oct 27 12:03:53 KST 2022, 12=yello banana}
hmap : {33=123, one=Thu Oct 27 12:03:53 KST 2022, 9=yello banana, 11=yello banana, 12=yello banana}
키 9에 대한 객체 : yello banana
hmap : {33=123, one=Thu Oct 27 12:03:53 KST 2022, 11=yello banana, 12=yello banana}
hmap에 저장된 객체 수 : 4
four=html5
one=java 11
two=oracle 18c
three=jdbc
five=css3
html5
java 11
oracle 18c
jdbc
css3
0 : html5
1 : java 11
2 : oracle 18c
3 : jdbc
4 : css3
four : html5
one : java 11
two : oracle 18c
three : jdbc
five : css3
구글 오라클 -제품- 회원가입(계정만들어놓기)
전체소프트웨어 기술관련 자료 - 자세히 알아보기 - 오라클 데이터베이스 Database Express Edition
prior (이전단계)
ase 18c Express Edition for Windows x64
package com.greedy.section03.map.run;
import java.io.FileInputStream;
import java.io.FileOutputStream;
import java.io.FileReader;
import java.io.FileWriter;
import java.io.IOException;
import java.util.Properties;
public class Application2 {
public static void main(String[] args) {

	/* 설정 파일의 값을 읽어서 애플리케이션에 적용할 때 사용*/
	Properties prop = new Properties();

	prop.setProperty("driver", "orcle.jdbc.dirver.OracleDriver");
	prop.setProperty("url", "jdbc:oracle:thin:@127.0.0.1:1521:xe");
	prop.setProperty("user", "student");
	prop.setProperty("password", "student");

	System.out.println(prop);

	try {

		prop.store(new FileOutputStream("driver.dat"),"jdbc driver"); // 파일만들기
		prop.store(new FileWriter("driver.txt"),"jdbc driver");
		prop.storeToXML(new FileOutputStream("driver.xml"),"jdbc driver");
	} catch (IOException e) {

		e.printStackTrace();
	}

	/* 파일로부터 읽어와서 Properties에 기록*/
	Properties prop2 = new Properties();

	System.out.println(prop2);

	try {

		prop2.load(new FileInputStream("driver.dat"));
		prop2.load(new FileReader("driver.txt")); //똑같은 키 값 벨류값 덮어쓰기

		prop2.loadFromXML(new FileInputStream("driver.xml"));
		/* Properties의 모든 키 값 목록을 대상스트림에 내보내기 한다. */
		prop2.list(System.out);

		System.out.println(prop2.get("driver"));

	} catch (IOException e) {

		e.printStackTrace();
	}
}
}
{password=student, driver=orcle.jdbc.dirver.OracleDriver, user=student, url=jdbc:oracle:thin:@127.0.0.1:1521:xe}
{}
-- listing properties --
password=student
driver=orcle.jdbc.dirver.OracleDriver
user=student
url=jdbc:oracle:thin:@127.0.0.1:1521:xe
orcle.jdbc.dirver.OracleDriver
File 클래스
-
파일 시스템의 파일을 표현하는 클래스
-파일크기, 파일속성, 파일이름 등의 정보와 파일 생성 가능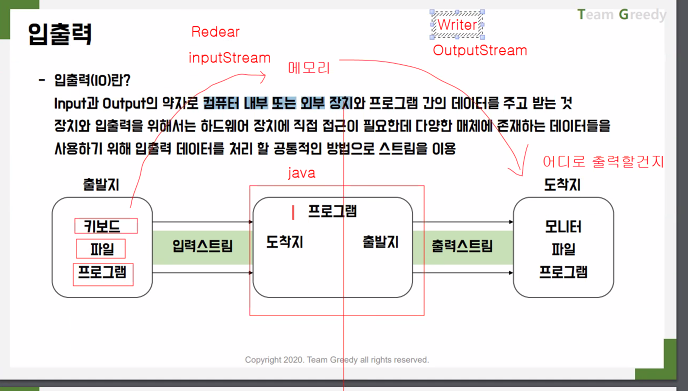
스트림(Stream) = 통로
입출력 장치에서 데이터를 읽고 쓰기 위해서 자바에서 제공하는 클래스
모든 스트림은 단방향(한쪽방향으로만) 이며 각각의 장치마다 연결할 수 있는 스트림 존재refresh -> 새로고침하면 파일이 생김
package com.greedy.section01.file;
import java.io.File;
import java.io.IOException;
public class Application {
public static void main(String[] args) {

	/*
	 * File 클래스
	 * JDK 1.0부터 지원하는 API로 파일 처리를 수행하는 대표적인 클래스이다.
	 *
	 * 대상 파일에 대한 정보로 인스턴스를 생성하고
	 * 파일의 생성, 삭제 등등의 처리를 수행하는 기능을 제공하고 있다.
	 * */

	/* 파일 클래스를 이용해서 인스턴스를 생성
	 * -> 대상 파일이 존재하지 않아도 인스턴스를 생성할 수 있다.
	 * */
	File file = new File("src/com/greedy/section01/file/test.txt"); //인스턴스생성 파일을 생성x
	System.out.println(file);

	try {

		boolean creatSuccess = file.createNewFile();

		/* 최초 실행하면 새롭게 파일이 만들어 지기 때문에 true을 반환하지만
		 * 파일이 한 번 생성되고 난 이후는 새롭게 파일을 만들지 않기 때문에 false를 반환한다.
		 * */
		System.out.println("createSuccess : " + creatSuccess);
	} catch (IOException e) {


		e.printStackTrace();
	}

	/* 생성한 파일의 크기 */
	System.out.println("파일의 크기 : " + file.length() + "byte");
	System.out.println("파일의 경로 : " + file.getPath());
	System.out.println("현재 파일의 상위 경로 : " + file.getParent());
	System.out.println("파일의 절대 경로 : " + file.getAbsolutePath());

	boolean deleteSuccess = file.delete();

	System.out.println("deleteSuccess : " + deleteSuccess);


}
}
src\com\greedy\section01\file\test.txt
createSuccess : false
파일의 크기 : 0byte
파일의 경로 : src\com\greedy\section01\file\test.txt
현재 파일의 상위 경로 : src\com\greedy\section01\file
파일의 절대 경로 : C:\dev\02_lectureSource\chap14-io-lecture-source\src\com\greedy\section01\file\test.txt
deleteSuccess : true
final 없애고싶을경우
package com.greedy.section02.stream;
import java.io.File;
import java.io.FileInputStream;
import java.io.FileNotFoundException;
import java.io.IOException;
public class Application1 {
public static void main(String[] args) {
/*
* 입출력 스트림 개요
*
* 우리는 프로그래밍을 할 때 많은 종류의 데이터를 다루어야 한다.
* 하지만 데이터는 프로그램 내부에 있을 수도 있지만, 프로그램 외부의 데이터를 가져와헛 사용해야 할 수도 있다.
* 또한 프로그램에서 생성한 데이터를 외부로 출력할 수 도 있다.
*
*
* [외부데이터란?]
* 프로그램 외부에 존재하는 모든 데이터를 의미한다.
* 하드디스크 상의 파일이 될수도 있고, 네트워크 상에 존재하는 자원이 될 수도 있다.
*
* 외부 데이터를 대상으로 작업할 때 가장 먼저 해야 할 일은 자바 프로그램과 외부 데이터를 연결하는 것이ㅏㄷ.
* 프로그램과 외부 데이터가 연결된 길을 스트림(stream)이라고 한다.
*
* 스트림은 단방향이기 때문에 데이터를 읽어오기 위한 길은 입력스트림, 데이터를 출력하기 위한 길은 출력스트림이라고 한다.
*
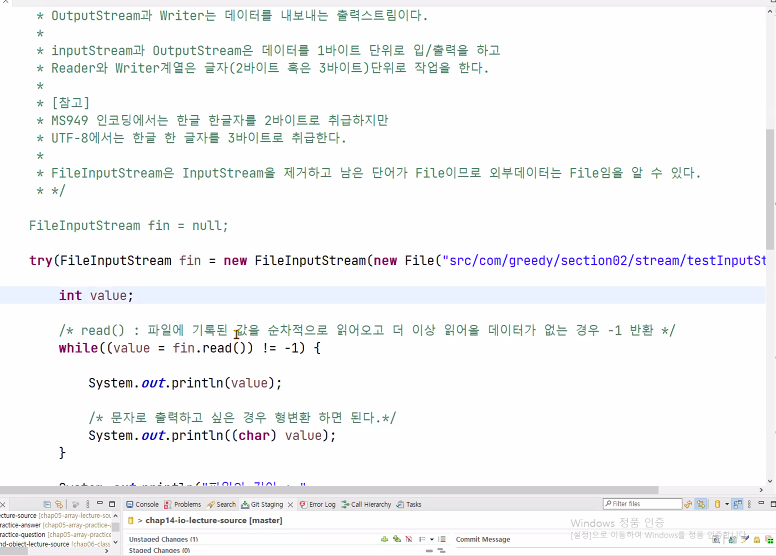
* InputStream과 Reader는 데이터를 읽어오는 입력스트림이고,
* OutputStream과 Writer는 데이터를 내보내는 출력스트림이다.
*
* inputStream과 OutputStream은 데이터를 1바이트 단위로 입/출력을 하고
* Reader와 Writer계열은 글자(2바이트 혹은 3바이트)단위로 작업을 한다.
*
* [참고]
* MS949 인코딩에서는 한글 한 글자를 2바이트로 취급하지만
* UTF-8에서는 한글 한 글자를 3바이트로 취급한다.
*
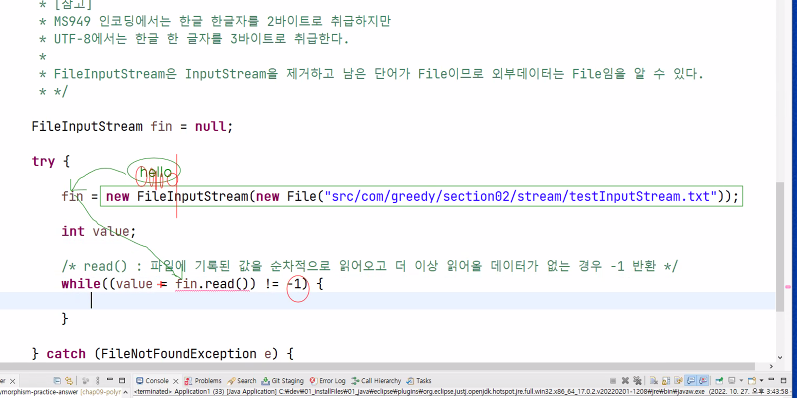
* FileInputStream은 InputStream을 제거하고 남은 단어가 File이므로 외부데이터는 File임을 알 수 있다.
*
*
* */
FileInputStream fin = null;
try {
fin = new FileInputStream(new File("src/com/greedy/section02/stream/testInputStream.txt"));
int value; // byte의
/* read() : 파일에 기록된 값을 순차적으로 읽어오고 더 이상 읽어올 데이터가 없는 경우 -1 반환*/
while((value = fin.read()) != -1) {
System.out.println(value);
/* 문자로 출력하고 싶은 경우 형변환 하면 된다. */
System.out.println((char)value); // 문자로 바꾸기
}
System.out.println("파일의 길이 : "
+ new File("src/com/greedy/section02/stream/testInputStream.txt").length());
int fileSize = (int) new File("src/com/greedy/section02/stream/testInputStream.txt").length();// 강제형변환
byte[] bar = new byte[fileSize];
fin.read(bar);
/* 해당 스트림은 파일의 끝까지 다 읽어들인 스트립이기 때문에
* 위에 1바이트씩 읽어온 내용을 주석해야지만 정상적으로 동작한다.
* */
for(int i = 0; i < bar.length; i++) {
System.out.println((char) bar[i]);
}
} catch (FileNotFoundException e) {
e.printStackTrace();
} catch (IOException e) { // 밑으로내려갈수록 더 넓은범위이다
e.printStackTrace();
} finally {
if(fin != null) { /*fin 인스턴스가 null이 아닌 경우 차원 반나을 해야한다.*/
try {
/* 자원 해제를 하는 경우에도 IOException 핸들링 해야한다.
* 이미 자원이 반납된 경우 발생하는 Exception이다.
* */
/* 자원 반납을 해야하는 이유
* 1. 장기간 실행 중인 프로그램에서 스트림을 닫지 않는 경우 다양한 리소스에서 누스(leak)가 발생한다.
* 2. 뒤에 배우는 버퍼를 이용하는 경우 마지막에 flush()로 버퍼에 있는 데이터를 강제로 전송해야 한다.
* 만약 잔류 데이터가 남은 상황에서 추가로 스트림을 사용한다면 데드락(deadlock)상태가 된다.
* 판단하기 어렵고 의도하지 않는 상황에서도 이런 현상을 발생할 수 있기 때문에 마지막에는 flush()를
* 무조건 실행해주는 것이 좋다.
* close()메소드는 자원을 반납하며 flush()를 해주기 때문에 close()만 제대로 해줘야 한다.
* 따라서 close() 메소드는 외부 자원을 사용하는 경우 반드시 마지막에 호출해줘야 한다.
* */
fin.close();
}catch (IOException e) {
e.printStackTrace();
}
}
}}}
package com.greedy.section02.stream;
import java.io.File;
import java.io.FileNotFoundException;
import java.io.FileReader;
import java.io.IOException;
public class Application2 {
public static void main(String[] args) {

	/* FileReader
	 *
	 * FileInputStream과 사용하는 방법은 거의 동일하다.
	 * 단, byte단위가 아닌 character단위로 읽어들이는 부분이 차이점이다.
	 * -> 2바이트이건 3바이트이건 글자 단위로 읽어오기 때문에 한글을 정상적으로 읽어올 수 있다.
	 * */

	FileReader fr = null;

	try {

		fr = new FileReader(new File("src/com/greedy/section02/stream/testReader.txt"));

		int value;
// while((value = fr.read()) != -1) {
//
// System.out.print((char) value);
// }
System.out.println((int) new File("src/com/greedy/section02/stream/testReader.txt").length());
char[] carr = new char[(int) new File("src/com/greedy/section02/stream/testReader.txt").length()];
	    fr.read(carr);

	    for(int i = 0; i < carr.length; i++) {

	    	System.out.print(carr[i]);
	    }


	} catch (FileNotFoundException e) {

		e.printStackTrace();

	} catch (IOException e) {

		e.printStackTrace();
	} finally {

		if(fr != null) {
			try {

				fr.close();
			} catch(IOException e) {

				e.printStackTrace();
			}
		}
	}
}
}
84
동해물과백두산이마르고닳도록하느님이보우하사우리나라만세
package com.greedy.section02.stream;import java.io.FileNotFoundException;
import java.io.FileOutputStream;
import java.io.IOException;
public class Application3 {
public static void main(String[] args) {

	/* FileOutputStream */

	/* 프로그램의 데이터를 파일로 내보내기 위한 용도의 스트림
	 * 1바이트 단위로 데이터를 처리한다.
	 * */


	FileOutputStream fout = null;

	try {
		/* 하지만 실행해도 예외는 발생하지 않는다.
		 * OutputStream의 경우 대상 파일이 존재하지 않으면 파일을 자동으로 생성해준다.
		 * */

		/* 두 번째 인자로 true를 전달하면 이어쓰기가 된다.
		 * false는 이어쓰기가 아닌 덮어쓰기이며 기본값은 false이다.
		 * */

		fout = new FileOutputStream("src/com/greedy/section02/stream/testOutputStream.txt");

		fout.write(97);

		/* byte 배열을 이용해서 한번에 기록하기
		 * 10 : 개행문자(엔터)
		 * */
		byte[] bar = new byte[] {98, 99, 100, 101, 102, 10};

		fout.write(bar);

		/* 인덱스를 지정해서 내보낼수있다.
		 * 1번 인덱스부터 3의 길이만큼 내보내라..
		 * */
		fout.write(bar, 1, 3);

	} catch (FileNotFoundException e) {

		e.printStackTrace();
	} catch (IOException e) {

		e.printStackTrace();
	} finally {

		if(fout != null) {

			try {
				fout.close();
			} catch (IOException e) {

				e.printStackTrace();
			}

		}
	}
}
}
abcdefcde
package com.greedy.section02.stream;import java.io.FileWriter;
import java.io.IOException;
public class Application4 {
public static void main(String[] args) {

	/* FileWriter
	 *
	 * 프로그램의 데이터를 파일로 내보내기 위한 용도의 스트림이다.
	 * 1 글자 단위로 데이터를 처리한다.
	 * */

	FileWriter fw = null;

	try {
		/* 두 번째 인자로 true를 전달하면 이어쓰기가 된다.
		 * false는 이어쓰기가 아닌 덮어쓰기이며 기본값은 false이다.
		 * */

		fw = new FileWriter("src/com/greedy/section02/stream/testWriter.txt");

		fw.write(97);

		fw.write('A');

		fw.write(new char[] {'a', 'p', 'p', 'l', 'e'});

		fw.write("우리나라 대한민국");

	} catch (IOException e) {

		e.printStackTrace();

	} finally {

		if(fw != null) {

			try {

				fw.close();

			} catch (IOException e) {

				e.printStackTrace();
			}
		}
	}

}
}
aAapple우리나라 대한민국