UITableView는 단일 컬럼의 세로(수직) 스크롤만 제공됨.
하지만 넷플릭스나 웨이브 처럼 세로(수직) 스크롤과 가로(수평) 스크롤을 동시에 할려면
어떻게 해야될까 의문을 가지고 기술 블로그 들을 찾아봤음.
How?
TableView와 CollectionView를 같이 쓰면 원하는 레이아웃을 구성할 수 있음.
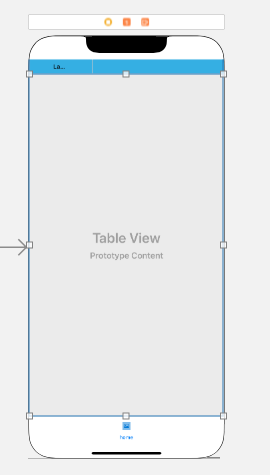
먼저, 스토리보드에 TableView를 설정함.
UITableViewDelegate와 UITableViewDataSource를
extension 으로 작성해주고 설정.
		tableView.delegate = self
        tableView.dataSource = self
        let categoryViewCellNib = UINib(nibName: "CategoryViewCell", bundle: nil)
        self.tableView.register(categoryViewCellNib, forCellReuseIdentifier: "CategoryViewCell")
extension ViewController: UITableViewDelegate, UITableViewDataSource {
//TableView Section 개수
func tableView(_ tableView: UITableView, numberOfRowsInSection section: Int) -> Int {
return 2
}
//TableView Height 설정
func tableView(_ tableView: UITableView, heightForRowAt indexPath: IndexPath) -> CGFloat {
switch indexPath.row {
case 0:
return 100
case 1:
return 200
default:
return 80
}
}
//TableViewCell 설정
func tableView(_ tableView: UITableView, cellForRowAt indexPath: IndexPath) -> UITableViewCell {
switch indexPath.row {
case 0:
if let cell = tableView.dequeueReusableCell(withIdentifier: "CategoryViewCell") as? CategoryViewCell {
return cell
}
case 1:
if let cell = tableView.dequeueReusableCell(withIdentifier: "CategoryViewCell") as? CategoryViewCell {
return cell
}
default:
return UITableViewCell()
}
return UITableViewCell()
}
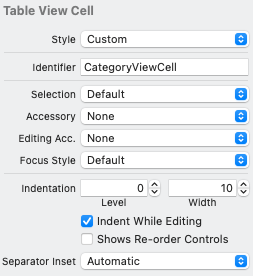
}다음으로 UITableViewCell Nib파일을 생성해줌.
(생성할 때 Xib파일도 체크해서 같이 생성해줌.)
생성한 UITableViewCell 파일에 CollectionView를 올려주고 IBOutlet 설정을 해줌. (CollectionView 외에도 필요한 것들이 있다면 추가해서 올리면 됨.)
그리고 Identifier도 class 이름과 동일하게 작성해 준다.(가독에 좋음.)
그 다음, CollectionView에 올릴 CollectionViewCell Nib파일을 생성해줌.
마찬가지로 Identifier를 class명과 동일하게 작성함.
CollectionViewCell에 표시할 항목들을 등록한다.(imageView , uilabel 등등...)
그리고 UITableViewCell에도 MainViewController와 마찬가지로 extension으로 UICollectionViewDelegate, UICollectionViewDataSource을 작성해주고 설정한다.
@IBOutlet weak var collectionView: UICollectionView!

    override func awakeFromNib() {
        super.awakeFromNib()
        // Initialization code

        collectionView.dataSource = self
        collectionView.delegate = self
        let categoryCollectionCellNib = UINib(nibName: "CategoryCollectionViewCell", bundle: nil)
        collectionView.register(categoryCollectionCellNib, forCellWithReuseIdentifier: "CategoryCollectionViewCell")
    }
extension CategoryViewCell: UICollectionViewDelegate, UICollectionViewDataSource, UICollectionViewDelegateFlowLayout {
func collectionView(_ collectionView: UICollectionView, numberOfItemsInSection section: Int) -> Int {
return 5
}
func collectionView(_ collectionView: UICollectionView, cellForItemAt indexPath: IndexPath) -> UICollectionViewCell {
switch indexPath.row {
case 0:
if let cell = collectionView.dequeueReusableCell(withReuseIdentifier: "CategoryCollectionViewCell", for: indexPath) as? CategoryCollectionViewCell {
let image = UIImage(named: "CategoryImage")
cell.categoryImageView.image = image
cell.categoryLabel.text = "전체"
return cell
}
case 1:
if let cell = collectionView.dequeueReusableCell(withReuseIdentifier: "CategoryCollectionViewCell", for: indexPath) as? CategoryCollectionViewCell {
let image = UIImage(named: "CategoryImage")
cell.categoryImageView.image = image
cell.categoryLabel.text = "평일 스터디"
return cell
}
case 2:
if let cell = collectionView.dequeueReusableCell(withReuseIdentifier: "CategoryCollectionViewCell", for: indexPath) as? CategoryCollectionViewCell {
let image = UIImage(named: "CategoryImage")
cell.categoryImageView.image = image
cell.categoryLabel.text = "주말 스터디"
return cell
}
case 3:
if let cell = collectionView.dequeueReusableCell(withReuseIdentifier: "CategoryCollectionViewCell", for: indexPath) as? CategoryCollectionViewCell {
let image = UIImage(named: "CategoryImage")
cell.categoryImageView.image = image
cell.categoryLabel.text = "주간 스터디"
return cell
}
case 4:
if let cell = collectionView.dequeueReusableCell(withReuseIdentifier: "CategoryCollectionViewCell", for: indexPath) as? CategoryCollectionViewCell {
let image = UIImage(named: "CategoryImage")
cell.categoryImageView.image = image
cell.categoryLabel.text = "인기"
return cell
}
default:
return UICollectionViewCell()
}
return UICollectionViewCell()
}
func collectionView(_ collectionView: UICollectionView, layout collectionViewLayout: UICollectionViewLayout, minimumLineSpacingForSectionAt section: Int) -> CGFloat {
return 0
}
// cell 사이즈( 옆 라인을 고려하여 설정 )
func collectionView(_ collectionView: UICollectionView, layout collectionViewLayout: UICollectionViewLayout, sizeForItemAt indexPath: IndexPath) -> CGSize {
let width = collectionView.frame.width / 5 /// 3등분하여 배치, 옆 간격이 1이므로 1을 빼줌
let size = CGSize(width: width, height: width + 10)
return size
}
}
마지막으로 UITableViewCell에 올렸던 CollectionView의 스크롤 방향을 가로로 설정 해줌.
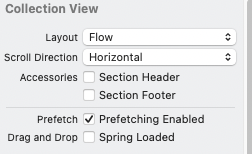
이제 넷플릭스나, 웨이브 처럼 수직 스크롤과 수평스크롤이 같이 되는 레이아웃을 구성할 수 있음.