WTF is Redux?
Redux is a globla state container for JS applications.
It can be used across multiple frameworks and libraries such as React.js or vue etc...
- Provides central state management container for React applications helping developer less concern specific about pipe drilling as the application grows larger over time.
- it is tiny (2kb including dependencies).
- It is also available as a precompiled UMD package that defines a window.Redux global variable. The UMD package can be used as a < script> tag directly.
Basic setup / prcocess of data handling in Redux
1) Global state of an app is stored in an object tree inside a single store.
2) The only way to change the state tree is to create an action, an object describing what happened.
3) Dispatch the action to the store.
To specify, write pure recucer funtions that calculate a new state based on the old state and the action.
- The Redux state should contain only plain JS objects, arrays, and primitives.
- The root state value is usually an object.
- It's important that you should not mutate the state object, but return a new object if the state changes.
- Reducer funtion
// A reducer's function signature is: (state, action) => newState

function counterReducer(state = {value:0}, action) {
	switch(action.type) {
    case `counter/incremented`:
    	return {value: state.value + 1}
    case `counter/decremented`:
    	return { value: state.value - 1}
    default:
    	return state
	}
}- Setting up the store
import { createStore } from 'redux'

// Create a Redux store holding the state of your app.
// Its API is { subscribe, dispatch, getState }.
let store = createStore(counterReducer)- Subscribe() to update the UI
You can use subscribe() to update the UI in response to state changes.
Normally you'd use a view binding library (e.g. React-Redux) rather than subscribe() directly.
There may be additional use cases where it's helpful to subscribe as well.
store.subscribe(() => console.log(store.getState()))
- Dispatch action
// The only way to mutate the internal state is to dispatch an action.
// The actions can be serialized, logged or stored and later replayed.
store.dispatch({ type: 'counter/incremented' })
// {value: 1}
store.dispatch({ type: 'counter/incremented' })
// {value: 2}
store.dispatch({ type: 'counter/decremented' })
// {value: 1}
Instead of mutating the state directly, you specify the mutations you want to happen with plain objects called actions. Then you write a special function called a reducer to decide how every action transforms the entire application's state.
In a typical Redux app, there is just a single store with a single root reducing function. As your app grows, you split the root reducer into smaller reducers independently operating on the different parts of the state tree. This is exactly like how there is just one root component in a React app, but it is composed out of many small components.
처음 사용자가 보기엔 카운터 어플 치고는 보일러 플레이트가 크게 보이지만 스케일 하기가 쉬워 미래 유지보수가 유지될수 있으며 mutation tracking도 가능하다(어떤 action으로 인해 어떤 state이 변했는지).
Redux Toolkit
- Official recommended approach for writing Redux logic.
- Wrapper for core of Redux that provides packages and functions.
- Helps developer for using the tool in the best practice by redux team.
simplifies process of store stup, creating reducers and writing immutable update logic and slices of state at once.
- 예시:
import {createSlice, configureStore} from '@reduxjs/toolkit`;

const counterSlice = createSlice({
  name: `counter`},
  initialState: {
	value: 0
  },
  reducers: {
      // Redux Toolkit allows us to write "mutating" logic in reducers. It
      // doesn't actually mutate the state because it uses the Immer library,
      // which detects changes to a "draft state" and produces a brand new
      // immutable state based off those changes
    incremented: state => {
     state.value += 1
    },
    decremented: staet => {
     state.value -= 1
    }
  }
});

export const {incremented, decremented } = counterSlice.actions;

const store = configureStore({
 reducer: counterSlice.reducer
});
Redux Toolkit allows us to write shorter logic that's easier to read, while still following the same Redux behavior and data flow.
When to use Redux?
- You have reasonable amounts of data changing over time
- if you have prediction that your app will grow larger over time in future.
- You need a single source of truth for your state
- You find that keeping all your state in a top-level component is no longer sufficient
React-Redux
- Official package that lets your UI framework such as react components interact with Redux store by reading pieces of state and dispatching actions to update the store.
Deeper concept of Redux
Often with vanilla way of making React.js application, we encounter a situation called 'Props drilling' where a ParentComponent passes props through multiple ChildrenComponents and handlers for lifting states.
The process seems quite redudant and repetitive and this is all thanks to unidirection in data handling in React library.
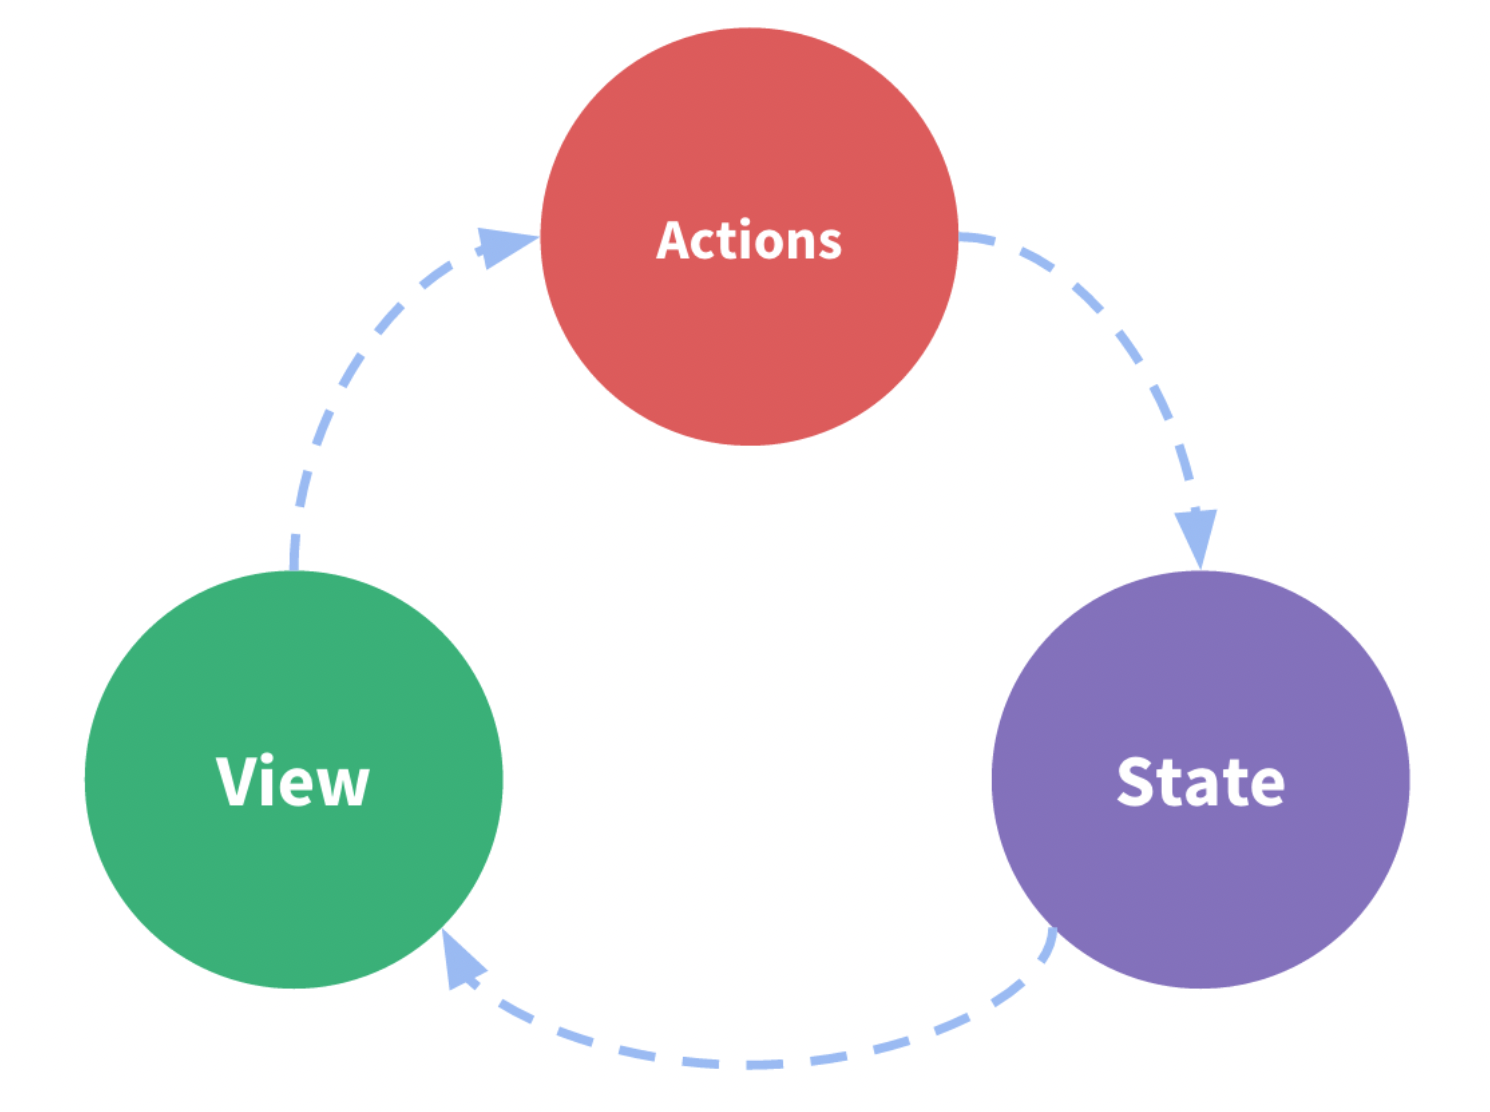
A small example of of 'one-way data flow' can be broken into 4 stepts:
1) State describes the condition of the app at a specific point in time
2) The UI is rendered based on that state
3) When something happens (such as a user clicking a button), the state is updated based on what occurred
4) The UI re-renders based on the new state
However, with Redux the prop drilling situation can be prevented when there are multiple associated components involved with shared states that bring complexity in overall logic of an application. by extracting the shared state from components, and put it into a central location outside of the component tree.
With this, the component tree becomes big "View" and any component can access the state or trigger actions regardless wherever they are within file structure.
By defining and separating the concepts involved in state management and enforcing rules that maintain independence between views and states, we give our code more structure and maintainability.
Immutability
JS objects and objects like (array) are all mutable by default.
In order to update values immutably, your code must make copies of existing objects/arrays, and then modify the copies. <-- Can be achieved by using spread operators or some builtin methods in array.
- Redux expects that all state updates are done immutably.
In Redux, our reducers are never allowed to mutate the original / current state values!
state.value = 123 <-- that's NONO
Terminology
- Actions: Js object that has a type field(constant string). Think of it as an event that describes something that happened in the application. Written like 'domain/eventName' like 'todos/todoAdded'. First part is the feature or category that the action belongs to and the second is specific thing that happened
- has type(string) and paylaod.
	const addTodoAction = {
  		type: 'todos/todoAdded',
  		payload: 'Buy milk'
}-
Action creators: is a function that creates and returns an action object. Use this to avoid redundancy from writing the action object by hand every time.
-
Reducers: is a function that receives the current state and an action object decides how to update the state. If necessary, returns the new state (state, action ) => newState. Think of reducer as an event listener which handles events based on the received action(event) type.
* Should ONLY calculate the new state value based on the state and action arguments.- Not allowed to modify the existing state. They must make immutable updates instead, by copying the existing state and making changes to the copied values.
- Not allowed to do any async logic, calculate random values, or cause other side effects.
-
The logic inside the reducer:
- Check to see if the reducer cares about this action
- If so, make a copy of the state, update the copy with new values, and return it
- Otherwise, return the existing state unchanged
const initialState = { value: 0 }

function counterReducer(state = initialState, action) {
  // Check to see if the reducer cares about this action
  if (action.type === 'counter/increment') {
    // If so, make a copy of `state`
    return {
      ...state,
      // and update the copy with the new value
      value: state.value + 1
    }
  }
  // otherwise return the existing state unchanged
  return state
}
Reducers can use any kind of logic inside to decide what the new state should be: if/else, switch, loops, and so on.
- Store: has dispatch() method and it is the only way to update the state by passing in an action object.
The store will run its reducer function and save the new state value inside, and we can call getState() to retrieve the updated value:
store.dispatch({ type: 'counter/increment' })

console.log(store.getState())
// {value: 1}
You can think of dispatching actions as "triggering an event" in the application. Something happened, and we want the store to know about it. Reducers act like event listeners, and when they hear an action they are interested in, they update the state in response.
Typically call action creators to dispatch the right action:
const increment = () => {
  return {
    type: 'counter/increment'
  }
}

store.dispatch(increment())

console.log(store.getState())
// {value: 2}- Selectors: are functions that know how to extract specific pieces of inromation from a store state value. Helps avoid repeating logic as different parts of the app need to read the same data. 쉽게말하면 initial state에 키-속성들이 많을때 한 속성값을 가져올수 있게 해줌:
const selectCounterValue = state => state.value

const currentValue = selectCounterValue(store.getState())
console.log(currentValue)
// 2
Redux Application Data Flow
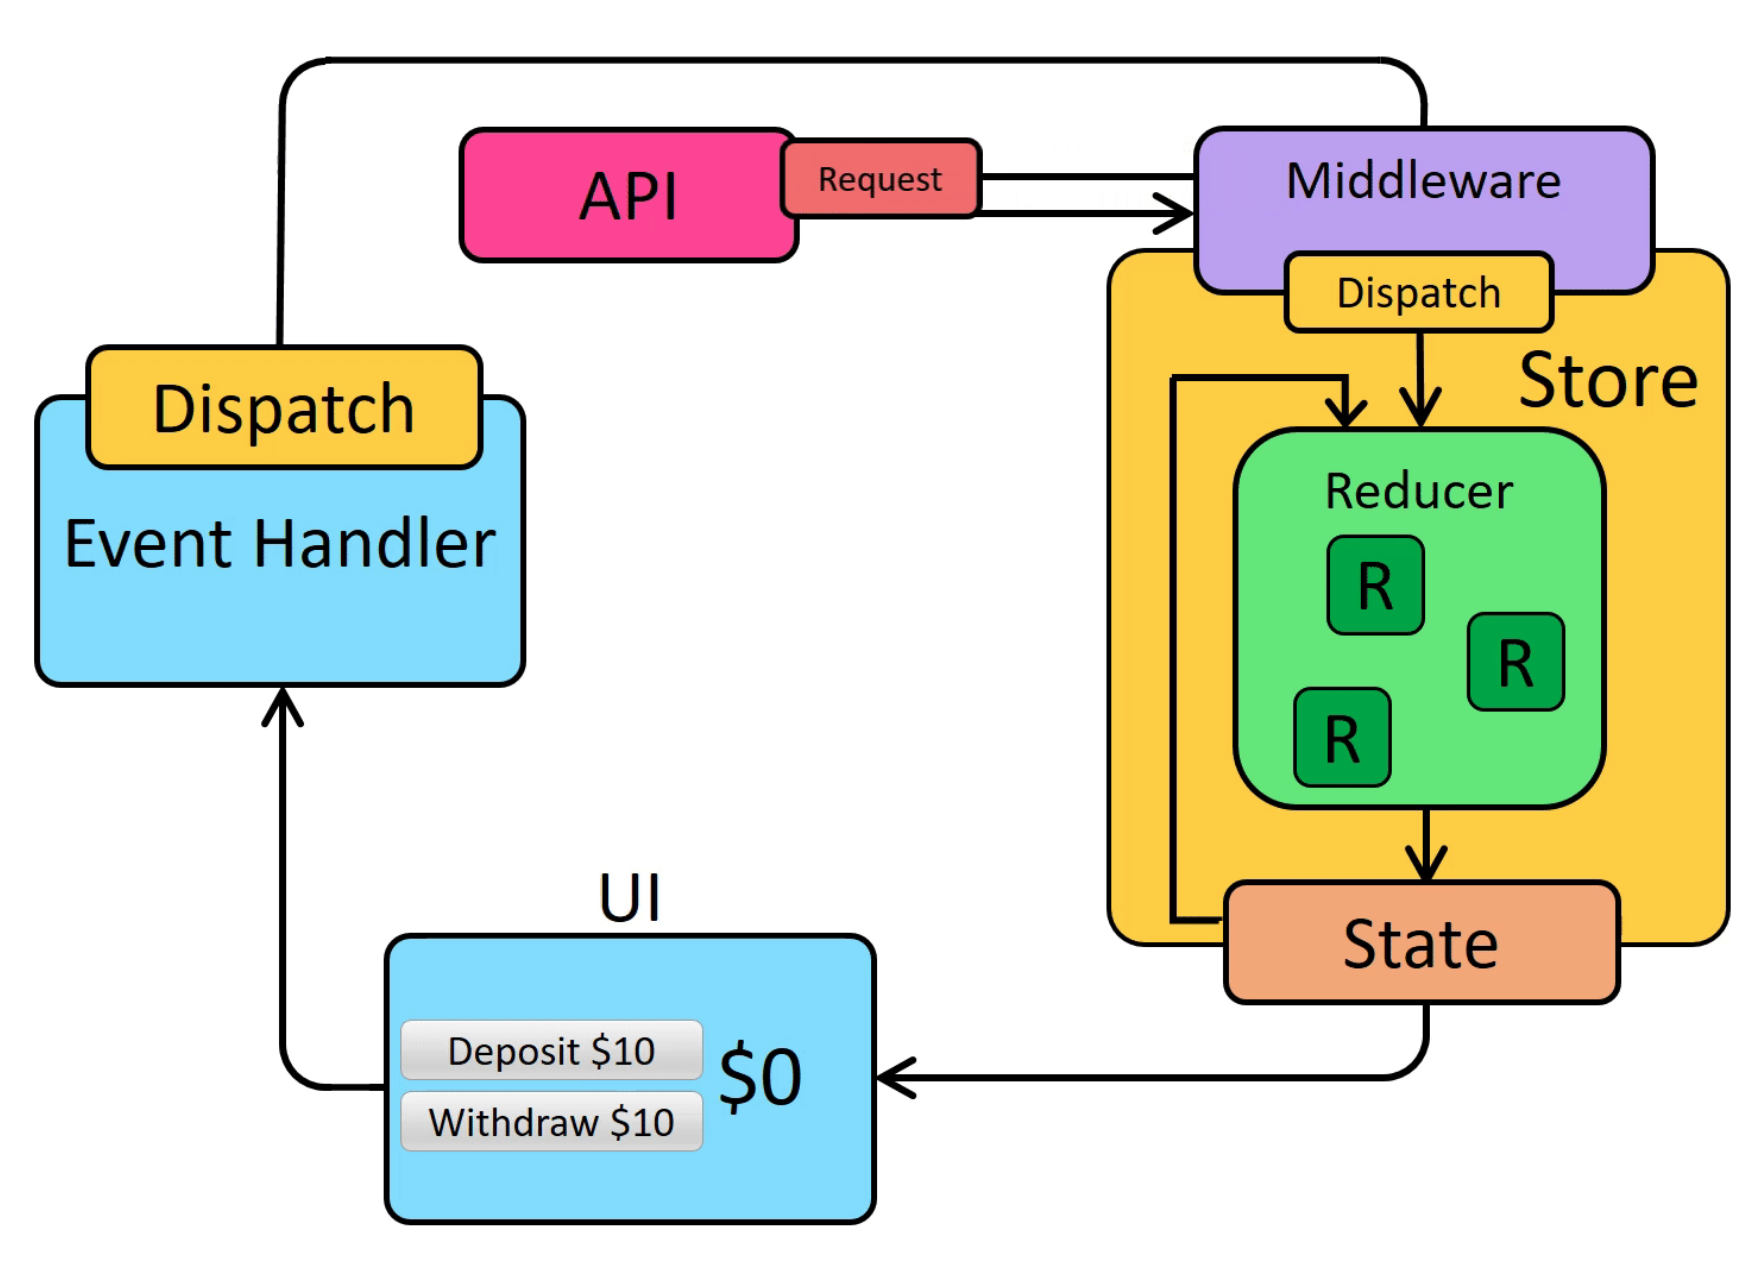
Unlike one-way data flow, Redux follows the steps below for data handling.
- Initial setup:
1) A Redux store is created using a root reducer function
2) The store calls the root reducer once, and saves the return value as its initial state
3) When the UI is first rendered, UI components access the current state of the Redux store, and use that data to decide what to render. They also subscribe to any future store updates so they can know if the state has changed. - Updates:
1) Something happens in the app, such as a user clicking a button
2) The app code dispatches an action to the Redux store, like dispatch({type: 'counter/increment'})
3) The store runs the reducer function again with the previous state and the current action, and saves the return value as the new state
4) The store notifies all parts of the UI that are subscribed that the store has been updated
5) Each UI component that needs data from the store checks to see if the parts of the state they need have changed. <- Meaning not all components trigger re-render. Only those subscribed to part of state data.
6) Each component that sees its data has changed forces a re-render with the new data, so it can update what's shown on the screen
SUMMARY
- Redux is a library for managing global application state
- Redux is typically used with the React-Redux library for integrating Redux and React together
- Redux Toolkit is the recommended way to write Redux logic - Redux uses a "one-way data flow" app structure
- State describes the condition of the app at a point in time, and UI renders based on that state
- When something happens in the app:
1) The UI dispatches an action
2) The store runs the reducers, and the state is updated based on what occurred
3) The store notifies the UI that the state has changed
- The UI re-renders based on the new state - Redux uses several types of code
- Actions are plain objects with a type field, and describe "what happened" in the app
- Reducers are functions that calculate a new state value based on previous state + an action
- A Redux store runs the root reducer whenever an action is dispatched
configureStore()
- store is created using the function with reducer as arguments.
- accepts all different reducers in an object. The key names in the object will define the kyes in our final statte value.
import { configureStore } from '@reduxjs/toolkit'
import counterReducer from '../features/counter/counterSlice'

export default configureStore({
  reducer: {
    counter: counterReducer
  }
})
When we pass in an object like {counter: counterReducer}, that says that we want to have a state.counter section of our Redux state object, and that we want the counterReducer function to be in charge of deciding if and how to update the state.counter section whenever an action is dispatched.
Redux allows store setup to be customized with different kinds of plugins ("middleware" and "enhancers").
Redux Slices
A "slice" is a collection of Redux reducer logic and actions for a single feature in your app typically defined together in a single file. The name comes from splitting up the root Redux state object into multiple "slices" of state.
import { configureStore } from '@reduxjs/toolkit'
import usersReducer from '../features/users/usersSlice'
import postsReducer from '../features/posts/postsSlice'
import commentsReducer from '../features/comments/commentsSlice'

export default configureStore({
  reducer: {
    users: usersReducer,
    posts: postsReducer,
    comments: commentsReducer
  }
})
위에 예시 에서 state.users, state.posts, and state.comments are each a separate slice of the redux state.
configureStore passes single root reducer of different slice reducers to combineReducers internally for generating the root reducer.
Creating Slice Reducers and Actions
import { createSlice } from '@reduxjs/toolkit'

export const counterSlice = createSlice({
  name: 'counter',
  initialState: {
    value: 0
  },
  reducers: {
    increment: state => {
      // Redux Toolkit allows us to write "mutating" logic in reducers. It
      // doesn't actually mutate the state because it uses the immer library,
      // which detects changes to a "draft state" and produces a brand new
      // immutable state based off those changes
      state.value += 1
    },
    decrement: state => {
      state.value -= 1
    },
    incrementByAmount: (state, action) => {
      state.value += action.payload
    }
  }
})

export const { increment, decrement, incrementByAmount } = counterSlice.actions

export default counterSlice.reducer
Redux Toolkit has a function called createSlice, which takes care of the work of generating action type strings, action creator functions, and action objects. All you have to do is define a name for this slice, write an object that has some reducer functions in it, and it generates the corresponding action code automatically.
The string from the name option is used as the first part of each action type string, and the key name of each reducer function is used as the second part. So, the "counter" name + the "increment" reducer function generated an action type of {type: "counter/increment"}. (After all, why write this by hand if the computer can do it for us!)
In addition to the name field,createSlice needs us to pass in the initial state value for the reducers, so that there is a state the first time it gets called. In this case, we're providing an object with a value field that starts off at 0.
We can see here that there are three reducer functions, and that corresponds to the three different action types that were dispatched by clicking the different buttons.
createSlice automatically generates action creators with the same names as the reducer functions we wrote.
It also generates the slice reducer function that knows how to respond to all these action types:
const newState = counterSlice.reducer(
  { value: 10 },
  counterSlice.actions.increment()
)
console.log(newState)
// {value: 11}- createSlice is essentially a function that accepts 1) an initial state, 2) an object of reducer functions and 3)a 'slice name', and automatically generates action creators and action types that correspond to the reducers and state.
- accepts initial state obj, and a slice name.
- generate action creator(function that returns action)
- action is a object with type(constant string) and payload which is a value for next update.
- createSlice function lets you write immutable updates an easier way
Internally, it uses createAction and createReducer, so you may also use Immer to write "mutating" immutable updates:
createSlice uses a library called Immer inside. Immer uses a special JS tool called a Proxy to wrap the data you provide, and lets you write code that "mutates" that wrapped data. But, Immer tracks all the changes you've tried to make, and then uses that list of changes to return a safely immutably updated value, as if you'd written all the immutable update logic by hand.
Instead of using spreads
function handwrittenReducer(state, action) {
  return {
    ...state,
    first: {
      ...state.first,
      second: {
        ...state.first.second,
        [action.someId]: {
          ...state.first.second[action.someId],
          fourth: action.someValue
        }
      }
    }
  }
}
With Immer:
function reducerWithImmer(state, action) {
  state.first.second[action.someId].fourth = action.someValue
}
Warning:
You can only write "mutating" logic in Redux Toolkit's createSlice and createReducer because they use Immer inside! If you write mutating logic in reducers without Immer, it will mutate the state and cause bugs!
it's always better to keep the action objects as small as possible, and do the state update calculations in the reducer. This also means that reducers can contain as much logic as necessary to calculate the new state.
Writing Async Logic with Thunks
A thunk is a specific kind of Redux function that can contain asynchronous logic. Thunks are written using two functions:
// The function below is called a thunk and allows us to perform async logic.
// It can be dispatched like a regular action: `dispatch(incrementAsync(10))`.
// This will call the thunk with the `dispatch` function as the first argument.
// Async code can then be executed and other actions can be dispatched
export const incrementAsync = amount => dispatch => {
  setTimeout(() => {
    dispatch(incrementByAmount(amount))
  }, 1000)
}


store.dispatch(incrementAsync(5))

// Example 2 for AJAX calls:
// outside 'thunk creator' function
const fetchUserById = userId => {
	// the inside thunk function
	return async (dispatch, getState) => {
    try{
    	// make an async call in the thunk
    	const user = await userAPI.fetchById(userId);
        //dispatch an action when we get the response back
        dispatch(userLoaded(user))
     } catch(err) {
     //If something went wrong, handle it here
     }
   }
 };
Thunk and async logic
Thunks are written using two functions:
- An inside thunk function, which gets dispatch and getState as arguments
- The outside creator function, which creates and returns the thunk function
The store needs to be set up with redux-thunk middleware which Redux Toolkit's configureStore already set that up for us default.
In a real Redux app, we're not allowed to import the store into other files, especially in our React components, because it makes that code harder to test and reuse. < -- ?? Didn't know this. I thought store could be exported freely to use .dispatch() method.
Middlewares such as thunk can also modify the store so that we can call dispatch() and pass in values that are not plain action objects, like functions or Promises.
The Redux Thunk middleware modifies the store to let you pass functions into dispatch. In fact, it's short enough we can paste it here:
const thunkMiddleware =
  ({ dispatch, getState }) =>
  next =>
  action => {
    if (typeof action === 'function') {
      return action(dispatch, getState)
    }

    return next(action)
  }
It looks to see if the "action" that was passed into dispatch is actually a function instead of a plain action object. If it's actually a function, it calls the function, and returns the result. Otherwise, since this must be an action object, it passes the action forward to the store.
Reading Data with useSelector
The useSelector hook lets our component extract whatever pieces of data it needs from the Redux store state.
export const selectCount = state => state.counter.value
// alternative inline version instead of importing selector function
const countPlusTwo = useSelector(state => state.counter.value + 2)
If we had access to a Redux store, we could retrieve the current counter value as:
const count = selectCount(store.getState())
console.log(count)
// 0
Our components can't talk to the Redux store directly, because we're not allowed to import it into component files. But, useSelector takes care of talking to the Redux store behind the scenes for us. If we pass in a selector function, it calls someSelector(store.getState()) for us, and returns the result.
Any time an action has been dispatched and the Redux store has been updated, useSelector will re-run our selector function. If the selector returns a different value than last time, useSelector will make sure our component re-renders with the new value. useSelector is in sync with global state status
It's important to note that the component will re-render any time the value returned from useSelector changes to a new reference.
Components should always try to select the smallest possible amount of data they need from the store, which will help ensure that it only renders when it actually needs to.
Dispatching Actions with useDispatch
const dispatch = useDispatch()

<button
  className={styles.button}
  aria-label="Increment value"
  onClick={() => dispatch(increment())}
>
  +
</button>
Component State and Forms
We can have local states in a component for handling / form control situtation instead of using redux's global state.
Following is derived from official doc:
NO. Global state that is needed across the app should go in the Redux store. State that's only needed in one place should be kept in component state.
In a React + Redux app, your global state should go in the Redux store, and your local state should stay in React components.
-TIP
-
If you're not sure where to put something, here are some common rules of thumb for determining what kind of data should be put into Redux:
-
Do other parts of the application care about this data?
-
Do you need to be able to create further derived data based on this original data?
-
Is the same data being used to drive multiple components?
-
Is there value to you in being able to restore this state to a given point in time (ie, time travel debugging)?
-
Do you want to cache the data (ie, use what's in state if it's already there instead of re-requesting it)?
-
Do you want to keep this data consistent while hot-reloading UI components (which may lose their internal state when swapped)?
useSelector and useDispatch hooks to talk to the Redux store.
Providing the Store
index.js
import React from 'react'
import ReactDOM from 'react-dom'
import './index.css'
import App from './App'
import store from './app/store'
import { Provider } from 'react-redux'
import * as serviceWorker from './serviceWorker'

ReactDOM.render(
  <Provider store={store}>
    <App />
  </Provider>,
  document.getElementById('root')
)
Summary 2
- We can create a Redux store using the Redux Toolkit configureStore API
configureStore accepts a reducer function as a named argument
configureStore automatically sets up the store with good default settings - Redux logic is typically organized into files called "slices"
A "slice" contains the reducer logic and actions related to a specific feature section of the Redux state
Redux Toolkit's createSlice API generates action creators and action types for each individual reducer function you provide - Redux reducers must follow specific rules
Should only calculate a new state value based on the state and action arguments
Must make immutable updates by copying the existing state
Cannot contain any asynchronous logic or other "side effects"
Redux Toolkit's createSlice API uses Immer to allow "mutating" immutable updates - Async logic is typically written in special functions called "thunks"
Thunks receive dispatch and getState as arguments
Redux Toolkit enables the redux-thunk middleware by default - React-Redux allows React components to interact with a Redux store
Wrapping the app with < Provider store={store}> enables all components to use the store
Global state should go in the Redux store, local state should stay in React components
- Dispatching action with createSlice().action.actionCreater()
- Redux Toolkit has a nanoid function that we can use to create unique id.
import { nanoid } from '@reduxjs/toolkit'Basic redux data Practice
1) The Redux Toolkit createSlice function generates "slice reducer" functions for you, and lets you write "mutating" code that is turned into safe immutable updates
2) Those slice reducer functions are added to the reducer field in configureStore, and that defines the data and state field names inside the Redux store
3) Selector functions receive the whole state object, and should return a value
4) createSlice will generate action creator functions for each reducer we add to a slice
5) Call dispatch(someActionCreator()) in a component to dispatch an action
6) Reducers will run, check to see if this action is relevant, and return new state if appropriate
7) Selectors will re-run whenever the Redux store is updated, and if the data they return has changed, the component will re-render
//features/posts/postsSlice.js

const postsSlice = createSlice({
  name: 'posts',
  initialState,
  reducers: {
    postAdded(state, action) {
      state.push(action.payload)
    }
  }
})

export const { postAdded } = postsSlice.actions

export default postsSlice.reducer
// features/posts/AddPostForm
import React, { useState } from 'react'
import { useDispatch } from 'react-redux'
import { nanoid } from '@reduxjs/toolkit'
import { postAdded } from './postsSlice'
export const AddPostForm = () => {
const [title, setTitle] = useState('')
const [content, setContent] = useState('')
const dispatch = useDispatch()
const onTitleChanged = e => setTitle(e.target.value)
const onContentChanged = e => setContent(e.target.value)
const onSavePostClicked = () => {
if (title && content) {
dispatch(
postAdded({
id: nanoid(),
title,
content
})
)
setTitle('')
setContent('')
}
}
return (
<section>
<h2>Add a New Post</h2>
<form>
{/* omit form inputs */}
<button type="button" onClick={onSavePostClicked}>
Save Post
</button>
</form>
</section>
)
}
Preparing Action Payloads
A way to customize the contents of action.payload.
Fortunately, createSlice lets us define a "prepare callback" function when we write a reducer. The "prepare callback" function can take multiple arguments, generate random values like unique IDs, and run whatever other synchronous logic is needed to decide what values go into the action object. It should then return an object with the payload field inside. (The return object may also contain a meta field, which can be used to add extra descriptive values to the action, and an error field, which should be a boolean indicating whether this action represents some kind of an error.)
Basically prepare call back is where we can write custom logics that we can't do within regular slice reducers functions.
Inside of the reducers field in createSlice, we can define one of the fields as an object that looks like {reducer, prepare}:
// features/posts/postsSlice.js

const postsSlice = createSlice({
  name: 'posts',
  initialState,
  reducers: {
    postAdded: {
      reducer(state, action) {
        state.push(action.payload)
      },
      // here to customize
      prepare(title, content) {
        return {
          payload: {
            id: nanoid(),
            title,
            content
          }
        }
      }
    }
    // other reducers here
  }
})

**Again, it's always better to keep the action objects as small as possible, and do the state update calculations in the reducer. This also means that reducers can contain as much logic as necessary to calculate the new state.**

//features/posts/AddPostForm.js

const onSavePostClicked = () => {
  if (title && content) {
    dispatch(postAdded(title, content))
    setTitle('')
    setContent('')
  }
}
Summary 3
- Any React component can use data from the Redux store as needed
Any component can read any data that is in the Redux store
Multiple components can read the same data, even at the same time
Components should extract the smallest amount of data they need to render themselves
Components can combine values from props, state, and the Redux store to determine what UI they need to render. They can read multiple pieces of data from the store, and reshape the data as needed for display.
* Any component can dispatch actions to cause state updates - Redux action creators can prepare action objects with the right contents
createSlice and createAction can accept a "prepare callback" that returns the action payload
Unique IDs and other random values should be put in the action, not calculated in the reducer - Reducers should contain the actual state update logic
Reducers can contain whatever logic is needed to calculate the next state
Action objects should contain just enough info to describe what happened
Async Logic and Data fetching
What if you want to have async logic interact with the store(becasuse redux store is not supposed to handle any async logics) by dispatching or checking the current store state? That's where Redux middleware come in. They extend the store, and allow you to:
- Execute extra logic when any action is dispatched (such as logging the action and state)
- Pause, modify, delay, replace, or halt dispatched actions
- Write extra code that has access to dispatch and getState
- Teach dispatch how to accept other values besides plain action objects, such as functions and promises, by intercepting them and dispatching real action objects instead
Thunks are typically written in "slice" files. createSlice itself does not have any special support for defining thunks, so you should write them as separate functions in the same slice file. That way, they have access to the plain action creators for that slice, and it's easy to find where the thunk lives.
The word "thunk" is a programming term that means "a piece of code that does some delayed work".
Data fetching logic for Redux typically follows a predictable pattern:
1) A "start" action is dispatched before the request, to indicate that the request is in progress. This may be used to track loading state to allow skipping duplicate requests or show loading indicators in the UI.
2) The async request is made
3) Depending on the request result, the async logic dispatches either a "success" action containing the result data, or a "failure" action containing error details. The reducer logic clears the loading state in both cases, and either processes the result data from the success case, or stores the error value for potential display.
These steps are not required, but are commonly used. (If all you care about is a successful result, you can just dispatch a single "success" action when the request finishes, and skip the "start" and "failure" actions.)
Redux Toolkit provides a createAsyncThunk API to implement the creation and dispatching of these actions, and we'll look at how to use it shortly.
Redux Toolkit's createAsyncThunk API generates thunks that automatically dispatch those "start/success/failure" actions for you.
There are times when a slice reducer needs to respond to other actions that weren't defined as part of this slice's reducers field. We can do that using the slice extraReducers field instead.
The extraReducers option should be a function that receives a parameter called builder. The builder object provides methods that let us define additional case reducers that will run in response to actions defined outside of the slice. We'll use builder.addCase(actionCreator, reducer) to handle each of the actions dispatched by our async thunks.
createAsyncThunk handles any errors internally, so that we don't see any messages about "rejected Promises" in our logs. It then returns the final action it dispatched: either the fulfilled action if it succeeded, or the rejected action if it failed.
However, it's common to want to write logic that looks at the success or failure of the actual request that was made. Redux Toolkit adds a .unwrap() function to the returned Promise, which will return a new Promise that either has the actual action.payload value from a fulfilled action, or throws an error if it's the rejected action. This lets us handle success and failure in the component using normal try/catch logic. So, we'll clear out the input fields to reset the form if the post was successfully created, and log the error to the console if it failed.
SUMMARY 4
- You can write reusable "selector" functions to encapsulate reading values from the Redux state
* Selectors are functions that get the Redux state as an argument, and return some data - Redux uses plugins called "middleware" to enable async logic
The standard async middleware is called redux-thunk, which is included in Redux Toolkit
Thunk functions receive dispatch and getState as arguments, and can use those as part of async logic - You can dispatch additional actions to help track the loading status of an API call
The typical pattern is dispatching a "pending" action before the call, then either a "success" containing the data or a "failure" action containing the error
Loading state should usually be stored as an enum, like 'idle' | 'loading' | 'succeeded' | 'failed' - Redux Toolkit has a createAsyncThunk API that dispatches these actions for you
createAsyncThunk accepts a "payload creator" callback that should return a Promise, and generates pending/fulfilled/rejected action types automatically
Generated action creators like fetchPosts dispatch those actions based on the Promise you return
You can listen for these action types in createSlice using the extraReducers field, and update the state in reducers based on those actions.
Action creators can be used to automatically fill in the keys of the extraReducers object so the slice knows what actions to listen for.
* Thunks can return promises. For createAsyncThunk specifically, you can await dispatch(someThunk()).unwrap() to handle the request success or failure at the component level.