두서말:
리액트 공식문서가 완전히 새로 업데이트가 되어서 기본도 다시 복습할겸 새로운 공식문서를 읽어가던중 까먹었거나 새로 알게된 내용들을 정리해 적어 본다. 일단 오늘 챕터는 Adding interactivity부터 시작하기로...
EventHandler in React
Functions passed to event handlers must be passed, not called. For example:
- passing a function (correct) - < button onClick={handleClick} />
2/ calling a function (incorrect) - < button onClick={handleClick()} />
The difference is subtle. In the first example, the handleClick function is passed as an onClick event handler. This tells React to remember it and only call your function when the user clicks the button.
In the second example, the () at the end of handleClick() fires the function immediately during rendering, without any clicks. This is because JavaScript inside the JSX { and } executes right away.
Note:
Using an arrow function in render creates a new function each time the component renders, which may break optimizations based on strict identity comparison.
From Reactjs point of view, since the arrow function creates a new function everytime, it could potentially cause two performance related problems:
- Could invoke the garbage collector more frequently than usual
- Will cause unnecessary re-render of your components(even the pure components) as new function will be considered as a new prop.
There is already a babel plugin that solves this re-render problem caused by using arrow fn: reflective-bind The performance benefit from using this plugin has been described here
refs:
https://stackoverflow.com/questions/64117611/reactjs-inline-arrow-functions-performance
https://flexport.engineering/ending-the-debate-on-inline-functions-in-react-8c03fabd144
Responding to Events
Event propagation
Event handlers will also catch events from any children your component might have. We say that an event “bubbles” or “propagates” up the tree: it starts with where the event happened, and then goes up the tree.
This <div -/> contains two buttons. Both the <div -/> and each button have their own onClick handlers. Which handlers do you think will fire when you click a button?
export default function Toolbar() {
  return (
    <div className="Toolbar" onClick={() => {
      alert('You clicked on the toolbar!');
    }}>
      <button onClick={() => alert('Playing!')}>
        Play Movie
      </button>
      <button onClick={() => alert('Uploading!')}>
        Upload Image
      </button>
    </div>
  );
}
If you click on either button, its onClick will run first, followed by the parent <div -/>’s onClick. So two messages will appear. If you click the toolbar itself, only the parent <div -/>’s onClick will run.
All events propagate in React except onScroll, which only works on the JSX tag you attach it to.
Don’t confuse e.stopPropagation() and e.preventDefault(). They are both useful, but are unrelated:
- e.stopPropagation() stops the event handlers attached to the tags above from firing.
- e.preventDefault() prevents the default browser behavior for the few events that have it.
Can event handlers have side effects?
Absolutely! Event handlers are the best place for side effects.
Unlike rendering functions, event handlers don’t need to be pure, so it’s a great place to change something—for example, change an input’s value in response to typing, or change a list in response to a button press. However, in order to change some information, you first need some way to store it. In React, this is done by using state, a component’s memory. You will learn all about it on the next page.
Recap
- You can handle events by passing a function as a prop to an element like <button -/>.
- Event handlers must be passed, not called! onClick={handleClick}, not onClick={handleClick()}.
- You can define an event handler function separately or inline.
- Event handlers are defined inside a component, so they can access props.
- You can declare an event handler in a parent and pass it as a prop to a child.
- You can define your own event handler props with application-specific names.
- Events propagate upwards. Call e.stopPropagation() on the first argument to prevent that.
- Events may have unwanted default browser behavior. Call e.preventDefault() to prevent that.
- Explicitly calling an event handler prop from a child handler is a good alternative to propagation.
Render and commit
Before your components are displayed on the screen, they must be rendered by React. Understanding the steps in this process will help you think about how your code executes and explain its behavior.
Imagine that your components are cooks in the kitchen, assembling tasty dishes from ingredients. In this scenario, React is the waiter who puts in requests from customers and brings them their orders. This process of requesting and serving UI has three steps:
1. Triggering a render (delivering the diner’s order to the kitchen)
2. Rendering the component (preparing the order in the kitchen)
3. Committing to the DOM (placing the order on the table)
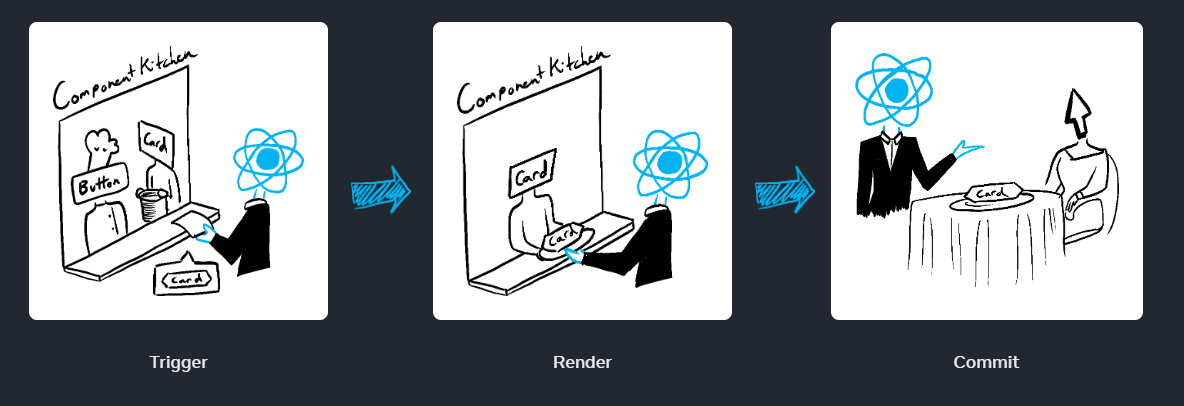
공식문서에서 발취한 일러스트레이션
Step 1: Trigger a render
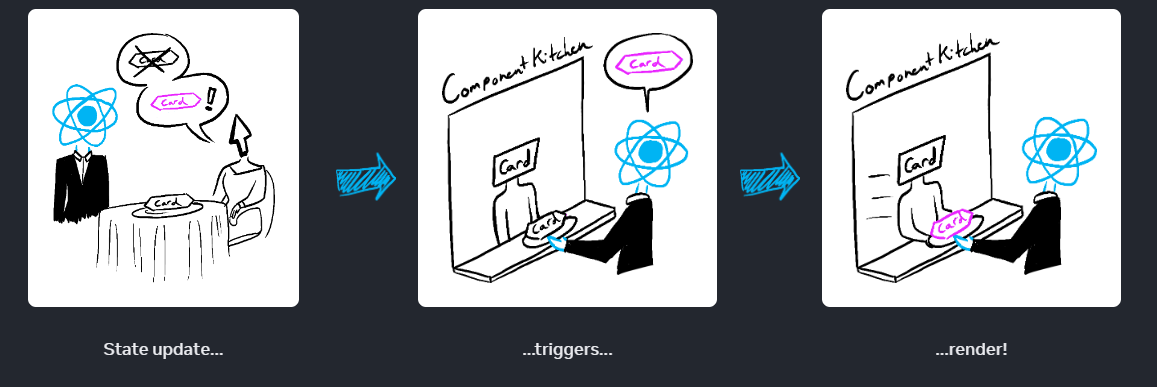
There are two reasons for a component to render:
- It’s the component’s initial render.
- The component’s (or one of its ancestors’) state has been updated.
Initial render
When your app starts, you need to trigger the initial render. Frameworks and sandboxes sometimes hide this code, but it’s done by calling createRoot with the target DOM node, and then calling its render method with your component:
Re-renders when state updates
Once the component has been initially rendered, you can trigger further renders by updating its state with the set function. Updating your component’s state automatically queues a render. (You can imagine these as a restaurant guest ordering tea, dessert, and all sorts of things after putting in their first order, depending on the state of their thirst or hunger.)
Step 2: React renders your components
After you trigger a render, React calls your components to figure out what to display on screen. “Rendering” is React calling your components.
- On initial render, React will call the root component.
- For subsequent renders, React will call the function component whose state update triggered the render.
This process is recursive: if the updated component returns some other component, React will render that component next, and if that component also returns something, it will render that component next, and so on. The process will continue until there are no more nested components and React knows exactly what should be displayed on screen.
Rendering must always be a pure calculation:
Same inputs, same output. Given the same inputs, a component should always return the same JSX. (When someone orders a salad with tomatoes, they should not receive a salad with onions!)
It minds its own business. It should not change any objects or variables that existed before rendering. (One order should not change anyone else’s order.)
Step 3: React commits changes to the DOM
After rendering (calling) your components, React will modify the DOM.
- For the initial render, React will use the appendChild() DOM API to put all the DOM nodes it has created on screen.
- For re-renders, React will apply the minimal necessary operations (calculated while rendering!) to make the DOM match the latest rendering output.
React only changes the DOM nodes if there’s a difference between renders. For example, here is a component that re-renders with different props passed from its parent every second. Notice how you can add some text into the , updating its value, but the text doesn’t disappear when the component re-renders:
export default function Clock({ time }) {
  return (
    <>
      <h1>{time}</h1>
      <input />
    </>
  );
}
This works because during this last step, React only updates the content of <h1 /-> with the new time. It sees that the <input/ > appears in the JSX in the same place as last time, so React doesn’t touch the < input / > —or its value!
Epilogue: Browser paint
After rendering is done and React updated the DOM, the browser will repaint the screen. Although this process is known as “browser rendering”, we’ll refer to it as “painting” to avoid confusion throughout the docs.
Recap:
- Any screen update in a React app happens in three steps:
1. Trigger
2. Render
3. Commit - You can use Strict Mode to find mistakes in your components
- React does not touch the DOM if the rendering result is the same as last time
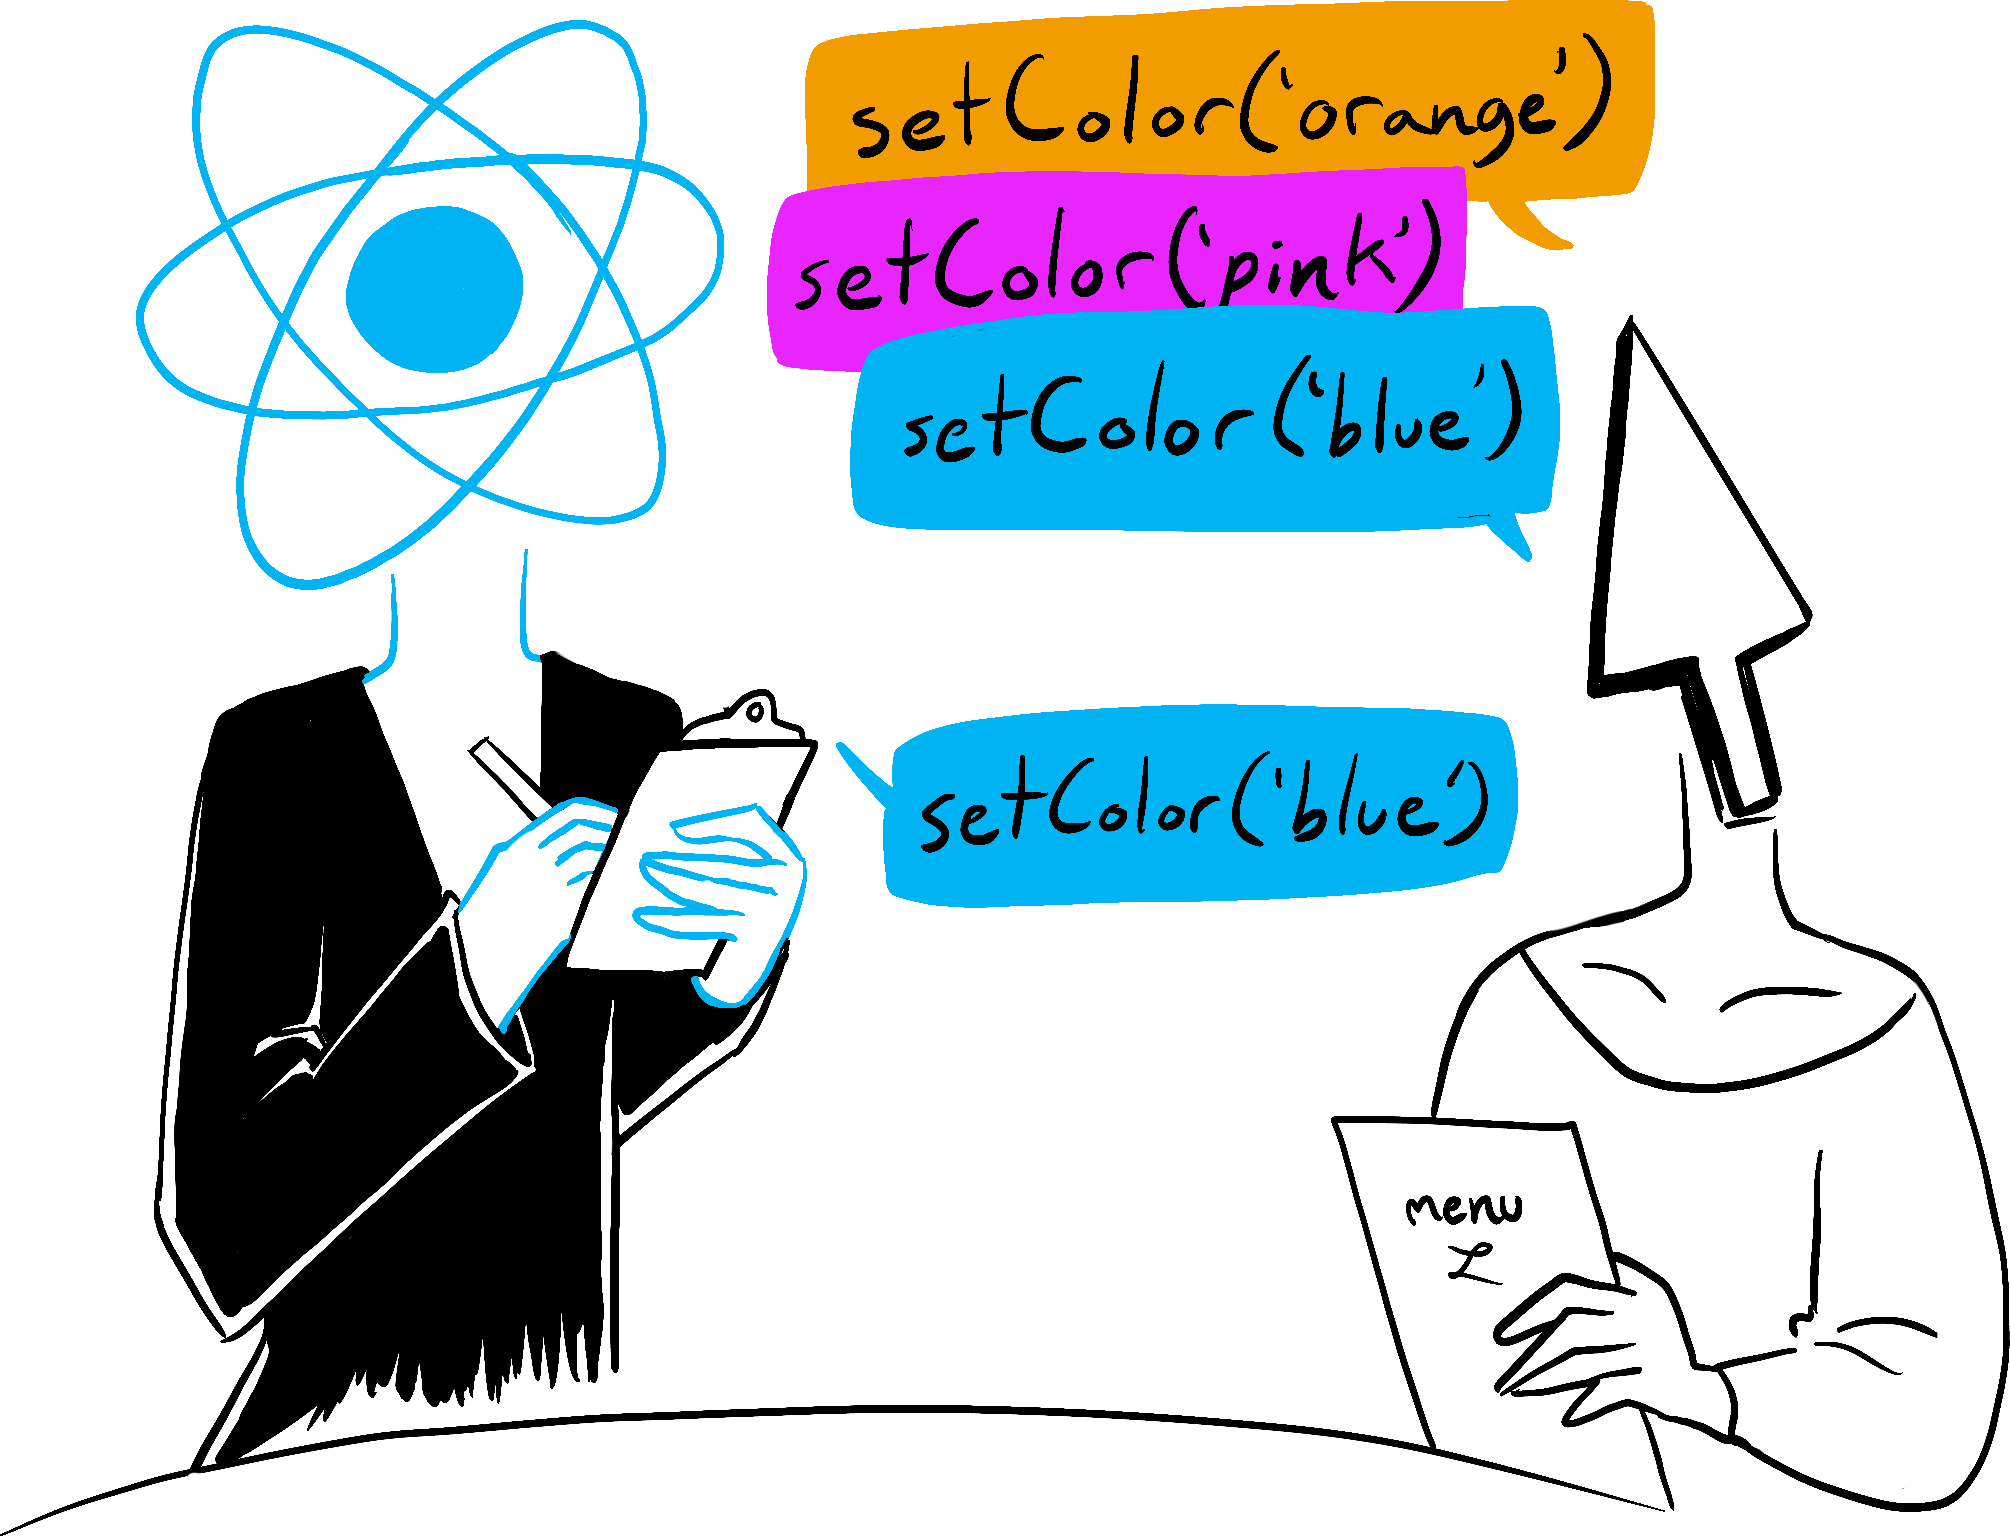
State as a snapshot
Unlike regular JavaScript variables, React state behaves more like a snapshot. Setting it does not change the state variable you already have, but instead triggers a re-render. This can be surprising at first!
console.log(count);  // 0
setCount(count + 1); // Request a re-render with 1
console.log(count);  // Still 0!
This behavior help you avoid subtle bugs.
Queueing a series of state updates
This component is buggy: clicking “+3” increments the score only once.
export default function Counter() {
  const [score, setScore] = useState(0);

  function increment() {
    setScore(score + 1);
  }

  return (
    <>
      <button onClick={() => increment()}>+1</button>
      <button onClick={() => {
        increment();
        increment();
        increment();
      }}>+3</button>
      <h1>Score: {score}</h1>
    </>
  )
}
State as a Snapshot explains why this is happening.
- This is because each render’s state values are fixed, so the value of score inside the first render's event handler is always 0.
- React waits until all code in the event handlers has run before processing your state updates. This is why the re-render only happens after all these increment() calls.
Setting state requests a new re-render, but does not change it in the already running code. So score continues to be 0 right after you call setScore(score + 1).
You can fix this by passing an updater function when setting state. Notice how replacing setScore(score + 1) with setScore(s => s + 1) fixes the “+3” button. This lets you queue multiple state updates. <-- why passing callback helps?
2) <- is called Batching: This lets you update multiple state variables—even from multiple components—without triggering too many re-renders. But this also means that the UI won’t be updated until after your event handler, and any code in it, completes. This behavior, also known as batching, makes your React app run much faster. It also avoids dealing with confusing “half-finished” renders where only some of the variables have been updated.
This might remind you of a waiter taking an order at the restaurant. A waiter doesn’t run to the kitchen at the mention of your first dish! Instead, they let you finish your order, let you make changes to it, and even take orders from other people at the table.
Updating the same state multiple times before the next render
It is an uncommon use case, but if you would like to update the same state variable multiple times before the next render, instead of passing the next state value like setNumber(number + 1), you can pass a function that calculates the next state based on the previous one in the queue, like setNumber(n => n + 1). It is a way to tell React to “do something with the state value” instead of just replacing it.
Recap
- Setting state does not change the variable in the existing render, but it requests a new render.
- React processes state updates after event handlers have finished running. This is called batching.
- To update some state multiple times in one event, you can use setNumber(n => n + 1) updater function that gets added to the que and run during rendering phase. < -- React queues this function to be processed after all the other code in the event handler has run.
During the next render, React goes through the queue and gives you the final updated state.
Updating Objects in state
State can hold any kind of JavaScript value, including objects. But you shouldn’t change objects and arrays that you hold in the React state directly. Instead, when you want to update an object and array, you need to create a new one (or make a copy of an existing one), and then update the state to use that copy.
- Treat all state in React as immutable.
- When you store objects in state, mutating them will not trigger renders and will change the state in previous render “snapshots”.
- Instead of mutating an object, create a new version of it, and trigger a re-render by setting state to it.
- You can use the {...obj, something: 'newValue'} object spread syntax to create copies of objects.
- Spread syntax is shallow: it only copies one level deep.
- To update a nested object, you need to create copies all the way up from the place you’re updating.
- To reduce repetitive copying code, use Immer.