며칠 사이에 Spring Security OAuth 2.0과 Twitch에서 제공하는 API를 이용하여 연동해보았습니다. 국제적으로 유명한 서비스(Google, OKta) 또는 국내 유명 서비스(네이버, 카카오 등)는 인터넷에 많은 예시가 있었지만, 제가 개발을 하기 위해 사용할 플랫폼은 Twitch이기 때문에 자료를 찾아봐야 했는데, 해외를 포함하여 자료가 별로 없어서 API 문서를 반복해서 읽어서 구현에 성공하였습니다.
특히나 많이 안 쓰는 플랫폼이라서 한국어로 적혀있지 않기 때문에 이런 자료는 하나쯤 적어두면 좋지 않을까 싶어서 간단하게 한 번 적어봅니다.
개발에 사용한 버전
- Microsoft OpenJDK 11
- Spring Boot 2.7.1
- Gradle 7.5
- H2 Database
주의 사항
이 글은 Java 언어 뿐만 아니라 Spring Framework, Spring Security 전반과 더불어 OAuth 2.0의 원리에 대해서 아시는 분들을 대상으로 하여 글을 간단하게 적었습니다. 혹여, 이해가 되지 않으시는 내용이 있다면, 편하게 댓글을 남겨주시면 감사하겠습니다.
준비물
- Twitch Developers에서 발급 받은 Client ID, Client Secret
환경(Properties) 설정
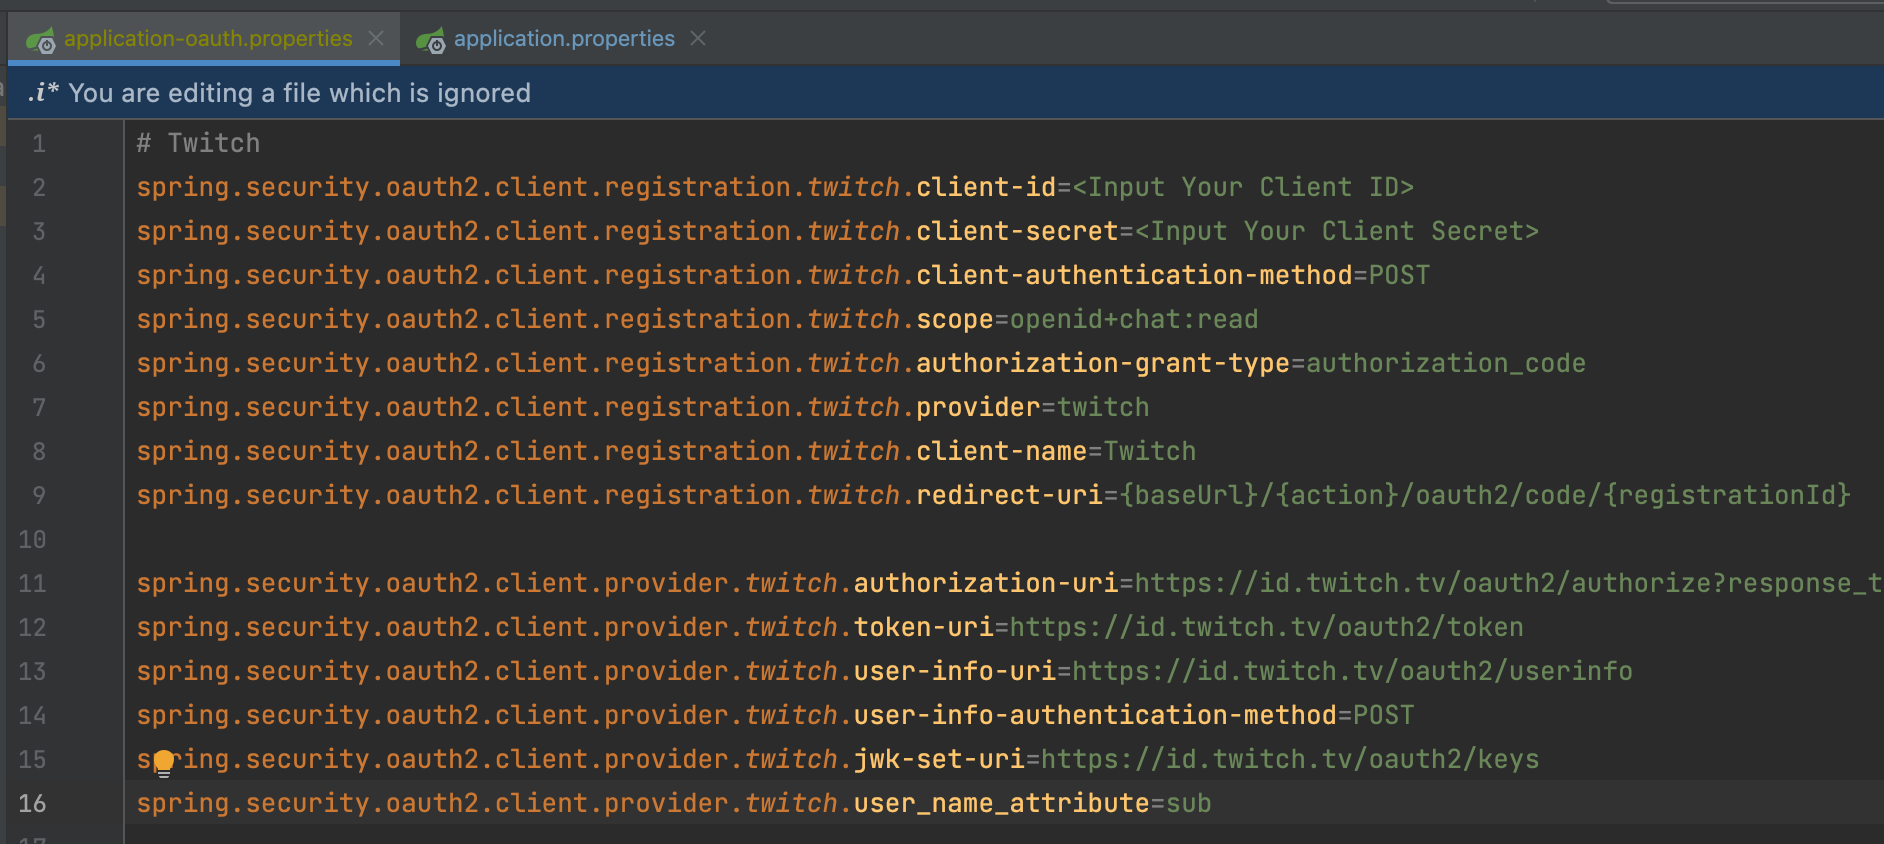
Spring Security를 통해 외부 서비스를 연결하기 위해서는 아시다싶이 properties를 설정하여 제공자(Provider)에 대한 정보를 설정해야합니다. Twitch의 경우 해당 정보를 한 곳에 정리한 곳이 없기 때문에 찾으시는데 문제를 겪으실 수 있어 아래에 적겠습니다.
spring.security.oauth2.client.registration.twitch.client-id=<Input Your Client ID>
spring.security.oauth2.client.registration.twitch.client-secret=<Input Your Client Secret>
spring.security.oauth2.client.registration.twitch.client-authentication-method=POST
spring.security.oauth2.client.registration.twitch.scope=<Want to get permission code>
spring.security.oauth2.client.registration.twitch.authorization-grant-type=authorization_code
spring.security.oauth2.client.registration.twitch.provider=twitch
spring.security.oauth2.client.registration.twitch.client-name=Twitch
spring.security.oauth2.client.registration.twitch.redirect-uri={baseUrl}/{action}/oauth2/code/{registrationId}

spring.security.oauth2.client.provider.twitch.authorization-uri=https://id.twitch.tv/oauth2/authorize?response_type=code
spring.security.oauth2.client.provider.twitch.token-uri=https://id.twitch.tv/oauth2/token
spring.security.oauth2.client.provider.twitch.user-info-uri=https://id.twitch.tv/oauth2/userinfo
spring.security.oauth2.client.provider.twitch.user-info-authentication-method=POST
spring.security.oauth2.client.provider.twitch.jwk-set-uri=https://id.twitch.tv/oauth2/keys
spring.security.oauth2.client.provider.twitch.user_name_attribute=sub"spring.security.oauth2.client.provider.twitch.authorization-uri" 설정의 경우 뒤에 매개변수(Parameter)로 response_type=code이 붙어있어야 합니다. 그러지 않으면 옳지 않은 요청으로 에러가 발생하게 됩니다.
"spring.security.oauth2.client.registration.twitch.scope"의 경우 다른 서비스와 다르게 컴마(,)로 구분하지 않고, 플러스(+)로 구분합니다. 예를 들어 'openid' 권한과 'chat:read' 권한을 같이 얻고 싶다면, 'openid+chat:read'으로 설정합니다.
만일, 글을 따라하시는 시점에 해당 설정이 작동하지 않는다면, 여기에 접속하시면, 각종 현재 인증 서버에 대한 정보를 얻으실 수 있습니다.
민감한 값 숨기기
해당 설정 중 "spring.security.oauth2.client.registration.twitch.client-secret"의 경우에는 절대로 노출되서는 안 될 값 입니다. 즉, Github 등 공개 된 SCM에 노출되서는 안 되기 때문에 아래 방법을 통해 분리하는 것을 추천드립니다.
Spring Framework를 능숙하게 다루시는 분들은 아시겠지만, .yml, .properties 확장자로 작성되는 프로파일(Profile)은 분리할 수 있으며, "spring.profiles.include"를 사용하여 다른 프로파일을 포함 시킬 수 있습니다.
즉, 위와 같이 민감한 값을 넣은 Profile의 이름을 'application-oauth.properties"라고 해보겠습니다.
해당 파일에 Twitch 등 OAuth에 필요한 정보를 넣습니다. 단, 이 파일은 민감한 내용을 담고 있으므로 .gitignore 파일에 ignore 파일로 선언합니다.
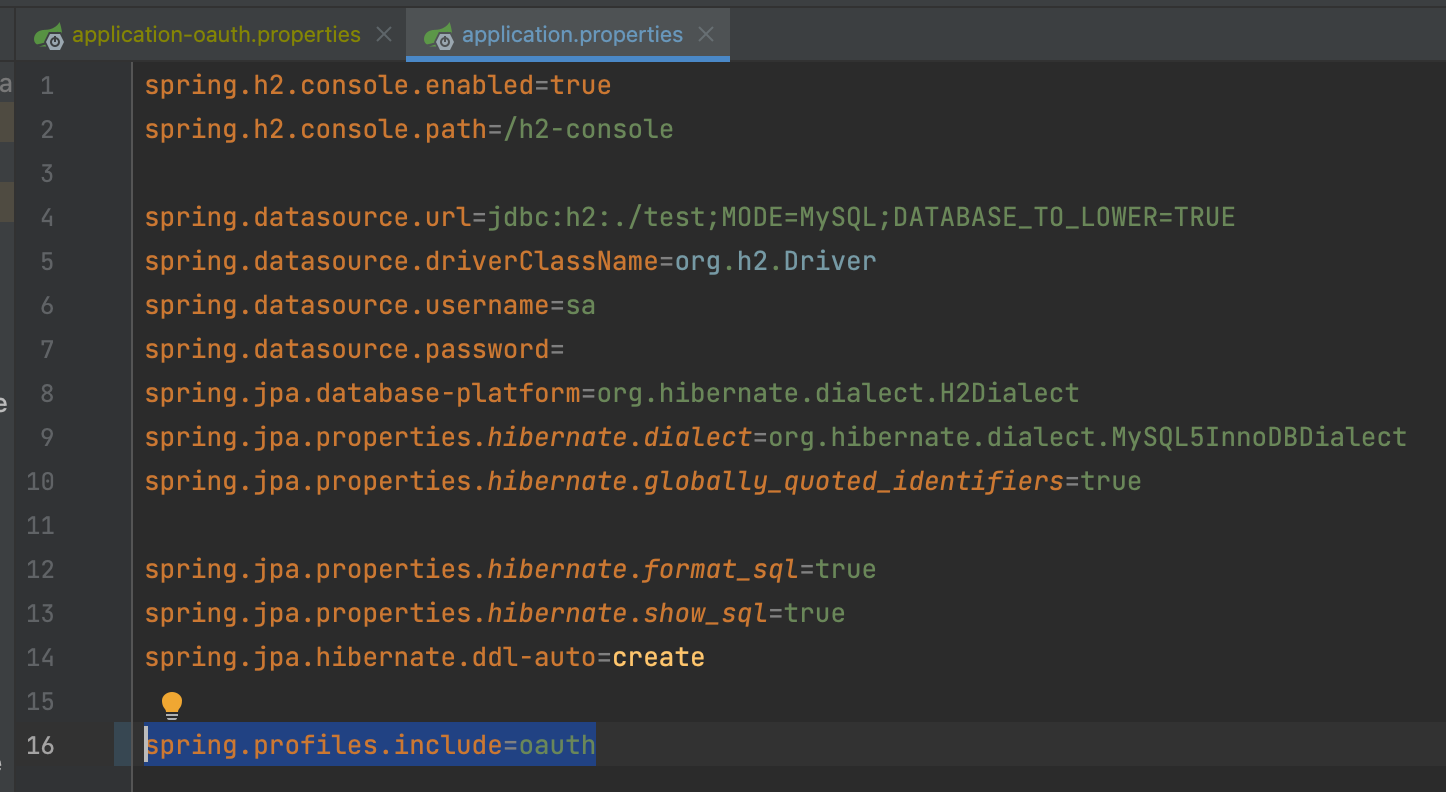
그 다음, 위 사진의 16번 라인처럼 적어줍니다.
즉, application-<임의 이름>.yml/properties 라면, 임의 이름 부분만 넣어주면 됩니다.
구상하기
유저 정보 저장 방법
유저 정보는 Twitch에서 제공한 정보 외에도 회원 정보를 자체 DB에 저장하여 우리 서비스의 회원임을 알아야합니다. 즉, 이번 글에서는 해당 이유로 아래와 같이 엔타티(Entity)를 구성하였습니다.
- long internalId: 내부 분류용 ID
- Long twitchId: Twitch에서 제공하는 유저의 고유 ID
- String name: Twitch에 설정한 닉네임
- String picture: Twitch에 설정한 프로필 사진 url
- String role: Spring Security에서 요구하는 ROLE
long VS Long
long은 기본 타입으로 별도의 값을 지정하지 않으면 0으로 지정이 되는데, Long은 박싱 타입으로 Null일 수가 있게 됩니다. 내부 분류 ID의 경우에는 자동으로 할당이 되기에 문제가 없는데요.
만일, Twitch ID가 제공되지 않을 때에는 Null 값을 갖게하고, Not Null 옵션을 DB에 줘서 에러가 생기도록하여 예외 조치 조치하기 위함입니다. (예시 코드에는 이에 대한 예외 처리를 하지 않았습니다.)
필요한 최소한의 개인정보
Scope를 지정하여 얻어올 수 있는 정보를 정의할 수 있는데요. 위를 기반으로 서비스에 필요한 정말 최소한의 개인정보만을 따져봅시다.
Twitch에서는 다른 서비스와 다르게 User-info Endpoint에는 E-mail, Picture 정보를 제공하지 않습니다. 위 정보를 이용하여 정의할 때에는 Picture 정보가 필요합니다. 즉, openid 권한이 필요하게 됩니다.
사실, 매우 간단한 서비스라면 'twitchId'만으로도 충분합니다. twitch에서 제공하는 ID의 경우에는 이메일, 닉네임, 프로필 사진 등에 영향을 받지 않고 불변하기 때문에 해당 정보를 활용하시는 것이 좋습니다.
아마도 대부분의 서비스에서 이메일 정보를 수집하는 것은 서비스 사용자가 Twitch 계정을 잃어버렸거나 정지 당해 사용할 수 없을 때를 상정하여 본인 인증할 방법을 제공하기 위해 사용할 것으로 추측되어집니다.
코드 설명
User.java
@Entity
@Data
@RequiredArgsConstructor
public class User {
    @Id
    @GeneratedValue(strategy = GenerationType.IDENTITY)
    private long internalId;

    @Column(nullable = false)
    private Long twitchId;

    @Column(nullable = false)
    private String name;

    private String picture;
    private final String role = "ROLE_USER";

    public User(String name, String twitchId, String picture) {
        this.name = name;
        this.twitchId = Long.parseLong(twitchId);
        this.picture = picture;
    }

    public User update(String name, String picture) {
        this.name = name;
        this.picture = picture;

        return this;
    }
}
DB에 저장할 유저의 정보입니다. 이 정보는 아까 구상한 것처럼 구성하였습니다.
update 메소드의 경우에는 닉네임과 프로필 사진이 변경되었을 때 정보를 업데이트하는 용도로 사용됩니다.
UserRepository.java
@Repository
public interface UserRepository extends JpaRepository<User, Long> {
    Optional<User> findByTwitchId(Long twitchId);
}
JPA를 사용하기 때문에 Repository 클래스를 정의합니다. 이미 가입되어 있는지 확인할 메소드를 정의합니다.
OAuthAttributes.java
@Data
@NoArgsConstructor
@Log4j2
public class OAuthAttributes {
    private Map<String, Object> attributes;
    private String nameAttributeKey;
    private String name;
    private String sub;
    private String picture;

    public OAuthAttributes(Map<String, Object> attributes, String nameAttributeKey, String name, String sub, String picture) {
        this.attributes = attributes;
        this.nameAttributeKey = nameAttributeKey;
        this.name = name;
        this.sub = sub;
        this.picture = picture;
    }

    public static OAuthAttributes of(String userNameAttributeName, Map<String, Object> attributes) {
        log.info("attributes: " + attributes.toString());
        return ofTwitch(userNameAttributeName, attributes);
    }
    private static OAuthAttributes ofTwitch(String userNameAttributeName, Map<String, Object> attributes) {
        return new OAuthAttributes(attributes,
                userNameAttributeName,
                (String) attributes.get("preferred_username"),
                (String) attributes.get("sub"),
                (String) attributes.get("picture"));
    }

    public User toEntity() {
        return new User(name, sub, picture);
    }
}
이 클래스에서는 OAuthAttributes를 정의해줍니다. Twitch에서 제공하는 User Info를 양식에 맞추어서 변환하는 역할을 수행합니다. 만일, Google, Okta 등 다른 OAuth 서비스도 추가하게 된다면, RegistrationId에 따라서 분기해야합니다.
CustomOAuth2UserService.java
@Service
@Log4j2
public class CustomOAuth2UserService implements OAuth2UserService<OAuth2UserRequest, OAuth2User> {

    @Autowired
    private UserRepository userRepository;
    @Autowired
    private HttpSession httpSession;

    @Override
    public OAuth2User loadUser(OAuth2UserRequest oAuth2UserRequest) {
        OAuth2UserService<OAuth2UserRequest, OAuth2User> oAuth2UserService = new DefaultOAuth2UserService();
        OAuth2User oAuth2User = oAuth2UserService.loadUser(oAuth2UserRequest);

        // OAuth2 로그인 시 키 값
        String userNameAttributeName = oAuth2UserRequest.getClientRegistration().getProviderDetails().getUserInfoEndpoint().getUserNameAttributeName();

        OAuthAttributes attributes = OAuthAttributes.of(userNameAttributeName, oAuth2User.getAttributes());

        User user = saveOrUpdate(attributes);
        httpSession.setAttribute("user", new SessionUser(user));

        log.info("attributes: " + attributes.getAttributes());
        return new DefaultOAuth2User(Collections.singleton(new SimpleGrantedAuthority("ROLE_USER"))
                , attributes.getAttributes()
                , attributes.getNameAttributeKey());
    }

    // 혹시 이미 저장된 정보라면, update 처리
    private User saveOrUpdate(OAuthAttributes attributes) {
        User user = userRepository.findByTwitchId(Long.parseLong(attributes.getSub()))
                .map(entity -> entity.update(attributes.getName(), attributes.getPicture()))
                .orElse(attributes.toEntity());

        return userRepository.save(user);
    }
}
OAuth2UserSerice를 implements 하여 작성해야하는 메소드를 Override 해줍니다. loadUser 라는 메소드입니다.
일단, oAuth2UserService을 구성한 뒤에 로그인했던 서비스에서 받은 정보를 oAuth2User 안에 넣습니다. 이 후, 'userNameAttributeName'에 User를 식별할 수 있는 코드(ID 등)가 있는 Attribute의 이름을 구해옵니다.
OAuthAttributes의 of 메소드를 호출하여 OAuthAttributes 객체를 만들어주고, DB에 데이터를 넣고, Spring Framework가 알 수 있는 객체로 변경하여 줍니다.
SecurityConfig.java
@Configuration
@EnableWebSecurity
@EnableGlobalMethodSecurity(securedEnabled = true, prePostEnabled = true)
@AllArgsConstructor
public class SecurityConfig extends WebSecurityConfigurerAdapter {
    private final CustomOAuth2UserService customOAuth2UserService;

    @Bean
    public WebSecurityCustomizer webSecurityCustomizer() {
        // In-Memory DB Console 예외 처리
        return (web) -> web.ignoring().antMatchers("/h2-console/**");
    }

    @Override
    protected void configure(HttpSecurity http) throws Exception {
        http.authorizeRequests()
                .anyRequest()
                .permitAll()
                .and()
                .logout()
                .logoutSuccessUrl("/")
                .and()
                .oauth2Login()
                .defaultSuccessUrl("/main", true)
                .userInfoEndpoint()
                .userService(customOAuth2UserService);
    }
}
여기서 핵심은 configure 메소드입니다. 그 중에서도 ".userService(customOAuth2UserService)" 이 부분이 중요한데요.
Spring Security OAuth 2.0의 기본 처리 프로세스를 거치는 것이 아닌 별도로 정의한 Service에서 실행하라는 정의입니다.
참조
- [Spring Security] 스프링 부트 OAuth2-client를 이용한 소셜(구글, 네이버, 카카오) 로그인 하기 By. iseunghan At Tistory
- SpringBoot OAuth2 Integration with Twitch At Twitch Developers
- Using OIDC to get OAuth Access Tokens At Twitch Devlopers
전체 소스 코드
혹시라도 모르는 부분이 있다면, 댓글 부탁드립니다. 감사합니다!

What did you set as "redirect OAuth2 redirect" in Twitch API configuration?