Flutter 일기 57번째
참고 : https://github.com/flutter/flutter/wiki/Upgrading-pre-1.12-Android-projects
https://syrang.tistory.com/17
https://github.com/flutter/flutter/issues/28787
주의! 이 일기는 문제 해결에 초점을 맞춘 일기입니다. 설명은 할 수 없어요...
1. Deprecated version of the Android embedding.

Udemy에서 Flutter 기초 강의를 듣고 있는데, 2019년 강의라 버전 문제가 빈번히 발생한다.
특히 Android emulator에서 실행이 안되는데, 반대로 iOS simulator 실행은 잘 됨.
Take a look at the docs for migrating an app : https://github.com/flutter/flutter/wiki/Upgrading-pre-1.12-Android-projects
여기를 보라고 하니 한번 가보자.
1. If you don't have any of your own added code to android/app/src/main/java/[your/package/name]/MainActivity.java - remove the body of your MainActivity.java and change the FlutterActivity import. The new FlutterActivity no longer requires manually registering your plugins. It will now perform the registration automatically when the underlaying FlutterEngine is created.
-> MainActivity.java 파일에 따로 추가한 코드가 없다면, body부분 지워버리고 import 수정하라.
android/app/src/main/java/[your/package/name]/MainActivity.java 파일을 찾아서
package [my_project_name];	// 각자 만든 프로젝트 이름으로 설정됨.

import android.os.Bundle;
import io.flutter.app.FlutterActivity;
import io.flutter.plugins.GeneratedPluginRegistrant;

public class MainActivity extends FlutterActivity {
  @Override
  protected void onCreate(Bundle savedInstanceState) {
    super.onCreate(savedInstanceState);
    GeneratedPluginRegistrant.registerWith(this);
  }
}
위 코드를 아래와 같이 변경해준다.
package [my_project_name];	// 이건 그대로 두면 됨.

import io.flutter.embedding.android.FlutterActivity;

public class MainActivity extends FlutterActivity {

}
이런 파일은 꼭꼭 숨어있는데, VS Code에서는 Comman+P(iOS) , Control+P(Windows) 를 누르고 MainActivity.java를 치면 바로 찾을 수 있다. Android Studio를 쓴다면 창 오른쪽 위에 Search 아이콘을 누르고 찾으면 된다.
2. Open android/app/src/main/AndroidManifest.xml. Replace the reference to FlutterApplication in the application tag with ${applicationName}. Add a new meta-data tag under application.
-> android:name 부분을 변경, meta-data tag를 application tag내부에 새로 삽입
android/app/src/main/AndroidManifest.xml 파일에 가서
<application
	android:name="io.flutter.app.FlutterApplication" -> "${applicationName}"
 요렇게 수정하고

<meta-data
    android:name="flutterEmbedding"
    android:value="2" />
application 태그 내부에 meta-data 태그 추가
결론적으로,
<application
        android:name="io.flutter.app.FlutterApplication"
             ...
        >
        <activity ...
            >
            <meta-data
                android:name="io.flutter.app.android.SplashScreenUntilFirstFrame"
                android:value="true" />
            <intent-filter>
                <action android:name="android.intent.action.MAIN"/>
                <category android:name="android.intent.category.LAUNCHER"/>
            </intent-filter>
        </activity>
    </application>
위 코드에서 아래와 같이 변경
    <application
        android:name="${applicationName}"
		> <!-- 요 윗줄 수정 -->
        <activity ...
            >
            <meta-data
                android:name="io.flutter.app.android.SplashScreenUntilFirstFrame"
                android:value="true" />
            <intent-filter>
                <action android:name="android.intent.action.MAIN"/>
                <category android:name="android.intent.category.LAUNCHER"/>
            </intent-filter>
        </activity>
      <!-- 아래의 meta-data 구문 추가 -->
        <meta-data
            android:name="flutterEmbedding"
            android:value="2" />
    </application>
에러가 싹 사라졌다 ^^
2. Android Studio - Emulator 실행
혹시나 해서 Android Studio 열고 emulator 상에서 실행하니 또 안됨.
1. 찾아보니 Android Gradle 플러그인 버전이 문제라고 하네

buildscript {
    repositories {
        google()
        jcenter()
    }

    dependencies {
        classpath 'com.android.tools.build:gradle:4.2.0'
    }
}
android/build.gradle에 가서 3.7.1 이던 버전을 4.2.0 으로 수정
2. Gradle 버전을 수정해 달라고 했다.

gradle-wrapper.properties 파일에 가서
distributionUrl=https\://services.gradle.org/distributions/gradle-5.4.1-all.zip
-> 변경 후
distributionUrl=https\://services.gradle.org/distributions/gradle-6.7.1-all.zip
3. 또 에러. compileSdkVersion을 수정해달라고 한다.
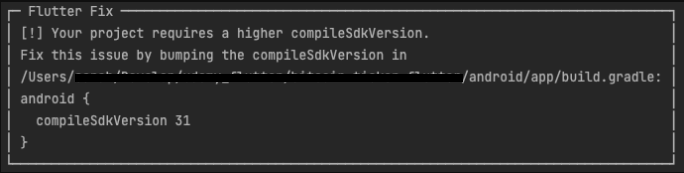
app 수준 build.gradle 파일에 가서
android {
    compileSdkVersion 29->31 변경
4. 또또 에러. 뭔지 알지도 못하겠다.
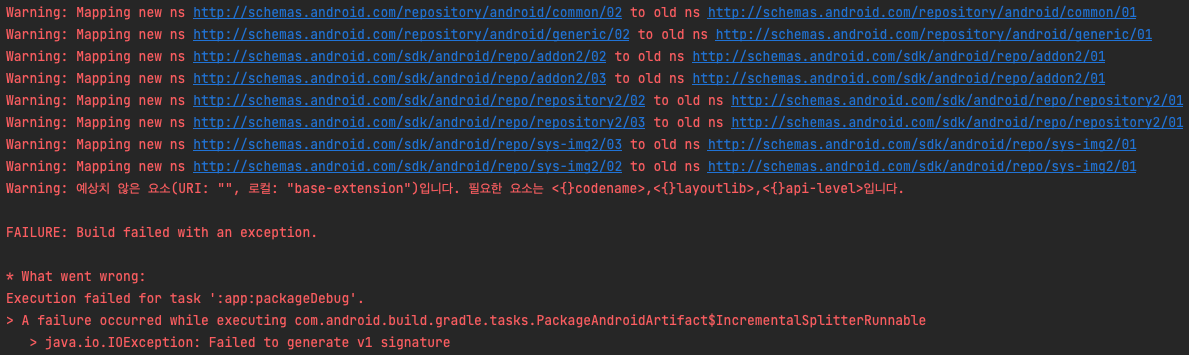
Warning: 예상치 않은 요소... 이 줄을 복사해서 구글에 뒤졌는데, StackOverFlow의 한 답변에서 Android SDK를 말끔히 삭제하고 다시 설치하라고 하더라.

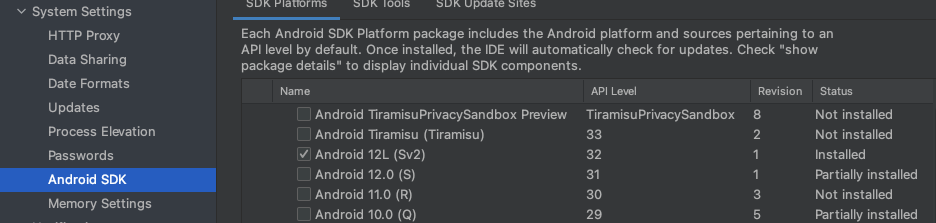
SDK Manager에 들어가서 우선
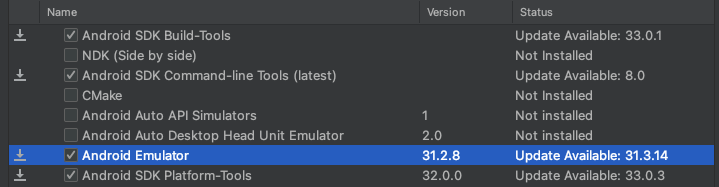
혹시 모르니 Build Tools 업데이트 가능한 것들은 싹 업데이트를 해주었다.
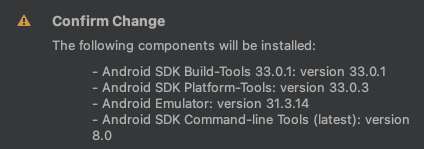
OK
그리고 SDK Platforms에서 원래 쓰던 32 버전을 uninstall 한 후 다시 설치
체크 상자를 누르다보면 X 표시가 뜨는데, Apply하면 uninstall 됨.
그래도 안됨
5. 살려주세요...

A failure occured while executing.... 이 줄을 복사해서 검색했더니 못 알아들을 결과만 나오길래,
Failed to generate v1 signature 로 다시 검색.
https://github.com/flutter/flutter/issues/28787 여기를 보고
~/.android/debug.keystore 까지 지움
또 안됨
저장 용량이 부족하대나 뭐래나
Emulator 하나 더 만들어서 실행
6. 엉엉 성공

코드 수정하면서 일기 쓰다가 실행이 도저히 안되서 중간에 한번 싹 날려먹고 처음부터 다시 했다.
앞으로는 그냥 새 프로젝트를 만들어서 코드를 잘 복사해보면 어떨까 싶다....