GridLayout
Grid : 격자무늬, 격자판, 기준선망
2차원 격자무늬 형태의 레이아웃으로 행과 열의 집합형태로구성된 레이아웃. TableLayout의 단점을 보완한 레이아웃으로 LinearLayout과 FrameLayout의 장점 포함
GridLayout 사용 시 다른 레이아웃과 중첩이 줄어들어 메모리 효율↑
사실 격자형의 레이아웃을 구성해야 하는 경우가 아니면 쓸일이 없고 단말기 성능이 좋아지면서 레이아웃에 따른 메모리 효율성을 따지는 것이 어려워졌다. 하지만 여전히 격자 형태 앱을 개발해야한다면 매력적인 Layout.
GridLayout 부모 뷰 속성
- orientation
자식 뷰들이 셀 영역에 배치되는 방향 결정- orientation = "horizontal" : 수평 방향으로 정렬
- orientation = "vertical" : 수직 방향으로 정렬
- rowCount
GridLayout의 행의 개수 지정 - columnCount
GridLayout의 열의 개수 지정
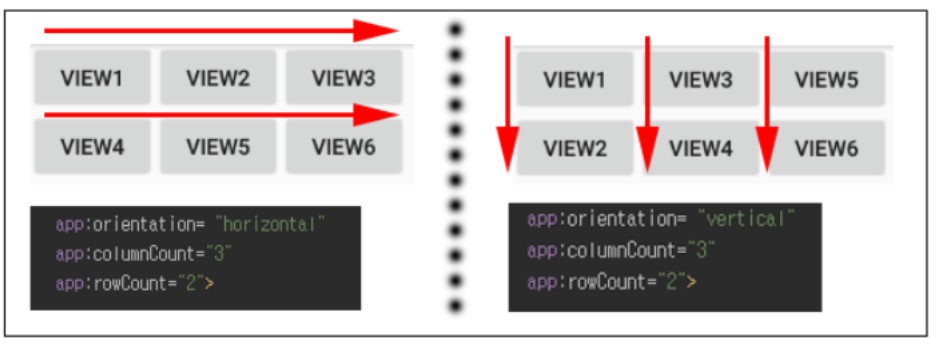
GridLayout은 자식 뷰(View)를 추가하면 행 또는 열이 계속해서 추가가 되는 레이아웃 orientation = "horizontal" 일 때 columnCount 속성을 통해 열의 개수 조절. 설정한 열만큼 생기고 그 뒤에는 새로운 행에 배치된다. 즉, orientation = "horizontal" 일 경우는 rowCount의 속성값은 의미가 없음.
Gridlayout 자식 뷰 속성
기본 row(행)과 column(열)의 대한 속성
- layout_row : 자식뷰의 행 좌표
- layout_column : 자식 뷰의 열 좌표
- layout_rowSpan : 지정한 값만큼 셀의 행을 합치는 속성
- layout_columnSpan : 지정한 값만큼 셀의 열을 합치는 속성
<GridLayout
        android:layout_width="wrap_content"
        android:layout_height="wrap_content"
        android:columnCount="3"
        android:orientation="horizontal"
        android:rowCount="2"
        app:layout_constraintTop_toTopOf="parent"
        app:layout_constraintStart_toStartOf="parent"
        >

    <Button
        android:id="@+id/View1"
        android:layout_width="wrap_content"
        android:layout_height="wrap_content"
        android:text="View1"
        android:layout_row="0"
        android:layout_column="0"
        android:layout_columnSpan="2"
        android:layout_gravity="fill"
        />

    <Button
        android:id="@+id/View2"
        android:layout_width="wrap_content"
        android:layout_height="wrap_content"
        android:text="VIEW2" />

    <Button
        android:id="@+id/button11"
        android:layout_width="wrap_content"
        android:layout_height="wrap_content"
        android:text="VIEW3" />

    <Button
        android:id="@+id/button12"
        android:layout_width="wrap_content"
        android:layout_height="wrap_content"
        android:text="VIEW4" />

    <Button
        android:id="@+id/button13"
        android:layout_width="wrap_content"
        android:layout_height="wrap_content"
        android:text="VIEW5" />
    </GridLayout>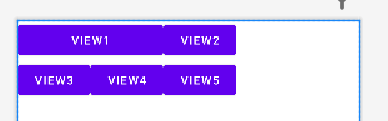
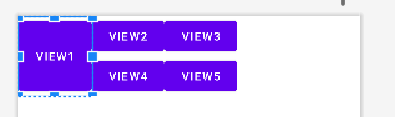
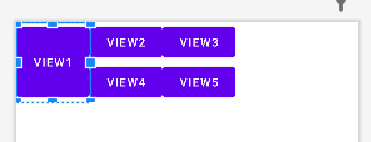
위 코드와 사진에 따르면 VIEW1을 행방향으로 2만큼 합쳤다. 그래서 첫번째 행(0번 인덱스 행)에 VIEW1이 두개의 셀이 채워진 것처럼 취급된다.
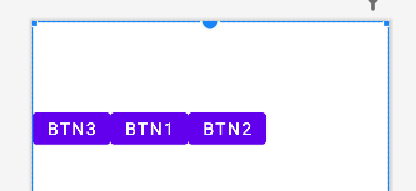
만약 columnSpan을 rowSpan으로 바꾸어 android:layout_columnSpan="2"으로 작성하게 된다면 아래와 같이 된다
alignmentMode
자식 뷰 들을 정렬할 때 기준이 되는 뷰의 여백을 포함하여 나머지 뷰들을 정렬할지를 결정
    <GridLayout
        ...
        android:columnCount="3"
        android:orientation="horizontal"
        android:rowCount="3"
        android:alignmentMode="alignMargins"
        >
        <Button
            android:layout_row="0"
            android:layout_column="0"
            android:text="btn3"
            ></Button>
        <Button
            android:text="btn1"
            android:layout_marginTop="100dp"
            ></Button>
        <Button
            android:text="btn2"></Button>
    </GridLayout>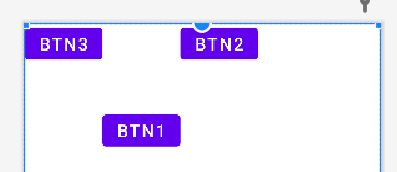
기준이 되는 뷰는 가장 큰 너비 혹은 높이를 가지는 뷰이다. 위 그림에서 BTN1이 높이가 가장 높다. alignmentMode를 "alignMargins"으로 적용하면 위처럼 BTN3과 BTN2이 BTN1의 높이에 맞게 정렬된다.
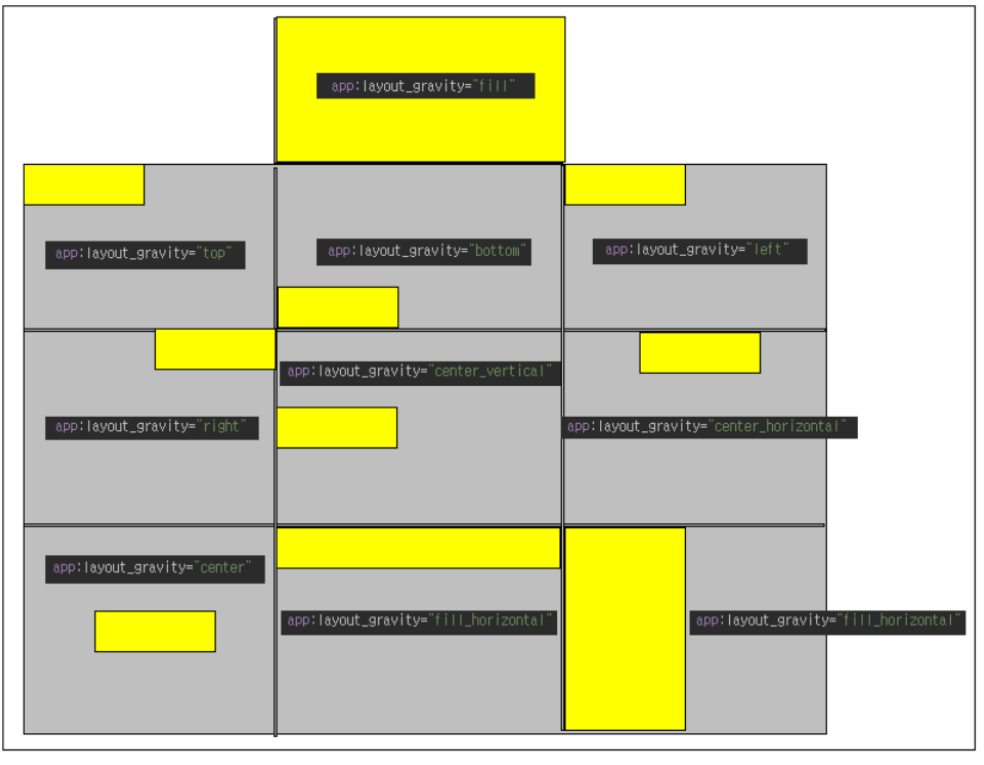
layout_gravity
자식뷰의 위치를 설정하는 속성으로 셀의 중앙/ 좌/ 우/ 상단/ 하단 등의 속성값을 지정
이는 다른 레이아웃에서도 많이 적용해왔던 속성이므로 간단히 짚고 넘어가자.
GridLayout에 익숙해지면 아주 쉽게 계산기의 형태를 만들 수 있을 것이다.
출처 :
https://lktprogrammer.tistory.com/136
https://lktprogrammer.tistory.com/136#recentEntries
https://developer.android.com/reference/android/widget/GridLayout