코드 흐름대로 읽어가기
디렉토리 구조
src
 ┣ components
 ┃ ┗ calendar
 ┃ ┃ ┣ dates
 ┃ ┃ ┃ ┣ DateCell.tsx
 ┃ ┃ ┃ ┗ index.tsx
 ┃ ┃ ┣ month
 ┃ ┃ ┃ ┣ WeekdayHeader.tsx
 ┃ ┃ ┃ ┣ Weekdays.tsx
 ┃ ┃ ┃ ┗ index.tsx
 ┃ ┃ ┣ BookingDatesView.tsx
 ┃ ┃ ┣ MonthNavigation.tsx
 ┃ ┃ ┗ index.tsx
 ┣ constants
 ┃ ┣ daysOfWeek.ts
 ┃ ┣ format.ts
 ┃ ┗ languages.ts
 ┣ context
 ┃ ┗ CalendarContext.tsx
 ┣ hooks
 ┃ ┣ useGetSavedPeriod.ts
 ┃ ┣ useHandleClickDate.ts
 ┃ ┗ useUpdateCheckInOut.ts
 ┣ styles
 ┃ ┗ GlobalStyles.tsx
 ┣ types
 ┃ ┗ index.ts
 ┣ utils
 ┃ ┗ dateUtils.ts
 ┣ App.tsx
 ┣ index.ts
 ┣ main.tsx
 ┗ vite-env.d.ts
index.ts
- index.ts: 라이브러리를 외부에 제공하는 역할
export { default as Calendar } from "./App";- 이 파일에서는 App 컴포넌트를 Calendar라는 이름으로 export 하고 있다.
이렇게 하면, 이 캘린더 라이브러리를 사용하는 다른 애플리케이션에서 import { Calendar } from '해당 라이브러리 경로'로 캘린더 컴포넌트를 가져와 사용할 수 있다.
main.tsx
- main.tsx: 실제 애플리케이션을 구동하는 역할
import React from "react";
import ReactDOM from "react-dom/client";
import App from "./App";

ReactDOM.createRoot(document.getElementById("root") as HTMLElement).render(
  <React.StrictMode>
    <App />
  </React.StrictMode>
);
이렇게 import된 App 컴포넌트는 이후 ReactDOM.createRoot(...).render(...) 메소드를 통해 렌더링되게 된다. (createRoot로 브라우저 DOM 노드 안에 React 컴포넌트를 표시하는 루트를 생성할 수 있다.)
document.getElementById("root") as HTMLElement는 HTML 문서에서 "root"라는 ID를 가진 엘리먼트를 찾아낸다.
<React.StrictMode> 는 개발 모드에서만 활성화되며, 잠재적인 문제를 찾아내기 위한 도구이다.
<App />는 애플리케이션의 루트 컴포넌트를 렌더링한다.
App.tsx
- App.tsx: 파일은 이 애플리케이션의 루트 컴포넌트
function App(props: CalendarProps) {
  const { mainColor, subMainColor, onCheckInOutChange } = props;

  return (
    <ThemeProvider theme={{ mainColor, subMainColor }}>
      <GlobalStyle />
      <CalendarProvider
        calendarProps={props}
        onCheckInOutChange={onCheckInOutChange}
      >
        <Calendar />
      </CalendarProvider>
    </ThemeProvider>
  );
}

export default App;-
<ThemeProvider/>: 어떤 컴포넌트가 몇 단계를 거쳐서 depth를 갖더라도 루트에ThemeProvider가 자리잡고 있다면 모든 렌더 트리의 자식에는 다 theme 속성을 갖게된다. -
<GlobalStyle />: 전역 스타일 설정 파일, 자식을 허용하지 않는 스타일드 컴포넌트를 반환한다. React 트리의 맨 위에 배치하면 컴포넌트가 "렌더링"될 때 전역 스타일이 주입된다.
context
<CalendarProvider/>
const defaultProps: CalendarProps = {
  startDay: 0,
  numMonths: 2,
  language: "en",
  maximumMonths: 12,
  showBookingDatesView: true,
  isRectangular: false,
  resetStyle: false,
  defaultCheckIn: dayjs().add(7, "day"),
  defaultCheckOut: dayjs().add(8, "day"),
};

type CalendarContextType = {
  today: dayjs.Dayjs;
  currentMonth: dayjs.Dayjs;
  setCurrentMonth: (num: number) => void;
  bookingDates: BookingDatesType;
  setBookingDates: React.Dispatch<React.SetStateAction<BookingDatesType>>;
  calendarSettings: CalendarProps;
  setCalendarSettings: React.Dispatch<React.SetStateAction<CalendarProps>>;
  onCheckInOutChange?: CheckInOutChangeType;
};

const initialContextValue: CalendarContextType = {
  today: dayjs(),
  currentMonth: dayjs(),
  setCurrentMonth: () => {},
  bookingDates: {
    checkIn: undefined,
    checkOut: undefined,
  },
  setBookingDates: () => {},
  calendarSettings: defaultProps,
  setCalendarSettings: () => {},
  onCheckInOutChange: () => {},
};

type CalendarProviderProps = {
  children: ReactNode;
  calendarProps: CalendarProps;
  onCheckInOutChange?: (checkInDate?: Date, checkOutDate?: Date) => void;
};

const CalendarContext = createContext<CalendarContextType>(initialContextValue);

const CalendarProvider = ({
  children,
  calendarProps = defaultProps,
  onCheckInOutChange,
}: CalendarProviderProps) => {
  const [currentMonth, _setCurrentMonth] = useState<dayjs.Dayjs>(dayjs());
  const [bookingDates, setBookingDates] = useState<{
    checkIn?: dayjs.Dayjs;
    checkOut?: dayjs.Dayjs;
  }>({
    checkIn: calendarProps.defaultCheckIn
      ? dayjs(calendarProps.defaultCheckIn)
      : dayjs().add(7, "day"),
    checkOut: calendarProps.defaultCheckOut
      ? dayjs(calendarProps.defaultCheckOut)
      : calendarProps.defaultCheckIn
      ? dayjs(calendarProps.defaultCheckIn).add(1, "day")
      : dayjs().add(8, "day"),
  });

  const setCurrentMonth = (num: number) => {
    _setCurrentMonth((prevMonth) => prevMonth.add(num, "month"));
  };
  const [calendarSettings, setCalendarSettings] = useState<CalendarProps>({
    ...defaultProps,
    ...calendarProps,
  });

  useGetSavedPeriod(setBookingDates);
  useUpdateCheckInOut(bookingDates, onCheckInOutChange);

  const value: CalendarContextType = {
    today: dayjs(),
    currentMonth,
    setCurrentMonth,
    bookingDates,
    setBookingDates,
    calendarSettings,
    setCalendarSettings,
    onCheckInOutChange,
  };

  return (
    <CalendarContext.Provider value={value}>
      {children}
    </CalendarContext.Provider>
  );
};

export { CalendarContext, CalendarProvider };- defaultProps :
CalendarProps의 기본값을 정의하며,CalendarProvider가 props로calendarProps를 받지 않았을 때 이를 사용한다. - initialContextValue:
initialContextValue는CalendarContext의 초기값을 설정하는 데 사용된다. 이 값은createContext에 전달되어 컨텍스트가 처음 만들어질 때 사용되며,CalendarProvider컴포넌트에서 이 값을 덮어쓸 수 있다. - CalendarContext 생성:
CalendarContext는 React의 컨텍스트 API를 통해 만들어진 객체로, 이를 통해 컴포넌트 트리에 걸쳐 데이터를 공유할 수 있다.CalendarContext.Provider는CalendarContext의 값을 제공하는 컴포넌트이며,CalendarProvider는 이Provider컴포넌트를 캡슐화하여 필요한 로직과 상태를 관리하는 역할을 한다. - CalendarProvider 컴포넌트: 이 컴포넌트는 CalendarContext에 값을 제공한다. 상태값(
currentMonth,bookingDates,calendarSettings)과 상태 변경 함수(setCurrentMonth,setBookingDates,setCalendarSettings)가 context에 제공된다.
즉, defaultProps 이 있고, initialContextValue 는 말그대로 context의 초기값을 말하고, CalendarContext, CalendarProvider 를 만들어주는것!
useGetSavedPeriod
type SetBookingDates = React.Dispatch<
  React.SetStateAction<{
    checkIn?: dayjs.Dayjs;
    checkOut?: dayjs.Dayjs;
  }>
>;

const STORAGE_KEY = "stayPeriod";

const useGetSavedPeriod = (setBookingDates: SetBookingDates) => {
  useEffect(() => {
    const periodData = localStorage.getItem(STORAGE_KEY);
    if (periodData) {
      const { checkIn, checkOut } = JSON.parse(periodData);
      setBookingDates({
        checkIn: dayjs(checkIn),
        checkOut: dayjs(checkOut),
      });
    }
  }, [setBookingDates]);
};

export default useGetSavedPeriod;
로컬 스토리지에서 저장된 체크인 및 체크아웃 날짜를 읽어와서 주어진 상태 설정 함수(setBookingDates)를 사용하여 해당 상태를 업데이트하는 커스텀 훅
useUpdateCheckInOut
type BookingDates = {
  checkIn?: dayjs.Dayjs;
  checkOut?: dayjs.Dayjs;
};

type CheckInOutChangeFunction = (
  checkInDate?: Date,
  checkOutDate?: Date
) => void;

export const useUpdateCheckInOut = (
  bookingDates: BookingDates,
  onCheckInOutChange: CheckInOutChangeFunction | undefined
) => {
  useEffect(() => {
    if (onCheckInOutChange) {
      onCheckInOutChange(
        bookingDates.checkIn?.toDate(),
        bookingDates.checkOut?.toDate()
      );
    }
  }, [bookingDates, onCheckInOutChange]);
};

export default useUpdateCheckInOut;
예약 날짜(체크인 날짜와 체크아웃 날짜)에 변화가 생기면, 해당 변화를 인자로 받는 함수 onCheckInOutChange를 실행하는 커스텀 훅
components - Calendar
<Calendar/>
const Calendar = () => {
  const { calendarSettings } = useContext(CalendarContext);
  const { numMonths, showBookingDatesView } = calendarSettings;

  return (
    <>
      {showBookingDatesView && <BookingDatesView />}

      <MonthNavigation />
      <CalendarContainer>
        {[...Array(numMonths)].map((_, index) => (
          <MonthView key={`month-view-${index}`} index={index} />
        ))}
      </CalendarContainer>
    </>
  );
};

export default Calendar;
calendarSettings 에서 numMonths,showBookingDatesView 의 prop 으로 받아온 값을 가져와서, showBookingDatesView 의 여부에따라 BookingDatesView 를 보여줄지 말지 결정하고 numMonths 에 따라서 MonthView를 몇개 보여줄지 결정한다. 기본값은 2개를 보여주는것
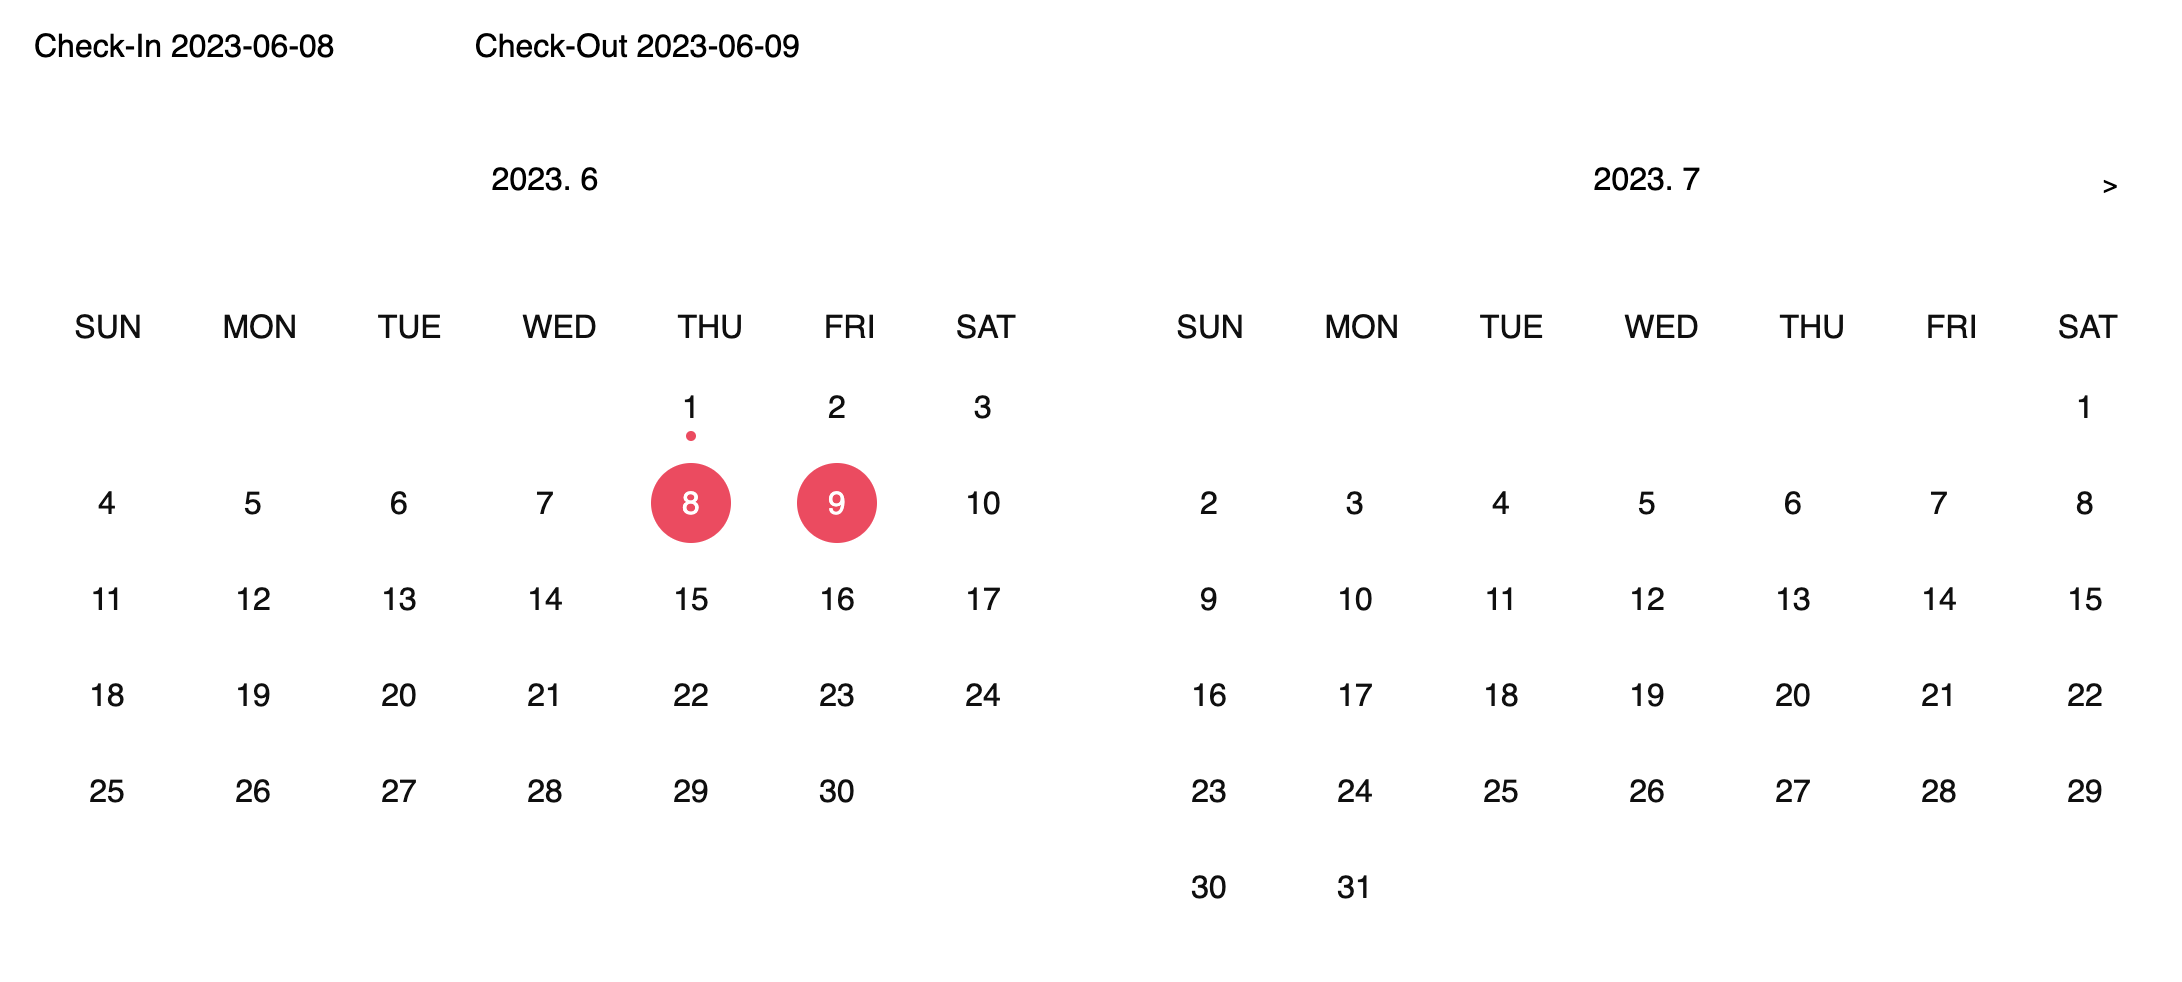
BookingDatesView
const BookingDatesView = () => {
  const { bookingDates, calendarSettings } = useContext(CalendarContext);
  const { language = "en" } = calendarSettings;

  const { checkIn: checkInText, checkOut: checkOutText } =
    languageTextMap[language];

  const renderDateView = (title: string, date?: dayjs.Dayjs) => (
    <BookingDatesViewBox>
      <BookingDatesTitle>
        {title} {date?.format(DATE_FORMAT)}
      </BookingDatesTitle>
    </BookingDatesViewBox>
  );

  return (
    <BookingDatesViewContainer>
      {renderDateView(checkInText, bookingDates.checkIn)}
      {renderDateView(checkOutText, bookingDates.checkOut)}
    </BookingDatesViewContainer>
  );
};

export default BookingDatesView;- Language 설정: calendarSettings에서 language를 가져온다. 설정된 언어가 없으면 디폴트로 "en"이 설정됨.
- renderDateView 함수: 이 함수는 입력으로 받은 title과 date를 사용해 일정 정보를 렌더링한다. BookingDatesViewBox 안에 BookingDatesTitle로 구성되어 있으며, title과 date의 포맷을 변경하여 출력한다.
이 컴포넌트는 체크인과 체크아웃 날짜를 각각 별도의 박스에 표시한다
MonthNavigation
const MonthNavigation = () => {
const { today, currentMonth, setCurrentMonth, calendarSettings } =
useContext(CalendarContext);
const { maximumMonths = 12 } = calendarSettings;
const laterMonthDate = useMemo(
() => today.add(maximumMonths - 1, "month").toDate(),
[today, maximumMonths]
);
const isPrevButtonDisabled =
today.year() >= currentMonth.year() &&
today.month() >= currentMonth.month();
const isNextButtonDisabled =
laterMonthDate.getFullYear() <= currentMonth.year() &&
laterMonthDate.getMonth() <= currentMonth.month();
const handleMonthChange = useCallback(
(num: number) => {
setCurrentMonth(num);
},
[setCurrentMonth]
);
return (
<Container>
<ButtonContainer>
<Button
disabled={isPrevButtonDisabled}
onClick={() => handleMonthChange(-1)}
>
<
</Button>
<Button
disabled={isNextButtonDisabled}
onClick={() => handleMonthChange(1)}
>
>
</Button>
</ButtonContainer>
</Container>
);
};
export default MonthNavigation;
- maximumMonths: calendarSettings에서 maximumMonths라는 값을 가져오는데, 이 값이 없으면 디폴트로 12를 설정하고 있다. 이 값을 통해 캘린더가 표시할 수 있는 최대 월 수를 제한하고 있다.
- laterMonthDate: useMemo 훅을 이용해 maximumMonths - 1 만큼 현재 날짜에 더해져 나중 월의 날짜를 계산한다.
- isPrevButtonDisabled / isNextButtonDisabled: 이전 월 / 다음 월로 이동하는 버튼의 활성화 여부를 결정하는 논리 값.
- handleMonthChange: 이 함수는 월을 변경하는 이벤트 핸들러로, 인자로 받은 num을 setCurrentMonth에 넘겨서 현재 월을 변경한다. 이 함수는 useCallback 훅을 사용해 메모이제이션 되었다.
월을 이동하는 기능을 담당하며, 이전 월과 다음 월로 이동하는 버튼을 렌더링하고, 버튼을 클릭하면 월이 변경된다.
이때, 이전 월로 이동하는 버튼은 현재 월이 현재 날짜보다 이전이면 비활성화 되며, 다음 월로 이동하는 버튼은 현재 월이 설정된 최대 월 이상이면 비활성화 된다.
MonthView
const MonthView = ({ index }: { index: number }) => {
  const { currentMonth, calendarSettings } = useContext(CalendarContext);
  const { language = "en" } = calendarSettings;
  const [dates, setDates] = useState(calculateNewDates(currentMonth, index));

  useEffect(() => {
    setDates(calculateNewDates(currentMonth, index));
  }, [currentMonth]);

  return (
    <Container>
      <WeekdayHeader
        year={dates.newYear}
        month={dates.newMonth}
        language={language}
      />

      <BodyContentContainer>
        <Weekdays />
        <Dates newYear={dates.newYear} newMonth={dates.newMonth} />
      </BodyContentContainer>
    </Container>
  );
};

export default MonthView;
- State 및 useEffect 사용: useState 훅을 사용하여 dates라는 state를 정의하고 있다. 이 dates는 현재 표시되는 월의 날짜 정보를 담고 있다. useEffect 훅을 사용하여 currentMonth가 변경될 때마다 dates를 갱신한다.
- WeekdayHeader 컴포넌트: 이 컴포넌트는 각 월의 헤더를 표시하는 컴포넌트이다. dates.newYear, dates.newMonth, 그리고 설정된 언어를 props로 받아 사용한다.
- BodyContentContainer 컴포넌트: 이 컴포넌트는 각 월의 요일과 날짜를 표시하는 컴포넌트이다. Weekdays 컴포넌트를 통해 요일을 표시하고, Dates 컴포넌트를 통해 날짜를 표시한다.
이 컴포넌트는 캘린더의 월별 뷰를 담당하며, 각 월의 헤더와 요일, 날짜를 표시한다.
calculateNewDates
export const calculateNewDates = (currentMonth: dayjs.Dayjs, index: number) => {
  const newMonth = ((currentMonth.month() + index) % 12) + 1;
  const newYear =
    currentMonth.year() + Math.floor((currentMonth.month() + index) / 12);
  return { newMonth, newYear };
};
이 함수는 현재의 월(currentMonth)와 인덱스(index)를 입력으로 받고, 주어진 인덱스를 사용하여 새로운 월과 연도를 계산한다.
이 인덱스는 월을 증가시키거나 감소시키는 데 사용될 수 있으며, 연도의 변경도 고려한다.
- 예를 들어, 현재 월이 12월이고 인덱스가 1인 경우, 이 함수는 1월과 다음 연도를 반환한다. 마찬가지로, 현재 월이 1월이고 인덱스가 -1인 경우, 이 함수는 12월과 이전 연도를 반환한다.
WeekdayHeader
type WeekdayHeaderProps = {
  year: number;
  month: number;
  language: string;
};

const WeekdayHeader = ({ year, month, language }: WeekdayHeaderProps) => {
  const getFormattedDateText = (
    year: number,
    month: number,
    language: string
  ) => (language === "ko" ? `${year}년 ${month}월` : `${year}. ${month}`);

  return (
    <WeekdayHeaderContainer>
      <WeekdayHeaderText>
        {getFormattedDateText(year, month, language)}
      </WeekdayHeaderText>
    </WeekdayHeaderContainer>
  );
};

export default WeekdayHeader;- getFormattedDateText 함수: 이 함수는 입력으로 받은 년도, 월, 언어 설정을 사용해 포맷된 날짜 문자열을 반환한다. 언어 설정이 "ko"인 경우 한국어로, 그렇지 않은 경우는 영어로 날짜를 표시한다.
각 월의 헤더 표시
Weekdays
const Weekdays = () => {
  const { calendarSettings } = useContext(CalendarContext);
  const { language = "en", startDay = 0 } = calendarSettings;

  const DAYS_OF_WEEK: string[] = useMemo(() => {
    let daysOfWeek = language === "ko" ? DAYS_OF_WEEK_KO : DAYS_OF_WEEK_EN;
    return [...daysOfWeek.slice(startDay), ...daysOfWeek.slice(0, startDay)];
  }, [language, startDay]);

  return (
    <Days>
      {DAYS_OF_WEEK.map((elm) => (
        <div key={elm}>{elm}</div>
      ))}
    </Days>
  );
};

export default Weekdays;
- DAYS_OF_WEEK: 이 컴포넌트에서는 useMemo 훅을 사용하여 언어 설정과 시작 요일에 따라 주중 요일 배열을 생성하고 있다. 언어 설정이 "ko"이면 한국어 요일 배열을, 그렇지 않으면 영어 요일 배열을 사용한다. 또한, 시작 요일을 기준으로 요일 배열을 재배열한다.
한 주 동안의 요일을 표시함, 사용자의 언어 설정과 시작 요일 설정에 따라 요일 표시를 동적으로 변경할 수 있다.
Dates
type DatesProps = {
  newYear: number;
  newMonth: number;
};

const Dates = ({ newYear, newMonth }: DatesProps) => {
  const { calendarSettings } = useContext(CalendarContext);
  const { startDay = 0 } = calendarSettings;

  const totalDate = useMemo(() => {
    return generateMonthCalendar(newYear, newMonth, startDay);
  }, [newYear, newMonth, startDay]);

  const lastDayOfMonth = useMemo(() => {
    return new Date(newYear, newMonth, 0).getDate();
  }, [newYear, newMonth]);
  return (
    <DatesContainer>
      {totalDate.map((date) => (
        <DateCell
          key={date.toString()}
          year={date.getFullYear()}
          month={date.getMonth() + 1}
          date={date.getDate()}
          isOtherDay={date.getMonth() + 1 !== newMonth}
          lastDayOfMonth={lastDayOfMonth}
        />
      ))}
    </DatesContainer>
  );
};

export default Dates;- totalDate와 lastDayOfMonth: useMemo 훅을 사용하여 주어진 년도와 월에 대한 전체 날짜 배열과 해당 월의 마지막 날을 계산하고 있다.
캘린더 한 달 동안의 모든 날짜 표시함, 사용자의 시작 요일 설정에 따라 날짜 표시를 동적으로 변경할 수 있다.
DateCell
type DateCellProps = {
  date: number;
  month: number;
  year: number;
  isOtherDay: boolean;
  lastDayOfMonth: number;
};

const DateCell = ({
  date,
  month,
  year,
  isOtherDay,
  lastDayOfMonth,
}: DateCellProps) => {
  const { bookingDates, today, calendarSettings } = useContext(CalendarContext);
  const { isRectangular } = calendarSettings;
  const currentDate = dayjs(new Date(year, month - 1, date));
  const { handleClickDate } = useHandleClickDate(today);
  const currentDateString = currentDate.format(DATE_FORMAT);
  const todayDateString = today.format(DATE_FORMAT);
  const isAfterLastDay = date > lastDayOfMonth;

  const checkInDateString = bookingDates.checkIn?.format(DATE_FORMAT);
  const checkOutDateString = bookingDates.checkOut?.format(DATE_FORMAT);
  const isSelectedDate =
    !isOtherDay &&
    (checkInDateString === currentDateString ||
      checkOutDateString === currentDateString);
  const isWithinRange =
    !isOtherDay &&
    checkInDateString &&
    checkOutDateString &&
    checkInDateString < currentDateString &&
    currentDateString < checkOutDateString;

  return (
    <DatesContainer
      onClick={
        !isAfterLastDay && !isOtherDay
          ? () => handleClickDate(currentDate)
          : undefined
      }
    >
      {isSelectedDate && <Highlighting isRectangular={isRectangular} />}
      {isWithinRange && <MiddleHighlighting isRectangular={isRectangular} />}
      {currentDateString === todayDateString && (
        <TodayDot isHighlighting={isSelectedDate} />
      )}
      <DateNum
        isBeforeToday={currentDateString < todayDateString}
        isOtherDay={isOtherDay}
        isHighlighting={isSelectedDate}
        isRectangular={isRectangular}
      >
        {date}
      </DateNum>
    </DatesContainer>
  );
};

export default DateCell;- handleClickDate : 각 날짜를 클릭할 때 어떤 일이 일어나야 하는지를 정의하는 함수
이 컴포넌트는 특정 날짜가 선택되었는지, 범위 안에 있는지, 그리고 오늘 날짜인지를 판별합니다. 이 조건에 따라 다양한 스타일을 적용한다.
useHandleClickDate
const useHandleClickDate = (today: dayjs.Dayjs) => {
  const { bookingDates, setBookingDates } = useContext(CalendarContext);

  const handleClickDate = (date: dayjs.Dayjs) => {
    const todayString = today.format("YYYY-MM-DD");
    const dateString = date.format("YYYY-MM-DD");

    if (todayString > dateString) {
      return;
    }
    if (
      !bookingDates.checkIn ||
      (bookingDates.checkIn && bookingDates.checkOut) ||
      date < bookingDates.checkIn
    ) {
      setBookingDates((prevBookingDates) => ({
        ...prevBookingDates,
        checkIn: date,
        checkOut: undefined,
      }));

    } else if (date > bookingDates.checkIn) {
      setBookingDates((prevBookingDates) => ({
        ...prevBookingDates,
        checkOut: date,
      }));
    }
  };

  return { handleClickDate };
};

export default useHandleClickDate;
- 사용자가 오늘 날짜 이전의 날짜를 클릭하면 아무런 동작을 수행하지 않음
- 사용자가 첫 번째로 날짜를 클릭하거나, 이미 체크인과 체크아웃 날짜가 모두 설정된 상태에서 날짜를 클릭하면, 클릭한 날짜를 체크인 날짜로 설정하고 체크아웃 날짜는 비움
- 또한, 체크인 날짜가 설정되어 있는 상태에서 체크인 날짜보다 이전의 날짜를 클릭하면, 클릭한 날짜를 새로운 체크인 날짜로 설정하고 체크아웃 날짜는 비움
- 체크인 날짜가 설정되어 있는 상태에서 체크인 날짜 이후의 날짜를 클릭하면, 클릭한 날짜를 체크아웃 날짜로 설정함
사용자가 캘린더에서 날짜를 클릭했을 때의 동작을 정의하는 커스텀 훅
generateMonthCalendar
export const generateMonthCalendar = (
  year: number,
  month: number,
  startDay: number
): Date[] => {
  const startOfMonth = new Date(year, month - 1, 1);
  const endOfMonth = new Date(year, month, 0);
  let startOfWeek = (7 + startOfMonth.getDay() - startDay) % 7;
  let endOfWeek = (7 + endOfMonth.getDay() - startDay) % 7;

  const startDate = startOfMonth.getDate();
  const endDate = endOfMonth.getDate();
  const days = Array.from({ length: endDate }, (_, i) => {
    return new Date(year, month - 1, i + 1);
  });

  const previousMonthDays = Array.from({ length: startOfWeek }, (_, i) => {
    const date = new Date(year, month - 2, startDate - startOfWeek + i);
    return date;
  });
  const nextMonthDays = Array.from({ length: 6 - endOfWeek }, (_, i) => {
    const date = new Date(year, month, endDate + i + 1);
    return date;
  });
  return previousMonthDays.concat(days, nextMonthDays);
};
이 함수는 주어진 연도(year), 월(month), 그리고 달력이 시작되는 요일(startDay)을 입력으로 받는다. 이 함수는 한 달의 날짜 데이터를 생성하는데, 그 달의 첫 주에 속하는 이전 달의 일부 날짜와, 마지막 주에 속하는 다음 달의 일부 날짜를 포함한다. 이를 통해 달력에 전체적으로 일주일 간의 날짜가 항상 표시되도록 한다.