Lecture 3에 이어서 Lecture 4에서는 Model 내에 Logic을 더 다루고 enum과 Optional에 대해 강의를 해주셨다. Lecture 4안에서 MVVM으로 간단한 Logic을 완성시켰고 Programming Assignment에서 scratch로 부터 스스로 앱을 만들어본다고 하셨다 🤩
enum
struct 와 class 처럼 사용하는 방법은 유사하지만 구분되는 상태(?)(discrete state)만 가져야한다. 모든 case는 각자 구분되는 것들로 구성되어있어야 한다.
ex)
enum FastFoodMenuItem {
    case hamburger
    case fires
    case drink
    case cookie
}
enum으로 var item: FastFoodMenuItem = .hamburger와 같이 선언되었다면 이것은 call-by-value를 의미한다.
아래와 같이 enum에서도 case를 다른 enum를 불러와서 하나의 enum을 생성할 수 있다. (중첩된 enum의 모습)
enum FastFoodMenuItem {
    case hamburger(numberOfPatties: Int)
    case fires(size: FryOrderSize)
    case drink(String, ounces:Int)
    case cookie
}

enum FryOrderSize {
    case large
    case small
}
위와 같이 한 enum의 case에서 해당 case를 다른 enum으로 선언하게 되면 nested enum구조가 가능하다. 왜냐하면 한 enum은 모두 각자 discrete하기 때문이다.
enum을 가진 variable
그렇다면 변수(variable)를 enum으로 선언할 때는 어떻게 해야할까?
아래와 같이 선언할 수 있다.
let menuItem: FastFoodMenuItem = FastFoodMenuItem.hamburger여기서 만약에 enum(FastFoodMenuItem)으로 Type이 이미 선언되어있다면 Swift는 이미 해당 variable이 명시한 Type을 갖고있다는 것을 알고 있다.
따라서 .hamburger 와 같이 사용해도 Swift Compiler는 알 수 있다. 이것은 당연한 일이다.
iterable enum
enum안에 선언되어있는 모든 state 를 알고 싶다면 switch-case 나 for-in loop를 사용하면 된다.
switch-case with enum
switch-case와 함께 사용한다면 발생할 수 있는 모든 경우의 수에 대해서 처리를 하는 것이 중요하다. 그래서 default를 사용하는 것이 굉장히 중요하다. 혹시나 프로그래머의 실수로 모든 경우의 수를 handle하지 못하는 경우에는 default가 처리해주기 때문이다.
things that can be placed inside enum
enum은 struct, class와 마찬가지로 method와 computed properties를 가질 수 있다. 하지만 정보를 저장할 수는 없다.
enumerate enum
enum FastFoodItem: CaseIterable {
	case hamburger
	case beverage
}
위와 같이 선언한 enum에 : (behaves like ~)를 CaseIterable로 작성해준다면 enumerate하게 enum을 접근할 수 있다.
CaseIterable로 enum이 선언되면 .allCases로 해당 enum을 순회할 수 있다.
Optional
강의를 듣고 나니 Dart, Flutter에서 사용했던 ? operator의 의미를 정확하게 알게 되었다.
사실은 ?는 enum으로 이루어진 하나의 template으로 생각하니 이해가 더 쉬웠다. 예를 들어서 enum으로 생각하면 더할 나위 없이 아래의 코드로 작성가능하다.
enum Optional<T> {
    case none
    case some(T)
}T는 Generic Type으로 그 어떤 Type이 와도 상관없다. 예를 들어 T는 String, Int, Double 등 다양한 Type이 올 수 있다.
Optional을 사용하는 이유
그렇다면 Optional을 왜 사용하는 것일까??
이유는 선언한 변수가 때에 따라서 값을 가질 수도 있고 아닐 수 도 있기 때문이다. 예를 들면, set 이 안됐거나 unspecified, undetermined인 상태라면 그 어떤 값도 변수에 할당된 상태가 아닐 것이다.
그리고 certain value, 특정한 값이 변수에 할당이 된다면 위에서 작성한 enum에서 some(T) 에 해당하게 된다.
이런 특성을 사용하는 방법은 다양하지만 크게 사용되는 방식은 아래와 같다.
!???
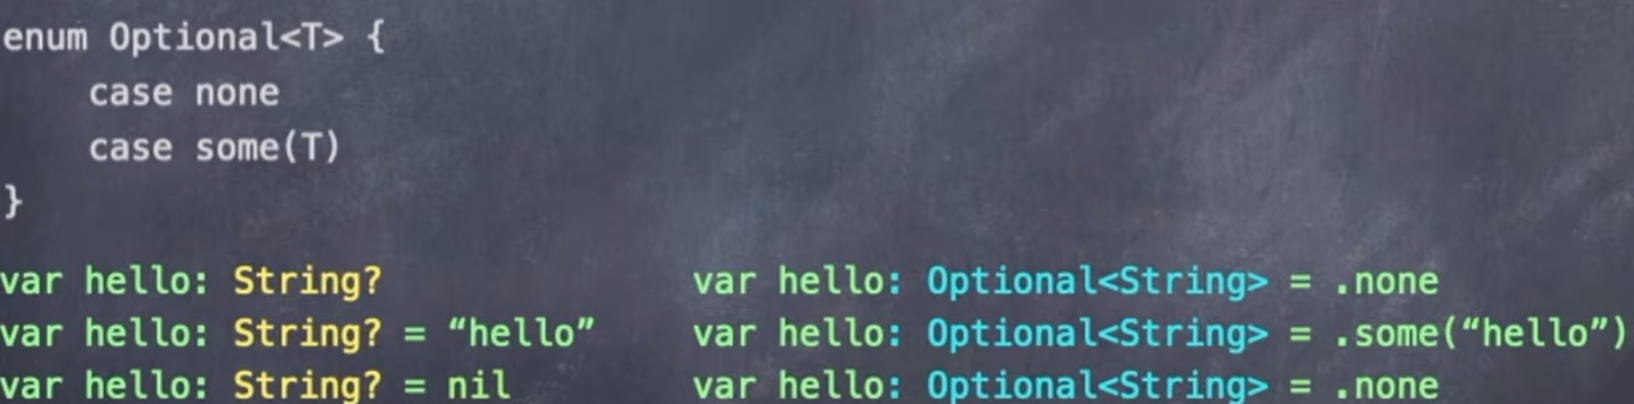
(어떤 Type을e Optional<T>으로 선언하는 것은 T?와 같다)
nil == Optional.none맨 아래 var hello: String? = nil은 이미 Optional.none으로 선언한 것과 같다.
usage of !

이름은 'forced unwrapping'이라고 한다. 뜻대로 강제로 값을 꺼내는 것으로 생각하면 쉽다. 만약에 할당된 값이 없거나 none이게 되면 rum-time error가 발생한다.
그래서 이런 오류를 방지하기 위해서 아래와 같이 작성이 가능하다.

if let을 사용해서 crash(error)가 발생하지 않도록 할 수 있다.
지금부터는 선호되지않는 방식, minor usage이다.
usage of ??
이 operator의 이름은 'optional defaulting, nil-coalescing operator'이다.

삼항연산자와 비슷하지만 다르다. ??을 기준으로 왼쪽에는 조건이 오게된다. 예를 들어서 아래와 같은 변수가 있다고 하자.
let h: String? = "Hello World"
let res = h ?? "no value"h가 만약에 let h:String?으로 선언되어 있다면 res 에 저장되는 값은 no value가 될 것이다. 하지만 지금 "Hello World"가 할당되어있기 때문에 h는 none에 해당하지 않고 some<String> 이기 때문에 h에 할당된 값이 res 에 저장된다.
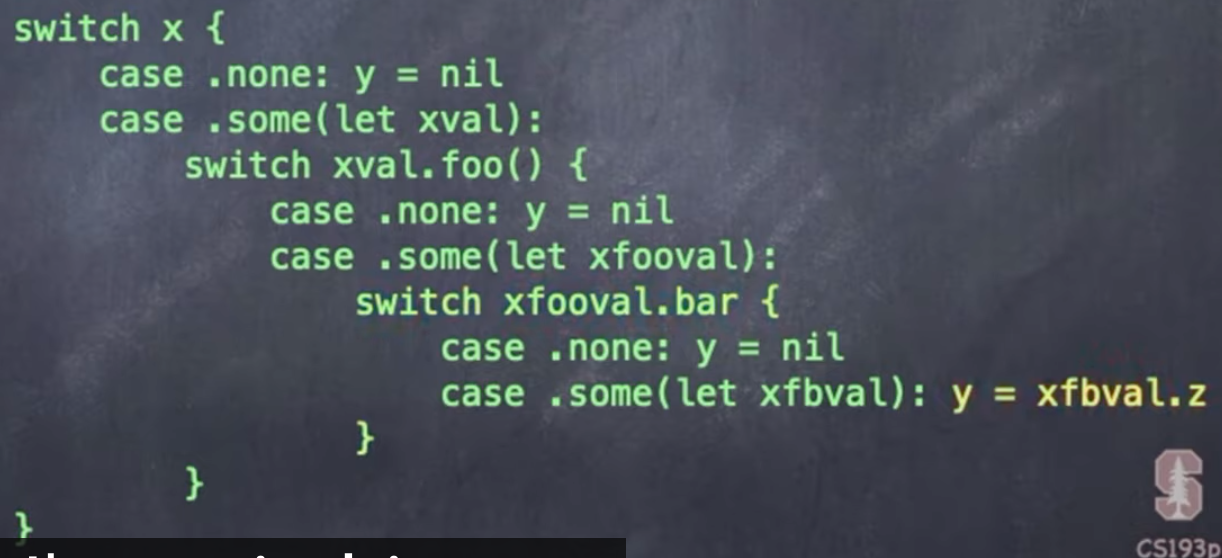
usage of ?
이름은 'optional-chaining'이다.
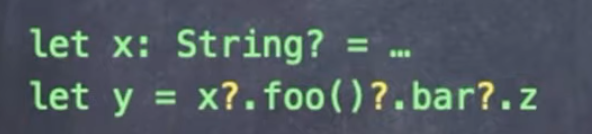
위에 보이는 것과 같이 계속 접근을 해서 none이 아닌 값이 할당되어있다면 저장이 되고 아니라면 끝까지 접근을 해도 none이 저장된다. 이를 switch-case로 표현하면 아래와 같다.
MVVM 구현
- Model:
struct로 구현 - ViewModel:
class로 구현 - View:
struct로 구현
Model 구현
우선 'MemoryGame'이란 모델을 만들기 전에 'don't care'로 만들기 위해서 CardContent를 이용했다. 그리고 MemoryGame은 카드를 뒤집어 같은 것을 맞추는 게임이기 때문에, 그런 상태를 가지는 여러개의 카드가 필요하므로 아래와 같이 작성했다.
struct MemoryGame<CardContent> {
	private var cards: Array<Card>
}Card란 object가 필요한데 앞서 Reading Assignment와 강의에서도 언급이 됐듯이 struct는 copied-by-value 이지만 class는 reference를 공유하기 때문에 이에 Card 를 구현하기에 적절한 것은 struct이다. 왜냐하면 우리는 구현하기 위해서 형태가 필요하기 때문이다. 그래서 아래와 같이 구현할 수 있다.
struct Card {
    var isFacedUp: Bool = false
    var isMatchdedUp: Bool = false
    var content: CardContent
}isFacedUp과 isMatchedUp은 초기에 뒤집혀 있고 매칭이 안된 상태이기 때문에 false로 default값을 설정해주었다. 그리고 content는 CardContent로 Int, String 등 다양하게 올 수 있어 "don't care"가 된다. 여기서 Card가 MemoryGame안에 중첩되도록 작성하는데 이유가 궁금했다. 보통 범용적으로 쓰이기 위해서는 MemoryGame 밖에 선언을 해주어야하는 것이 아닌가 싶었다.
왜 Card를 MemoryGame안에 선언해주나요?
이유는 간단하다. MemoryGame.Card 처럼 Card란 struct가 MemoryGame 안에 속하는 것을 직관적으로 알 수 있기 때문이다.
Card란 struct는 단어로 봤을 때 쓰일 수 있는 곳이 굉장히 많다. 하지만 .란 namespace를 통해서 한 줄로 읽었을 때, MemoryGame에서 쓰이는 Card로 이해하기 훨씬 수월하기 때문이다.
init
'Free' init을 사용할 수 도 있지만 특정한 값이 필요할 경우에는 argument가 필요하다. 이번 게임에서는 '짝 지어진 카드의 갯수'와 '카드를 생성하는 함수'를 argument로 받아서 init를 작성하였다.
init(numberOfPairsOfCards: Int, createCardContent: (Int) -> CardContent) {
        cards = Array<Card>()
        // add numberOfPairsOfCards * 2 cards to cards array
        for pairIndex in 0..<numberOfPairsOfCards {
            let content = createCardContent(pairIndex)
            /// can use free initializer
            cards.append(Card(content: content, id: pairIndex * 2))
            cards.append(Card(content: content, id: pairIndex * 2 + 1))
        }

}numberOfPairsOfCards와 createCardContent를 입력받아서 사용할 cards를 만들어낸다. 먼저 cards를 비어있는 Array로 초기화를 해준 다음에 for-in을 사용해서 입력받은 카드의 갯수 만큼 cards안에 각 card의 content를 만들어낸다. createCardContent는 입력받는 function으로 ViewModel에서 입력될 예정이다.
card의 content 를 만들때는 Card의 free initializer를 사용해서 default로 값이 주어지지 않은 property를 채워주었다. ViewModel에서 입력받을 createCardContent 함수를 통해서 content 란 변수를 초기화해주었고 이를 2장씩 index 별로 cards에 추가해주었다.
위에서 작성했던 코드와 다른 점은 id 란 property가 생겼다는 점이다. id는 card의 identifiable, 즉 카드들을 식별가능할 수 있도록 해주기 위해서 추가해주었다. 추후에 구현할 method 내에서 두개의 card를 비교할 때 유용하게 쓰일 수 있기 때문이다.
Identifiable
변경된 Card struct의 모습
/// `MemoryGame.Card`
/// why do we namespace?
/// by nesting this, it makes clear that  this Card is of MemoryGame card
struct Card: Identifiable {
        /// set default
        var isFacedUp: Bool = false
        var isMatched: Bool = false
        var content: CardContent   // use don't care for future development
        var id: Int
}
주석(comments)는 제가 강의를 들으면서 작성한 것이기 때문에 신경안쓰셔도 됩니다 :)
강의에서는 id를 Int로 설정해주었다.
그리고 이제 게임을 하기위해서는 기능이 필요하다. 카드를 선택할 때는 3가지 경우가 있을 수 있다.
- 아무것도 선택한 카트가 없는 경우, 선택한 카드 갯수 0개
- 하나를 이미 선택한 경우, 선택한 카드 갯수 1개
- 두개를 이미 선택했는 데 짝이 안맞거나 매칭이 된 경우, 선택한 카드 갯수 2개
여기서 이미 선택한 카드가 1개 이상일 경우에는 선택한 카드의 속성(?), 카드(Card)의 내부 값이(content) 필요하다.
choose
완성된 코드를 먼저 보면 아래와 같다.
private var indexOfTheOneAndOnlyFaceUpCard: Int?

// calling this function will change the struct
mutating func choose(_ card: Card) {
	if let chosenIndex = cards.firstIndex(where: { $0.id == card.id }),
		!cards[chosenIndex].isFacedUp,
		!cards[chosenIndex].isMatched
		{
		if let potentialMatchIndex = indexOfTheOneAndOnlyFaceUpCard {
			if cards[chosenIndex].content == cards[potentialMatchIndex].content {
				cards[chosenIndex].isMatched = true
				cards[potentialMatchIndex].isMatched = true
			}
			indexOfTheOneAndOnlyFaceUpCard = nil
		} else {
			for index in cards.indices {
				cards[index].isFacedUp = false
			}
			indexOfTheOneAndOnlyFaceUpCard = chosenIndex
		}
		cards[chosenIndex].isFacedUp.toggle() // card.isFacedUp = !card.isFacedUp
	}
	print("\(cards)")
}
기존의 선택한 카드의 유무와 값을 알기 위해서 indexOfTheOneAndOnlyFaceUpCard로 변수를 선언해주었는데, 여기서 중요한 점은 ?를 사용했다는 것이다. 카드를 선택할 때는 3가지경우가 있을 수 있는 데 0개 인 경우 값을 어떻게 저장할 것인지가 중요하다. 이번 강의에서도 enum과 Optional을 배웠듯이 Optional을 사용해볼 수 있는 좋은 기회이다.
mutating이란 keyword 없이 위 function을 작성한다면 private var cards: Array<Card> 로 선언된 cards가 변경되지 않을 것이다. 이처럼 mutating이란 keyword를 선언해주면 Swift Compiler에게 이 function은 "MemoryGame struct를 바꿀꺼야"라고 얘기해주는 것과 같다.
첫 if문을 보면 cards 안에서 입력된 card의 id와 같은 값을 먼저 찾게 된다. chosenIndex가 존재하지 않는 경우에는 run-time error 가 발생하기 때문에 if의 조건으로 사용했다. for-in을 통해서 같은 id값을 찾을 수 도 있지만 교수님이 강의에서 내장 함수를 사용하는 것도 좋은 습관이라고 하셨다. 강의에서는 firstIndex란 내장 함수를 이용해서 구현하였는데 자세한 설명은 공식문서에도 잘 나와있다.
그리고 특이했던 건 다른 언어에서는 if 조건문에 &&나 and로 조건을 추가했었는데 Swift에서는 ,로 조건을 추가하였다. 그래서 여기에는 선택한 card가 선택한 시점에서 뒤집혀있고 매칭이 안된 카드인지 추가로 검사를 한다.
그러고 나서 전에 선택했던 카드, 즉, indexOfTheOneAndOnlyFaceUpCard가 값이 있다면 potentailMatchIndex에 저장이 되고 아니면 if문을 벗어나게 된다. 만약에 이전에 선택한 카드(cards[indexOfTheOneAndOnlyFaceUpCard])가 있다면 이를 현재 시점에 선택한 카드(cards[chosenIndex])가 같은지 Card내 content로 비교를 한다.
이때 비교를 하기 위해 앞에서 Card를 :(Behaves like ~) Identifiable로 update 해준 것이다. 만약에 content가 같다면 isMatched를 두개의 카드 모두 true로 update해준다. 그리고 content가 같지 않더라도 기존에 선택한 카드를 초기화해주기 위해서(다시 매칭을 하기 위해서) nil로 저장해준다.
두 번째 if문에서는 .enumerated()로 key, value를 사용할 필요없이 index에만 접근하려면 .indices를 사용하는 것도 좋다. 매칭에 실패했으므로 뒤집어진 카드를 모두 false로 바꾸고 기존에 선택한 카드(cards[indexOfTheOneAndOnlyFaceUpCard])를 지금 현재 선택한 카드(cards[chosenIndex])로 업데이트 해준다.
마지막으로 선택한 카드를 뒤집어 놓기 위해서 toggle()이란 function을 사용해서 뒤집어준다. 굳이 cards[chosenIndex].isFacedUp = !cards[chosenIndex].isFacedUp 으로 값을 초기화해주지 않아도 된다.
완성된 Model 소스코드
//
//  MemoryGame.swift
//  Memorize
//
//  Created by 이승환 on 2021/09/20.
//

import Foundation // Array, String, Dictionary, ...

/// when using certain don't care need to declare the type
/// don't care type has to do with '==' operator, use `where` and `Equatable`
struct MemoryGame<CardContent> where CardContent: Equatable {
    private(set) var cards: Array<Card>

    private var indexOfTheOneAndOnlyFaceUpCard: Int?

    // calling this function will change the struct
    mutating func choose(_ card: Card) {
        if let chosenIndex = cards.firstIndex(where: { $0.id == card.id }),
           !cards[chosenIndex].isFacedUp,
           !cards[chosenIndex].isMatched
        {
            if let potentialMatchIndex = indexOfTheOneAndOnlyFaceUpCard {
                if cards[chosenIndex].content == cards[potentialMatchIndex].content {
                    cards[chosenIndex].isMatched = true
                    cards[potentialMatchIndex].isMatched = true
                }
                indexOfTheOneAndOnlyFaceUpCard = nil
            } else {
                for index in cards.indices {
                    cards[index].isFacedUp = false
                }
                indexOfTheOneAndOnlyFaceUpCard = chosenIndex
            }
            cards[chosenIndex].isFacedUp.toggle() // card.isFacedUp = !card.isFacedUp
        }
        print("\(cards)")
    }

    init(numberOfPairsOfCards: Int, createCardContent: (Int) -> CardContent) {
        cards = Array<Card>()
        // add numberOfPairsOfCards * 2 cards to cards array
        for pairIndex in 0..<numberOfPairsOfCards {
            let content = createCardContent(pairIndex)
            /// can use free initializer
            cards.append(Card(content: content, id: pairIndex * 2))
            cards.append(Card(content: content, id: pairIndex * 2 + 1))
        }

    }

    /// `MemoryGame.Card`
    /// why do we namespace?
    /// by nesting this, it makes clear that  this Card is of MemoryGame card
    struct Card: Identifiable {
        /// set default
        var isFacedUp: Bool = false
        var isMatched: Bool = false
        var content: CardContent   // use don't care for future development
        var id: Int
    }
}
ViewModel 구현
ViewModel은 Model가 modified(수정)되는지 확인하고 View에게 이를 전달하는 역할을 한다. 우선 class를 정의해보자.
class EmojiMemoryGame {
	private var model: MemoryGame<String>
}
이모티콘(Emoji)를 이용해서 MemoryGame을 만들어 볼 것이기 때문에 View에서 Model로 바로 볼 수 없고 ViewModel 내에서도 바로 Model를 볼 수 없도록 private으로 선언해주었다. MemoryGame을 init하기 위해서는 위해서 Model을 만들 때 init func안에 argument로 numberOfPairsOfCards와 createCardContent func이 필요하다.
아래와 같이 두개의 parameter를 전달하면서 model를 초기화 해줄 수 있다.
let emojis = ["😀","😃","😄","😁","😆","😅","🤣","😂","🙂","🙃","😉","😊","😇","🥰","😍","🤩","😘","😗"]

private var model: MemoryGame<String> = MemoryGame<String>(numberOfPairsOfCards: 4, createCardContent: {
	for pairIndex in 0..<4 {
		emojis[pairIndex]
	}
})}
문제는 emojis를 저렇게 사용하면 instance memeber가 property initializer로 적합하지 않다고 오류가 발생한다. property는 var나 let으로 class 나 struct 내에 선언된 변수를 말하는데 initializer는 =로 값이 저장되는 것을 말한다. 여기서 model에 =로 값 저장되려고 해서 오류가 발생한다.
심지어 compile될 때 emojis가 먼저 compile될 지 model이 먼저될 지는 랜덤하게 되기 때문에 아무도 모른다. emojis를 class 밖에으로 빼서 사용하면 전역 변수(Global Variable)로 사용하게 되는데, 이는 굉장히 위험하고 좋지 않다.
이를 essentially Global하게 사용하려면 어떻게 해야할까?
static의 사용
교수님께서 강의에서는 emojis를 class 밖에 사용해서 Global variable로 사용할 수 도 있지만, 위험한 작업이기 때문에 emojis를 essentially Global하게 사용하려면 prefix에 static을 붙여준다고 하셨다.
static을 사용하므로써 model이란 property는 이제 더이상 EmojiMemoryGame내 생성되는 instance에 의존하지 않아도 된다.
그러면 static을 prefix에 붙인다는 것은 더이상 Instance method가 아닌 것인데 Type Method와의 차이점은 뭘까?
Instance vs. Type
공식문서에 Instance method와 Type method에 대해 설명이 잘 되어있지만 정리할 겸 알아보도록 하자.
우선 Instance란?
객체지향 프로그래밍(OOP(Object-Oriented Programming))에서는 크게 class, object 그리고 instance로 대상이 분류된다.
여기서 Instance는 어떤 object의 실체, 프로그램 실행 시 run-time 때 존재하는 것이 Instance다. Instance 는 object의 실제화(realization)이기 때문에 'object'와 동의어이며 실제화된 이것을 instance object라고 불린다. 이런 instance의 생성을 instantiation(인스턴스화)라고 한다.
클래스기반 프로그래밍(Class-based Programming)에서는 object는 생성자와 소멸자에 의해서 생성되고 파괴되는데 이때 생성된 객체(object)는 class의 instance이다. 이를 class instance 또는 class object라고 부른다.
Tips.
- abstract classes: 추상화 클래스는 instantiation(인스턴스화) 불가능
- concrete classes: 구상 클래스는 instantiation(인스턴스화) 가능
Type이란?
공식문서에는 Swift에서 다루는 모든 Type에 대해 설명이되어있다. 우리가 흔히 접했던 Data Type을 기반으로 생각하면 될 듯 하다.
Instance Method vs. Type Methods
Instance Method란?
특정한 class, struct 그리고 enum에 속하는 instance method를 말한다. instance method 들은 속해있는 class, struct, enum내 property에게 여러 functionality(기능)을 지원해준다. 예를 들어서 property내 접근(access), 수정(modify) 또는 property의 목적에 맞는 기능을 지원해준다.
instance methods는 오직 특정한 instance에만 작용을 해야하고 존재하는 instance가 있어야 실행이 가능하다.
class Counter {
    var count = 0
    func increment() {
        count += 1
    }
    func increment(by amount: Int) {
        count += amount
    }
    func reset() {
        count = 0
    }
}increment(), increment(by), reset() 모두 count란 instance에 작용하며 Counter란 class는 3개의 instance method를 갖게 된다.
Type Methods란?
Instance method는 특정한 Type을 가진 instance와 작용한다면, Type Method는 Type 그 자체에 대해서 method를 정의할 수 있다.
static을 func앞에 사용하므로써 해당 method가 class나 struct내 Type Method란 것을 명시할 수 있다. class는 func앞에 class
를 사용해서 상속받는 sub-class 내에서 override할 수 있게 해줄 수 있다.
However, you call type methods on the type, not on an instance of that type.
위에서 model을 할당하기 위해서 만든 createCardContent func은 EmojiMemoryGame과는 다른 Type을 return 한다. 그리고 다른 instance를 사용하지 않기 때문에 Type Method로 사용해야한다.
완성된 ViewModel 소스코드
//
//  EmojiMemoryGame.swift
//  Memorize
//
//  Created by 이승환 on 2021/09/20.
//

import SwiftUI // cause its part of UI

/// ViewModel is going to be a `class`
/// intermediary between Model and View
/// all the variables in class, it have to be initialized
class EmojiMemoryGame: ObservableObject {
    /// `static`
    static let emojis = ["😀","😃","😄","😁","😆","😅","🤣","😂","🙂","🙃","😉","😊","😇","🥰","😍","🤩","😘","😗"]
    /// Not an `instance` of type, is used like `Global` function
    static func createMemoryGames() -> MemoryGame<String> {
        MemoryGame<String>(numberOfPairsOfCards: 3) { pairIndex in
            /// static variables can be called without declaring `EmojiMemoryGame`
            emojis[pairIndex]
        }
    }

    /// since out model is type of struct
    /// cause the EmojiMemoryGame handles emoji, set the `CardContent` to `String`
    /// `private` only the Viewmodel itself can see `model`
    /// `private(set)` tells swift, its read-only from others, can look at this but cannot touch them
    /// `in` distributes place with arguments and the code excutes
    @Published private var model: MemoryGame<String> = createMemoryGames()


    /// to get the cards - get fresh copy
    var cards: Array<MemoryGame<String>.Card> {
        return model.cards
    }

    // MARK: - Intent(s)

    func choose(_ card: MemoryGame<String>.Card) {
        // if @Published is declared we don't need below thing
        //    objectWillChange.send() // send to the world this object will change
        model.choose(card)
    }
}
아직 다루지 않은 2가지가 있다. ObservableObject와 Published란 keyword이다.
State Management
애플리케이션 내에서 state를 다룰 때 3가지를 주의해서 사용해야한다.
ObservableObject@ObservedObject@Published
| ObservableObject | @ObservedObject | @Published |
|---|---|---|
| protocol | property wrapper | property wrapper |
| ViewModel에 사용 | View 안에서 사용 | ViewModel 안에서 사용 |
| data를 저장할 수 있는 class 종류에 사용 | ObservableObject의 instance를 저장 | View가 update해야할 property에 적용 |
ObservableObject
이 protocol은 data를 저장할 수 있는 그런 class 종류에 사용된다. 위에서 작성한 ViewModel을 :(Behaves like ~) ObservableObject로 선언해서 사용하였다.
소스코드 일부분
class EmojiMemoryGame: ObservableObject {
...
}
instance of class(EmojiMemoryGame)가 View안에서 사용될 수 있도록 허용해주는 역할을 한다. 해당 instance와 binding 되어있는 View들은 ViewModel에서 @Published keyword가 있는 property가 변경될 때 rebuild 되겠죠? 🤩
@Published
ObservableObject로 선언된 class 내에서 View가 update할 Model의 property에 적용된다.
소스코드 일부분
class EmojiMemoryGame: ObservableObject {
...
@Published private var model: MemoryGame<String> = createMemoryGames()
...
}
이처럼 View는 MemoryGame<String>를 update 해줘야하기 때문에 앞에 @Published를 붙여준다. 이처럼 model이 변경되면 View는 rebuild가 된다.
@ObservedObject
View안에서 ObservableObject의 instance이다.
Tips.
절대로 initial instance를 @ObservedObject로 생성하지 말 것. state 관리에 있어서 initial instance를 생성하는데 다른 protocol을 사용해야한다. - @StateObject를 사용해야한다.
ex) @ObservedObject
struct ContentView: View {
    @ObservedObject var viewModel: EmojiMemoryGame
    ...
}
ex) @StateObject
struct ContentView: View {
	@StateObject var viewModel = EmojiMemoryGame()
}
마지막으로 View의 완성된 소스코드는 아래와 같다.
ContentView.swift
//
//  ContentView.swift
//  Memorize
//
//  Created by 이승환 on 2021/09/14.
//

import SwiftUI // imports when we build UIs

struct ContentView: View {
    @ObservedObject var viewModel: EmojiMemoryGame

    var body: some View {
        ScrollView {
            LazyVGrid(columns: [GridItem(.adaptive(minimum: 65))]) {
                ForEach(viewModel.cards) { card in
                    CardView(card: card)
                        .aspectRatio(2/3, contentMode: .fit)
                        .onTapGesture {
                            viewModel.choose(card)
                        }
                }
            }
            .foregroundColor(.yellow)
            .padding()
        }
    }
}

struct ContentView_Previews: PreviewProvider {
    static var previews: some View {
        let game = EmojiMemoryGame()
        ContentView(viewModel: game)
    }
}

struct CardView: View {
    let card: MemoryGame<String>.Card // highly recommended, read-only state

    var body: some View {
        ZStack {
            let shape = RoundedRectangle(cornerRadius: 12)
            if card.isFacedUp {
                shape.fill().foregroundColor(.white)
                shape.strokeBorder(lineWidth: 3.0)
                Text(card.content).font(.title)
            } else if card.isMatched {
                shape.opacity(0.0)
            } else {
                shape.fill().foregroundColor(.yellow)
            }
        }
    }
}
MemorizeApp.swift
//
//  MemorizeApp.swift
//  Memorize
//
//  Created by 이승환 on 2021/09/14.
//

import SwiftUI

@main
struct MemorizeApp: App {
    /// used free init to create `EmojiMemoryGame`
    let game = EmojiMemoryGame() // Reference Type

    var body: some Scene {
        WindowGroup {
            ContentView(viewModel: game)
        }
    }
}
Summary
- enum
- Optional
- Identifiable
- private vs. private(set)
set을 선언해주게되면 외부에서 수정(modify)은 안되지만 읽기(read)는 가능, read-only인 property에 사용 - mutating
- inner func.
- toggle(), indices, - Instance vs. Type
- static
- State Management
- ObservableObject
- @Published
- @ObservedObject

형 화이팅 !!! 😉