🍎 비동기 통신
🌳 Axios
' HTTP 클라이언트 라이브러리 '
node.js와 브라우저를 위한 Promise 기반 http 클라이언트
→ http를 이용해서 서버와 통신하기 위해 사용하는 패키지
🌱 Axios 설치
yarn add axios
🌱 GET
Axios get
get은 서버의 데이터를 조회할 때 사용
// url에는 서버의 url이 들어가고, config에는 기타 여러가지 설정을 추가할 수 있다.
axios.get(url[, config])	// GET
Axios config 공식문서
https://axios-http.com/kr/docs/req_config
우리가 사용하는 json-server API 명세서 확인하기
전체 정보나 상세 정보는 아래와 같이 path variable로 url을 작성
Plural routes
GET		/posts
GET		/posts/1
filter와 같은 기능을 위해서 GET 요청을 하고자할 때는 query로 보내라고 명시하고 있다.
Filter
use . to access deep properies
GET /posts?title=json-server&author=typicode
GET /posts?id=1&id=2
GET /comments?author.name=typicode
json-server에 있는 todos를 axios를 이용해서 fetching하고 useState를 통해서 관리하는 로직
// src/App.js
import React, { useEffect, useState } from "react";
import axios from "axios";

const App = () => {
	const [todos, setTodos] = useState(null);

    // axios를 통해서 get 요청을 하는 함수를 생성한다.
    // 비동기처리를 해야하므로 async/await 구문을 통해서 처리한다.
    const fetchTodos = async () => {
    	const { data } = await axios.get("http://localhost:3001/todos");
      	setTodos(data);	// 서버로부터 fetching한 데이터를 useState의 state로 set 한다
    };

  // 생성한 함수를 컴포넌트가 mount 됐을 때 실행하기 위해 useEffect를 사용한다.
  useEffect(() => {
    // effect 구문에 생성한 함수를 넣어 실행한다.
    fetchTodos();
  }, []);
}
🌱 POST
Axios POST
axios.post(url[, data[, config]]) // postpost는 보통 서버에 데이터를 추가할 때 사용
보통은 클라이언트의 데이터를 body 형태로 서버에 보내고자 할 때 사용.
const onSubmitHandler = async(todo) => {
	// 1. 이때 todos는 [{투두하나}]임
	await axios.post("http://localhost:3001/todos", todo);
	// 이때 서버에 있는 todos도 [{투두하나}]임

  	// 근데 여기서 서버 요청이 끝나고 서버는 [{투두가}, {두개임}]

  	setTodos([...todos, todo])	// 2. 만약 이게 없다면, go to useEffect
  	// 4. 새로고침해서 진짜 현재 서버 데이터를 받아오기전에 상태를 똑같이 동기시켜줌
  	// 5. 유저한테 서버에서 새로 받아온것처럼
}

useEffect(() => {
	fetchTodos();	// 3. 새로고침해서 여기를 다시 실행해줘야 서버값이 새로 들어옴 [{투두가}, {두개임}]
}, []);
🌱 DELETE
Axios delete
axios.delete(url[, config]) // DeleteDELETE는 저장되어 있는 데이터를 삭제하고자 요청을 보낼 때 사용.
const onClickDeleteButtonHandler = (todoId) => {
	axios.delete(`http://localhost:3001/todos/${todoId}`)
}
🌱 PATCH
Axios patch
axios.patch(url[, data[, config]]) // PATCHpatch는 보통 어떤 데이터를 수정하고자 서버에 요청을 보낼 때 사용하는 메서드이다.
http 환경에서 서로가 한 약속이자 문맥이기 때문에, 수정을 하고자 반드시 patch, put을 써야만 하는 것은 아니지만 이러한 약속들을 대부분의 개발자들이 지키고 있다.
const [editTodo, setEditTodo] = useState({
	title: "",
});

const onClickEditButtonHandler = (todoId, edit) => {
	axios.patch(`http://localhost:3001/todos/${todoId}`, edit)
}
🌳 Fetch
Fetch는 ES6부터 도입된 Javascript 내장 라이브러리.
Promise 기반 비동기 통신 라이브러리.
fetch 단점
- 미지원 브라우저 존재
- 개발자에게 불친절한 response
- axios에 비해 부족한 기능
🌱 fetch와 axios의 차이점
데이터 읽어오기
fetch
const url = "http://jsonplaceholder.typicode.com/todos";
fetch(url)
.then((response) => response.json())	// 한 번 더 json화
.then(console.log);
fetch().then을 한 상태여도 여전히 JSON 포맷의 응답이 아니기 때문에 response.json()을 한 번 더 해주는 과정이 필요하다.
따라서, fetch로 데이터를 요청하는 경우 두 개의 .then()이 필요하다.
axios
const url = "http://jsonplaceholder.typicode.com/todos";
axios.get(url).then((response) => console.log(response.data));
axios는 응답(response)을 기본적으로 JSON 포맷으로 제공한다.
에러 처리
fetch
const url = "https://jsonplaceholder.typicode.com/todos";

fetch(url)
	.then((response)=>{
		if(!response.ok) {
        	throw new Error(
            	`This is an HTTP error: The status is ${response.status}`
            );
        }
  		return response.json();
	})
	.then(console.log)
	.catch((err) => {
		console.log(err.message);
	});
axios
const url = "https://jsonplaceholder.typicode.com/todos";

axios
	.get(url)
	.then((response) => console.log(response.data))
	.catch((err) => {
		console.log(err.message);
	})
axios.get() 요청이 반환하는 Promise 객체가 갖고 있는 상태코드가 2xx의 범위를 넘어가면 거부(reject)를 한다.
따라서, 곧바로 catch() 부분을 통해 error handling이 가능하다.
const url = "https://jsonplaceholder.typiicode.com/todos";

// axios 요청 로직
axios
	.get(url)
    .then((response) => console.log(response.data))
    .catch((err) => {

      // 오류 객체 내의 response가 존재한다 = 서버가 오류 응답을 주었다
      if (err.response){
            const { status, config } = err.response;

            // 없는 페이지
            if (status === 404) {
                console.log(`${config.url} not found`);
            }
            // 서버 오류
            if (status === 500) {
                console.log("Server error");
            }

            // 요청이 이루어졌으나 서버에서 응답이 없었을 경우
      } else if (err.request) {
      	console.log("Error", err.message);
        // 그 외 다른 에러
      } else {
      	console.log("Error", err.message);
      }
    });
fetch의 경우, catch()가 발생하는 경우는 오직 네트워크 장애 케이스이다.
따라서 개발자가 일일히 then() 안에 모든 케이스에 대한 HTTP 에러 처리를 해야한다.
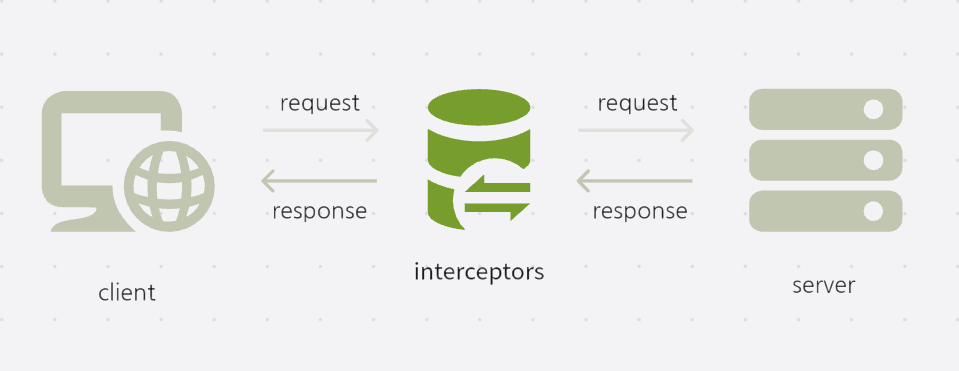
🍎 axios interceptor의 개념과 필요성
axios interceptor는 다음 두 상황에서 흐름을 가로채서 어떠한 코드 상의 관여를 할 수 있게 한다.
1. 요청(request)이 처리되기 전(= http request가 서버에 전달되기 전)
2. 응답(response)의 then(=성공) 또는 catch(=실패)가 처리되기 전
아래와 같은 요청 및 응답시에 필요한 작업들을 한꺼번에 처리.
- 요청 헤더 추가
- 인증 관리
- 로그 관련 로직 삽입
- 에러 핸들링
🌳 instance 만들기, baseURL 설정하기
const data = axios.get("http://localhost:4000/")인스턴스(instance) : custom 설정이 되어 있지 않은 완전히 plain axios, 순수 axios
// src > axios > api.js

import axios from "axios";

// axios.create의 입력값으로 들어가는 객체는 configuration 객체이다.

const instance = axios.create({
	baseURL : "http://localhost:4000",
});

export default instance;
참고주소 https://axios-http.com/docs/req_config
axios.create는 Axios 라이브러리에서 사용되는 메서드 중 하나이다.
이 메서드를 사용하면 Axios의 인스턴스를 생성할 수 있으며, 이를 통해 HTTP 요청을 보내고 응답을 받을 수 있다.
// App.jsx

import {useEffect} from "react";
import api from "./axios/api";

function App() {
	useEffect(()=>{
    	api
        	.get("/cafe")
      		.then((res) => {
        		console.log("결과 => ", res.data)
        	})
      		.catch(() => {
        		console.log("오류가 발생하였습니다!")
        	});
    }, []);

  	return <div>axios 예제</div>;
}

export default App;
서버의 정보가
http://localhost:4000 → http://localhost:5000
변경이 되어도, api.js 파일만 수정해주면 된다.
🌳 request, response
// src > axios > api.js

import axios from "axios";

const instance = axios. create({
	baseURL: "http://localhost:4000",
});

instance.interceptors.request.use(
	function (config) {
    	// 요청을 보내기 전 수행
      	console.log("인터셉트 요청 성공!");
      	return config;
    }
  	function (error) {
		// 오류 요청을 보내기 전 수행
  		console.log("인터셉트 요청 오류!");
  		return Promise.reject(error);
	}
);

instance.interceptors.response.use(
	function (response) {
    	console.log("인터셉트 응답 받았어요!");
      	// 정상 응답
      	return response;
    },

  	function (error) {
    	console.log("인터셉트 응답을 받지 못하였어요!");
      	return Promise.reject(error);
    }
);
요청과 응답 중간에 가로채서 어떠한 작업을 수행해 주는 것을 볼 수 있다.
🌳 더 적용할 수 있는 부분
- 요청 시, content-type 적용
- token 등 인증 관련 로직 적용
- 서버 응답 코드에 대한 오류 처리(controller)
- 통신시작 및 종료에 대한 전역 상태를 관리하여 spinner, progress bar 등 구현 가능