
해당 포스팅은 Notion의 문서를 간략히 정리한 것으로 이 링크에 정리된 Notion을 통해 더 자세하고 정리된 정보를 얻으실 수 있습니다.
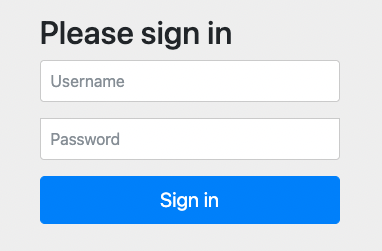
Spring Security를 세팅하면 처음으로 보이는 화면은 다음과 같습니다. 다음과 같이 username과 password를 사용하는 인증은 어떻게, 어떤 클래스가, 어떤 방법으로 진행되는 이해하지 못한 상태로 Spring Security를 사용하다보니 항상 의문점 투성이었습니다. 그래서 이번 포스팅을 계기로 조금 더 깊게 Spring Security의 기본적인 인증방법을 이해해보려 합니다.
Servlet Filters + Spring Security Filters
Spring Security의 인증 과정을 알아보기에 앞서, Spring Security의 인증을 담당하는 Filter chain과 Servlet의 Filter chain이 어떻게 구성됐는지 이해해야 합니다.
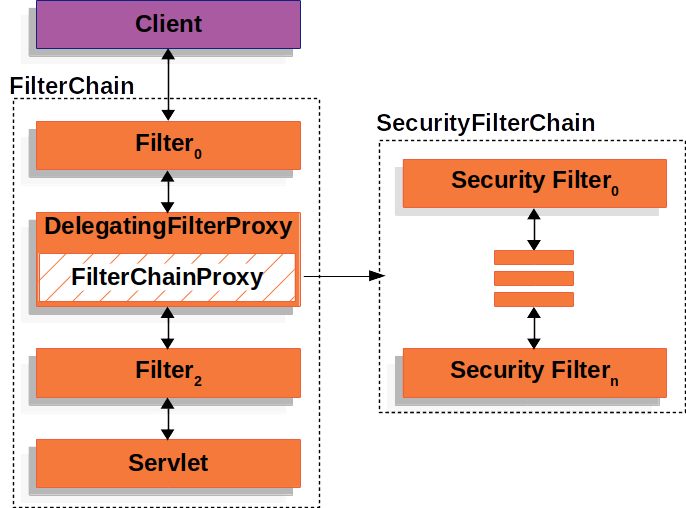
출처: Spring security documentation
위의 이미지는 Spring Security Documentation에서 가져온 Security Filterchain의 구성인데요, 위의 구성에서 Servlet을 포함하는 FilterChain은 HttpRequest, 즉 client의 request가 처리되는 일련의 Filter 입니다. Spring Security는 DelegatingFilterProxy를 wrapping한 FilterChainProxy를 통해 Servlet의 FilterChain에 SecurityFilterChain을 연결시킵니다. SecurityFilterChain은 요청된 request에 어떠한 인증관련Filter을 적용시킬지 결정합니다. SecurityFilterChain이 이번 포스팅에서 알아보고자 하는 UsernamePasswordAuthenticationFilter이 등록된 부분입니다.
Spring Security Filters
SecurityFilterChain에 등록된 Filter들은 다음과 같습니다.
- ChannelProcessingFilter
- WebAsyncManagerIntegrationFilter
- SecurityContextPersistenceFilter
- HeaderWriterFilter
- CorsFilter
- CsrfFilter
- LogoutFilter
- OAuth2AuthorizationRequestRedirectFilter
- Saml2WebSsoAuthenticationRequestFilter
- X509AuthenticationFilter
- AbstractPreAuthenticatedProcessingFilter
- CasAuthenticationFilter
- OAuth2LoginAuthenticationFilter
- Saml2WebSsoAuthenticationFilter
- UsernamePasswordAuthenticationFilter`
- OpenIDAuthenticationFilter
- DefaultLoginPageGeneratingFilter
- DefaultLogoutPageGeneratingFilter
- ConcurrentSessionFilter
- DigestAuthenticationFilter`
- BearerTokenAuthenticationFilter
- BasicAuthenticationFilter`
- RequestCacheAwareFilter
- SecurityContextHolderAwareRequestFilter
- JaasApiIntegrationFilter
- RememberMeAuthenticationFilter
- AnonymousAuthenticationFilter
- OAuth2AuthorizationCodeGrantFilter
- SessionManagementFilter
- ExceptionTranslationFilter`
- FilterSecurityInterceptor`
- SwitchUserFilter
Spring Security는 위와 같이 등록된 일련의 Filter들을 통해 인증과정을 진행합니다. 이번 포스팅에서 알아보고자 하는 UsernamePasswordAuthenticationFilter은 username과 password가 post 방식으로 요청되는 경우 해당 요청을 처리하는 Filter입니다.
UsernamePasswordAuthentication 인증과정
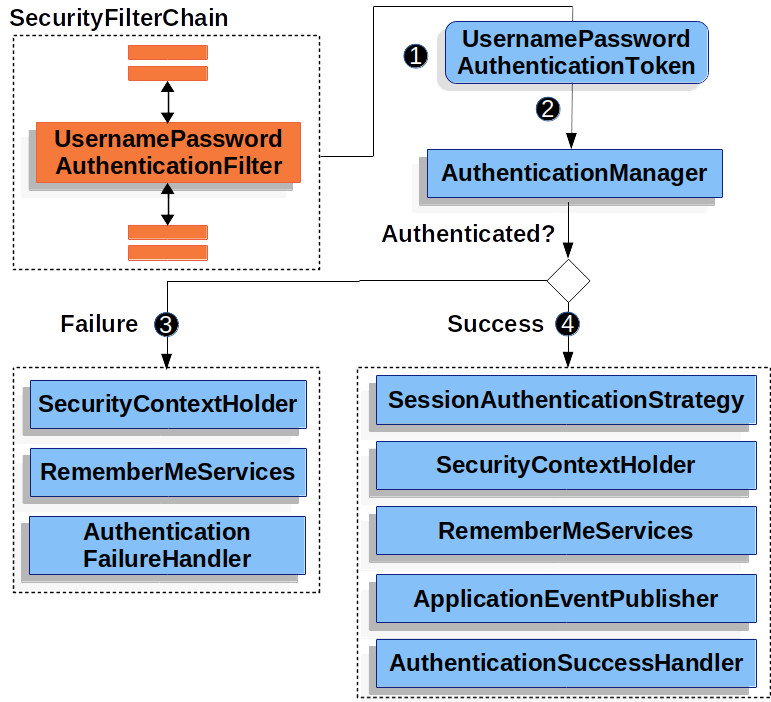
1. username과 password를 통한 post 요청이 들어오는 경우, UsernamePasswordAuthenticationFilter는 HttpServletRequest에서 username과 password를 추출해서 UsernamePasswordAuthenticationToken객체를 생성합니다.
2. UsernamePasswordAuthenticationToken은 AuthenticationManager에게 넘겨지고, AuthenticationManager은 해당 UsernamePasswordAuthenticationToken을 인증할 수 있는 AuthenticationProvider을 찾아서 인증을 진행합니다.
3. 인증과정이 실패한다면 SecurityContextHolder을 비우고, remember-me가 설정되어있다면 RememberMeServices.loginFail을 실행합니다. 마지막으로 AuthenticationFailureHandler 을 실행시킵니다.
4. 인증과성에 성공한다면 SecurityContextHolder에 해당 Authentication객체가 저장되고, remember-me가 설정되어있다면 RememberMeServices.loginSuccess가 실행됩니다. 마지막으로 AuthenticationSuccessHandler이 실행되면서 login 하기 이전에 접근했었던 url로 redirect 됩니다.
이번 포스팅에서는 username과 password를 활용한 인증이 어떻게 진행되는지 디버깅 툴을 활용해 하나하나 자세히 알아보겠습니다.
UsernamePasswordAuthentication의 동작방식
UsernamePasswordAuthentication 에 의한 인증과정을 자세히 알아보기 위해 intellij의 debugging 툴을 사용해보겠습니다. 기본적으로 Spring security는 성공적인 인증을 마치면 JSESSION이라는 session을 브라우저에 저장하게 되는데, 이는 인증과정을 디버깅하는 과정을 귀찮게 할 수 있기 때문에, chrome의 시크릿 창을 통해서 디버깅을 진행하겠습니다.
Project Structure

-
pom.xml과 application.yml 파일은 해당 링크를 참조하십시오.
-
Project structure은 다음과 같이 기본적인 spring boot project이며, pom에 설정된 의존성은 spring security, spring webMvc, lombok 과 kotlin입니다.
-
application.yml을 통해서 spring security의 default user의 username과 password를 설정할 수 있습니다. 프로젝트 설정은username=user, password=1234입니다. -
요청이 Spring Security Filter Chain에서 어떻게 처리되는지 더 자세히 확인해보고 싶다면
logging.level.org.springframework.security값을DEBUG또는TRACE로 설정해주면 됩니다.
Main class
@SpringBootApplication
class SpringSecurityBlog0Application

fun main(args: Array<String>) {
    runApplication<SpringSecurityBlog0Application>(*args)
}

@RestController
@RequestMapping("/")
class ExampleController {
    @GetMapping("/hello")
    fun hello(): String {
        return "hello"
    }
}
해당 프로젝트와 관련된 코드의 전부이며 localhost:8080/hello라는 하나의 endpoint만 개방하도록 하겠습니다. Spring Security는 기본적으로 모든 endpoint에서 인증을 요구하기 때문에 해당 endpoint에 접근하기 위해서는 성공적인 인증이 요구됩니다.
UsernamePassword 인증의 진행
- 외부에서
http://localhost:8080/hellosecured endpoint 접근

http://localhost:8080/hello는 기본적으로 secured endpoint 이기 때문에 인증되지 않은 요청의 경우 자동적으로http://localhost:8080/login으로 redirect됩니다. - application.yml에서 설정한 username(user), password(1234)로 로그인을 요청합니다.
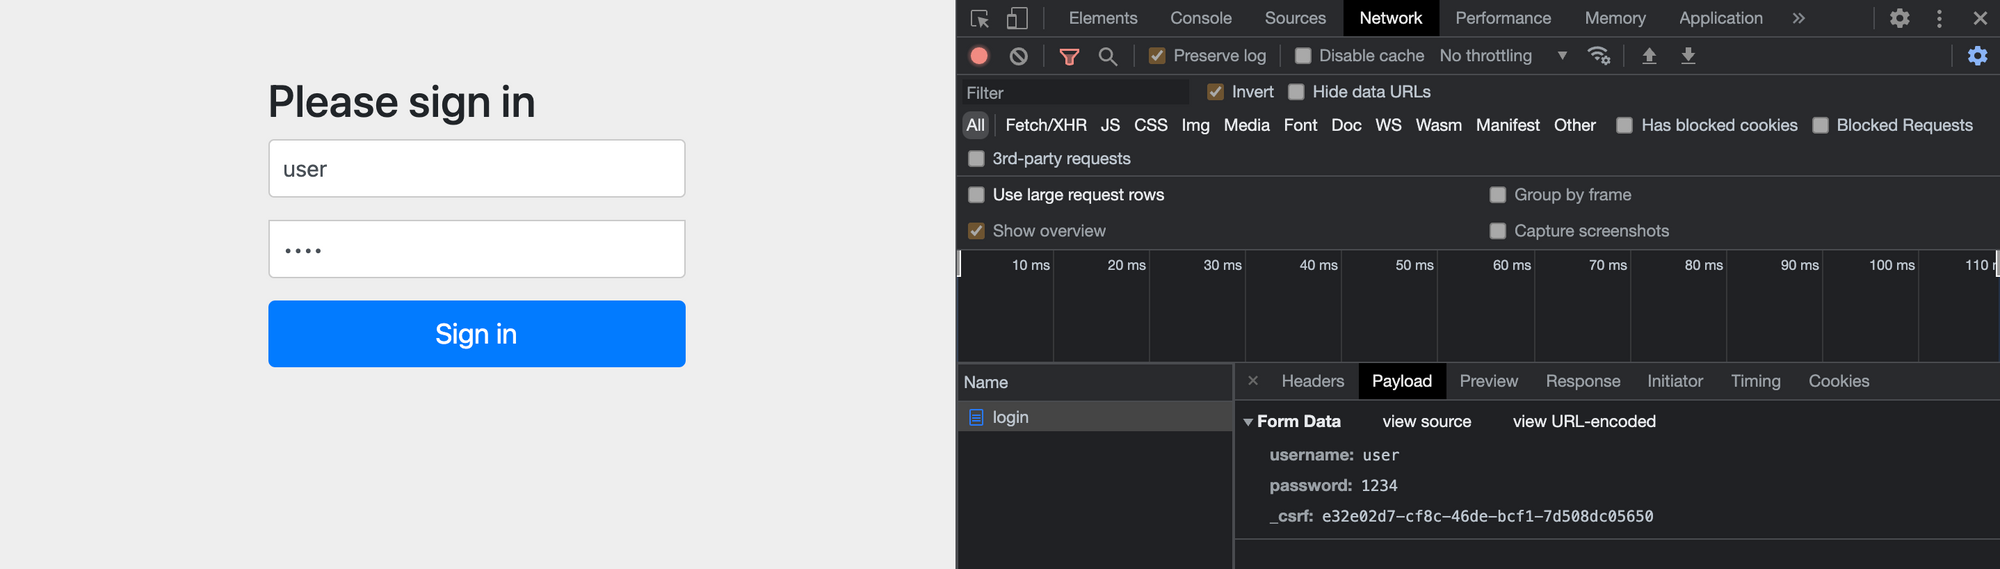 payload에 username, password 그리고 Spring security에서 default로 제공해주는 _csrf 토큰값이 포함되는 것을 알 수 있습니다.
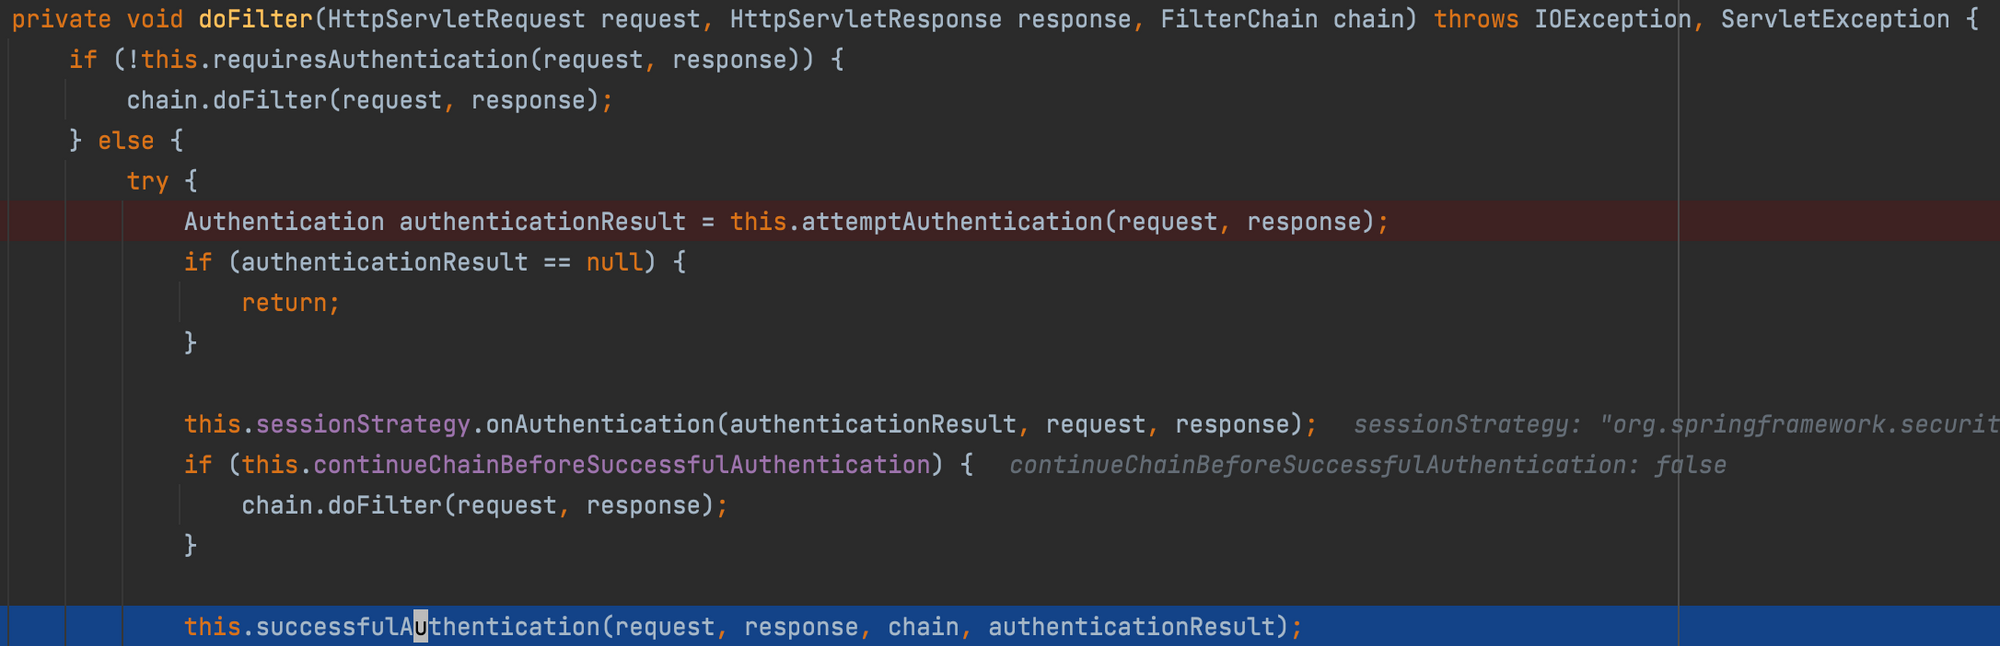
 AbstractAuthenticationProcessingFilter의doFilter메서드
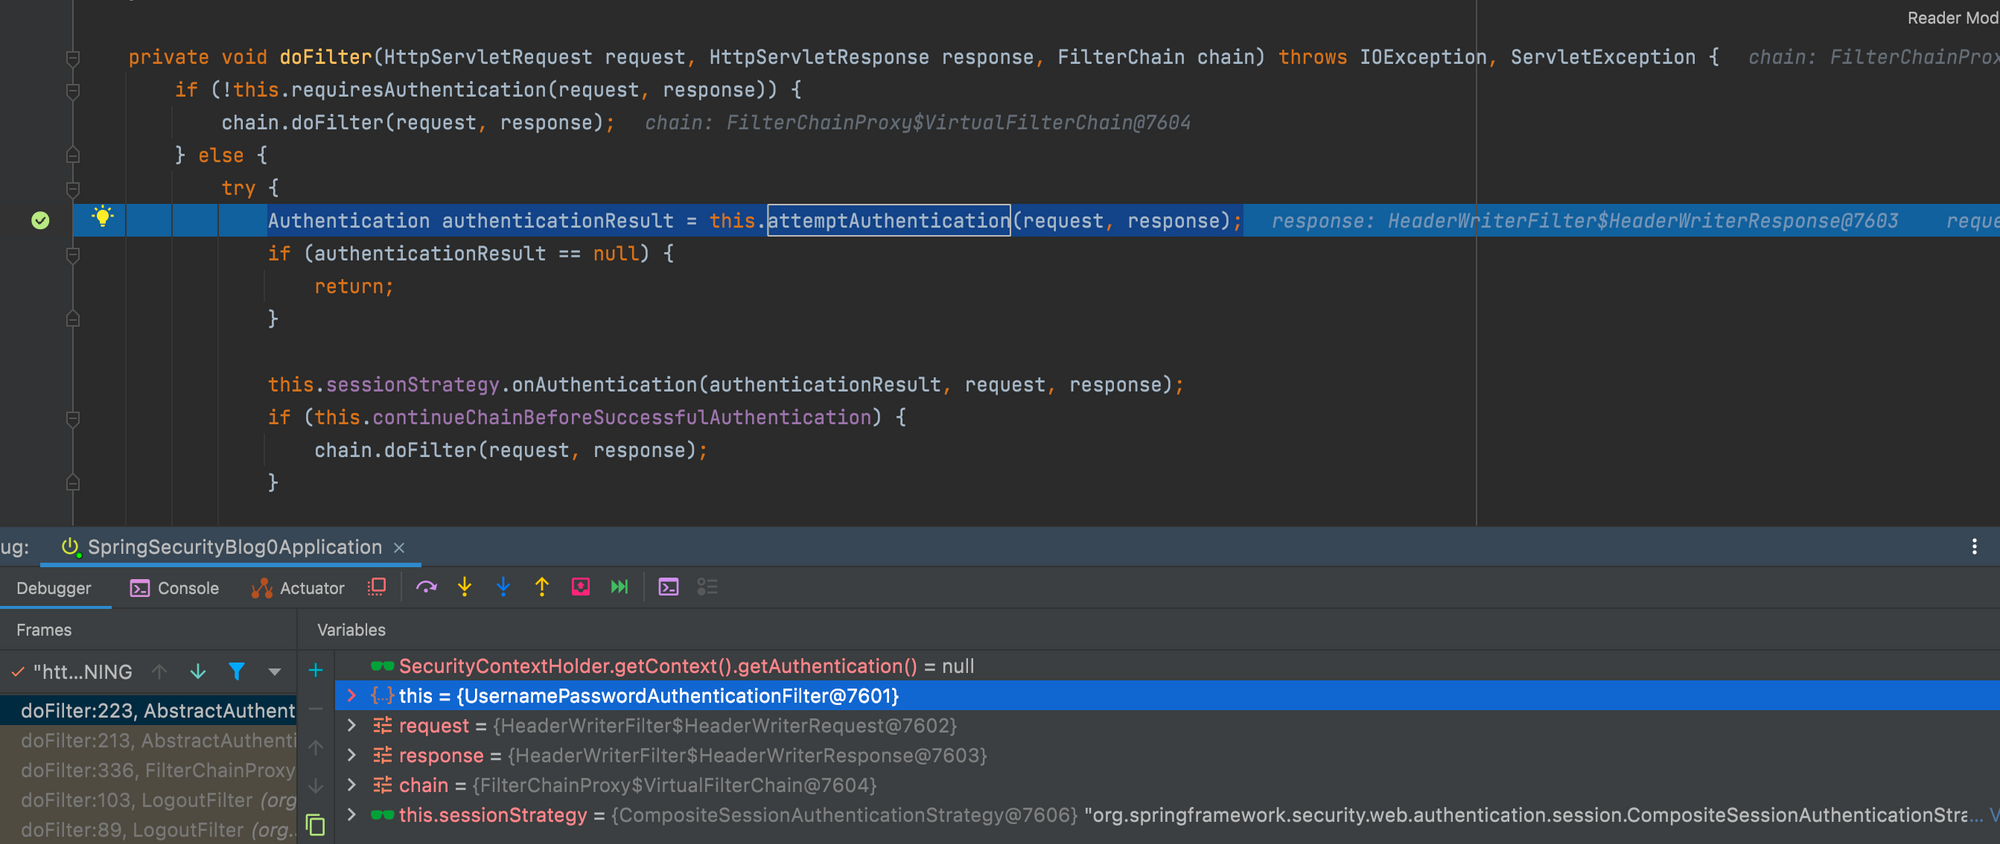
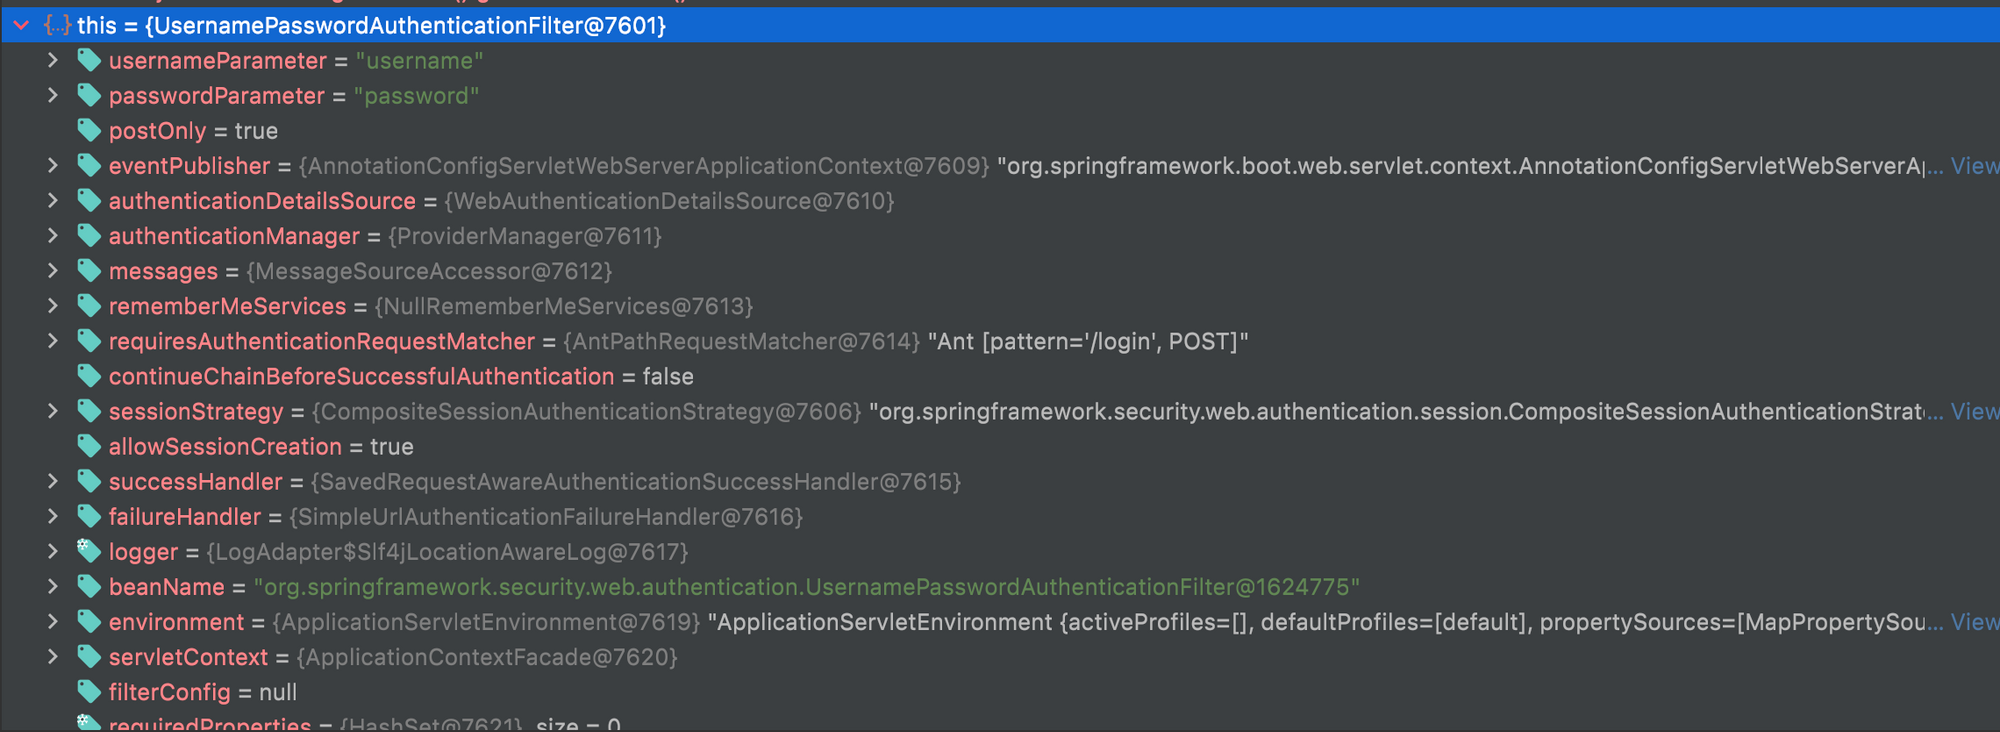
Authentication authenticationResult = this.attemptAuthentication(request, response)에서this는AbstractAuthenticationProcessingFilter의 구현체인UsernamePasswordAuthenticationFilter객체입니다.
UsernamePasswordAuthenticationFilter의attemptAuthentication메서드
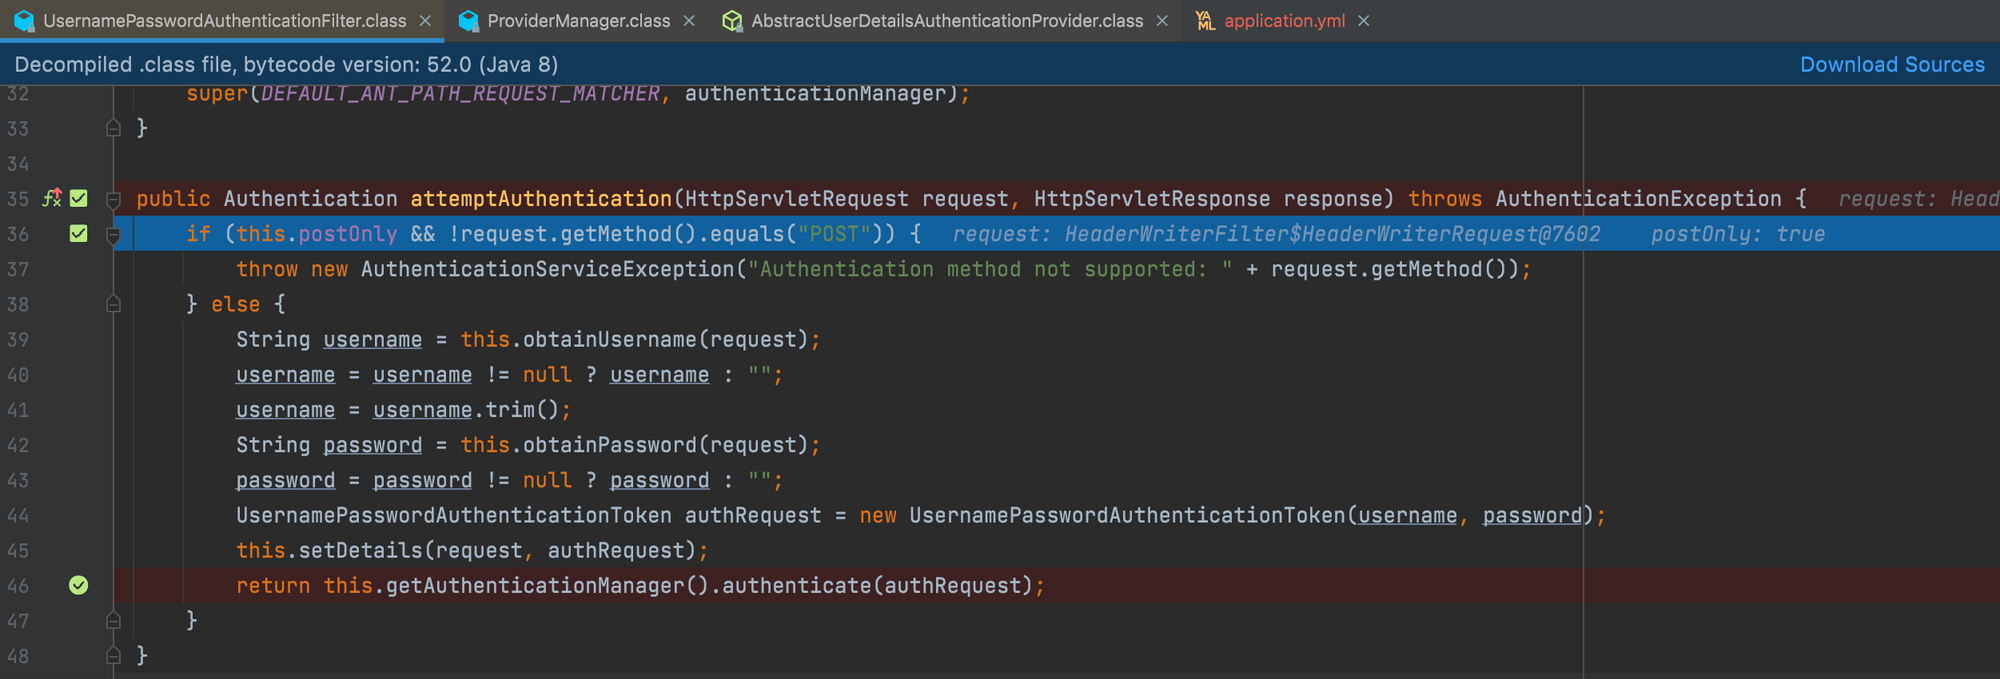
request.getMethod().equals("POST")를 통해서 POST 요청만 받음을 확인할 수 있습니다.
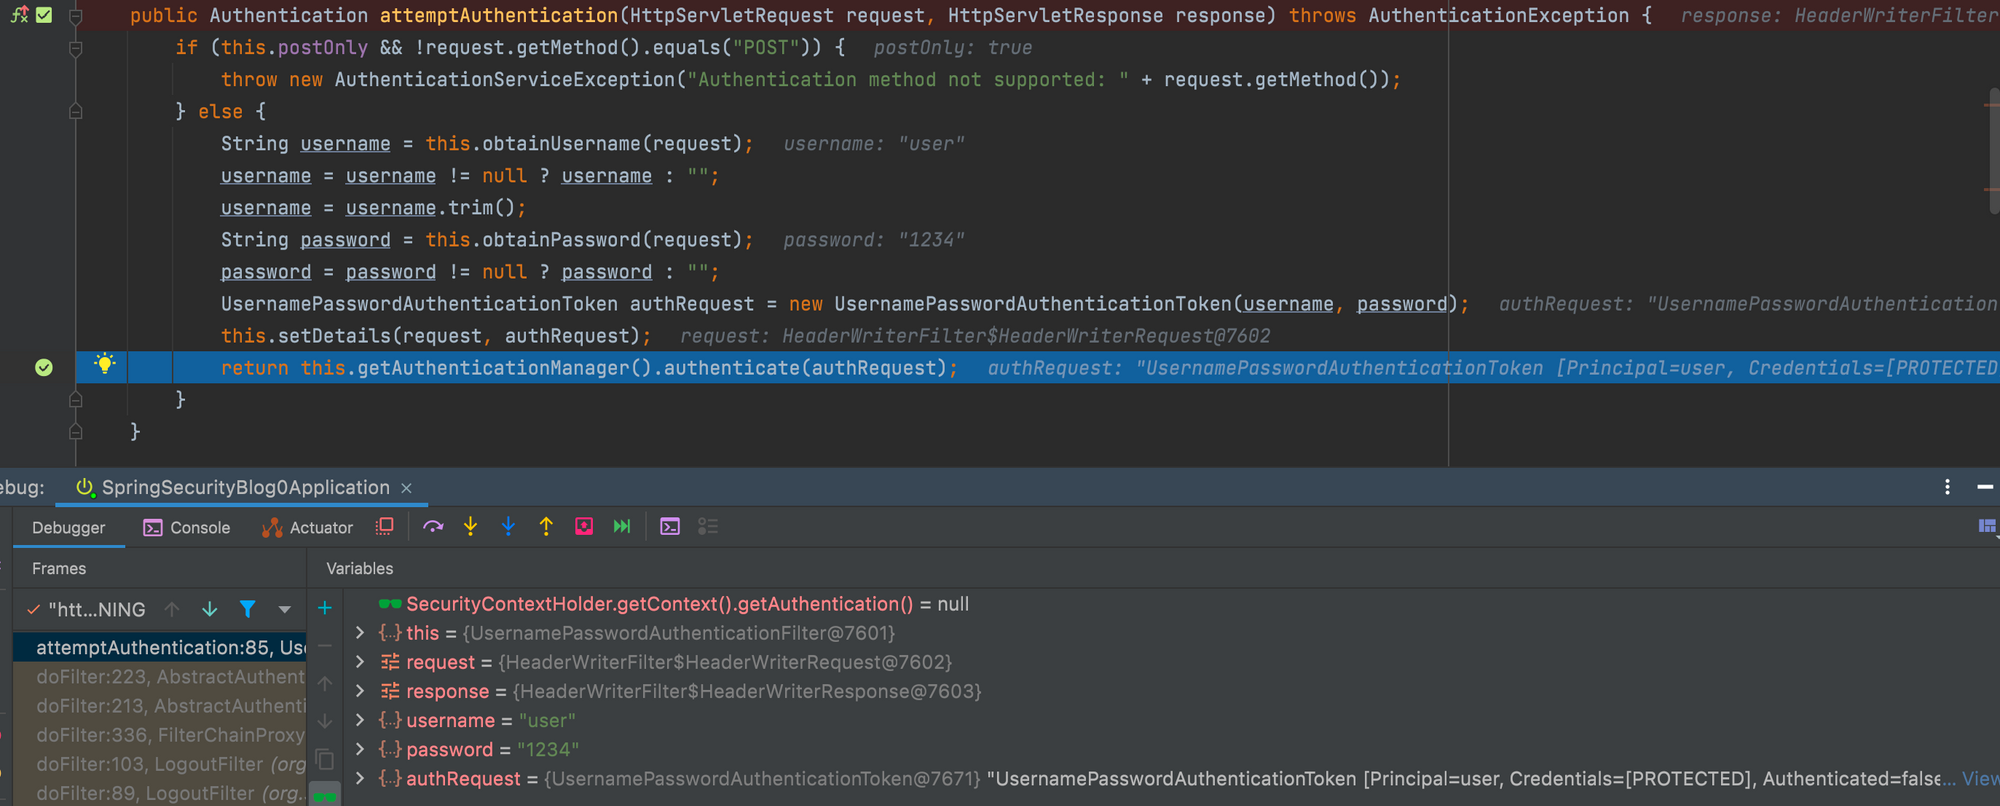 요청으로부터 username, password를 추출해서
 UsernamePasswordAuthenticationToken객체를 생성합니다. 이후 해당 객체를this.getAuthenticationManager().authenticate(authRequest)를 통해 인증과정을 진행합니다.
this.getAuthenticationManager()은AuthenticationManager의 구현체인ProviderManager객체입니다.ProviderManager의authenticate(authRequest)메서드
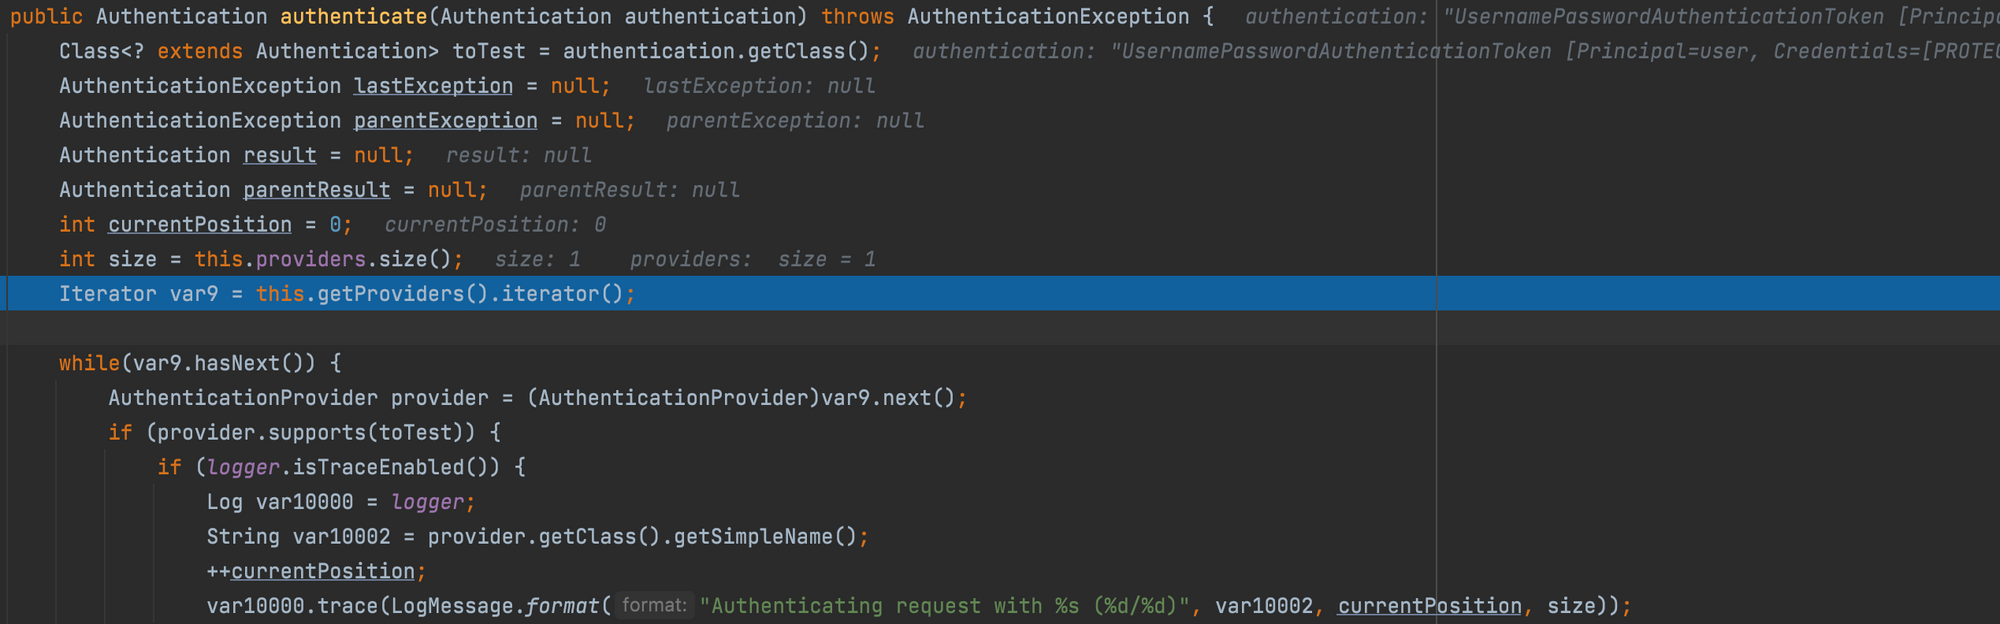
this.getProviders()를 통해서 현재AuthenticationManager에 등록된AuthenticationProvider들을 확인할 수 있습니다.
 다음의
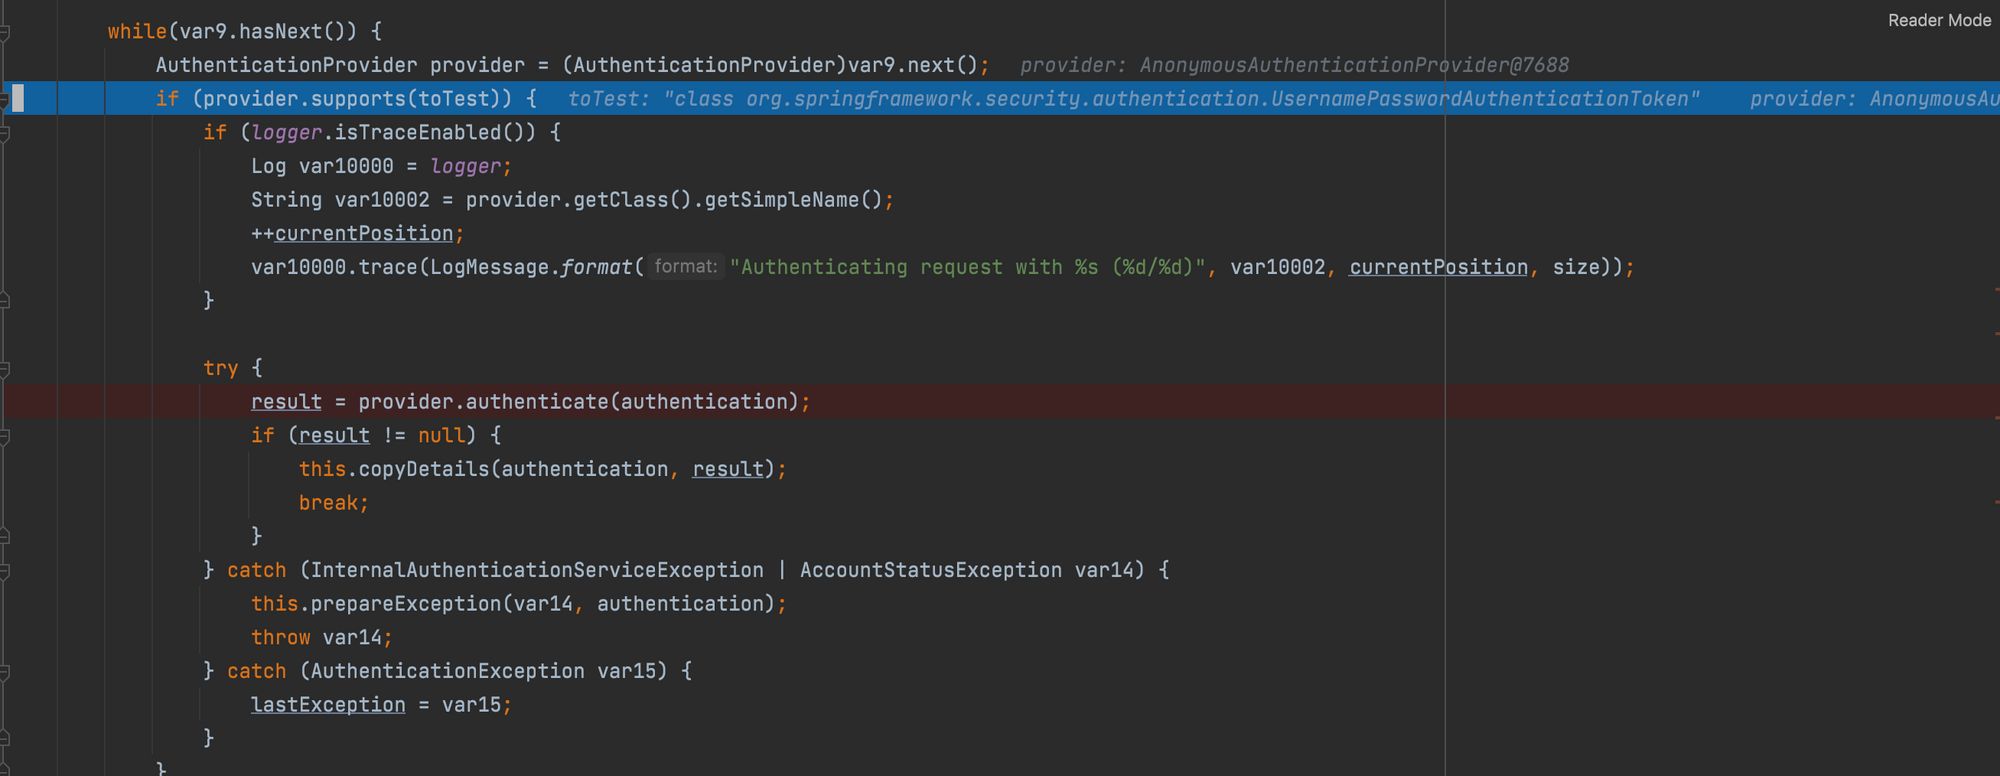
다음의 while문을 통해서AuthenticationProvider을 각각 순회하면서provider.support(toTest)를 호출합니다. 해당AuthenticationProvider이 해당 인증 객체를 인증할 수 있다면(support 메서드에 의한 결과가 true라면), 인증이 수행됩니다.
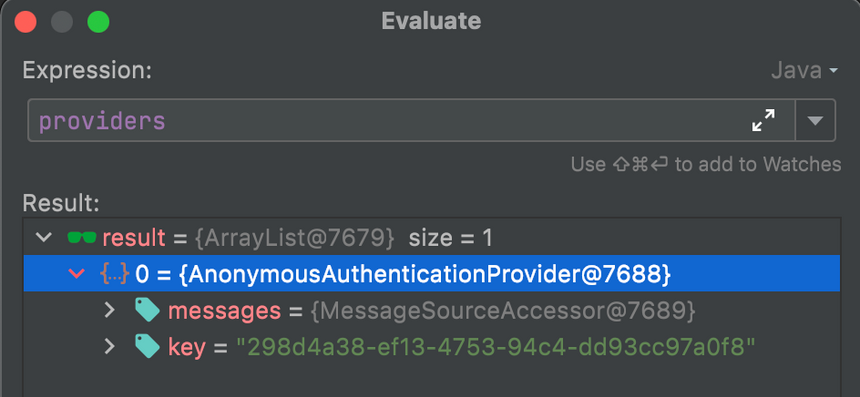 → 현재 등록된
 AuthenticationProvider은AnonymousAuthenticationProvider밖에 없기 때문에 위의while(var9.hasNext())의while문을 바로 탈출하게 됩니다.
while문을 탈출하게 되면this.parent.authenticate(authentication)을 통해서 상위AuthenticationManager으로부터AuthenticationProvider을 찾습니다.

- 상위
AuthenticationMananger'sAuthenticationProvider인DaoAuthenticationProvider에 의한 인증 진행
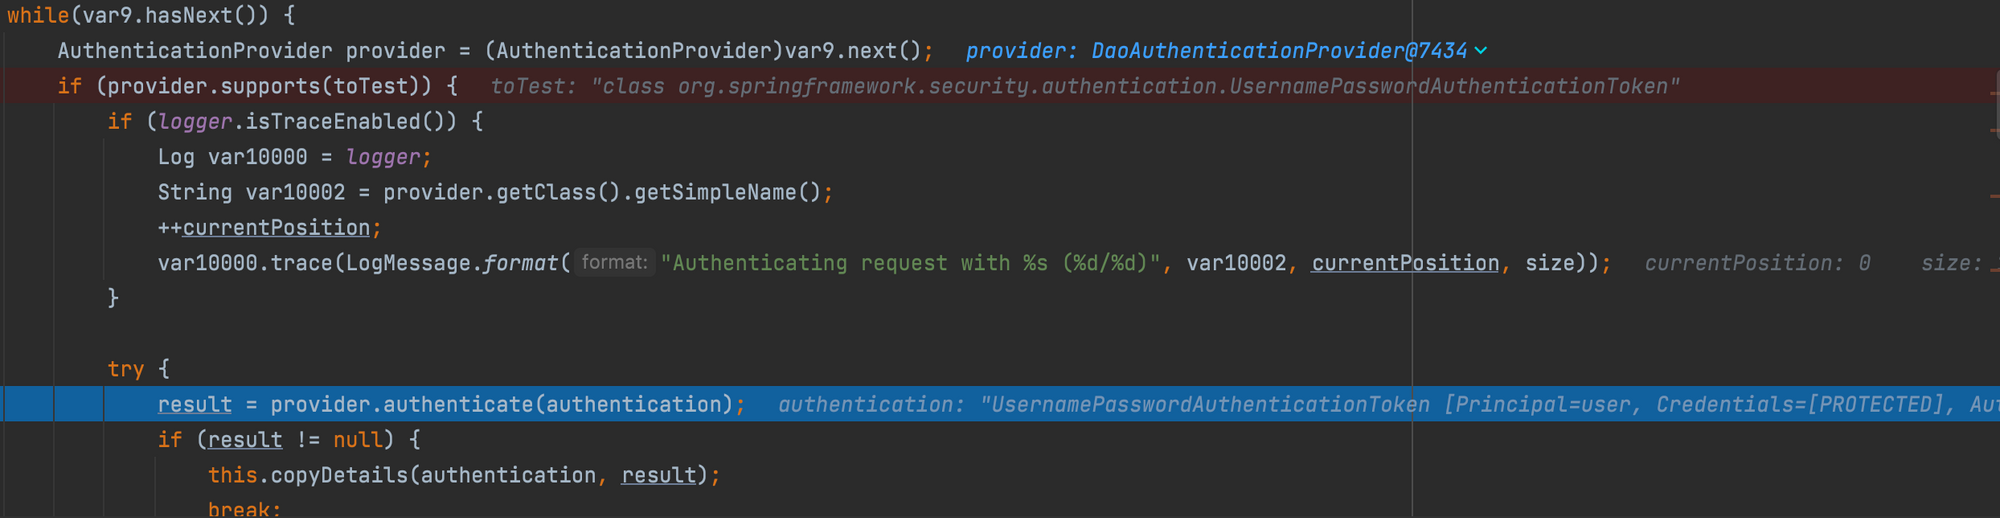
DaoAuthenticationProvider은AbstractUserDetailsAuthenticationProviders를 상속하고 상속된AbstractUserDetailsAuthenticationProviders의supports메서드는 다음과 같이UsernamePasswordAuthenticationToken의 인증을 지원합니다.

AbstractUserDetailsAuthenticationProvider의authenticate메서드를 통해서 인증을 진행합니다.authenticate메서드에서의 성공적인 인증 후 마지막으로 createSuccessAuthentication을 호출합니다.- 인증이 완료되면
AbstractAuthenticationProcessingFilter의 인증 후처리를 진행합니다.
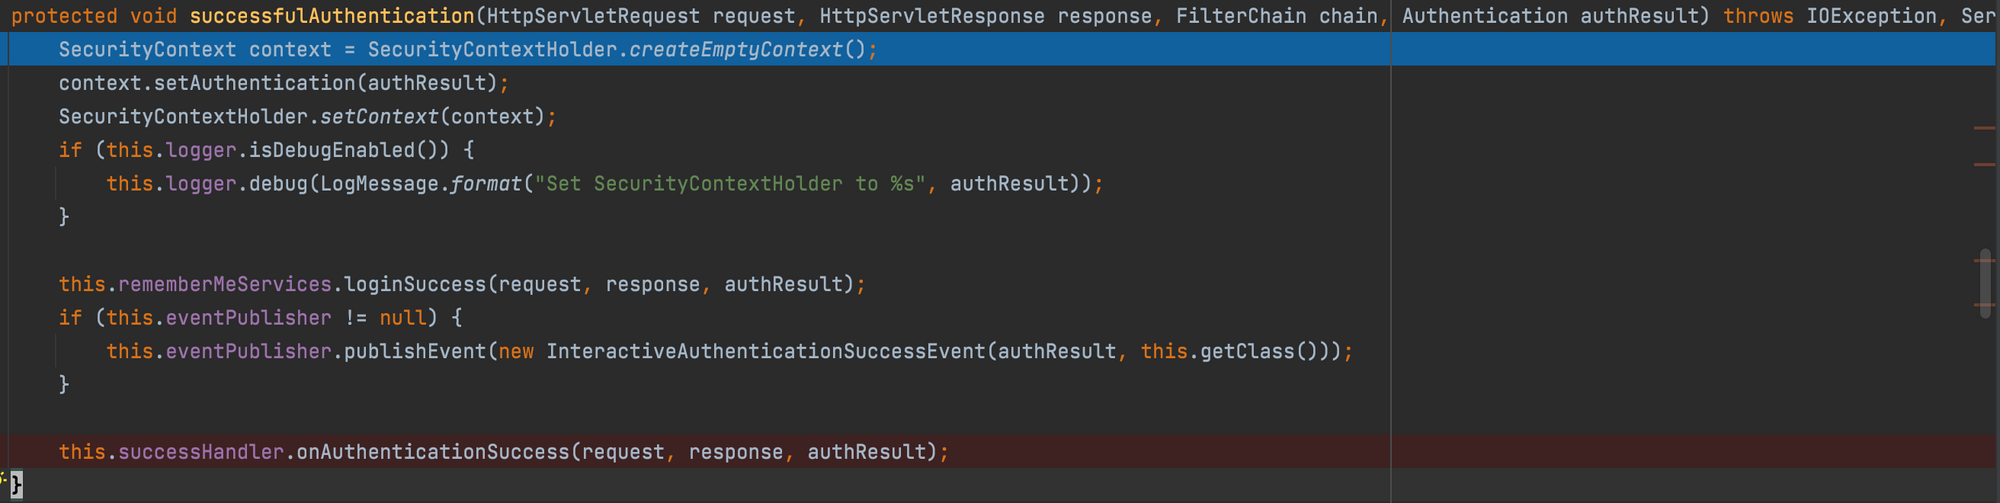
SecurityContextHolder에 인증된 객체를 저장하는 것을 볼 수 있습니다.
요약
Spring Security의 인증은 Security Filter Chain에 등록된 적절한 Filter로부터 시작된다. 해당 Filter는 구현에 따라 인증하는 방식이 다양할 수 있다. Username과 password를 사용하는 UsernamePasswordAuthenticationFilter는 POST요청에서 username과 password를 추출해서 이를 UsernamePasswordAuthenticationToken객체로 만들어서 AuthenticationManager에게 인증을 위임한다. AuthenticationManager은 자신에게 등록된 AuthenticationProvider의 support메서드를 활용해서 어떤 AuthenticationProvider이 해당 UsernamePasswordAuthenticationToken객체를 인증할 수 있는지 찾아서 인증을 위임한다. 정상적으로 인증이 완료된다면 인증된 유저와 관련된 정보를 SecurityContextHolder에 저장한다.