Form login이란?
Form Login은 Spring Security에서 제공하는 인증방식입니다.
Spring Security의 인증(Authentication)의 구조와 메커니즘을 잘 모르시는 분들은 아래의 링크를 통해 확인해 보실 수 있습니다.
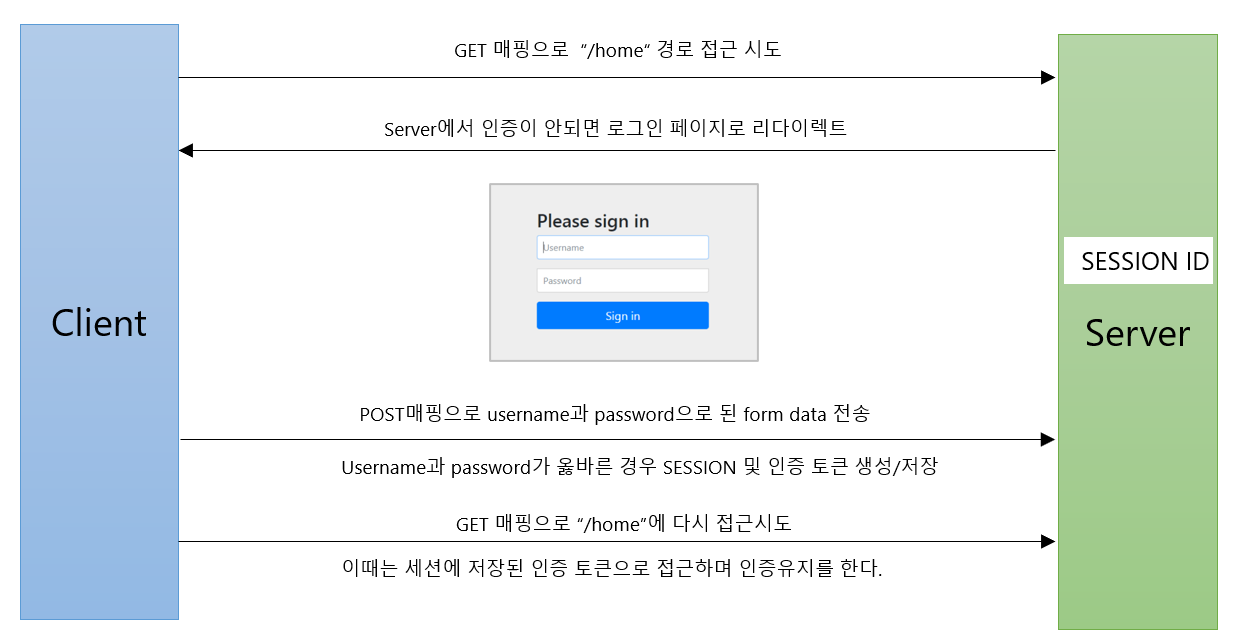
Form Login의 동작 방식은 다음 사진과 같습니다.

- 사용자가 Server에 특정 URL을 요청하였을 때 해당 URL이 인증이 필요할 경우 Server는 Login 페이지를 return하게 됩니다.
- 사용자는 username(ID)와 password를 입력하여 로그인 요청을 하면 Post mapping으로 해당 데이터가 서버에 전송됩니다.
- Server는 해당 로그인 정보를 확인합니다. 해당 유저 정보가 존재한다면 Session과 Token을 생성하고 저장해둡니다.
이러한 과정을 거친 후 사용자가 원래 접속하려던 url에 접속 요청을 할 경우 세션에 저장된 인증 토근으로 접근을 할 수 있게되며 세션에 인증토큰이 있는 동안은 해당 사용자가 인증된 사용자라 판단하여 인증을 유지하게 됩니다.
Form Login사용하기
Form Login사용은 앞서 기본 동작 구조 이해하기 의 '사용자 기능 정의하기' 파트에서 설명한 configure()메서드를 재정의하는 곳에 작성합니다.
사용은 http.formLogin()을 추가하게 된다면 Form로그인 기능이 작동하게 되며 api들은 다음과 같습니다.
protected void configure(HttpSecurity http) throws Exception {
    http.formLogin()
       .loginPage(“/login.html")   			// 사용자 정의 로그인 페이지
       .defaultSuccessUrl("/home)			// 로그인 성공 후 이동 페이지
       .failureUrl("/login.html?error=true“)	        // 로그인 실패 후 이동 페이지
       .usernameParameter("username")			// 아이디 파라미터명 설정
       .passwordParameter(“password”)			// 패스워드 파라미터명 설정
       .loginProcessingUrl(“/login")			// 로그인 Form Action Url
       .successHandler(loginSuccessHandler())		// 로그인 성공 후 핸들러
       .failureHandler(loginFailureHandler())		// 로그인 실패 후 핸들러
}
사용 예시
http
        .formLogin()
        .loginPage("/loginPage")
        .defaultSuccessUrl("/")
        .failureUrl("/login")
        .usernameParameter("userId")
        .passwordParameter("passwd")
        .loginProcessingUrl("/login_proc")
        .successHandler(
                new AuthenticationSuccessHandler() {
                    @Override
                    public void onAuthenticationSuccess(HttpServletRequest request, HttpServletResponse response, Authentication authentication) throws IOException, ServletException {
                        System.out.println("authentication : " + authentication.getName());
                        response.sendRedirect("/"); // 인증이 성공한 후에는 root로 이동
                    }
                }
        )
        .failureHandler(
                new AuthenticationFailureHandler() {
                    @Override
                    public void onAuthenticationFailure(HttpServletRequest request, HttpServletResponse response, AuthenticationException exception) throws IOException, ServletException {
                        System.out.println("exception : " + exception.getMessage());
                        response.sendRedirect("/login");
                    }
                }
        )
.permitAll()loginPage("/loginPage"): 인증이 필요할 때 이동하는 페이지 설정하는 api입니다. 해당 api설정을 하지 않을 경우 기본적으로 spring security가 제공하는 템플릿으로 연결됩니다.
작성한 코드로는 인증이 필요할때 "~/loginPage" url로 mapping시켜주게 됩니다.defaultSuccessUrl("/"): 인증이 성공하였을 때 default로 이동하는 URL지정하는 api입니다.
작성된 코드로는 인증이 성공하였을 때 root페이지로 mapping시켜주게 됩니다.failureUrl("/login"): 인증이 실패하였을 때 이동하는 페이지 지정하는 api입니다.
작성된 코드로는 인증이 실패하였을 때 "~/login" url로 mapping시켜주게 됩니다.usernameParameter("userId"), passwordParameter("passwd"): spring security에서 기본값인 username, password의 파라미터값을 변경하게 해주는 api입니다.loginProcessingUrl("/login_proc"): 폼 테그의 action url을 설정하는 api입니다. default값은 default login입니다.successHandler(): 로그인이 성공했을 때 success handler를 호출하는 api입니다. 파라미터로는AuthenticationSuccessHandler인터페이스를 구현한 것을 넣으면 됩니다.
작성된 코드로는 인증이 성공하였을 때 인증 객체에 저장된 사용자의 이름을 출력한 후 root페이지로 이동하게 됩니다.failureHandler(): 로그인이 실패하였을 때 failure handler를 호출하는 api입니다. 파라미터로는AuthenticationFailureHandler인터페이스를 구현한 것을 넣으면 됩니다.
작성된 코드로는 인증이 실패하였을 때 exception메시지를 출력하고 login페이지로 redirect되어 이동하게 됩니다.permitAll():http.authorizeRequests().anyRequest().authenticated();와 같이 인가(Authorization)관련 코드가 있다면 인증을 받지 않았으면 어떤 Request들도 접근이 안될 수 있습니다. 그러면 우리가 로그인 페이지로 사용할 loginPage도 인증을 받지 않으면 접근이 불가능한데 permitAll을 붙여주면 해당 경로는 인증을 받지 않아도 누구나 접근 가능해집니다.
Form Login 인증 필터 동작 과정

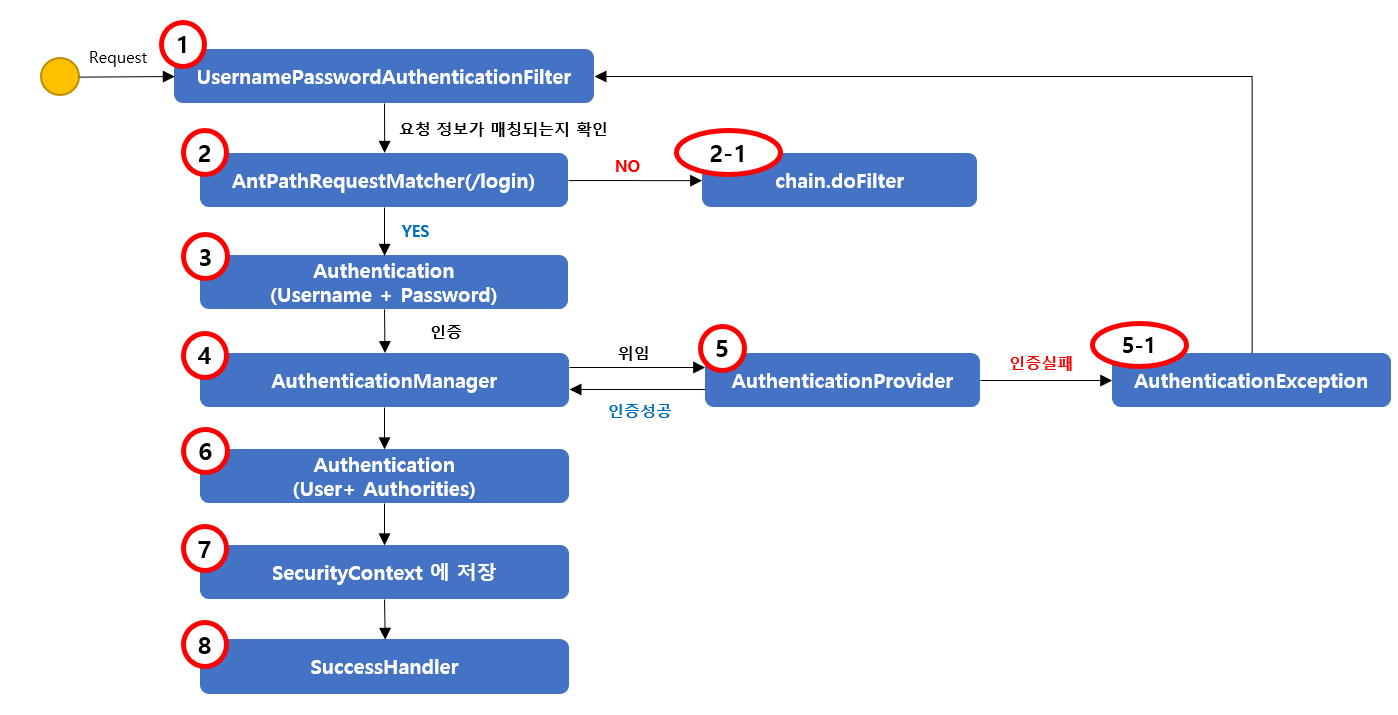
- Form Login을 사용하게 된다면 인증 필터인
UsernamePasswordAuthenticationFilter가 실행되게 됩니다. AntPathRequestMatcher는 요청 정보의 url이 해당 값으로 시작되는지 체크를 하는 하며 요청 정보가 일치하지 않는다면 2-1인 Filter로 이동한다.
※ url의 값은.loginProcessingUrl(“/login")의 값 변경에 따라 변경됩니다.- 요청 정보가 일치하면 Username과 Password정보가 담긴
Authentication객체를 생성하여AuthenticationManager에 넘깁니다. AuthenticationManager는 이전 과정에서 받은 Authenticaton객체를AuthenticationProvider에 넘겨주어 인증을 체크하도록 합니다.AuthenticationProvider는 실질적으로 인증을 체크하는 역할을 합니다. 인증을 성공한다면 최종적인Authenticatoin객체를 생성하여Authentication객체를 넘기며 인증을 실패한다면 5-1의AuthenticationException을 호출하여UsernamePasswordAuthenticationFilter가 시작된 초기 부분으로 이동하게 합니다.AuthenticationManager는AuthenticationProvider로부터 받은 최종 Authentication객체를 다음 과정으로 넘겨줍니다.- 최종 Authenticatoin 객체는
Security Context에 저장됩니다. Security Context에 저장된 후에는SuccessHandler를 호출하여 실행하게 됩니다.
이 후에는 SecurityContextHolder.getContext().getAuthentication()코드를 통해 인증 객체를 꺼내서 쓸 수 있습니다.
최종 Authentication객체는 Authentication의 구조 에서 Authentication에 들어가는 내용 부분을 통해 확인하실 수 있습니다.
